Agent项目实战开发-Spring AIibaba实战
一.接入 Spring AI Alibaba——通义千问全家桶
1.Spring AI Alibaba 是什么.
Spring AI Alibaba 是阿里巴巴基于 Spring AI 开发的扩展包,底层对接阿里云的大模型服务 DashScope(灵积)。
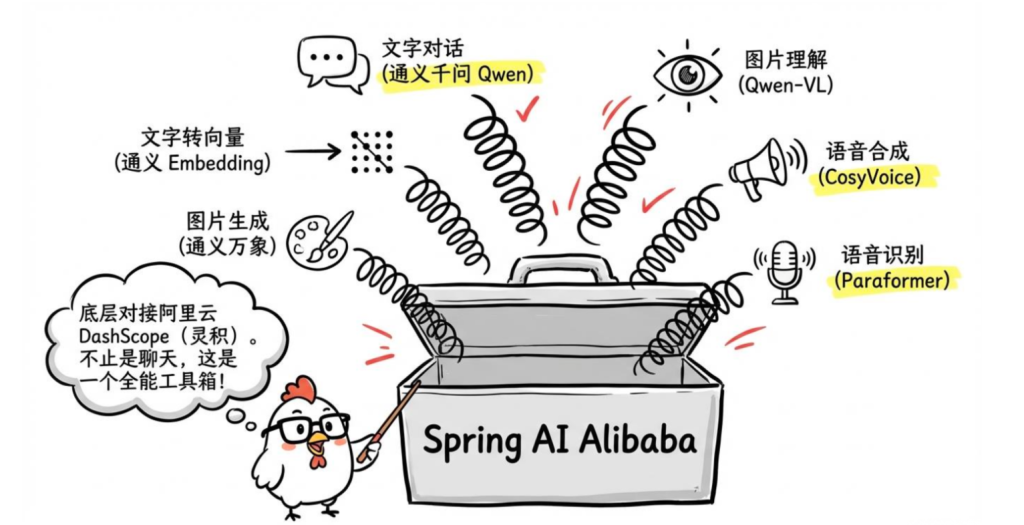
| 能力 |
对应服务 |
| 文字对话 |
通义千问(Qwen 系列) |
| 文字转向量 |
通义 Embedding |
| 图片生成 |
通义万象(DALL-E 同类) |
| 图片理解 |
通义千问视觉版(Qwen-VL) |
| 语音合成(TTS) |
CosyVoice |
| 语音识别(STT) |
Paraformer |
2.准备工作
新建 Spring Boot 项目
新建一个独立的 Spring Boot 项目,不要在原来的 OpenAI 项目上叠加——两个 AI starter 并存会有 Bean 冲突,排查起来烦人。后面有一节专门讲怎么在同一个项目里用多个模型,现在先老老实实新开一个。
完整 pom.xml:
1
2
3
4
5
6
7
8
9
10
11
12
13
14
15
16
17
18
19
20
21
22
23
24
25
26
27
28
29
30
31
32
33
34
35
36
37
38
39
40
41
42
43
44
45
46
47
48
49
50
51
52
53
54
55
56
57
58
59
60
61
62
63
64
65
66
67
68
69
70
71
72
73
74
75
76
77
78
79
| <?xml version="1.0" encoding="UTF-8"?>
<project xmlns="http://maven.apache.org/POM/4.0.0"
xmlns:xsi="http://www.w3.org/2001/XMLSchema-instance"
xsi:schemaLocation="http://maven.apache.org/POM/4.0.0
https://maven.apache.org/xsd/maven-4.0.0.xsd">
<modelVersion>4.0.0</modelVersion>
<parent>
<groupId>org.springframework.boot</groupId>
<artifactId>spring-boot-starter-parent</artifactId>
<version>3.5.11</version>
<relativePath/>
</parent>
<groupId>com.jichi</groupId>
<artifactId>spring-ai-alibaba</artifactId>
<version>0.0.1-SNAPSHOT</version>
<name>spring-ai-alibaba</name>
<properties>
<java.version>21</java.version>
<spring-ai-alibaba.version>1.1.2.0</spring-ai-alibaba.version>
</properties>
<dependencyManagement>
<dependencies>
<dependency>
<groupId>com.alibaba.cloud.ai</groupId>
<artifactId>spring-ai-alibaba-bom</artifactId>
<version>${spring-ai-alibaba.version}</version>
<type>pom</type>
<scope>import</scope>
</dependency>
</dependencies>
</dependencyManagement>
<dependencies>
<dependency>
<groupId>org.springframework.boot</groupId>
<artifactId>spring-boot-starter-web</artifactId>
</dependency>
<dependency>
<groupId>org.springframework.boot</groupId>
<artifactId>spring-boot-starter-webflux</artifactId>
</dependency>
<dependency>
<groupId>com.alibaba.cloud.ai</groupId>
<artifactId>spring-ai-alibaba-starter-dashscope</artifactId>
<version>1.1.2.0</version>
</dependency>
<dependency>
<groupId>org.projectlombok</groupId>
<artifactId>lombok</artifactId>
<optional>true</optional>
</dependency>
<dependency>
<groupId>org.springframework.boot</groupId>
<artifactId>spring-boot-starter-test</artifactId>
<scope>test</scope>
</dependency>
</dependencies>
<build>
<plugins>
<plugin>
<groupId>org.springframework.boot</groupId>
<artifactId>spring-boot-maven-plugin</artifactId>
<configuration>
<excludes>
<exclude>
<groupId>org.projectlombok</groupId>
<artifactId>lombok</artifactId>
</exclude>
</excludes>
</configuration>
</plugin>
</plugins>
</build>
</project>
|
注意 artifactId 是 spring-ai-alibaba-starter-dashscope,不是 spring-ai-alibaba-starter——后者在 1.1.2.0 版本已经拆分,直接用前者。
3.配置
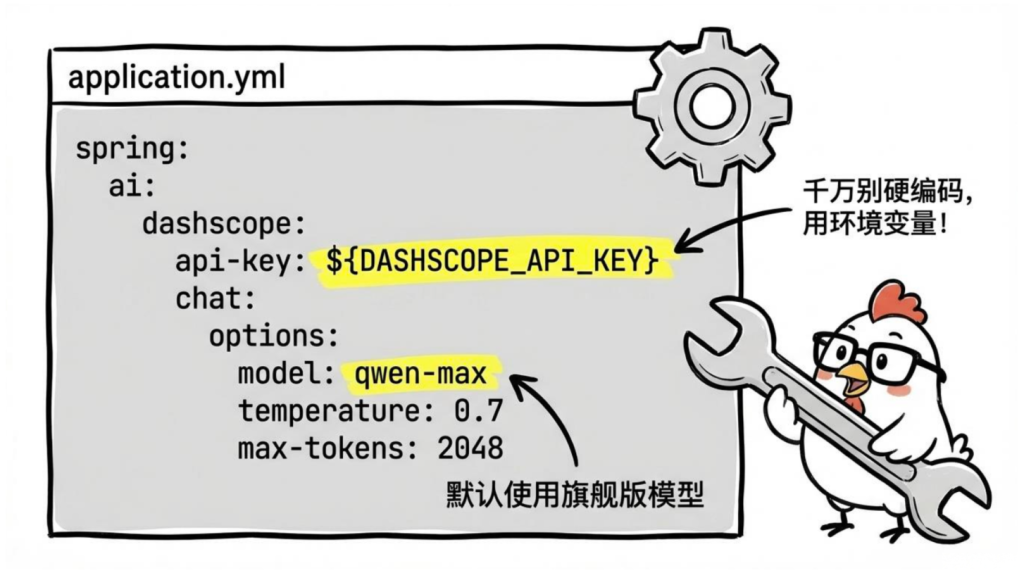
DashScope 的常用模型名
| 模型 |
说明 |
适用场景 |
qwen-max |
旗舰版,效果最好 |
复杂任务、高质量要求 |
qwen-plus |
均衡版,效果和价格平衡 |
日常对话、RAG |
qwen-turbo |
速度最快,价格最低 |
高频简单任务 |
qwen-long |
超长上下文 |
长文档处理 |
qwen-vl-max |
视觉理解版 |
图片识别 |
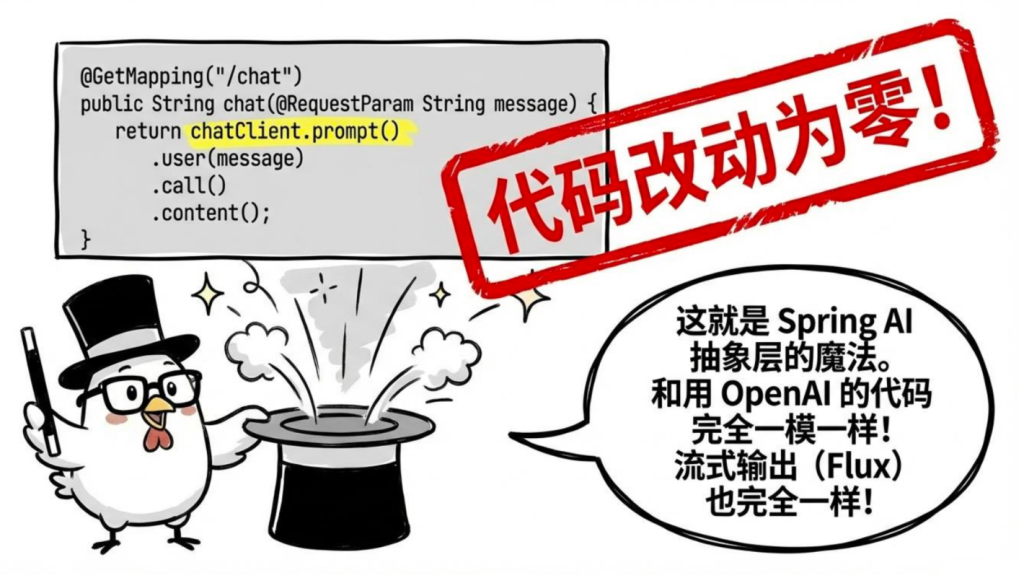
4.对话:和 OpenAI 用法完全一样
@RestController
@RequestMapping(“/api/qwen”)
public class QwenChatController {
private final ChatClient chatClient;
public QwenChatController(DashScopeChatModel dashScopeChatModel) {
this.chatClient = ChatClient.builder(dashScopeChatModel)
.defaultSystem("你是一个专业的 Java 技术助手")
.build();
}
// 普通对话
@GetMapping("/chat")
public String chat(@RequestParam String message) {
return chatClient.prompt()
.user(message)
.call()
.content();
}
// 流式输出
@GetMapping(value = "/stream", produces = "text/event-stream")
public Flux<String> stream(@RequestParam String message) {
return chatClient.prompt()
.user(message)
.stream()
.content();
}
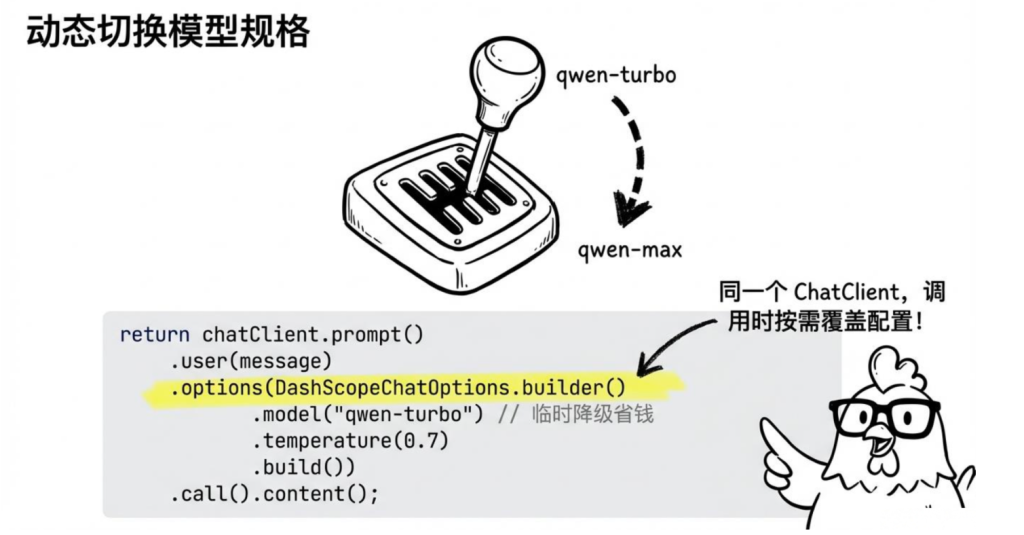
// 动态指定模型规格:正常用 qwen-turbo 省钱,重要任务临时换 qwen-max
@GetMapping("/chat-with-model")
public String chatWithModel(
@RequestParam String message,
@RequestParam(defaultValue = "qwen-turbo") String model) {
return chatClient.prompt()
.user(message)
.options(DashScopeChatOptions.builder()
.withModel(model)
.withTemperature(0.7)
.withMaxToken(1000)
.build())
.call()
.content();
}
}
注意 DashScopeChatOptions 的方法名带 with 前缀,且是 withMaxToken(单数),这是 DashScope 和标准 Spring AI Options 的命名差异,鸡哥踩过这个坑。
注:环境jdk25,目前with前缀方法被弃用了,看似是不需要前缀了
测试:
1
2
3
4
5
6
| curl "http://localhost:8080/api/qwen/chat?message=什么是Spring AI"
curl "http://localhost:8080/api/qwen/stream?message=介绍一下通义千问"
curl "http://localhost:8080/api/qwen/chat-with-model?message=你好"
curl "http://localhost:8080/api/qwen/chat-with-model?message=写一篇技术方案&model=qwen-max"
|
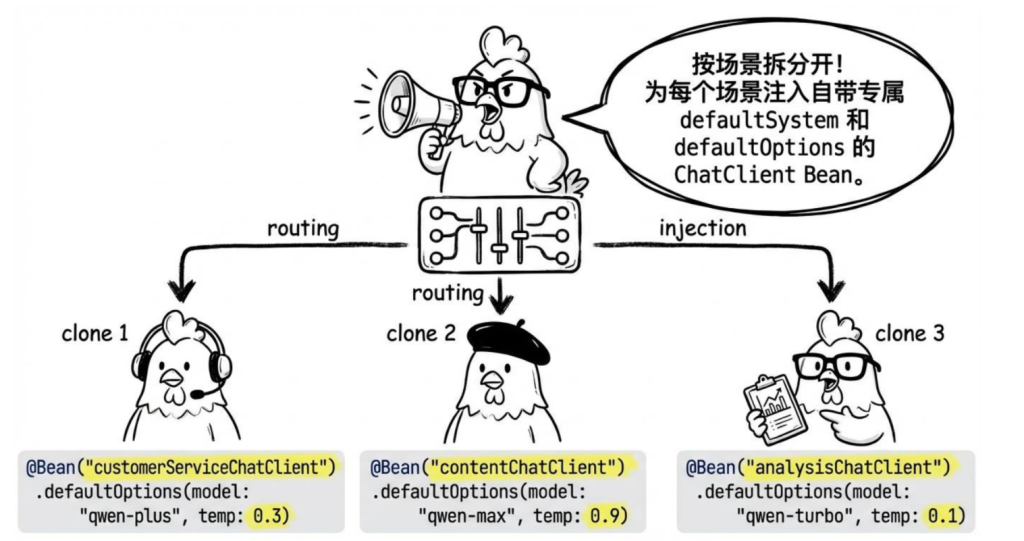
5.多场景隔离:注入不同配置的 ChatClient
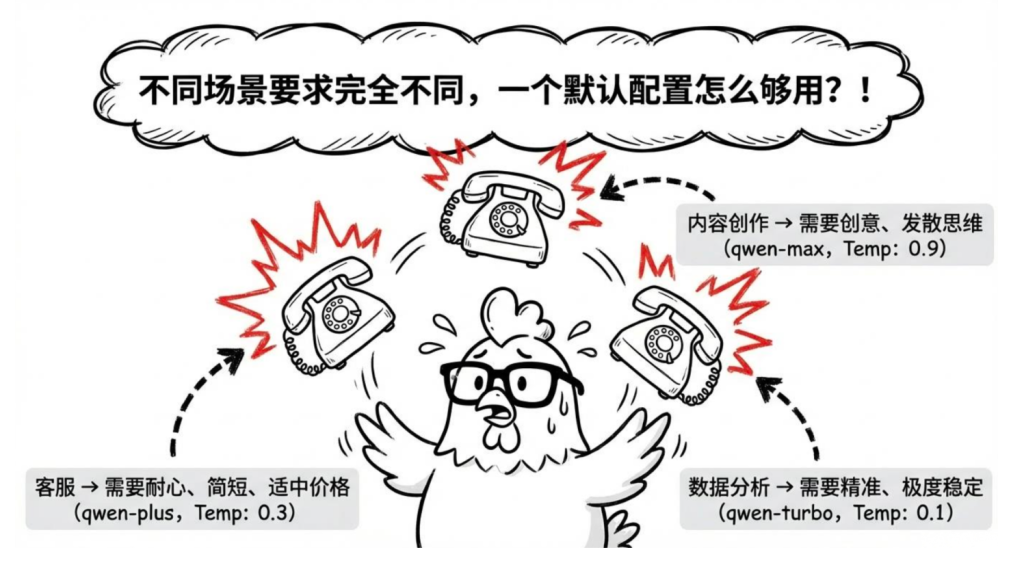
实际项目里,客服、内容创作、数据分析对模型的要求完全不同——客服要稳、创作要有创意、分析要准。鸡哥建议按场景拆开配置,各用各的:
1
2
3
4
5
6
7
8
9
10
11
12
13
14
15
16
17
18
19
20
21
22
23
24
25
26
27
28
29
30
31
32
33
34
35
36
37
38
39
40
| @Configuration
public class QwenChatClientConfig {
@Bean("customerServiceChatClient")
public ChatClient customerServiceChatClient(DashScopeChatModel dashScopeChatModel) {
return ChatClient.builder(dashScopeChatModel)
.defaultSystem("""
你是一个专业、耐心的电商客服助手。
只回答和我们产品、订单相关的问题。
回答简洁,不超过 200 字。
""")
.defaultOptions(DashScopeChatOptions.builder()
.withModel("qwen-plus")
.withTemperature(0.3)
.build())
.build();
}
@Bean("contentChatClient")
public ChatClient contentChatClient(DashScopeChatModel dashScopeChatModel) {
return ChatClient.builder(dashScopeChatModel)
.defaultSystem("你是一个资深文案策划,擅长撰写吸引人的营销文案。")
.defaultOptions(DashScopeChatOptions.builder()
.withModel("qwen-max")
.withTemperature(0.9)
.build())
.build();
}
@Bean("analysisChatClient")
public ChatClient analysisChatClient(DashScopeChatModel dashScopeChatModel) {
return ChatClient.builder(dashScopeChatModel)
.defaultSystem("你是一个数据分析师,擅长解读数据并给出业务洞察。")
.defaultOptions(DashScopeChatOptions.builder()
.withModel("qwen-turbo")
.withTemperature(0.1)
.build())
.build();
}
}
|
用 @Qualifier 注入对应的 Bean:
1
2
3
4
5
6
7
8
9
10
11
12
13
14
15
16
17
18
19
20
21
22
23
24
25
26
27
28
29
30
| @RestController
@RequestMapping("/api/business")
public class BusinessController {
private final ChatClient customerServiceChatClient;
private final ChatClient contentChatClient;
public BusinessController(
@Qualifier("customerServiceChatClient") ChatClient customerServiceChatClient,
@Qualifier("contentChatClient") ChatClient contentChatClient) {
this.customerServiceChatClient = customerServiceChatClient;
this.contentChatClient = contentChatClient;
}
@GetMapping("/customer-service")
public String customerService(@RequestParam String message) {
return customerServiceChatClient.prompt()
.user(message)
.call()
.content();
}
@GetMapping("/generate-copy")
public String generateCopy(@RequestParam String brief) {
return contentChatClient.prompt()
.user("根据以下简报,生成一段产品推广文案:\n" + brief)
.call()
.content();
}
}
|
测试:
1
2
| curl "http://localhost:8080/api/business/customer-service?message=我的订单什么时候发货"
curl "http://localhost:8080/api/business/generate-copy?brief=一款防水蓝牙耳机,续航30小时"
|
6.DashScope 特有能力:联网搜索与深度思考
标准 Spring AI 的 ChatOptions 只有 temperature、model 这些通用参数。DashScope 的专属能力——联网搜索和 Qwen3 深度思考——DashScopeChatOptions 都封装好了,直接用就行,不需要绕到原生 API。
联网搜索
让模型实时查网络资料后再回答,回答时效性强的问题效果明显:
1
2
3
4
5
6
7
8
9
10
11
12
13
14
15
16
17
18
19
20
21
22
| @RestController
@RequestMapping("/api/qwen/search")
public class SearchController {
private final ChatClient chatClient;
public SearchController(DashScopeChatModel dashScopeChatModel) {
this.chatClient = ChatClient.builder(dashScopeChatModel).build();
}
@GetMapping
public String search(@RequestParam String question) {
return chatClient.prompt()
.user(question)
.options(DashScopeChatOptions.builder()
.withModel("qwen-max")
.withEnableSearch(true)
.build())
.call()
.content();
}
}
|
测试:
1
| curl "http://localhost:8080/api/qwen/search?question=今天A股涨了多少"
|
深度思考(Qwen3)
Qwen3 系列支持开启 enable_thinking,让模型在回答前先把推理过程跑完,适合数学、逻辑推理类题目:
1
2
3
4
5
6
7
8
9
10
11
12
| @GetMapping("/think")
public String think(@RequestParam String question) {
return chatClient.prompt()
.user(question)
.options(DashScopeChatOptions.builder()
.withModel("qwen3-235b-a22b")
.withEnableThinking(true)
.withThinkingBudget(2000)
.build())
.call()
.content();
}
|
这两个参数是 DashScope 专有的,标准 Spring AI 的 ChatOptions 里没有,提醒大家别在换成 OpenAI 时忘了这个差异。
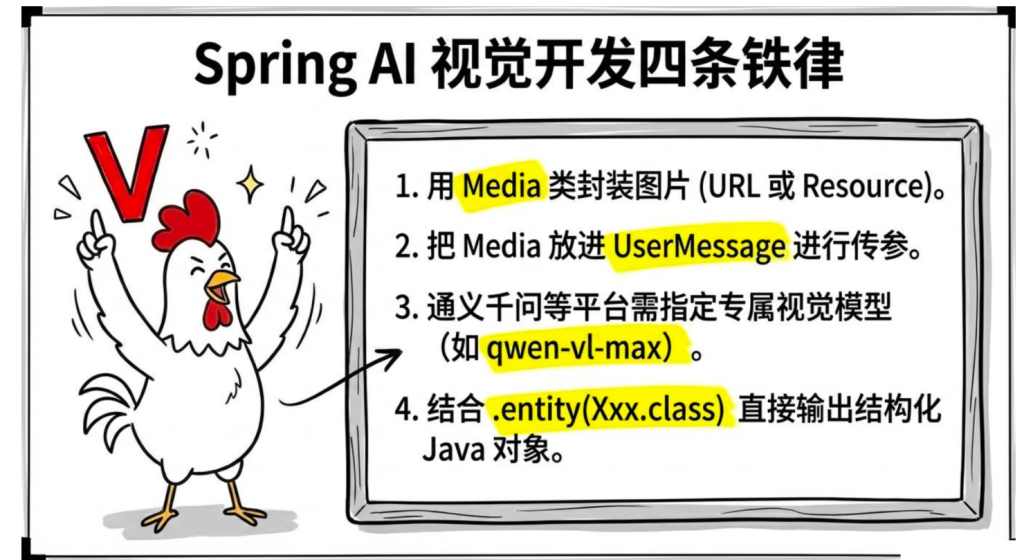
二.多模态输入——让 AI 看图理解图片
这节讲怎么在 Spring AI 里实现多模态输入。
1.多模态的应用场景
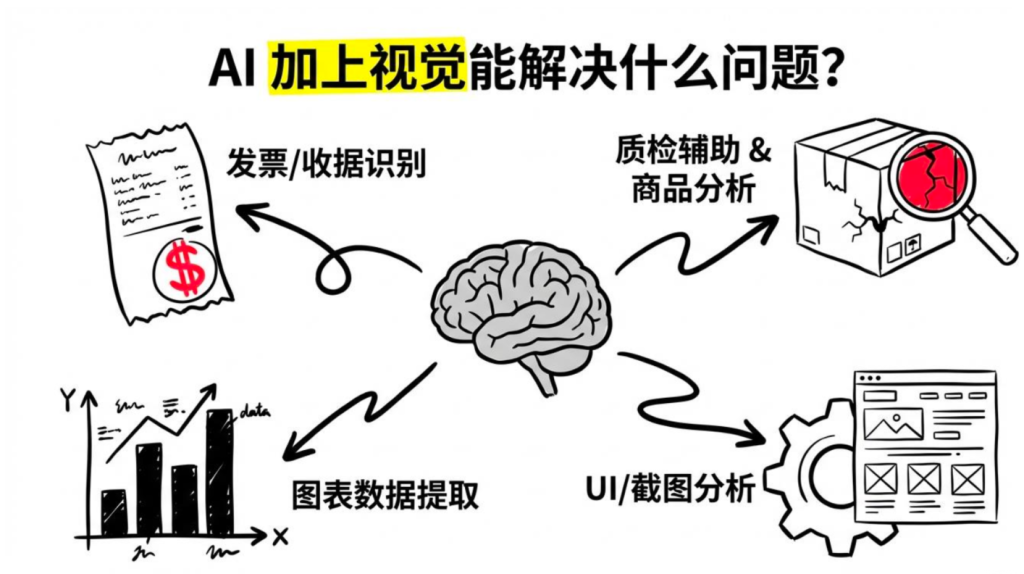
- 发票/收据识别:上传发票图片,自动提取金额、日期、商家信息
- 商品图片分析:用户上传商品图片,自动识别品牌、型号、状态
- 图表数据提取:上传报表截图,提取里面的数据
- UI/截图分析:上传页面截图,分析界面问题或提取信息
- 文档 OCR + 理解:上传文档图片,不只识别文字,还能理解文档含义
- 质检辅助:上传产品图片,判断是否有缺陷
2.基础用法:传图片 URL
最简单的方式,传一个可以公开访问的图片 URL:
1
2
3
4
5
6
7
8
9
10
11
12
13
14
15
16
17
18
19
20
21
22
23
24
25
26
27
28
29
30
31
32
33
34
35
36
37
38
39
40
41
42
43
44
45
46
47
48
49
50
51
52
53
54
55
56
57
58
59
60
61
62
63
64
65
66
67
68
69
70
71
72
73
74
75
76
77
78
79
80
81
82
83
84
85
86
87
88
89
90
91
92
93
| @RestController
@RequestMapping("/api/vision")
public class VisionController {
private final ChatClient chatClient;
public VisionController(DashScopeChatModel dashScopeChatModel) {
this.chatClient = ChatClient.builder(dashScopeChatModel).build();
}
private static final DashScopeChatOptions VL_OPTIONS = DashScopeChatOptions.builder()
.withModel("qwen-vl-max")
.withMultiModel(true)
.build();
@GetMapping("/analyze-url")
public String analyzeImageUrl(
@RequestParam String imageUrl,
@RequestParam(defaultValue = "请描述这张图片的内容") String question) {
Media media = Media.builder()
.mimeType(MimeTypeUtils.IMAGE_JPEG)
.data(URI.create(imageUrl))
.build();
UserMessage message = UserMessage.builder()
.text(question)
.media(media)
.build();
return chatClient.prompt()
.messages(message)
.options(VL_OPTIONS)
.call()
.content();
}
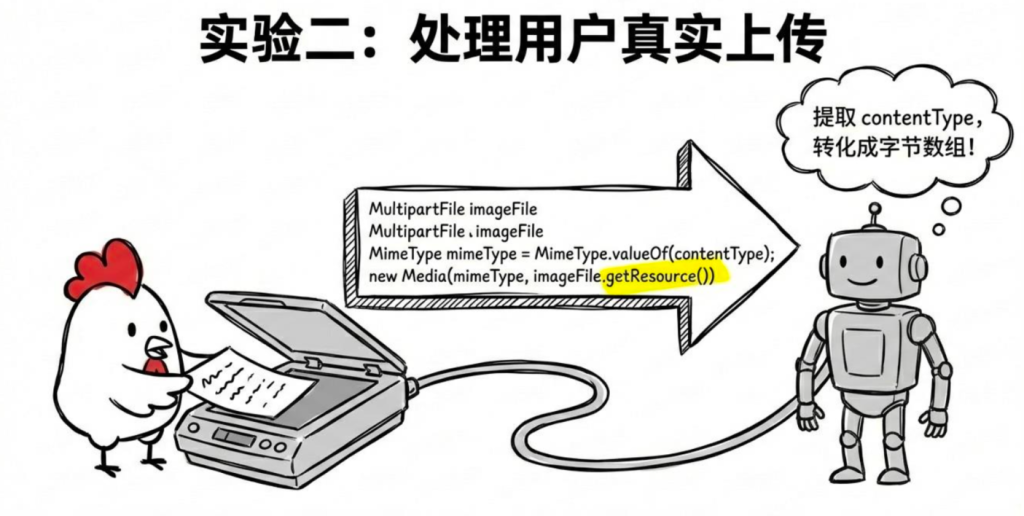
@PostMapping("/analyze-upload")
public String analyzeUploadedImage(
@RequestParam("image") MultipartFile imageFile,
@RequestParam(defaultValue = "请描述这张图片的内容") String question) throws Exception {
MimeType mimeType = MimeType.valueOf(
imageFile.getContentType() != null ? imageFile.getContentType() : "image/jpeg");
Media media = Media.builder()
.mimeType(mimeType)
.data(imageFile.getResource())
.build();
UserMessage message = UserMessage.builder()
.text(question)
.media(media)
.build();
return chatClient.prompt()
.messages(message)
.options(VL_OPTIONS)
.call()
.content();
}
@PostMapping("/compare-images")
public String compareImages(
@RequestParam("images") List<MultipartFile> images,
@RequestParam String question) throws Exception {
List<Media> mediaList = new ArrayList<>();
for (MultipartFile image : images) {
MimeType mimeType = MimeType.valueOf(
image.getContentType() != null ? image.getContentType() : "image/jpeg");
mediaList.add(Media.builder()
.mimeType(mimeType)
.data(image.getResource())
.build());
}
UserMessage message = UserMessage.builder()
.text(question)
.media(mediaList)
.build();
return chatClient.prompt()
.messages(message)
.options(VL_OPTIONS)
.call()
.content();
}
}
|
测试:
1
2
3
4
5
6
7
8
9
10
11
12
13
|
curl "http://localhost:8080/api/vision/analyze-url?imageUrl=https://p1-juejin.byteimg.com/tos-cn-i-k3u1fbpfcp/3b1c44a5bf7243779841d17bfabc4824~tplv-k3u1fbpfcp-jj-mark:3024:0:0:0:q75.awebp&question=图片里有什么"
curl -X POST "http://localhost:8080/api/vision/analyze-upload" \
-F "image=@/path/to/photo.jpg" \
-F "question=描述这张图片"
curl -X POST "http://localhost:8080/api/vision/compare-images" \
-F "images=@before.jpg" \
-F "images=@after.jpg" \
-F "question=对比这两张图片的差异"
|
3.实战:发票识别
来个真实场景——上传发票图片,自动提取结构化数据。这在财务报销场景里特别有用:
1
2
3
4
5
6
7
8
9
10
11
12
13
14
15
16
17
18
19
20
21
22
23
24
25
26
27
28
29
30
31
32
33
34
35
36
37
38
39
40
41
42
43
44
45
46
47
48
49
50
51
52
53
54
55
56
57
58
59
60
61
62
63
64
65
66
67
68
69
70
71
72
73
74
75
| @RestController
@RequestMapping("/api/invoice")
public class InvoiceController {
private final ChatClient chatClient;
public InvoiceController(DashScopeChatModel dashScopeChatModel) {
this.chatClient = ChatClient.builder(dashScopeChatModel)
.defaultSystem("""
你是一个发票信息提取助手。
精确提取发票上的信息,不要猜测,看不清楚的字段返回 null。
金额统一用数字表示,不要带"元"或"¥"符号。
""")
.build();
}
record InvoiceInfo(
@JsonPropertyDescription("发票号码")
String invoiceNumber,
@JsonPropertyDescription("开票日期,格式 yyyy-MM-dd")
String invoiceDate,
@JsonPropertyDescription("销售方名称(卖家)")
String sellerName,
@JsonPropertyDescription("销售方税号")
String sellerTaxId,
@JsonPropertyDescription("购买方名称(买家)")
String buyerName,
@JsonPropertyDescription("购买方税号")
String buyerTaxId,
@JsonPropertyDescription("不含税金额,纯数字")
Double amountExcludingTax,
@JsonPropertyDescription("税额,纯数字")
Double taxAmount,
@JsonPropertyDescription("价税合计(含税总金额),纯数字")
Double totalAmount,
@JsonPropertyDescription("货物或服务名称")
String items
) {}
@PostMapping("/extract")
public InvoiceInfo extractInvoice(
@RequestParam("file") MultipartFile file) throws Exception {
MimeType mimeType = MimeType.valueOf(
file.getContentType() != null ? file.getContentType() : "image/jpeg");
Media media = Media.builder()
.mimeType(mimeType)
.data(file.getResource())
.build();
UserMessage message = UserMessage.builder()
.text("请提取这张发票上的所有信息")
.media(media)
.build();
return chatClient.prompt()
.messages(message)
.options(DashScopeChatOptions.builder()
.withModel("qwen-vl-max")
.withMultiModel(true)
.build())
.call()
.entity(InvoiceInfo.class);
}
}
|
测试:
1
2
| curl -X POST "http://localhost:8080/api/invoice/extract" \
-F "file=@invoice.jpg"
|
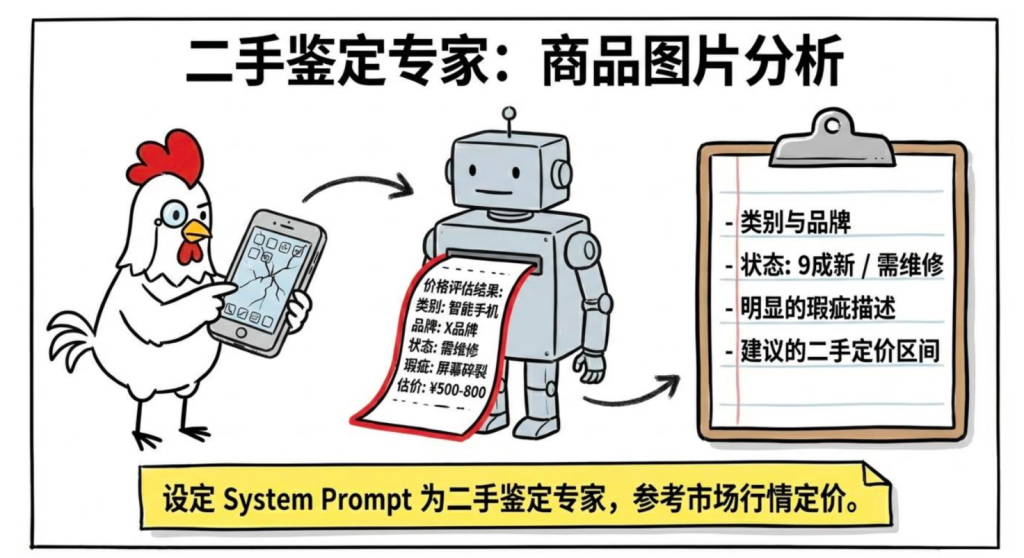
4.实战:商品图片分析
再来一个电商场景——用户上传二手商品图片,AI 自动分析状态和建议定价:
@RestController
@RequestMapping("/api/product")
public class ProductAnalysisController {
private final ChatClient chatClient;

public ProductAnalysisController(DashScopeChatModel dashScopeChatModel) {
    this.chatClient = ChatClient.builder(dashScopeChatModel)
            .defaultSystem("你是一个二手商品鉴定专家,擅长评估商品价值和状态。定价参考市场行情,客观准确。")
            .build();
}

record ProductAnalysis(
    @JsonPropertyDescription("商品类别,如:手机/笔记本/衣服")
    String category,

    @JsonPropertyDescription("品牌(如果能识别的话)")
    String brand,

    @JsonPropertyDescription("商品状态:全新/9成新/7-8成新/5-6成新/需维修")
    String condition,

    @JsonPropertyDescription("识别到的主要特征,最多5条")
    List<String> features,

    @JsonPropertyDescription("明显的瑕疵描述,没有则为空列表")
    List<String> defects,

    @JsonPropertyDescription("建议的二手定价区间,格式:最低价-最高价,单位元")
    String suggestedPriceRange,

    @JsonPropertyDescription("商品描述,适合用于二手交易平台的文案,100字以内")
    String description
) {}

@PostMapping("/analyze")
public ProductAnalysis analyzeProduct(
        @RequestParam("image") MultipartFile imageFile) throws Exception {

    MimeType mimeType = MimeType.valueOf(
            imageFile.getContentType() != null ? imageFile.getContentType() : "image/jpeg");

    Media media = Media.builder()
            .mimeType(mimeType)
            .data(imageFile.getResource())
            .build();

    UserMessage message = UserMessage.builder()
            .text("请分析这个二手商品的状况,并给出合理的定价建议")
            .media(media)
            .build();

    return chatClient.prompt()
            .messages(message)
            .options(DashScopeChatOptions.builder()
                    .withModel("qwen-vl-max")
                    .withMultiModel(true)
                    .build())
            .call()
            .entity(ProductAnalysis.class);
}
}
测试:
1
2
| curl -X POST "http://localhost:8080/api/product/analyze" \
-F "image=@product.jpg"
|
5.通义千问视觉版的配置
用 DashScope 的视觉模型有两个必填项,少一个就会报错:
- 模型名:必须用
qwen-vl-max 或 qwen-vl-plus,普通的 qwen-max 不支持图片输入
withMultiModel(true):必须设置,告诉 Spring AI Alibaba 把请求发到 multimodal-generation 端点,而不是默认的 text-generation 端点——少了这个就会报 url error
在 application.yml 里统一配置(项目只用视觉模型时):
1
2
3
4
5
6
7
8
| spring:
ai:
dashscope:
api-key: ${DASHSCOPE_API_KEY}
chat:
options:
model: qwen-vl-max
multi-model: true
|
代码里动态指定(同一个项目既有文字请求又有图片请求时):
1
2
3
4
| DashScopeChatOptions.builder()
.withModel("qwen-vl-max")
.withMultiModel(true)
.build()
|
6.图片大小和格式限制
有一个实际开发中容易踩的坑——不同模型对图片有限制,超了会直接报错:
| 模型 |
支持格式 |
大小限制 |
| GPT-4o |
JPEG、PNG、GIF、WEBP |
单张 20MB |
| Qwen-VL |
JPEG、PNG |
单张 10MB,URL 限制更小 |
最好在接口层提前校验,比等模型报错友好多了。我们习惯把这个做成一个工具方法,在 Controller 里复用:
1
2
3
4
5
6
7
8
9
10
11
| private void validateImage(MultipartFile file) {
if (file.getSize() > 10 * 1024 * 1024) {
throw new IllegalArgumentException("图片大小不能超过 10MB");
}
String contentType = file.getContentType();
if (contentType == null || !List.of("image/jpeg", "image/png", "image/webp")
.contains(contentType)) {
throw new IllegalArgumentException("只支持 JPEG、PNG、WEBP 格式");
}
}
|
在 extractInvoice、analyzeProduct 这些方法里,调用前加一行 validateImage(file) 就行。
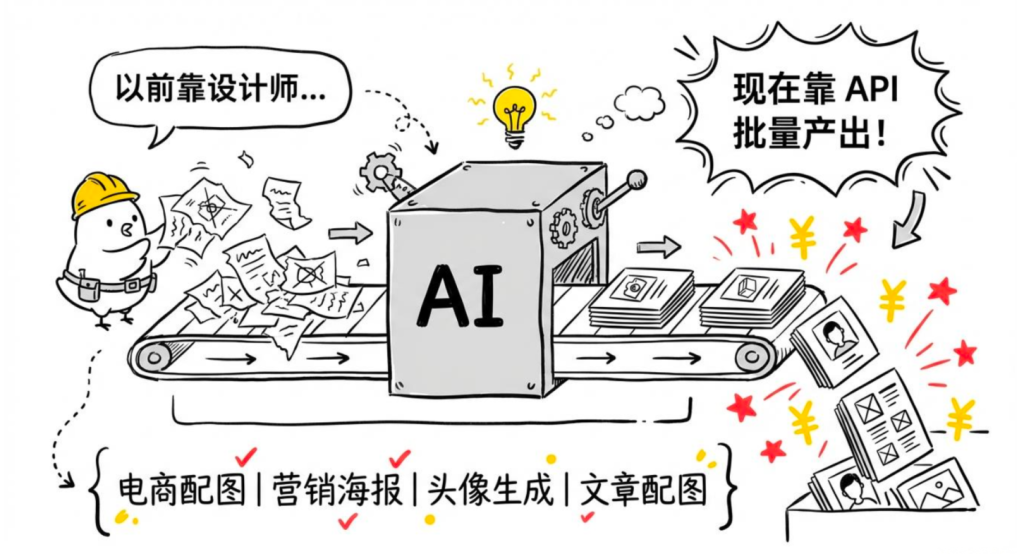
三.图片合成**——**通义万象接入实战
图片生成的应用场景很直观:电商商品配图、营销海报、头像生成、文章配图……这些以前需要设计师的事,现在可以通过 API 批量生成。鸡哥见过不少团队用这个做自动化运营,效率提升很明显。
1.通义万象配置
通义万象包含在 spring-ai-alibaba-starter-dashscope 里,不需要额外依赖。application.yml 只需要配置 API key 和 retry 参数,模型参数直接在代码里的 DashScopeImageOptions 里指定:
1
2
3
4
5
6
7
8
9
10
| spring:
ai:
dashscope:
api-key: ${DASHSCOPE_API_KEY}
retry:
max-attempts: 20
backoff:
initial-interval: 3s
multiplier: 2
max-interval: 15s
|
为什么要配 retry? 通义万象图片生成是异步的——API 不会立即返回图片,而是先提交任务,Spring AI 在后台轮询任务状态。每次图片还没生成好,就触发一次 retry,日志会看到 WARN: Image generation still pending,这是正常行为,不是报错。
默认 multiplier: 5 会让间隔迅速拉长(2s → 10s → 50s),而图片通常 15-30s 生成好,结果 Spring AI 已经在等 50s 的大间隔,白白浪费时间。调小 multiplier 让轮询更均匀,加大 max-attempts 防止提前放弃。
2.基础图片生成
ImageModel 和 DashScopeChatModel 一样,Spring AI Alibaba 会自动注册,直接构造函数注入:
1
2
3
4
5
6
7
8
9
10
11
12
13
14
15
16
17
18
19
20
21
22
23
24
25
26
27
28
29
30
31
32
33
34
35
36
37
38
39
40
41
42
| @RestController
@RequestMapping("/api/image")
public class ImageGenerationController {
private final ImageModel imageModel;
public ImageGenerationController(ImageModel imageModel) {
this.imageModel = imageModel;
}
@GetMapping("/generate")
public String generateImage(@RequestParam String description) {
ImageResponse response = imageModel.call(new ImagePrompt(description));
return response.getResult().getOutput().getUrl();
}
@GetMapping("/generate-custom")
public List<String> generateCustomImage(
@RequestParam String description,
@RequestParam(defaultValue = "1") int count,
@RequestParam(defaultValue = "1024") int width,
@RequestParam(defaultValue = "1024") int height) {
ImageResponse response = imageModel.call(
new ImagePrompt(
description,
DashScopeImageOptions.builder()
.withModel("wanx2.1-t2i-plus")
.withN(count)
.withWidth(width)
.withHeight(height)
.build()
)
);
return response.getResults().stream()
.map(result -> result.getOutput().getUrl())
.collect(Collectors.toList());
}
}
|
测试:
1
2
3
| curl "http://localhost:8080/api/image/generate?description=一只可爱的橘猫坐在窗台上"
curl "http://localhost:8080/api/image/generate-custom?description=科技感办公室&count=2&width=1024&height=768"
|
3.实战:商品配图生成
1
2
3
4
5
6
7
8
9
10
11
12
13
14
15
16
17
18
19
20
21
22
23
24
25
26
27
28
29
30
31
32
33
34
35
36
37
38
39
40
41
42
43
44
45
46
47
48
49
50
51
52
53
54
55
56
57
58
| @RestController
@RequestMapping("/api/product-image")
public class ProductImageController {
private final ChatClient chatClient;
private final ImageModel imageModel;
public ProductImageController(DashScopeChatModel dashScopeChatModel,
ImageModel imageModel) {
this.chatClient = ChatClient.builder(dashScopeChatModel).build();
this.imageModel = imageModel;
}
record GenerateRequest(
String productName,
String productDescription,
String style
) {}
record GenerateResult(
String imagePrompt,
String imageUrl
) {}
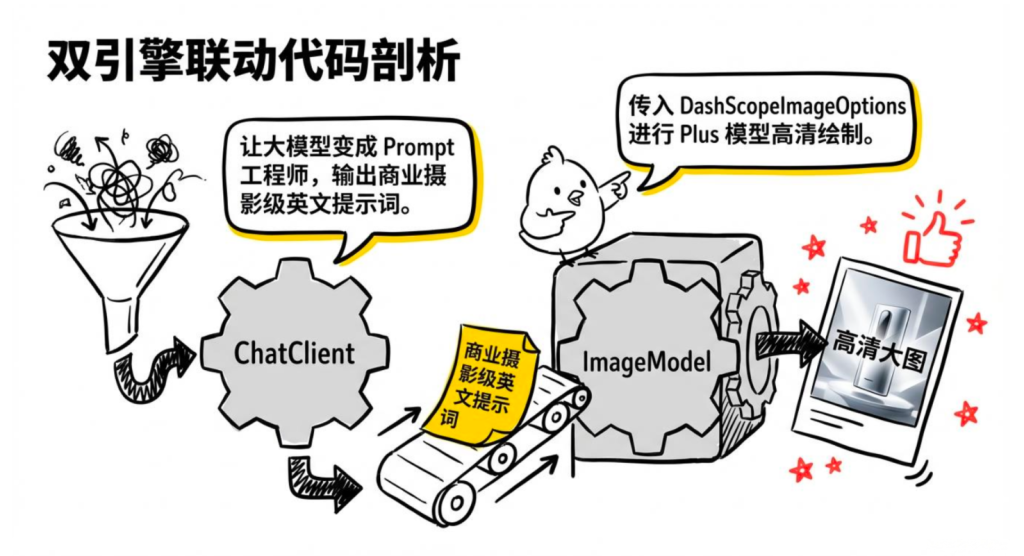
@PostMapping("/generate")
public GenerateResult generateProductImage(@RequestBody GenerateRequest request) {
String imagePrompt = chatClient.prompt()
.system("""
你是一个专业的 AI 绘画 prompt 工程师。
根据商品信息,生成一段用于 AI 图片生成的英文 prompt。
要求:用英文写,50-100 词,包含商品外观特征、背景、光线、风格,
商业摄影风格,适合电商展示。只输出 prompt 文本,不要其他内容。
""")
.user(String.format(
"商品名称:%s\n商品描述:%s\n风格要求:%s",
request.productName(),
request.productDescription(),
request.style()))
.call()
.content();
ImageResponse imageResponse = imageModel.call(
new ImagePrompt(
imagePrompt,
DashScopeImageOptions.builder()
.withModel("wanx2.1-t2i-plus")
.withN(1)
.withWidth(1024)
.withHeight(1024)
.build()
)
);
return new GenerateResult(imagePrompt, imageResponse.getResult().getOutput().getUrl());
}
}
|
测试:
1
2
3
| curl -X POST "http://localhost:8080/api/product-image/generate" \
-H "Content-Type: application/json" \
-d '{"productName":"蓝牙耳机","productDescription":"入耳式,深蓝色,金属质感","style":"写实摄影"}'
|
4.图片风格控制
通义万象支持通过 Prompt 关键词控制风格。鸡哥整理了一套常用风格词:
1
2
3
4
5
6
7
8
9
10
11
12
13
14
15
16
17
18
19
20
21
22
23
24
25
26
27
28
29
30
31
32
33
34
35
36
37
38
| @RestController
@RequestMapping("/api/styled-image")
public class StyledImageController {
private final ImageModel imageModel;
private static final Map<String, String> STYLE_KEYWORDS = Map.of(
"写实摄影", "professional photography, realistic, high resolution, 8k",
"扁平插画", "flat design, minimalist illustration, vector style",
"油画风格", "oil painting style, artistic, textured brushstrokes",
"水彩风格", "watercolor painting, soft colors, artistic",
"3D渲染", "3D rendering, CGI, photorealistic, studio lighting",
"日系动漫", "anime style, Japanese illustration, clean lines",
"商务简约", "clean corporate style, white background, professional"
);
public StyledImageController(ImageModel imageModel) {
this.imageModel = imageModel;
}
@GetMapping("/generate")
public String generateStyledImage(
@RequestParam String description,
@RequestParam(defaultValue = "写实摄影") String style) {
String styleKeyword = STYLE_KEYWORDS.getOrDefault(style, "");
String fullPrompt = description + ", " + styleKeyword;
return imageModel.call(
new ImagePrompt(fullPrompt, DashScopeImageOptions.builder()
.withModel("wanx2.1-t2i-plus")
.withN(1)
.withWidth(1024)
.withHeight(1024)
.build()))
.getResult().getOutput().getUrl();
}
}
|
测试:
1
2
| curl "http://localhost:8080/api/styled-image/generate?description=一杯咖啡&style=水彩风格"
curl "http://localhost:8080/api/styled-image/generate?description=城市夜景&style=油画风格"
|
5.如果用 OpenAI DALL-E
如果大家的项目用 OpenAI,代码层面和通义万象完全一样,都是 ImageModel 接口,只需要换配置:
1
2
3
4
5
6
7
8
9
10
| spring:
ai:
openai:
api-key: ${OPENAI_API_KEY}
image:
options:
model: dall-e-3
quality: standard
style: vivid
size: "1024x1024"
|
这段代码无论底层是 DALL-E 还是通义万象,写法完全相同:
1
2
| ImageResponse response = imageModel.call(new ImagePrompt("a cute chicken mascot"))
String url = response.getResult().getOutput().getUrl()
|
这就是 Spring AI 抽象层的价值——切换提供商,业务代码不动。
四.语音合成——CosyVoice 接入实战
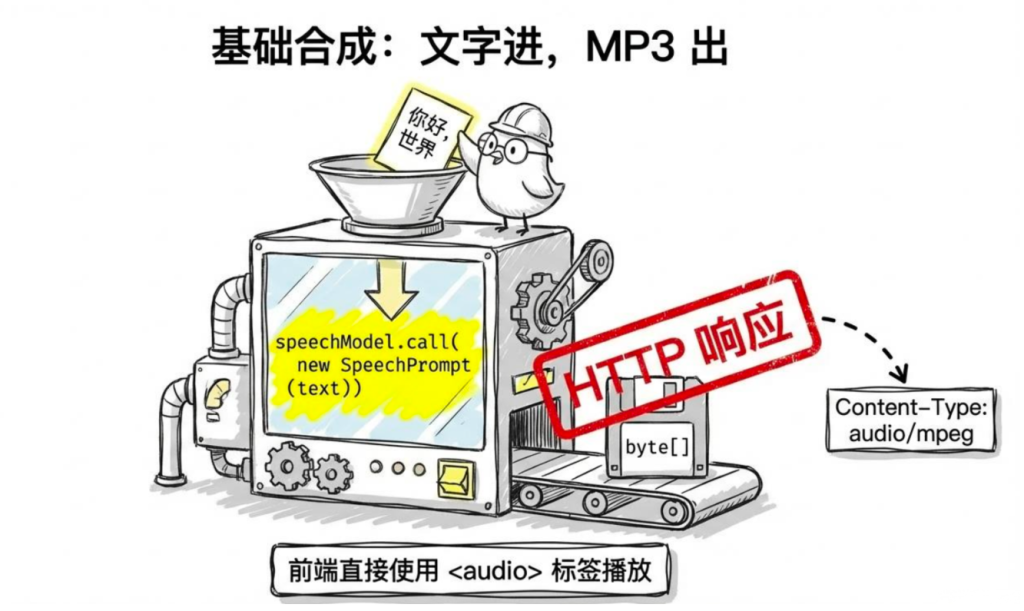
1.Spring AI Alibaba 与 TTS
先说清楚一件事:Spring AI Alibaba 没有封装 TTS。
ChatModel、ImageModel 这些有 Spring AI 的标准接口,TTS 没有。CosyVoice 语音合成用的是原生 DashScope Java SDK,类在 com.alibaba.dashscope.audio.ttsv2 包下。
spring-ai-alibaba-starter-dashscope 没有传递 DashScope 原生 SDK,需要在 pom.xml 里单独加:
1
2
3
4
5
| <dependency>
<groupId>com.alibaba</groupId>
<artifactId>dashscope-sdk-java</artifactId>
<version>2.22.4</version>
</dependency>
|
核心类只有两个:
| 类名 |
说明 |
SpeechSynthesizer |
TTS 的入口,调 call() 发起合成 |
SpeechSynthesisParam |
封装模型、音色、格式等参数 |
2.CosyVoice 配置
CosyVoice 目前最新版是 cosyvoice-v3-flash,速度快、音质好,直接用这个。
注意:不同模型版本需配套对应的音色,v3-flash 用 longanyang 这一批,v2 用 longxiaochun_v2 这一批,不能混用。完整音色列表:https://help.aliyun.com/zh/model-studio/cosyvoice-voice-list
常用音色(cosyvoice-v3-flash):
| 音色 ID |
说明 |
longanyang |
女声,亲切自然,适合客服 |
longxiaocheng |
男声,成熟稳重,适合播报 |
longxiaoxia |
女声,活泼可爱,适合娱乐 |
3.基础用法:文字转语音
1
2
3
4
5
6
7
8
9
10
11
12
13
14
15
16
17
18
19
20
21
22
23
24
25
26
27
28
29
30
31
32
33
34
35
36
37
38
39
40
41
42
43
44
45
46
47
48
49
50
51
52
53
54
55
56
57
58
59
60
61
62
63
64
65
| @RestController
@RequestMapping("/api/tts")
public class TextToSpeechController {
@Value("${spring.ai.dashscope.api-key}")
private String apiKey;
@GetMapping(value = "/synthesize", produces = "audio/mpeg")
public ResponseEntity<byte[]> synthesize(@RequestParam String text) throws Exception {
Constants.baseWebsocketApiUrl = "wss://dashscope.aliyuncs.com/api-ws/v1/inference";
SpeechSynthesisParam param = SpeechSynthesisParam.builder()
.apiKey(apiKey)
.model("cosyvoice-v3-flash")
.voice("longanyang")
.build();
SpeechSynthesizer synthesizer = new SpeechSynthesizer(param, null);
ByteBuffer audio = synthesizer.call(text);
synthesizer.getDuplexApi().close(1000, "bye");
byte[] audioBytes = audio.array();
Files.write(Path.of("speech.mp3"), audioBytes);
return ResponseEntity.ok()
.contentType(MediaType.parseMediaType("audio/mpeg"))
.header(HttpHeaders.CONTENT_DISPOSITION, "inline; filename=\"speech.mp3\"")
.body(audioBytes);
}
@GetMapping(value = "/synthesize-custom", produces = "audio/mpeg")
public ResponseEntity<byte[]> synthesizeCustom(
@RequestParam String text,
@RequestParam(defaultValue = "longanyang") String voice,
@RequestParam(defaultValue = "1.0") float speed) throws Exception {
Constants.baseWebsocketApiUrl = "wss://dashscope.aliyuncs.com/api-ws/v1/inference";
SpeechSynthesisParam param = SpeechSynthesisParam.builder()
.apiKey(apiKey)
.model("cosyvoice-v3-flash")
.voice(voice)
.speechRate(speed)
.build();
SpeechSynthesizer synthesizer = new SpeechSynthesizer(param, null);
ByteBuffer audio = synthesizer.call(text);
synthesizer.getDuplexApi().close(1000, "bye");
byte[] audioBytes = audio.array();
Files.write(Path.of("speech-custom.mp3"), audioBytes);
return ResponseEntity.ok()
.contentType(MediaType.parseMediaType("audio/mpeg"))
.body(audioBytes);
}
}
|
测试:
1
2
3
4
5
|
curl "http://localhost:8080/api/tts/synthesize?text=你好,欢迎使用智能语音助手"
curl "http://localhost:8080/api/tts/synthesize-custom?text=今日播报&voice=longxiaocheng&speed=0.9"
|
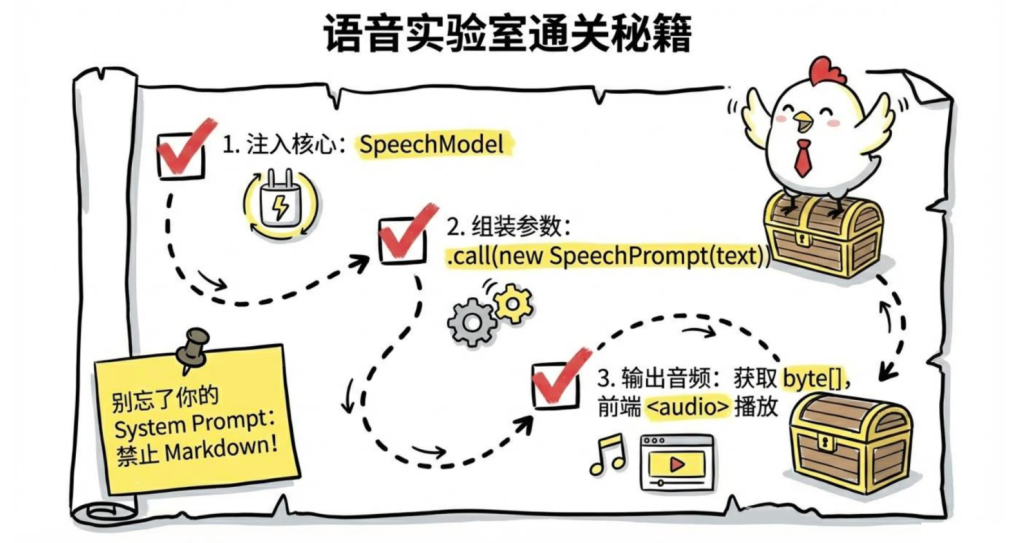
4.实战:AI 对话 + 语音播报
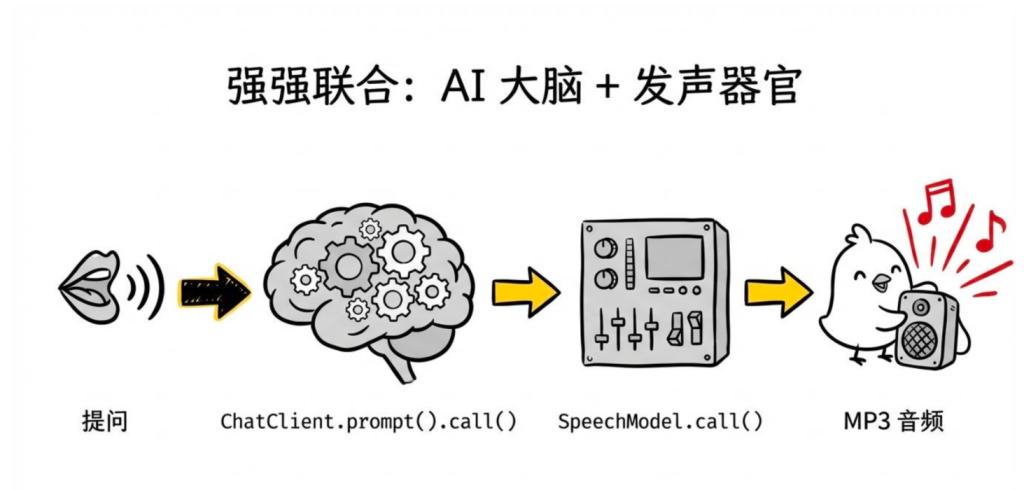
把 ChatClient 和 SpeechSynthesizer 接起来,实现"文字提问,AI 用语音回答":
1
2
3
4
5
6
7
8
9
10
11
12
13
14
15
16
17
18
19
20
21
22
23
24
25
26
27
28
29
30
31
32
33
34
35
36
37
38
39
40
41
42
43
44
45
46
47
48
49
50
51
52
53
54
55
| @RestController
@RequestMapping("/api/voice-chat")
public class VoiceChatController {
private final ChatClient chatClient;
@Value("${spring.ai.dashscope.api-key}")
private String apiKey;
public VoiceChatController(DashScopeChatModel dashScopeChatModel) {
this.chatClient = ChatClient.builder(dashScopeChatModel)
.defaultSystem("""
你是一个语音助手,回答会被转成语音播放。
因此:
- 回答要口语化,避免用 Markdown 格式
- 不要输出代码块、列表符号(*、-)等
- 句子要自然流畅,适合朗读
- 回答控制在 100 字以内
""")
.build();
}
@GetMapping(value = "/ask", produces = "audio/mpeg")
public ResponseEntity<byte[]> askWithVoice(
@RequestParam String question,
@RequestParam(defaultValue = "longanyang") String voice) throws Exception {
String textAnswer = chatClient.prompt()
.user(question)
.call()
.content();
Constants.baseWebsocketApiUrl = "wss://dashscope.aliyuncs.com/api-ws/v1/inference";
SpeechSynthesisParam param = SpeechSynthesisParam.builder()
.apiKey(apiKey)
.model("cosyvoice-v3-flash")
.voice(voice)
.build();
SpeechSynthesizer synthesizer = new SpeechSynthesizer(param, null);
ByteBuffer audio = synthesizer.call(textAnswer);
synthesizer.getDuplexApi().close(1000, "bye");
byte[] audioBytes = audio.array();
Files.write(Path.of("voice-answer.mp3"), audioBytes);
return ResponseEntity.ok()
.contentType(MediaType.parseMediaType("audio/mpeg"))
.body(audioBytes);
}
}
|
System Prompt 里要特别说明"不要输出 Markdown"——语音播放 **加粗**、- 列表 这些符号会直接念出来,听感很差。鸡哥踩过这个坑。
1
| curl "http://localhost:8080/api/voice-chat/ask?question=今天天气怎么样"
|
5.定时语音播报
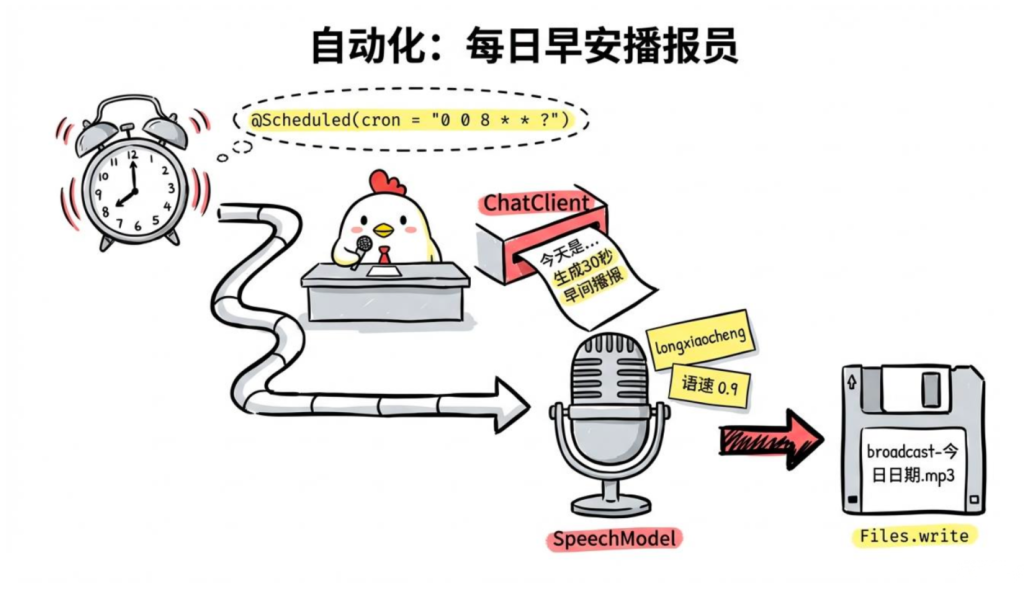
适合每日早报、系统通知等场景。注意需要在启动类加 @EnableScheduling:
1
2
3
4
5
6
7
8
9
10
11
12
13
14
15
16
17
18
19
20
21
22
23
24
25
26
27
28
29
30
31
32
33
34
35
36
37
38
39
40
41
42
43
44
45
| @Service
public class DailyBroadcastService {
private final ChatClient chatClient;
@Value("${spring.ai.dashscope.api-key}")
private String apiKey;
public DailyBroadcastService(DashScopeChatModel dashScopeChatModel) {
this.chatClient = ChatClient.builder(dashScopeChatModel).build();
}
@Scheduled(cron = "0 0 8 * * ?")
public void generateDailyBroadcast() throws Exception {
String script = chatClient.prompt()
.system("你是一个播音员,生成简洁的早间播报文案,不要用 Markdown 格式")
.user("今天是 " + LocalDate.now().format(DateTimeFormatter.ofPattern("yyyy年M月d日")) +
",请生成一段 30 秒的早间播报,包括问候语和今日关键提示")
.call()
.content();
Constants.baseWebsocketApiUrl = "wss://dashscope.aliyuncs.com/api-ws/v1/inference";
SpeechSynthesisParam param = SpeechSynthesisParam.builder()
.apiKey(apiKey)
.model("cosyvoice-v3-flash")
.voice("longxiaocheng")
.speechRate(0.9f)
.build();
SpeechSynthesizer synthesizer = new SpeechSynthesizer(param, null);
ByteBuffer audio = synthesizer.call(script);
synthesizer.getDuplexApi().close(1000, "bye");
String filename = "broadcast-" + LocalDate.now() + ".mp3";
try {
Files.write(Path.of(filename), audio.array());
} catch (IOException e) {
throw new RuntimeException("保存播报文件失败", e);
}
}
}
|