Agent项目实战开发-Spring AI 实战一.SpringAI是什么
Spring AI 是 Spring 官方出的 AI 应用开发框架,2024 年正式发布 1.0。
Spring AI 之于 AI 开发,就像 Spring Boot 之于 Web 开发 。
Spring Boot 出来之前,写一个 Web 接口要配 web.xml、DispatcherServlet、各种 Bean,很繁琐。Spring Boot 出来之后,加个注解、配几行 yaml,HTTP 接口就好了。
Spring AI 做的是同一件事——把和大模型打交道这件事标准化、抽象化 :
不管你用 OpenAI、DeepSeek 还是通义千问,调用方式完全一样
Prompt、流式输出、对话记忆、Function Calling,全都封装好了,开箱即用
和 Spring 生态无缝集成,依赖注入、配置管理、测试,用起来就像用 Spring 里的其他组件
Spring AI 的设计哲学是"面向接口编程"。它定义了一套接口,让不同的模型提供商实现这些接口。你的业务代码只依赖接口,不依赖具体实现,不管底层是 OpenAI 还是通义千问,接口是一样的
1
2
3
LangChain → Python 生态,最成熟,教程最多 LangChain4j → Java 移植,社区维护,功能全 Spring AI → Spring 官方,Java 原生,Spring 生态集成最好
二.跑通一个Spring AI 应用
1.环境要求
JDK 21(Spring Boot 4.0 最低要求 JDK 21)
Maven 3.6+
一个大模型的 API Key
2.创建项目
推荐用 Spring Initializr(start.spring.io )创建:
Project:Maven
Language:Java
Spring Boot:3.5.11
Java:21
Dependencies:Spring Web (其他 AI 依赖手动加,Initializr 上的 Spring AI 版本可能不是最新的)
https://spring.io/projects/spring-ai 可以看最新的 spring ai 版本https://docs.spring.io/spring-ai/reference/getting-started.html 可以看 spring ai 版本支持的 boot 版本
3.添加依赖
1
2
3
4
5
6
7
8
9
10
11
12
13
14
15
16
17
18
19
20
21
22
23
24
25
26
27
28
29
30
31
32
33
34
35
36
37
38
39
40
41
42
43
44
45
46
47
48
49
50
51
52
53
54
55
56
57
58
59
60
<?xml version="1.0" encoding="UTF-8" ?> <project xmlns ="http://maven.apache.org/POM/4.0.0" xmlns:xsi ="http://www.w3.org/2001/XMLSchema-instance" xsi:schemaLocation ="http://maven.apache.org/POM/4.0.0 https://maven.apache.org/xsd/maven-4.0.0.xsd" > <modelVersion > 4.0.0</modelVersion > <parent > <groupId > org.springframework.boot</groupId > <artifactId > spring-boot-starter-parent</artifactId > <version > 3.5.11</version > </parent > <groupId > com.jichi</groupId > <artifactId > spring-ai-jichi</artifactId > <version > 0.0.1-SNAPSHOT</version > <properties > <java.version > 21</java.version > <spring-ai.version > 1.1.2</spring-ai.version > </properties > <dependencyManagement > <dependencies > <dependency > <groupId > org.springframework.ai</groupId > <artifactId > spring-ai-bom</artifactId > <version > $ {spring-ai.version} </version > <type > pom</type > <scope > import</scope > </dependency > </dependencies > </dependencyManagement > <dependencies > <dependency > <groupId > org.springframework.boot</groupId > <artifactId > spring-boot-starter-web</artifactId > </dependency > <dependency > <groupId > org.springframework.ai</groupId > <artifactId > spring-ai-starter-model-openai</artifactId > </dependency > <dependency > <groupId > org.springframework.boot</groupId > <artifactId > spring-boot-starter-test</artifactId > <scope > test</scope > </dependency > </dependencies > <build > <plugins > <plugin > <groupId > org.springframework.boot</groupId > <artifactId > spring-boot-maven-plugin</artifactId > </plugin > </plugins > </build > </project >
4.配置 API Key
1
2
3
4
5
6
7
8
9
10
11
spring: ai: openai: # 如果用 DeepSeek,改成 https: # 如果用 OpenAI,改成 https: base-url: https: api-key: ${ DEEPSEEK_API_KEY} # 从环境变量读取,不要直接写在配置文件里 chat: options: model: deepseek-chat # DeepSeek-V3 的模型名 temperature: 0.7
5.写第一个 Controller
1
2
3
4
5
6
7
8
9
10
11
12
13
14
15
16
17
18
19
20
21
22
23
24
25
26
27
28
29
30
31
package com.jichi.springai.controller;import org.springframework.ai.chat.client.ChatClient;import org.springframework.web.bind.annotation .GetMapping;import org.springframework.web.bind.annotation .RequestMapping;import org.springframework.web.bind.annotation .RequestParam;import org.springframework.web.bind.annotation .RestController;@RestController @RequestMapping("/chat" ) public class ChatController { private final ChatClient chatClient; public ChatController(ChatClient.Builder builder) { this .chatClient = builder.build(); } @GetMapping public String chat(@RequestParam String message) { return chatClient.prompt() .user(message) .call() .content(); } }
就这几行,启动项目,访问 http://localhost:8080/chat?message=你好,就能得到 AI 的回复。
如果不想用云端 API,也可以用 Ollama 跑本地模型,完全免费。
第一步:改依赖
把 spring-ai-starter-model-openai 换成:
同时要将之前 spring-ai-starter-model-openai 去掉,否则会冲突。
1 2 3 4 <dependency > <groupId > org.springframework.ai</groupId > <artifactId > spring-ai-starter-model-ollama</artifactId > </dependency >
第二步:改配置
1
2
3
4
5
6
7
spring: ai: ollama: base-url: http://localhost:11434 chat: options: model: qwen2.5:7b
第三步:Controller 代码一行不用改
ChatClient.Builder 注入的是 Ollama 的实现,接口完全一致。这就是 Spring AI 抽象层的价值所在。
三.全面解读ChatClient
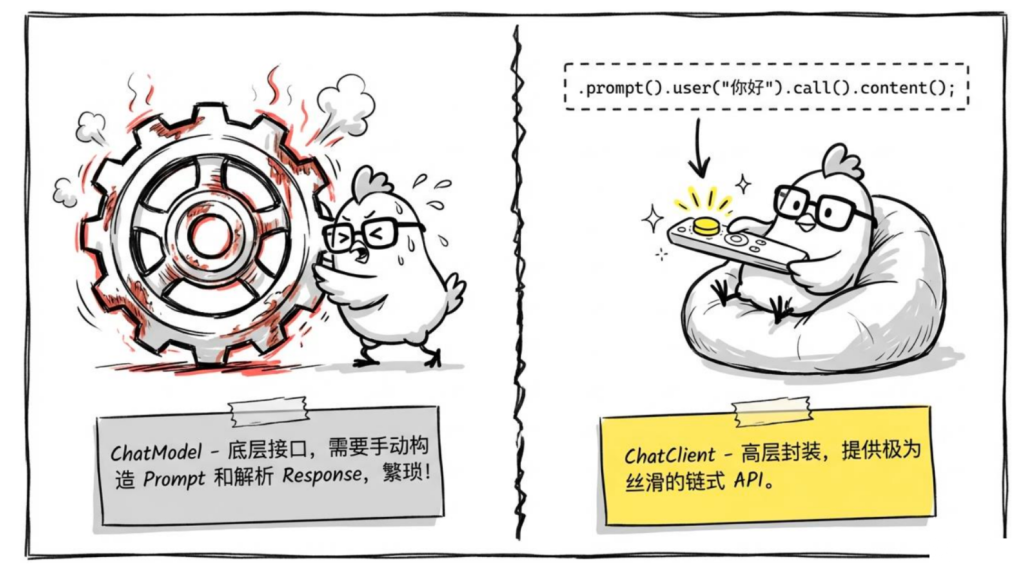
1.ChatClient 和 ChatModel 的关系
Spring AI 里有两个东西容易混:ChatClient 和 ChatModel,先把它们讲清楚。
ChatModel 是底层接口,负责和模型 API 打交道:
1
2
3
4
public interface ChatModel { ChatResponse call (Prompt prompt ) ; Flux<ChatResponse> stream (Prompt prompt ) ; }
调用 ChatModel 需要自己构造 Prompt 对象,处理 ChatResponse,稍微繁琐一点。
ChatClient 是对 ChatModel 的高层封装,提供流畅的链式 API:
1
2
3
4
5
6
7
8
9
10
11
12
13
14
15
16
17
18
19
20
21
22
23
24
25
26
27
28
29
30
31
32
33
package com.jichi.springai.controller;import org.springframework.ai.chat.client.ChatClient;import org.springframework.ai.chat.messages.UserMessage;import org.springframework.ai.chat.model.ChatModel;import org.springframework.ai.chat.model.ChatResponse;import org.springframework.ai.chat.prompt.Prompt;import org.springframework.stereotype.Service;@Service public class ChatCompareDemo { private final ChatClient chatClient; private final ChatModel chatModel; public ChatCompareDemo (ChatClient.Builder builder, ChatModel chatModel) { this .chatClient = builder.build(); this .chatModel = chatModel; } public void compare () { Prompt prompt = new Prompt (new UserMessage ("你好" )); ChatResponse response = chatModel.call(prompt); String content1 = response.getResult().getOutput().getText(); String content2 = chatClient.prompt() .user("你好" ) .call() .content(); } }
日常业务代码用 ChatClient,需要细粒度控制(比如拿 Token 用量、拿原始响应)时才用 ChatModel。
2.创建 ChatClient的方法
方式一:通过 Builder 创建(推荐)
1
2
3
4
5
6
7
8
9
10
11
12
13
14
15
16
17
18
19
20
21
22
23
24
25
26
27
package com.jichi.springai.controller;import org.springframework.ai.chat.client.ChatClient;import org.springframework.web.bind.annotation .GetMapping;import org.springframework.web.bind.annotation .RequestMapping;import org.springframework.web.bind.annotation .RequestParam;import org.springframework.web.bind.annotation .RestController;@RestController @RequestMapping("/simpleChat" ) public class SimpleChatController { private final ChatClient chatClient; public SimpleChatController(ChatClient.Builder builder) { this .chatClient = builder.build(); } @GetMapping public String chat(@RequestParam String message) { return chatClient.prompt() .user(message) .call() .content(); } }
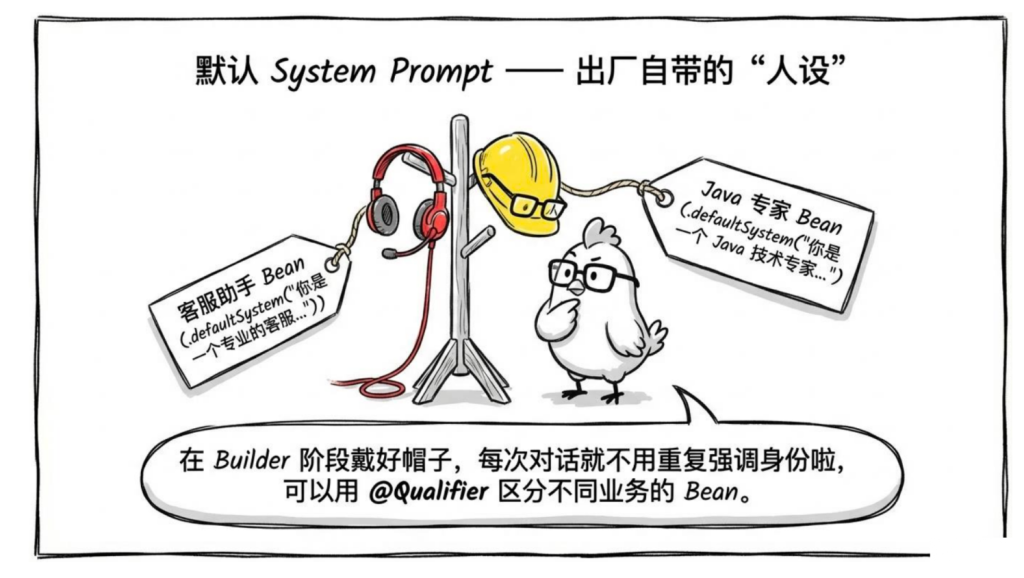
方式二:带默认 System Prompt 的 ChatClient
很多时候,你希望这个 ChatClient 每次调用都带一个固定的 System Prompt(比如角色设定),可以在 Builder 阶段就设置好:
1
2
3
4
5
6
7
8
9
10
11
12
13
14
15
16
17
18
19
20
21
22
23
package com.jichi.demo.config;import org.springframework.ai.chat.client.ChatClient;import org.springframework.context.annotation .Bean;import org.springframework.context.annotation .Configuration;@Configuration public class ChatClientConfig { @Bean public ChatClient customerServiceChatClient(ChatClient.Builder builder) { return builder .defaultSystem("你是一个专业的客服助手,回答简洁友好,遇到不确定的问题要如实说不知道,不要编造答案。" ) .build(); } @Bean public ChatClient codingChatClient(ChatClient.Builder builder) { return builder .defaultSystem("你是一个 Java 技术专家,代码示例使用 Java 21 语法,优先推荐 Spring Boot 相关方案。" ) .build(); } }
不同业务场景可以注册不同的 ChatClient Bean,用 @Qualifier 区分:
1
2
3
4
5
6
7
8
9
10
11
12
13
14
15
16
17
18
19
20
21
22
23
24
25
26
27
28
29
30
31
32
33
34
35
36
37
38
39
package com.jichi.springai.controller;import org.springframework.ai.chat.client.ChatClient;import org.springframework.beans.factory.annotation .Qualifier;import org.springframework.web.bind.annotation .GetMapping;import org.springframework.web.bind.annotation .RequestMapping;import org.springframework.web.bind.annotation .RequestParam;import org.springframework.web.bind.annotation .RestController;@RestController @RequestMapping("/multi-chat" ) public class MultiChatController { private final ChatClient customerServiceChatClient; private final ChatClient codingChatClient; public MultiChatController( @Qualifier("customerServiceChatClient" ) ChatClient customerServiceChatClient, @Qualifier("codingChatClient" ) ChatClient codingChatClient) { this .customerServiceChatClient = customerServiceChatClient; this .codingChatClient = codingChatClient; } @GetMapping("/service" ) public String service(@RequestParam String message) { return customerServiceChatClient.prompt() .user(message) .call() .content(); } @GetMapping("/code" ) public String code(@RequestParam String message) { return codingChatClient.prompt() .user(message) .call() .content(); } }
@Qualifier 的作用 是解决 Spring 框架中依赖注入(DI)时因存在多个同类型 Bean 而产生的歧义问题,确保容器能精确注入目标 Bean。
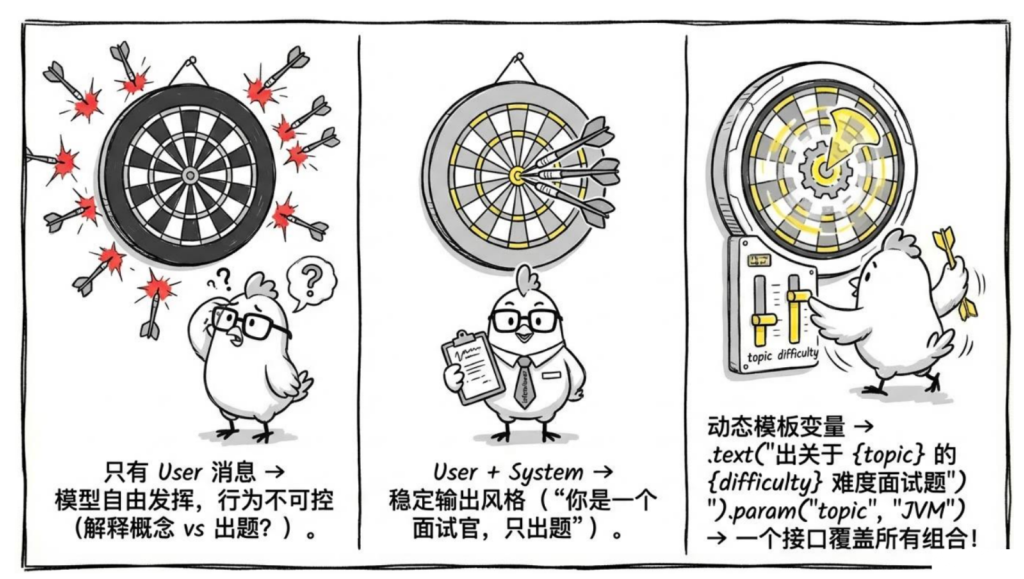
3.Prompt 构建:user、system、messages
三种写法都用"出面试题"这个场景,对比一下效果差异。
同样发"JVM"这个词,三个接口会给出完全不同的回答:
1 2 3 4 5 6 7 8 9 10 11 GET /prompt-demo/simple?message =JVMGET /prompt-demo/with-system?message =JVMGET /prompt-demo/template?topic =JVM&difficulty=高级
1
2
3
4
5
6
7
8
9
10
11
12
13
14
15
16
17
18
19
20
21
22
23
24
25
26
27
28
29
30
31
32
33
34
35
36
37
38
39
40
41
42
43
44
45
46
47
48
49
50
51
52
53
54
55
56
57
58
59
60
61
62
63
64
65
66
package com.jichi.springai.controller;import org.springframework.ai.chat.client.ChatClient;import org.springframework.web.bind.annotation .GetMapping;import org.springframework.web.bind.annotation .RequestMapping;import org.springframework.web.bind.annotation .RequestParam;import org.springframework.web.bind.annotation .RestController;@RestController @RequestMapping("/prompt-demo" ) public class PromptDemoController { private final ChatClient chatClient; public PromptDemoController(ChatClient.Builder builder) { this .chatClient = builder.build(); } @GetMapping("/simple" ) public String simple(@RequestParam String message) { return chatClient.prompt() .user(message) .call() .content(); } @GetMapping("/with-system" ) public String withSystem(@RequestParam String message) { return chatClient.prompt() .system("你是一个面试官,用提问的方式检验候选人对知识的掌握程度。只出题,不给答案。" ) .user(message) .call() .content(); } @GetMapping("/template" ) public String template( @RequestParam String topic, @RequestParam(defaultValue = "中级" ) String difficulty) { return chatClient.prompt() .user(u -> u.text("请出一道关于 {topic} 的 {difficulty} 难度 Java 面试题,只出题,不给答案。" ) .param("topic" , topic) .param("difficulty" , difficulty)) .call() .content(); } }
4.手动构造多轮对话消息列表
先说为什么要手动构造消息列表。
大模型本身是无状态 的——每次调用都是一次全新的请求,它完全不记得上一轮说了什么。你问它"它和 Spring 框架有什么区别",如果没有上下文,它根本不知道"它"指的是什么。
让模型"记住"对话的方式只有一个:把历史对话一起发过去 。每次请求都要把完整的对话历史打包进来:
1
2
3
4
5
6
第一轮发送: [system: 你是Java助手] [user: 什么是Spring Boot] 第二轮发送: [system: 你是Java助手] [user: 什么是Spring Boot] [assistant: Spring Boot是...] [user: 它和Spring有啥区别] ↑ 上一轮对话历史,新加进来的
模型拿到这个消息列表,才能理解"它"指的是 Spring Boot,给出正确的回答。
消息列表里有三种角色:
SystemMessage:给模型的"幕后指令",用户看不到,设定角色和规则
UserMessage:用户说的话
AssistantMessage:模型上一轮的回复(构造历史时用)
1
2
3
4
5
6
7
8
9
10
11
12
13
14
15
16
17
18
19
20
21
22
23
24
25
26
27
28
29
30
31
32
33
34
35
36
37
38
39
40
41
42
43
44
45
46
47
48
49
50
51
52
53
54
55
56
57
58
59
package com.jichi.springai.controller;import org.springframework.ai.chat.client.ChatClient;import org.springframework.ai.chat.messages.AssistantMessage;import org.springframework.ai.chat.messages.Message;import org.springframework.ai.chat.messages.SystemMessage;import org.springframework.ai.chat.messages.UserMessage;import org.springframework.web.bind.annotation.PostMapping;import org.springframework.web.bind.annotation.RequestBody;import org.springframework.web.bind.annotation.RequestMapping;import org.springframework.web.bind.annotation.RestController;import java.util.List;@RestController @RequestMapping ("/messages-demo" )public class MessagesDemoController private final ChatClient chatClient; public MessagesDemoController(ChatClient.Builder builder) { this .chatClient = builder.build(); } @PostMapping public String chat(@RequestBody ChatHistoryRequest request) { List<Message> messages = List.of( new "你是一个 Java 技术助手" ), new "什么是 Spring Boot" ), new new ); return chatClient.prompt() .messages(messages) .call() .content(); } record ChatHistoryRequest(String lastAssistantReply, String currentQuestion) {} }
测试一下,对比有无历史的区别:
1
2
3
4
5
6
7
8
9
10
11
# 有历史——模型知道"它" 指的是 Spring Boot ,能正确回答 curl -X POST http: -H "Content-Type: application/json" \ -d '{ "lastAssistantReply" : "Spring Boot 是基于 Spring 的快速开发框架,通过自动配置简化了项目搭建" , "currentQuestion" : "它和 Spring 框架有什么区别" }' # 没有历史(直接发第二轮问题)——模型不知道"它" 指谁 curl "http://localhost:8080/prompt-demo/simple?message=它和Spring框架有什么区别" # 模型会反问:请问"它" 指的是什么?或者给一个牛头不对马嘴的回答
这只是演示底层原理,实际项目里不会手动管理这个列表。 后面讲的 ChatMemory 会自动帮你维护历史消息,存储、截断、注入全部自动处理,不用自己拼。
5.调用方式:call vs stream
1
2
3
4
5
6
7
8
9
10
11
12
13
14
15
16
17
18
19
20
21
22
23
24
25
26
27
28
29
30
31
32
33
34
35
36
37
38
39
40
41
42
43
44
45
46
47
48
49
50
51
52
53
54
55
56
57
58
59
60
package com.jichi.springai.controller;import org.springframework.ai.chat.client.ChatClient;import org.springframework.ai.chat.metadata.Usage;import org.springframework.ai.chat.model.ChatResponse;import org.springframework.web.bind.annotation .GetMapping;import org.springframework.web.bind.annotation .RequestMapping;import org.springframework.web.bind.annotation .RequestParam;import org.springframework.web.bind.annotation .RestController;import reactor.core.publisher.Flux;@RestController @RequestMapping("/call-demo" ) public class CallDemoController { private final ChatClient chatClient; public CallDemoController(ChatClient.Builder builder) { this .chatClient = builder.build(); } @GetMapping("/sync" ) public String sync(@RequestParam String message) { return chatClient.prompt() .user(message) .call() .content(); } @GetMapping("/token-usage" ) public TokenUsageResponse tokenUsage(@RequestParam String message) { ChatResponse response = chatClient.prompt() .user(message) .call() .chatResponse(); Usage usage = response.getMetadata().getUsage(); return new TokenUsageResponse( response.getResult().getOutput().getText(), usage.getPromptTokens(), usage.getCompletionTokens(), usage.getTotalTokens() ); } @GetMapping("/stream" ) public Flux<String> stream(@RequestParam String message) { return chatClient.prompt() .user(message) .stream() .content(); } record TokenUsageResponse(String content, Integer inputTokens, Integer outputTokens, Integer totalTokens) { } }
6.模型参数配置
在配置文件里设置默认参数
1
2
3
4
5
6
7
8
9
spring: ai: openai: chat: options: model: deepseek-chat temperature: 0.7 max-tokens: 2048 top-p: 1.0
可以在代码里动态覆盖参数
1
2
3
4
5
6
7
8
9
10
11
12
13
14
15
16
17
18
19
20
21
22
23
24
25
26
27
28
29
30
31
32
33
34
35
36
37
38
39
40
41
42
43
44
45
46
47
48
49
50
51
52
53
54
55
56
57
58
59
package com.jichi.springai.controller;import org.springframework.ai.chat.client.ChatClient;import org.springframework.ai.chat.prompt.ChatOptions;import org.springframework.ai.openai.OpenAiChatOptions;import org.springframework.web.bind.annotation .GetMapping;import org.springframework.web.bind.annotation .RequestMapping;import org.springframework.web.bind.annotation .RequestParam;import org.springframework.web.bind.annotation .RestController;@RestController @RequestMapping("/options-demo" ) public class OptionsDemoController { private final ChatClient chatClient; public OptionsDemoController(ChatClient.Builder builder) { this .chatClient = builder.build(); } @GetMapping("/creative" ) public String creative(@RequestParam String message) { return chatClient.prompt() .user(message) .options(OpenAiChatOptions.builder() .temperature(1.5 ) .maxTokens(500 ) .build()) .call() .content(); } @GetMapping("/precise" ) public String precise(@RequestParam String message) { return chatClient.prompt() .user(message) .options(OpenAiChatOptions.builder() .temperature(0.1 ) .maxTokens(1000 ) .build()) .call() .content(); } @GetMapping("/generic" ) public String generic(@RequestParam String message) { return chatClient.prompt() .user(message) .options(ChatOptions.builder() .temperature(0.8 ) .maxTokens(1000 ) .build()) .call() .content(); } }
7.可直接复制运行的 Controller
1
2
3
4
5
6
7
8
9
10
11
12
13
14
15
16
17
18
19
20
21
22
23
24
25
26
27
28
29
30
31
32
33
34
35
36
37
38
39
40
41
42
43
44
45
46
47
48
49
50
51
52
53
54
55
56
57
58
59
60
61
62
63
64
65
66
67
68
69
70
71
72
73
74
75
76
77
78
79
80
81
82
83
84
85
86
87
88
89
90
91
92
93
94
95
96
97
98
99
100
101
102
103
104
105
106
107
108
109
110
111
112
113
114
115
116
117
118
119
120
121
122
123
124
125
126
127
128
129
130
131
132
133
134
135
136
137
138
139
140
package com.jichi .springai .controller ; import org.springframework .ai .chat .client .ChatClient ;import org.springframework .ai .chat .messages .AssistantMessage ;import org.springframework .ai .chat .messages .Message ;import org.springframework .ai .chat .messages .SystemMessage ;import org.springframework .ai .chat .messages .UserMessage ;import org.springframework .ai .chat .model .ChatResponse ;import org.springframework .ai .openai .OpenAiChatOptions ;import org.springframework .web .bind .annotation .*;import reactor.core .publisher .Flux ;import java.util .List ;@RestController @RequestMapping ("/api/chat" )public class ChatController { private final ChatClient chatClient; public ChatController (ChatClient .Builder builder) { this .chatClient = builder .defaultSystem ("你是一个专业的 Java 技术助手,回答简洁准确,代码示例使用 Java 21 语法。" ) .build (); } @GetMapping public String chat (@RequestParam String message return chatClient.prompt () .user (message) .call () .content (); } @PostMapping ("/with-role" ) public String chatWithRole (@RequestBody ChatRequest request return chatClient.prompt () .system (request.systemPrompt ()) .user (request.userMessage ()) .call () .content (); } @GetMapping ("/template" ) public String chatWithTemplate ( @RequestParam String topic, @RequestParam (defaultValue = "中级" ) String difficulty ) { return chatClient.prompt () .user (u -> u.text ("请出一道关于 {topic} 的 {difficulty} 难度面试题" ) .param ("topic" , topic) .param ("difficulty" , difficulty)) .call () .content (); } @GetMapping ("/detail" ) public ChatDetailResponse chatDetail (@RequestParam String message ChatResponse response = chatClient.prompt () .user (message) .call () .chatResponse (); return new ChatDetailResponse ( response.getResult ().getOutput ().getText (), response.getMetadata ().getUsage ().getTotalTokens () ); } @GetMapping ("/creative" ) public String creativeChat (@RequestParam String message return chatClient.prompt () .user (message) .options (OpenAiChatOptions .builder () .temperature (1.2 ) .maxTokens (500 ) .build ()) .call () .content (); } @GetMapping (value = "/stream" , produces = "text/event-stream;charset=UTF-8" ) public Flux <String > streamChat (@RequestParam String message return chatClient.prompt () .user (message) .stream () .content (); } @PostMapping ("/history" ) public String chatWithHistory (@RequestBody HistoryRequest request List <Message > messages = List .of ( new SystemMessage ("你是一个 Java 技术助手" ), new UserMessage (request.previousQuestion ()), new AssistantMessage (request.previousAnswer ()), new UserMessage (request.currentQuestion ()) ); return chatClient.prompt () .messages (messages) .call () .content (); } record ChatRequest (String systemPrompt, String userMessage) {} record ChatDetailResponse (String content, Long totalTokens) {} record HistoryRequest (String previousQuestion, String previousAnswer, String currentQuestion) {} }
启动后可以直接测试
1 2 3 4 5 6 7 8 9 10 11 12 13 14 curl "http://localhost:8080/api/chat?message=什么是JVM" curl "http://localhost:8080/api/chat/creative?message=给我起个有意思的项目名" curl "http://localhost:8080/api/chat/template?topic=Redis&difficulty=高级" curl "http://localhost:8080/api/chat/detail?message=你好" curl -N "http://localhost:8080/api/chat/stream?message=写一首关于代码的诗"
四.Prompt工程实践
1.System Prompt 和 User Prompt 的职责
System Prompt 是给模型的"岗位说明书",定义:
模型扮演什么角色
有哪些能力限制
输出格式是什么
遇到特定情况怎么处理
User Prompt 是每次用户发送的具体问题,内容是变化的。
好的做法是把稳定的、全局的约束 放在 System Prompt,把动态的、每次不同的内容 放在 User Prompt。
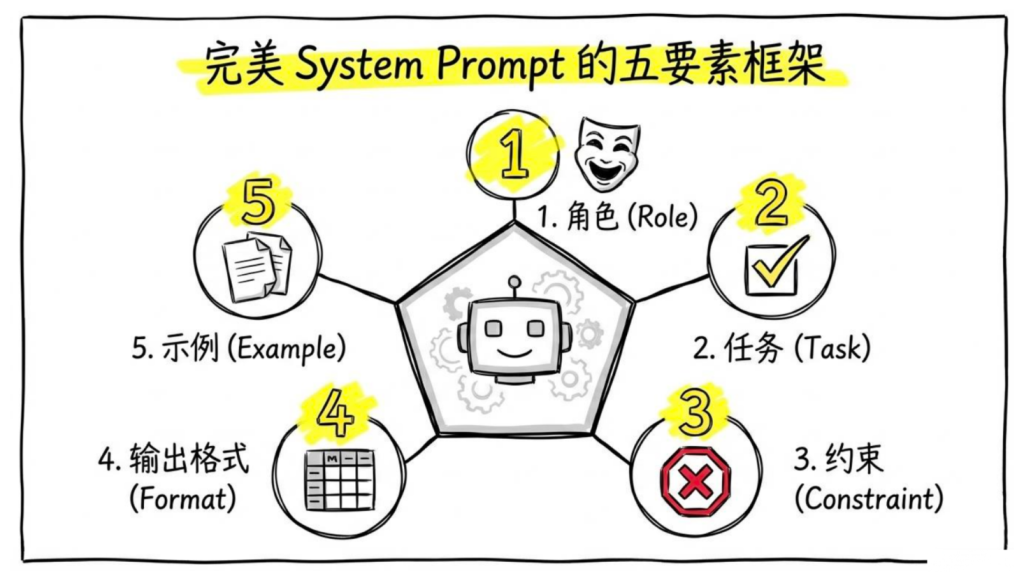
2.System Prompt 的写法:五要素
角色:告诉模型它是谁
任务:明确它要做什么
约束:告诉它不能做什么,或者有什么限制
输出格式:告诉它输出什么格式
示例:给几个正确的示例输入输出
3.Spring AI 里写 System Prompt
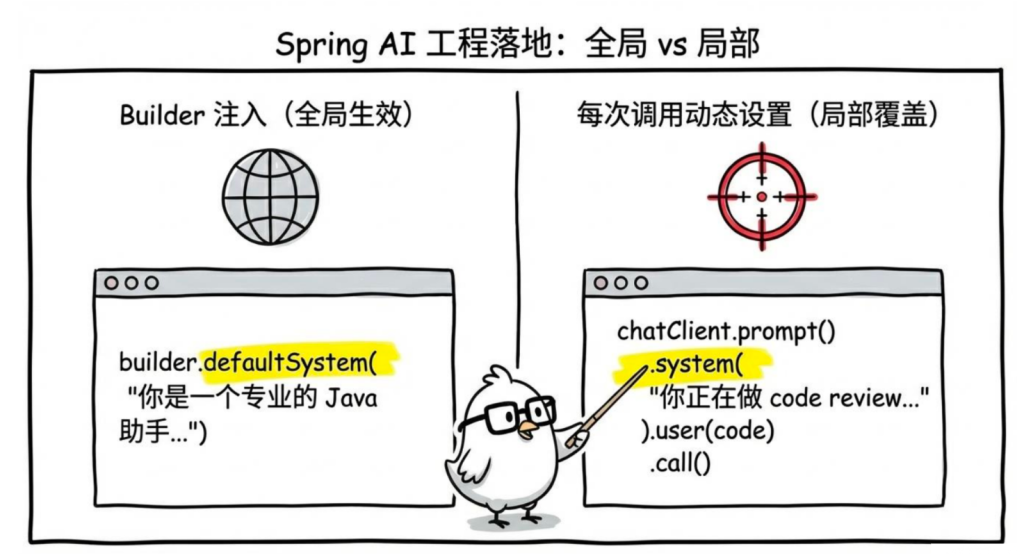
直接写在 Builder 里(对该实例全局生效)
在 Service 或 Controller 的构造方法里,用 defaultSystem() 把 System Prompt 固定下来,后续这个 chatClient 实例每次调用都会自动带上它:
1
2
3
4
5
6
7
8
9
10
11
12
13
14
15
16
17
18
19
20
21
22
23
24
25
26
27
28
29
30
31
32
33
34
35
36
37
38
39
40
package com.jichi.springai.service;import org.springframework.ai.chat.client.ChatClient;import org.springframework.stereotype.Service;@Service public class JavaTechService { private final ChatClient chatClient; public JavaTechService(ChatClient.Builder builder) { this .chatClient = builder .defaultSystem(""" 你是一个专业的 Java 技术助手。 职责: - 回答 Java、Spring Boot、Spring AI 相关的技术问题 - 帮助用户 debug 代码 - 提供最佳实践建议 规则: - 代码示例使用 Java 17+ 语法 - 回答简洁,不要过度解释 - 不确定的内容要说明,不要编造 - 非技术问题礼貌拒绝 输出格式: - 使用 Markdown 格式 - 代码用代码块包裹 """ ) .build(); } public String ask(String question) { return chatClient.prompt() .user(question) .call() .content(); } }
Controller 调用:
1
2
3
4
5
6
7
8
9
10
11
12
13
14
15
16
17
18
19
20
21
22
23
package com.jichi.springai.controller;import com.jichi.springai.service.JavaTechService;import org.springframework.web.bind.annotation .GetMapping;import org.springframework.web.bind.annotation .RequestMapping;import org.springframework.web.bind.annotation .RequestParam;import org.springframework.web.bind.annotation .RestController;@RestController @RequestMapping("/java-tech" ) public class JavaTechController { private final JavaTechService javaTechService; public JavaTechController(JavaTechService javaTechService) { this .javaTechService = javaTechService; } @GetMapping("/ask" ) public String ask(@RequestParam String question) { return javaTechService.ask(question); } }
这是上节 ChatClient 多实例写法的延伸——每个 Service 拿到的 ChatClient.Builder 是独立的,.defaultSystem() 只影响当前这个实例,不影响其他地方注入的 ChatClient。
每次调用时动态设置(局部生效,覆盖默认)
1
2
3
4
5
6
7
8
9
10
11
12
13
14
15
16
17
18
19
20
21
22
23
24
25
26
27
28
29
30
31
32
33
34
35
36
37
package com.jichi.springai.controller;import org.springframework.ai.chat.client.ChatClient;import org.springframework.web.bind.annotation .GetMapping;import org.springframework.web.bind.annotation .RequestParam;import org.springframework.web.bind.annotation .RestController;@RestController public class CodeReviewController { private final ChatClient chatClient; public CodeReviewController(ChatClient.Builder builder) { this .chatClient = builder.build(); } @GetMapping("/review" ) public String codeReview(@RequestParam String code) { return chatClient.prompt() .system(""" 你是一个资深 Java 工程师,正在做 code review。 找出代码中的: 1. Bug(包括潜在的运行时错误) 2. 性能问题 3. 不符合 Java 最佳实践的写法 输出格式: 每个问题单独列出,格式为: 【问题类型】问题描述 原代码:... 建议修改:... """ ) .user("请 review 这段代码:\n" + code) .call() .content(); } }
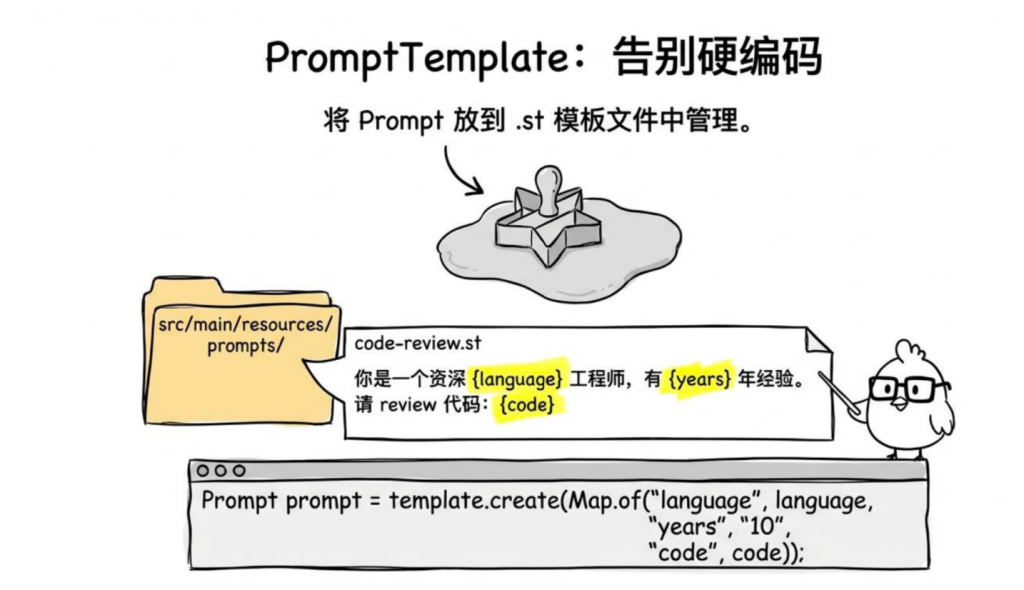
PromptTemplate:模板化管理 Prompt
实际项目里,Prompt 通常不是硬编码在 Java 代码里的,而是放在模板文件里管理。Spring AI 提供了 PromptTemplate 来做这件事。
创建模板文件
src/main/resources/prompts/code-review.st(.st 是 StringTemplate 格式):
1
2
3
4
5
6
7
8
9
10
11
你是一个资深 {language} 工程师,有 {years} 年开发经验。 请 review 以下代码,找出: 1. Bug 和潜在风险2. 性能优化点3. 代码风格问题代码: {code} 请用中文回答,格式:每个问题独立列出,标注严重程度(高/中/低)。
在代码里使用模板
1
2
3
4
5
6
7
8
9
10
11
12
13
14
15
16
17
18
19
20
21
22
23
24
25
26
27
28
29
30
31
32
33
34
35
package com.jichi.springai.service;import org.springframework.ai.chat.client.ChatClient;import org.springframework.ai.chat.prompt.Prompt;import org.springframework.ai.chat.prompt.PromptTemplate;import org.springframework.core.io.ClassPathResource;import org.springframework.stereotype.Service;import java.util.Map;@Service public class CodeReviewService { private final ChatClient chatClient; public CodeReviewService (ChatClient.Builder builder) { this .chatClient = builder.build(); } public String review (String language, String code) { PromptTemplate template = new PromptTemplate ( new ClassPathResource ("prompts/code-review.st" ) ); Prompt prompt = template.create(Map.of( "language" , language, "years" , "10" , "code" , code )); return chatClient.prompt(prompt) .call() .content(); } }
Controller 调用:
1
2
3
4
5
6
7
8
9
10
11
12
13
14
15
16
17
18
19
20
21
22
23
24
25
26
package com.jichi.springai.controller;import com.jichi.springai.service.CodeReviewService;import org.springframework.web.bind.annotation .PostMapping;import org.springframework.web.bind.annotation .RequestMapping;import org.springframework.web.bind.annotation .RequestParam;import org.springframework.web.bind.annotation .RestController;@RestController @RequestMapping("/template" ) public class TemplateCodeReviewController { private final CodeReviewService codeReviewService; public TemplateCodeReviewController(CodeReviewService codeReviewService) { this .codeReviewService = codeReviewService; } @PostMapping("/review" ) public String review( @RequestParam(defaultValue = "Java" ) String language, @RequestParam String code ) { return codeReviewService.review(language, code); } }
直接在代码里用模板字符串
1
2
3
4
5
6
7
8
9
10
11
12
13
14
15
16
17
18
19
20
21
22
23
24
25
26
27
28
29
30
31
32
33
34
package com.jichi.springai.service;import org.springframework.ai.chat.client.ChatClient;import org.springframework.ai.chat.prompt.Prompt;import org.springframework.ai.chat.prompt.PromptTemplate;import org.springframework.stereotype.Service;import java.util.Map;@Service public class TranslateService { private final ChatClient chatClient; public TranslateService (ChatClient.Builder builder) { this .chatClient = builder.build(); } public String translate (String text, String targetLanguage) { PromptTemplate template = new PromptTemplate (""" 请将下面这段文字翻译成 {targetLanguage}, 保持原文的语气和风格,不要意译: {text} """ ); Prompt prompt = template.create(Map.of( "targetLanguage" , targetLanguage, "text" , text )); return chatClient.prompt(prompt).call().content(); } }
Controller 调用:
1
2
3
4
5
6
7
8
9
10
11
12
13
14
15
16
17
18
19
20
21
22
23
24
25
26
package com.jichi.springai.controller;import com.jichi.springai.service.TranslateService;import org.springframework.web.bind.annotation .GetMapping;import org.springframework.web.bind.annotation .RequestMapping;import org.springframework.web.bind.annotation .RequestParam;import org.springframework.web.bind.annotation .RestController;@RestController @RequestMapping("/translate" ) public class TranslateController { private final TranslateService translateService; public TranslateController(TranslateService translateService) { this .translateService = translateService; } @GetMapping public String translate( @RequestParam String text, @RequestParam(defaultValue = "英文" ) String targetLanguage ) { return translateService.translate(text, targetLanguage); } }
ChatClient 的内联模板变量
上节提ChatClient 的 .system() 和 .user() 都支持模板变量,不需要单独创建 PromptTemplate:
1
2
3
4
5
6
7
8
9
10
11
12
13
14
15
16
17
18
19
20
21
22
23
24
25
package com.jichi.springai.service; import org.springframework.ai.chat.client.ChatClient;import org.springframework.stereotype.Service;@Service public class InlineTemplateService { private final ChatClient chatClient; public InlineTemplateService (ChatClient.Builder builder) this .chatClient = builder.build (); } public String ask (String role, String domain, String concept ) return chatClient.prompt () .system (s -> s.text ("你是一个 {role},擅长 {domain} 领域的问题。" ) .param ("role" , role) .param ("domain" , domain)) .user (u -> u.text ("请解释 {concept} 的工作原理" ) .param ("concept" , concept )) .call () .content (); } }
Controller 调用:
1
2
3
4
5
6
7
8
9
10
11
12
13
14
15
16
17
18
19
20
21
22
23
24
25
26
27
package com.jichi.springai.controller;import com.jichi.springai.service.InlineTemplateService;import org.springframework.web.bind.annotation .GetMapping;import org.springframework.web.bind.annotation .RequestMapping;import org.springframework.web.bind.annotation .RequestParam;import org.springframework.web.bind.annotation .RestController;@RestController @RequestMapping("/inline" ) public class InlineTemplateController { private final InlineTemplateService inlineTemplateService; public InlineTemplateController(InlineTemplateService inlineTemplateService) { this .inlineTemplateService = inlineTemplateService; } @GetMapping("/ask" ) public String ask( @RequestParam String role, @RequestParam String domain, @RequestParam String concept ) { return inlineTemplateService.ask(role, domain, concept); } }
调用示例:
1
2
3
4
5
6
7
8
9
10
11
12
13
14
GET /inline /ask?role =资深 Java 工程师&domain =JVM&concept=垃圾回收响应(System Prompt 里的 role 和 domain 已替换): 我是一位资深 Java 工程师,擅长 JVM 领域。 垃圾回收(Garbage Collection)的工作原理如下: JVM 通过可达性分析算法判断对象是否存活——从 GC Roots 出发, 能被引用链到达的对象为存活对象,否则判定为垃圾。 主要回收器及工作方式: - **Serial GC**:单线程,Stop-The-World,适合小内存单核场景 - **G1 GC**(JDK 9 + 默认):将堆划分为等大的 Region,优先回收垃圾最多的区域 - **ZGC**:低延迟,停顿时间 < 1 ms,适合大堆生产环境
1
2
注意 `.system()` 和 `.user()` 里的占位符要分别通过各自的 `.param()` 传值。如果占位符没有对应的 param,Spring AI 不会报错,而是原样保留 `{variable}` 字符串发给模型,这种情况要小心排查。
4.几个实用技巧
1.直接说"回答简洁"效果不如:
1
2
你是一个忙碌的技术顾问,时间有限,每个问题只给出最核心的 1-3 个点, 不展开解释,有需要的用户会追问。
2.对于需要推理的任务,加一句:
1 在给出最终答案之前,先在心里分析一下问题的关键点,然后再输出。
3.对于知识库问答类场景,一定要加:
1
2
3
如果你不确定答案,或者问题超出了你的知识范围, 直接说"我不确定" 或"这个问题我没有足够的信息回答" , 不要编造答案。
4.Prompt 版本管理
Prompt 也是代码,也需要版本管理。建议:
所有 Prompt 放在 src/main/resources/prompts/ 目录下
用有意义的文件名,比如 customer-service.st、code-review.st
重要的 Prompt 变更写进 Git commit message
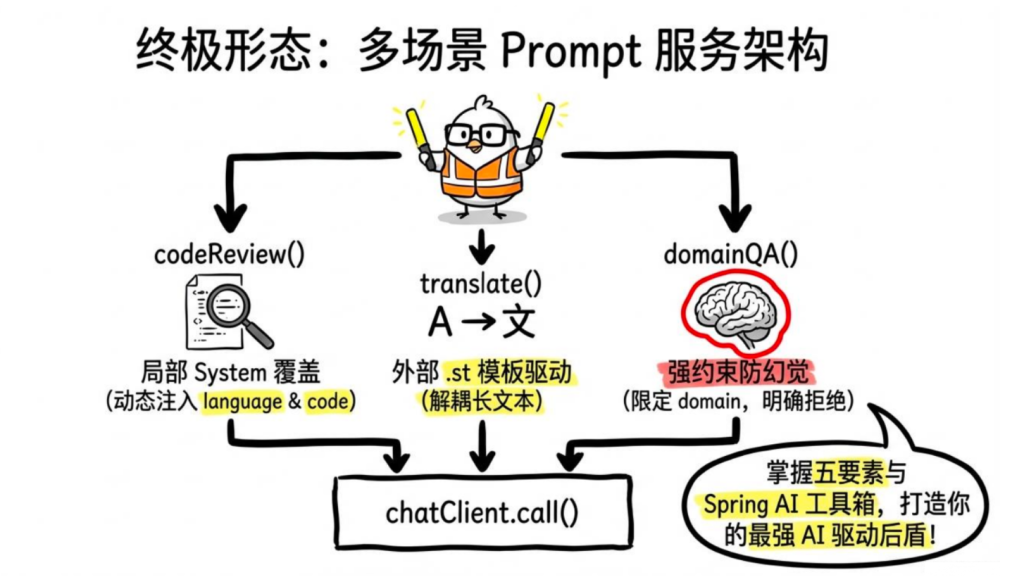
5.完整示例:多场景 Prompt 服务
Service 层:
1
2
3
4
5
6
7
8
9
10
11
12
13
14
15
16
17
18
19
20
21
22
23
24
25
26
27
28
29
30
31
32
33
34
35
36
37
38
39
40
41
42
43
44
45
46
47
48
49
50
51
52
53
54
55
56
57
58
59
60
61
62
63
64
65
66
67
68
69
70
package com.jichi.springai.service;import org.springframework.ai.chat.client.ChatClient;import org.springframework.ai.chat.prompt.Prompt;import org.springframework.ai.chat.prompt.PromptTemplate;import org.springframework.stereotype.Service;import java.util.Map;@Service public class PromptDemoService { private final ChatClient chatClient; public PromptDemoService(ChatClient.Builder builder) { this .chatClient = builder.build(); } public String codeReview(String language, String code) { return chatClient.prompt() .system(s -> s.text(""" 你是一个资深 {language} 工程师,做 code review。 找出 Bug、性能问题、代码风格问题,每个问题注明严重程度(高/中/低)。 """ ) .param("language" , language)) .user(u -> u.text("请 review 这段代码:\n```\n{code}\n ```" ) .param("code" , code)) .call() .content(); } public String translate(String text, String targetLanguage) { PromptTemplate template = new PromptTemplate(""" 将下面的文字翻译成 {targetLanguage},保持原文语气,不要意译: {text} """ ); Prompt prompt = template.create(Map.of ( "targetLanguage" , targetLanguage, "text" , text )); return chatClient.prompt(prompt) .call() .content(); } public String domainQA(String domain, String question) { return chatClient.prompt() .system(s -> s.text(""" 你是一个 {domain} 领域的专家顾问。 只回答和 {domain} 相关的问题,其他问题拒绝回答。 不确定的内容要明确说明,不要编造。 """ ) .param("domain" , domain)) .user(question) .call() .content(); } }
Controller 层:
1
2
3
4
5
6
7
8
9
10
11
12
13
14
15
16
17
18
19
20
21
22
23
24
25
26
27
28
29
30
31
32
33
34
35
36
37
38
39
40
41
42
package com.jichi.springai.controller;import com.jichi.springai.service.PromptDemoService;import org.springframework.web.bind.annotation .GetMapping;import org.springframework.web.bind.annotation .RequestMapping;import org.springframework.web.bind.annotation .RequestParam;import org.springframework.web.bind.annotation .RestController;@RestController @RequestMapping("/multi-scene" ) public class MultiScenePromptController { private final PromptDemoService promptDemoService; public MultiScenePromptController(PromptDemoService promptDemoService) { this .promptDemoService = promptDemoService; } @GetMapping("/review" ) public String review( @RequestParam(defaultValue = "Java" ) String language, @RequestParam String code ) { return promptDemoService.codeReview(language, code); } @GetMapping("/translate" ) public String translate( @RequestParam String text, @RequestParam(defaultValue = "英文" ) String targetLanguage ) { return promptDemoService.translate(text, targetLanguage); } @GetMapping("/qa" ) public String qa( @RequestParam String domain, @RequestParam String question ) { return promptDemoService.domainQA(domain, question); } }
五.结构化输出
默认情况下,模型返回的是纯文本。但在实际开发里,你经常需要的不是一段话,而是一个结构化的数据——比如从简历里提取姓名、技能、工作经历,或者让模型分析一篇文章并输出分类标签和摘要。
这些场景你可以让模型返回 JSON,然后自己解析,但这很麻烦,而且模型不一定每次都输出格式完全正确的 JSON。Spring AI 的结构化输出功能把这些都封装好了。
1.结构化输出的原理
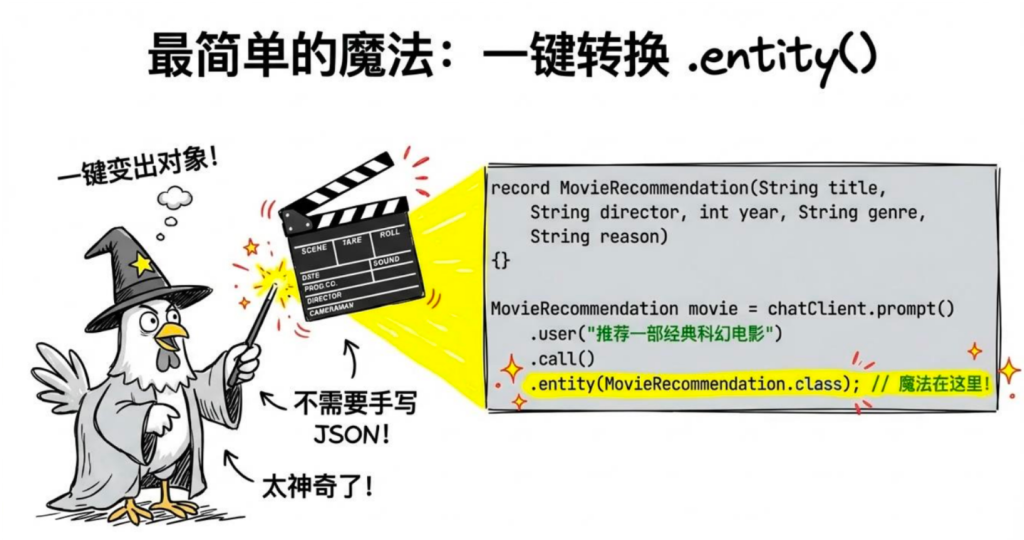
2.最简单的用法:.entity()
调用示例:
1
2
3
4
5
6
7
8
9
10
GET /movie/recommend响应: { "title" : "星际穿越" , "director" : "克里斯托弗·诺兰" , "year" : 2014, "genre" : "科幻" , "reason" : "通过引力与时间的宏大设定,探讨了人类对未知的探索精神和亲情的力量" }
3.返回 List
1
2
3
4
5
6
7
8
9
10
11
12
13
14
15
16
17
18
19
20
@RestController @RequestMapping ("/book" )public class BookController record BookSummary(String title, String author, String oneLinerSummary) {} private final ChatClient chatClient; public BookController(ChatClient.Builder builder) { this .chatClient = builder.build(); } @GetMapping ("/list" ) public List<BookSummary> list() { return chatClient.prompt() .user("列出 5 本经典的 Java 技术书籍" ) .call() .entity(new } }
调用示例:
1
2
3
4
5
6
7
8
GET /book/list 响应: [ {"title" : "Effective Java" , "author" : "Joshua Bloch" , "oneLinerSummary" : "Java 最佳实践圣经" }, {"title" : "深入理解Java虚拟机" , "author" : "周志明" , "oneLinerSummary" : "JVM 原理与调优必读" }, ... ]
注意这里用的是 ParameterizedTypeReference,因为 Java 泛型在运行时会被擦除,List<BookSummary>.class 写不出来,要用这个方式传递带泛型的类型信息。
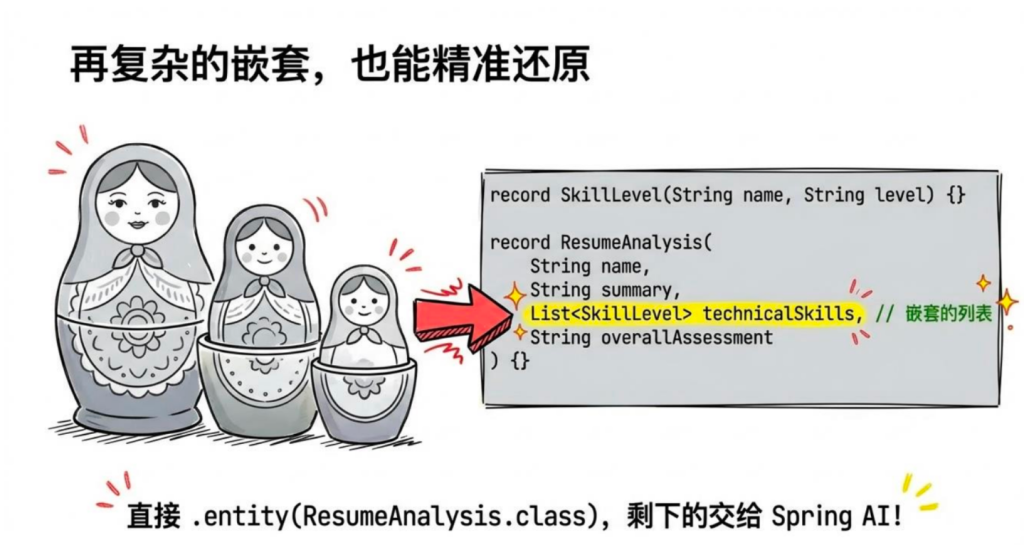
4.复杂嵌套对象
1
2
3
4
5
6
7
8
9
10
11
12
13
14
15
16
17
18
19
20
21
22
23
24
25
26
27
28
29
30
31
32
@RestController @RequestMapping ("/resume" ) public class ResumeController { record SkillLevel (String name, String level) {} record ResumeAnalysis ( String name, String email, String summary, List<SkillLevel> technicalSkills, List<String > workHistory, String overallAssessment ) record ResumeRequest (String content) {} private final ChatClient chatClient; public ResumeController (ChatClient.Builder builder) this .chatClient = builder.build (); } @PostMapping ("/analyze" ) public ResumeAnalysis analyze (@RequestBody ResumeRequest request) return chatClient.prompt () .system ("你是一个专业的HR,帮助分析候选人简历。字段为空时填null,技能等级只能是:入门/熟练/精通。" ) .user ("分析这份简历:\n" + request.content ()) .call () .entity (ResumeAnalysis.class ); } }
调用示例:
1
2
3
4
5
6
7
8
9
10
11
12
13
14
15
16
17
18
19
20
21
POST /resume/analyze Content-Type: application/json { "content" : "张三,邮箱 zhangsan@example.com\n 5年Java开发经验,熟练使用Spring Boot、MyBatis\n 精通JVM调优,了解Kubernetes\n 曾就职于阿里巴巴、字节跳动" } 响应: { "name" : "张三" , "email" : "zhangsan@example.com" , "summary" : "5年Java后端开发经验,技术栈扎实,有大厂背景" , "technicalSkills" : [ {"name" : "Spring Boot" , "level" : "熟练" }, {"name" : "MyBatis" , "level" : "熟练" }, {"name" : "JVM调优" , "level" : "精通" }, {"name" : "Kubernetes" , "level" : "入门" } ], "workHistory" : ["阿里巴巴" , "字节跳动" ], "overallAssessment" : "候选人技术基础扎实,大厂经历丰富,适合中高级Java工程师岗位" }
5.用 @JsonProperty 和 @JsonDescription 加描述
有时候字段名不够直观,模型可能不知道你想要什么。可以用注解加描述:
1
2
3
4
5
6
7
8
9
10
11
12
13
14
15
16
17
18
19
20
21
22
23
24
25
26
27
28
29
30
31
32
33
34
35
36
37
38
39
40
41
42
@RestController @RequestMapping("/review" ) public class ProductReviewController { record ProductReview( @JsonProperty("product_name" ) @JsonPropertyDescription("商品名称,从评论中提取" ) String productName, @JsonProperty("sentiment" ) @JsonPropertyDescription("情感倾向:POSITIVE(正面)、NEGATIVE(负面)、NEUTRAL(中性)" ) String sentiment, @JsonProperty("score" ) @JsonPropertyDescription("评分,1-5分,根据评论语气推断" ) int score, @JsonProperty("key_points" ) @JsonPropertyDescription("评论中提到的关键点,最多3条" ) List<String> keyPoints, @JsonProperty("improvement_suggestions" ) @JsonPropertyDescription("改进建议,如果没有则为空列表" ) List<String> improvementSuggestions ) {} record ReviewRequest(String content) {} private final ChatClient chatClient; public ProductReviewController(ChatClient.Builder builder) { this .chatClient = builder.build(); } @PostMapping("/analyze" ) public ProductReview analyze(@RequestBody ReviewRequest request) { return chatClient.prompt() .user("分析这条商品评论:" + request.content()) .call() .entity(ProductReview.class ); } }
调用示例:
1
2
3
4
5
6
7
8
9
10
11
12
13
POST /review/analyze Content -Type: application/json{"content ": "这款耳机音质不错,低音有力,佩戴也舒适,但续航有点差,充电半天用两小时,价格偏贵。" } 响应: { "product_name": "耳机" , "sentiment" : "NEUTRAL" , "score" : 3 , "key_points" : ["音质不错,低音有力" , "佩戴舒适" , "续航差,充电半天用两小时" ], "improvement_suggestions" : ["提升续航时间" , "调整定价策略" ] }
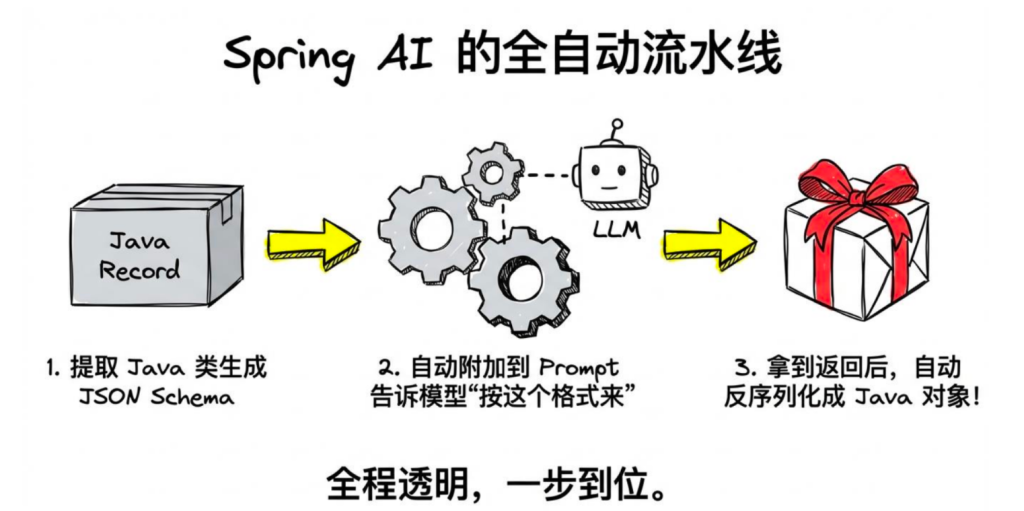
6.BeanOutputConverter:手动控制(进阶)
.entity() 底层是用 BeanOutputConverter 实现的。如果你需要更细粒度的控制,可以直接用它:
1
2
3
4
5
6
7
8
9
10
11
12
13
14
15
16
17
18
19
20
21
22
23
24
25
26
27
28
29
30
31
32
33
34
35
36
37
38
39
40
41
42
43
44
45
46
@RestController @RequestMapping("/converter") public class ConverterDemoController { record SkillLevel(String name , String level ) {} record ResumeAnalysis( String name , String email, String summary , List<SkillLevel> technicalSkills, List<String> workHistory, String overallAssessment ) {} record ResumeRequest(String content) {} private final ChatClient chatClient; public ConverterDemoController(ChatClient.Builder builder) { this.chatClient = builder.build(); } @PostMapping("/analyze") public ResumeAnalysis analyze (@RequestBody ResumeRequest request) { BeanOutputConverter<ResumeAnalysis> converter = new BeanOutputConverter<>(ResumeAnalysis.class ); // 查看自动生成的 JSON Schema (开发调试时可以打印出来看) // System .out .println(converter.getFormat()); String prompt = """ 分析这份简历,按照以下 JSON 格式输出: %s 简历内容:%s """.formatted(converter.getFormat(), request.content()); String jsonResponse = chatClient.prompt() .user (prompt) .call () .content(); return converter.convert(jsonResponse); } }
converter.getFormat() 返回的是注入给模型的指令,类似:
1
2
3
4
5
6
7
8
9
10
Respond with a JSON object that conforms to the following JSON Schema: { "type" : "object" , "properties" : { "name" : {"type" : "string" }, "email" : {"type" : "string" }, ... } } Do not include any explanations, only provide a RFC8259 compliant JSON response.
7.枚举类型
如果某个字段只能是有限个值,用枚举:
1
2
3
4
5
6
7
8
9
10
11
12
13
14
15
16
17
18
19
20
21
22
23
24
25
26
27
28
29
30
31
32
33
@RestController @RequestMapping ("/issue" ) public class IssueController { enum Priority { LOW , MEDIUM, HIGH , CRITICAL } enum Category { BUG, FEATURE, IMPROVEMENT, DOCUMENTATION } record IssueClassification ( String title, Category category, Priority priority, String assignTo, String reason ) record IssueRequest (String description) {} private final ChatClient chatClient; public IssueController (ChatClient.Builder builder) this .chatClient = builder.build (); } @PostMapping ("/classify" ) public IssueClassification classify (@RequestBody IssueRequest request) return chatClient.prompt () .system ("你是项目经理,负责对 Issue 进行分类和优先级评估。" ) .user ("请对这个 Issue 进行分类:" + request.description ()) .call () .entity (IssueClassification.class ); } }
调用示例:
1
2
3
4
5
6
7
8
9
10
11
12
13
POST /issue/classify Content-Type: application/json {"description" : "登录页面在 Safari 浏览器上白屏,用户无法登录" } 响应: { "title" : "Safari浏览器登录页白屏问题" , "category" : "BUG" , "priority" : "HIGH" , "assignTo" : "前端团队" , "reason" : "影响用户正常登录,属于核心功能故障,需优先修复" }
8.实战:文章分析 API
把这节内容综合起来,写一个实用的文章分析接口:
1
2
3
4
5
6
7
8
9
10
11
12
13
14
15
16
17
18
19
20
21
22
23
24
25
26
27
28
29
30
31
32
33
34
35
36
37
38
39
40
41
42
43
44
45
46
47
48
49
50
51
52
53
54
55
56
57
58
59
60
61
62
63
@RestController @RequestMapping("/api/article" ) public class ArticleAnalysisController { private final ChatClient chatClient; public ArticleAnalysisController(ChatClient.Builder builder) { this .chatClient = builder .defaultSystem(""" 你是一个专业的文章分析助手。 分析准确,不要添加原文没有的内容。 """ ) .build(); } record ArticleAnalysis( @JsonPropertyDescription("文章标题,如果没有则根据内容生成" ) String title, @JsonPropertyDescription("文章类型:NEWS/OPINION/TUTORIAL/RESEARCH/OTHER" ) String type, @JsonPropertyDescription("100字以内的摘要" ) String summary, @JsonPropertyDescription("关键词列表,最多5个" ) List<String> keywords, @JsonPropertyDescription("文章的主要观点,最多3条" ) List<String> mainPoints, @JsonPropertyDescription("情感倾向:POSITIVE/NEGATIVE/NEUTRAL" ) String sentiment, @JsonPropertyDescription("可读性评分,1-10分,10分最易读" ) int readabilityScore ) {} @PostMapping("/analyze" ) public ArticleAnalysis analyze(@RequestBody ArticleRequest request) { return chatClient.prompt() .user("请分析以下文章:\n\n" + request.content()) .call() .entity(ArticleAnalysis.class ); } @PostMapping("/keywords" ) public List<String> extractKeywords(@RequestBody ArticleRequest request) { return chatClient.prompt() .user("从以下文章中提取5个最重要的关键词:\n\n" + request.content()) .call() .entity(new ParameterizedTypeReference<List<String>>() {}); } record ArticleRequest(String content) {} }
六.多轮对话与ChatMemory
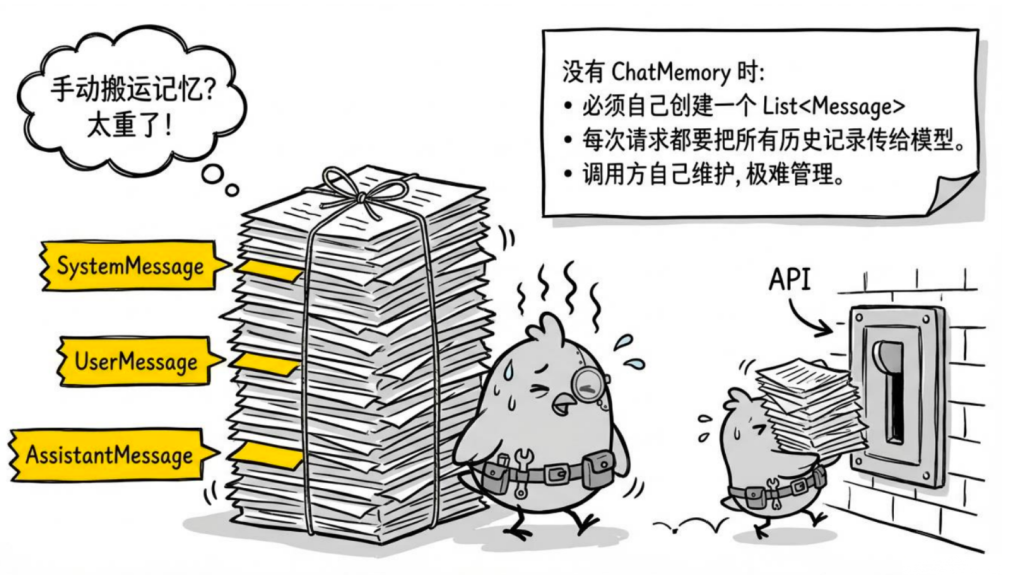
先看看不用 ChatMemory,手动实现多轮对话是什么样的
1
2
3
4
5
6
7
8
9
10
11
12
13
14
15
16
17
18
19
20
21
22
23
24
25
26
27
28
29
30
31
32
33
34
35
36
37
38
@RestController @RequestMapping ("/manual-chat" )public class ManualChatController private final ChatClient chatClient; private final Map<String , List<Message>> sessions = new public ManualChatController(ChatClient.Builder builder) { this .chatClient = builder.build(); } @PostMapping public String chat(@RequestBody ChatRequest request) { List<Message> history = sessions.computeIfAbsent(request.conversationId(), id -> { List<Message> list = new list.add(new "你是一个 Java 技术助手" )); return list; }); history.add(new String reply = chatClient.prompt() .messages(history) .call() .content(); history.add(new return reply; } record ChatRequest(String conversationId, String message) {} }
能实现,但有几个问题:
历史列表需要调用方自己维护 ,接口是无状态的,每次请求都要传 history上下文窗口有限 ,对话一长,总 Token 数超出限制就会报错没有持久化 ,服务重启历史就丢了
ChatMemory 解决的就是这些问题。
1.ChatMemory 基础用法
Spring AI 内置了基于 Advisor 的 ChatMemory 支持。
最简单的内存版本
1
2
3
4
5
6
7
8
9
10
11
12
13
14
15
16
17
18
19
20
21
22
23
24
25
26
27
28
29
30
31
32
33
@RestController @RequestMapping("/memory-chat" ) public class MemoryChatController { private final ChatClient chatClient; private final MessageWindowChatMemory chatMemory; public MemoryChatController(ChatClient.Builder builder) { this .chatMemory = MessageWindowChatMemory.builder().maxMessages(10 ).build(); this .chatClient = builder .defaultSystem("你是一个 Java 技术助手" ) .build(); } @GetMapping public String chat( @RequestParam String message, @RequestParam(defaultValue = "default" ) String conversationId) { return chatClient.prompt() .user(message) .advisors(MessageChatMemoryAdvisor.builder(chatMemory) .conversationId(conversationId) .build()) .call() .content(); } }
1 2 3 4 5 6 7 8 9 10 11 curl "http://localhost:8080/api/chat?message=我叫鸡哥&conversationId=user123" curl "http://localhost:8080/api/chat?message=你还记得我叫什么吗&conversationId=user123" curl "http://localhost:8080/api/chat?message=你还记得我叫什么吗&conversationId=user456"
2.控制保留的消息数量
默认保留最近 10 条消息,可以自定义:
1
2
3
4
5
6
7
8
9
10
11
12
13
14
15
16
17
18
19
20
21
22
23
24
25
26
27
28
29
30
@RestController @RequestMapping("/long-chat" ) public class LongChatController { private final ChatClient chatClient; private final MessageWindowChatMemory chatMemory; public LongChatController(ChatClient.Builder builder) { this .chatMemory = MessageWindowChatMemory.builder().maxMessages(20 ).build(); this .chatClient = builder .defaultSystem("你是一个 Java 技术助手" ) .build(); } @GetMapping public String chat( @RequestParam String message, @RequestParam(defaultValue = "default" ) String conversationId ) { return chatClient.prompt() .user(message) .advisors(MessageChatMemoryAdvisor.builder(chatMemory) .conversationId(conversationId) .build()) .call() .content(); } }
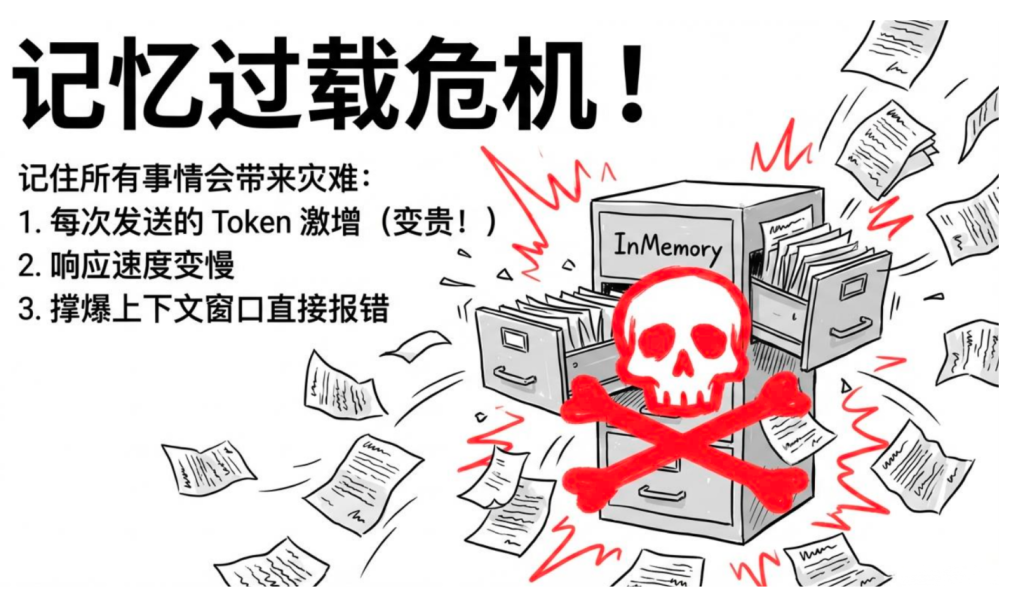
一般客服/聊天场景保留 10-20 条够用;如果是长文档处理,需要配合 RAG 或用长上下文模型。
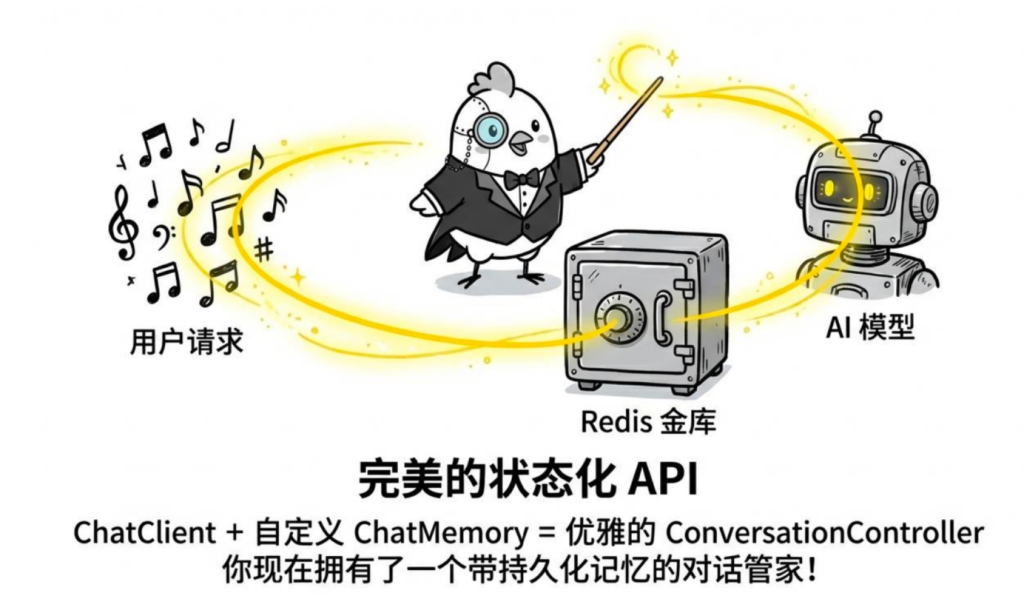
3.持久化存储(生产环境必备)
MessageWindowChatMemory 只在内存里,服务一重启历史就没了,生产环境不能用。
Spring AI 1.1.x 把存储层和裁剪逻辑拆成了两层:
ChatMemoryRepository:纯存储接口,只管读写全量消息,不做任何裁剪。MessageWindowChatMemory:包装 Repository,对外暴露 ChatMemory,负责按条数裁剪窗口。
要做 Redis 持久化,只需实现 ChatMemoryRepository,然后用 MessageWindowChatMemory 包一层就好:
添加依赖
pom.xml 里加入 Redis 的 starter:
1 2 3 4 5 <dependency > <groupId > org.springframework.boot</groupId > <artifactId > spring-boot-starter-data-redis</artifactId > </dependency >
配置 Redis 连接
application.yml 里加上:
1
2
3
4
5
6
7
spring: data: redis: host: localhost port: 6379 database: 0
或者本地开发可以用 Docker 快速启动一个 Redis:
1 docker run -d --name redis -p 6379 :6379 redis:7
自定义 Redis ChatMemory
1 2 3 4 5 6 7 8 9 10 11 12 13 14 15 16 17 18 19 20 21 22 23 24 25 26 27 28 29 30 31 32 33 34 35 36 37 38 39 40 41 42 43 44 45 46 47 48 49 50 51 52 53 54 55 56 57 58 59 60 61 62 63 64 65 66 67 68 69 70 71 72 73 74 75 public class RedisChatMemoryRepository implements ChatMemoryRepository { private static final String KEY_PREFIX = "chat:memory:" ; private static final int TTL_DAYS = 7 ; private final StringRedisTemplate redisTemplate; private final ObjectMapper objectMapper; public RedisChatMemoryRepository (StringRedisTemplate redisTemplate, ObjectMapper objectMapper) { this .redisTemplate = redisTemplate; this .objectMapper = objectMapper; } @Override public void saveAll (String conversationId, List<Message> messages) { String key = KEY_PREFIX + conversationId; redisTemplate.delete(key); for (Message message : messages) { try { MessageRecord record = new MessageRecord ( message.getMessageType().name(), message.getText() ); redisTemplate.opsForList().rightPush(key, objectMapper.writeValueAsString(record)); } catch (Exception e) { throw new RuntimeException ("存储消息失败" , e); } } redisTemplate.expire(key, TTL_DAYS, TimeUnit.DAYS); } @Override public List<Message> findByConversationId (String conversationId) { String key = KEY_PREFIX + conversationId; List<String> rawMessages = redisTemplate.opsForList().range(key, 0 , -1 ); if (rawMessages == null ) return new ArrayList <>(); List<Message> messages = new ArrayList <>(); for (String raw : rawMessages) { try { MessageRecord record = objectMapper.readValue(raw, MessageRecord.class); if ("USER" .equals(record.role())) { messages.add(new UserMessage (record.content())); } else if ("ASSISTANT" .equals(record.role())) { messages.add(new AssistantMessage (record.content())); } } catch (Exception ignored) {} } return messages; } @Override public void deleteByConversationId (String conversationId) { redisTemplate.delete(KEY_PREFIX + conversationId); } @Override public List<String> findConversationIds () { Set<String> keys = redisTemplate.keys(KEY_PREFIX + "*" ); if (keys == null ) return new ArrayList <>(); return keys.stream() .map(key -> key.substring(KEY_PREFIX.length())) .toList(); } record MessageRecord (String role, String content) {} }
注册为 Bean:用 RedisChatMemoryRepository 作为底层存储,外面包一层 MessageWindowChatMemory 对外暴露 ChatMemory:
1
2
3
4
5
6
7
8
9
10
11
12
13
@Configuration public class ChatMemoryConfig { @Bean public ChatMemory chatMemory (StringRedisTemplate redisTemplate, ObjectMapper objectMapper) { RedisChatMemoryRepository repository = new RedisChatMemoryRepository (redisTemplate, objectMapper); return MessageWindowChatMemory.builder() .chatMemoryRepository(repository) .maxMessages(20 ) .build(); } }
Bean 注册好之后,Controller 直接注入 ChatMemory 使用,代码和内存版完全一样,只是底层换成了 Redis:
1
2
3
4
5
6
7
8
9
10
11
12
13
14
15
16
17
18
19
20
21
22
23
24
25
26
27
28
@RestController @RequestMapping("/redis-chat" ) public class RedisChatController { private final ChatClient chatClient; private final ChatMemory chatMemory; public RedisChatController(ChatClient.Builder builder, ChatMemory chatMemory) { this .chatMemory = chatMemory; this .chatClient = builder .defaultSystem("你是一个 Java 技术助手" ) .build(); } @GetMapping public String chat( @RequestParam String message, @RequestParam(defaultValue = "default" ) String conversationId) { return chatClient.prompt() .user(message) .advisors(MessageChatMemoryAdvisor.builder(chatMemory) .conversationId(conversationId) .build()) .call() .content(); } }
测试效果:服务重启后历史依然保留(数据存在 Redis 里)
1 2 3 4 5 6 curl "http://localhost:8080/redis-chat?message=我叫鸡哥&conversationId=user123" curl "http://localhost:8080/redis-chat?message=你还记得我叫什么吗&conversationId=user123"
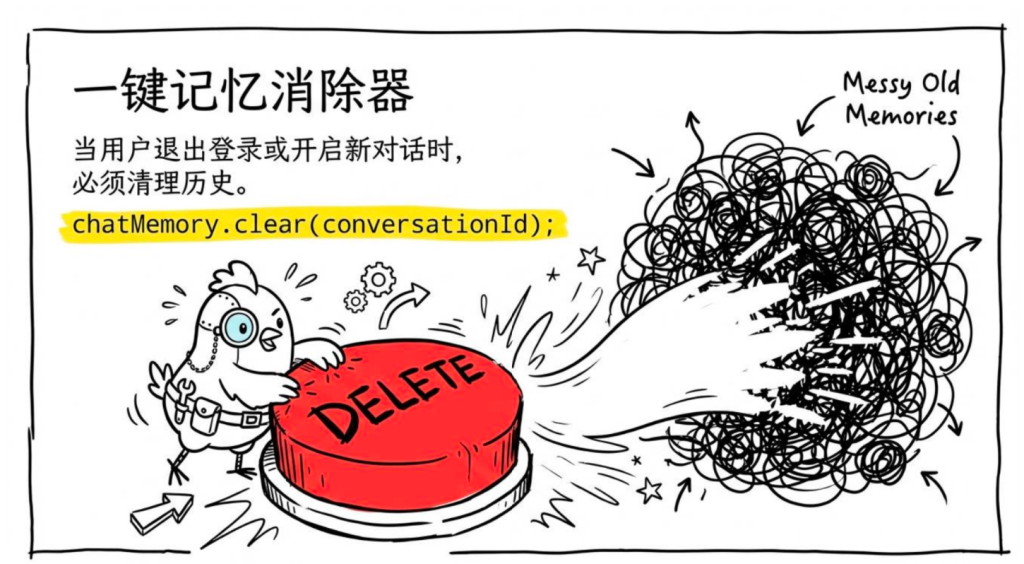
4.会话管理:清除历史
用户退出登录、开启新对话时,需要清除历史:
1
2
3
4
5
6
7
8
9
10
11
12
13
14
15
@RestController @RequestMapping("/session" ) public class SessionController { private final ChatMemory chatMemory; public SessionController(ChatMemory chatMemory) { this .chatMemory = chatMemory; } @DeleteMapping("/{conversationId}" ) public void clearHistory(@PathVariable String conversationId) { chatMemory.clear(conversationId); } }
5.完整的多轮对话 Controller
1
2
3
4
5
6
7
8
9
10
11
12
13
14
15
16
17
18
19
20
21
22
23
24
25
26
27
28
29
30
31
32
33
34
35
36
37
38
39
40
41
42
43
44
45
@RestController @RequestMapping("/api/conversation") public class ConversationController { private final ChatClient chatClient; private final ChatMemory chatMemory; public ConversationController (ChatClient.Builder builder, ChatMemory chatMemory) { this .chatMemory = chatMemory; this .chatClient = builder .defaultSystem(""" 你是一个智能助手。 记住用户告诉你的所有信息,在后续对话中灵活运用。 回答简洁,除非用户要求详细解释。 """ ) .build(); } @PostMapping("/message") public MessageResponse sendMessage (@RequestBody MessageRequest request) { String reply = chatClient.prompt() .user(request.message()) .advisors(MessageChatMemoryAdvisor.builder(chatMemory) .conversationId(request.conversationId()) .build()) .call() .content(); return new MessageResponse (reply, request.conversationId()); } @DeleteMapping("/{conversationId}") public void clearConversation (@PathVariable String conversationId) { chatMemory.clear(conversationId); } record MessageRequest (String conversationId, String message) {} record MessageResponse (String reply, String conversationId) {} }
6.上下文窗口和 Token 预算
多轮对话最容易踩的坑是Token 超限 。
每个模型都有最大上下文长度限制(比如 DeepSeek-V3 是 128K Token)。历史消息越多,每次请求的 Token 数就越多,超出限制就会报错。
几个策略:
策略一:限制保留消息数 (已介绍,最简单)
策略二:按 Token 数限制 (更精确)
在 ChatMemory.get() 里按 Token 数截断,而不是按条数:
1
2
3
4
5
6
7
8
9
10
11
12
13
14
15
16
17
18
19
20
21
22
23
24
25
26
27
28
29
30
31
32
33
34
35
36
37
38
39
40
41
public class TokenBudgetChatMemory implements ChatMemory { private static final int CHARS_PER_TOKEN = 4 ; private final int maxTokenBudget; private final ConcurrentHashMap<String , List<Message>> store = new ConcurrentHashMap<>(); public TokenBudgetChatMemory (int maxTokenBudget) this .maxTokenBudget = maxTokenBudget; } @Override public void add (String conversationId, List<Message> messages) { store.computeIfAbsent (conversationId, k -> new ArrayList<>()).addAll (messages); } @Override public List<Message> get (String conversationId) { List<Message> all = store.getOrDefault (conversationId, List.of ()); if (all.isEmpty ()) return List.of (); List<Message> result = new ArrayList<>(); int tokenCount = 0 ; for (int i = all.size () - 1 ; i >= 0 ; i--) { int msgTokens = all.get (i).getText ().length () / CHARS_PER_TOKEN; if (tokenCount + msgTokens > maxTokenBudget) break ; result.add (all.get (i)); tokenCount += msgTokens; } Collections.reverse (result); return result; } @Override public void clear (String conversationId) { store.remove (conversationId); } }
使用:
1 2 ChatMemory tokenBudgetMemory = new TokenBudgetChatMemory (2000 );
策略三:摘要压缩 (高级)
定期把历史消息压缩成摘要,用摘要替代原始历史,大幅减少 Token 占用。这个方案比较复杂,适合长期对话场景,后续 Agent 模块会涉及。
七.SSE流式输出
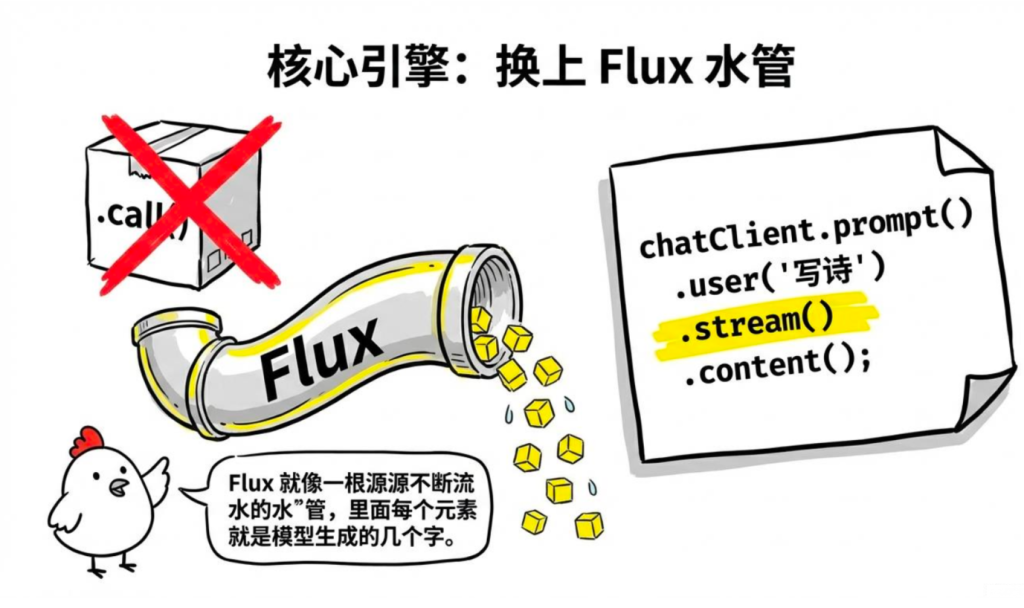
1.Spring AI 流式调用基础
Spring AI 的流式 API 基于 Reactor 的 Flux:
1
2
3
4
5
6
7
8
9
10
11
// 同步String content = chatClient.prompt() .user ("写一首诗") .call () .content () ; // 流式:返回 Flux<String>,每个元素是一小段文字Flux<String> stream = chatClient.prompt() .user ("写一首诗") .stream () .content () ;
Flux<String> 里的每个元素是模型生成的一小片内容(通常是几个字),订阅它就能实时处理每一片。
2、Server-Sent Events(SSE)接入前端
光有后端返回 Flux 还不够,前端得有办法接收这个流。在 Web 场景里,最常见也最省事的方案是 SSE(Server-Sent Events) 。SSE 是 HTTP 里服务器向客户端推送事件的标准方式,浏览器原生支持,不需要 WebSocket,也不需要额外的库。
后端:Spring MVC SSE 接口
1
2
3
4
5
6
7
8
9
10
11
12
13
14
15
16
17
18
19
20
21
22
23
24
@RestController @RequestMapping("/api/stream" ) public class StreamController { private final ChatClient chatClient; public StreamController(ChatClient.Builder builder) { this .chatClient = builder .defaultSystem("你是一个 Java 技术助手,回答详细且有条理。" ) .build(); } @GetMapping(value = "/chat" , produces = MediaType.TEXT_EVENT_STREAM_VALUE) public Flux<String> streamChat(@RequestParam String message) { return chatClient.prompt() .user(message) .stream() .content(); } }
就这几行,SSE 接口就好了。produces = MediaType.TEXT_EVENT_STREAM_VALUE 是关键,让 Spring 以 SSE 格式响应。
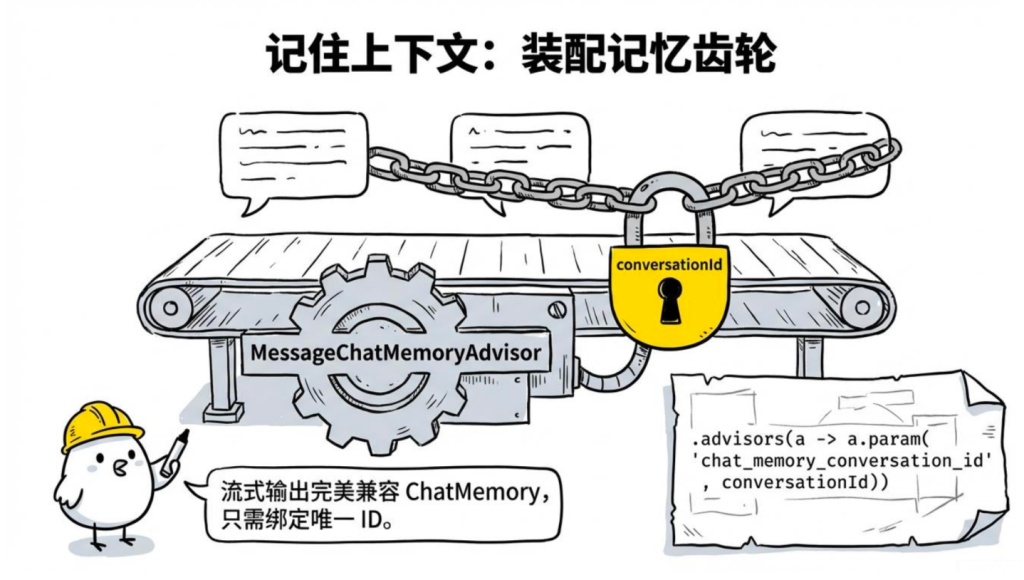
3.带 conversationId 的流式多轮对话
上节课讲过 ChatMemory,流式输出和多轮对话是可以同时用的——加一个 MessageChatMemoryAdvisor 就行,写法上变化不大:
1
2
3
4
5
6
7
8
9
10
11
12
13
14
15
16
17
18
19
20
21
22
23
24
25
26
27
28
29
@RestController @RequestMapping("/api/stream/conversation" ) public class StreamConversationController { private final ChatClient chatClient; private final MessageWindowChatMemory chatMemory; public StreamConversationController(ChatClient.Builder builder) { this .chatMemory = MessageWindowChatMemory.builder().maxMessages(10 ).build(); this .chatClient = builder .defaultSystem("你是一个 Java 技术助手" ) .build(); } @GetMapping(produces = MediaType.TEXT_EVENT_STREAM_VALUE) public Flux<String> streamChat( @RequestParam String message, @RequestParam(defaultValue = "default" ) String conversationId) { return chatClient.prompt() .user(message) .advisors(MessageChatMemoryAdvisor.builder(chatMemory) .conversationId(conversationId) .build()) .stream() .content(); } }
1 2 3 4 5 curl "http://localhost:8080/api/stream/conversation?message=我叫鸡哥&conversationId=user001" curl "http://localhost:8080/api/stream/conversation?message=你还记得我叫什么吗&conversationId=user001"
4.WebFlux 版本(更高性能)
大家如果项目用的是 Spring WebFlux(响应式栈),接口写法略有不同——但其实更简洁,框架对 Flux 的支持是原生的:
pom.xml 换成 WebFlux starter:
1 2 3 4 5 <dependency > <groupId > org.springframework.boot</groupId > <artifactId > spring-boot-starter-webflux</artifactId > </dependency >
Controller 写法(WebFlux 原生支持 Flux 返回):
1
2
3
4
5
6
7
8
9
10
11
12
13
14
15
16
17
18
19
20
21
22
@RestController @RequestMapping("/api/stream" ) public class WebFluxStreamController { private final ChatClient chatClient; public WebFluxStreamController(ChatClient.Builder builder) { this .chatClient = builder.build(); } @GetMapping(produces = MediaType.TEXT_EVENT_STREAM_VALUE) public Flux<String> chat(@RequestParam String message) { return chatClient.prompt() .user(message) .stream() .content() .doOnNext(chunk -> System.out .print(chunk)) .doOnComplete(() -> System.out .println("\n完成" )); } }
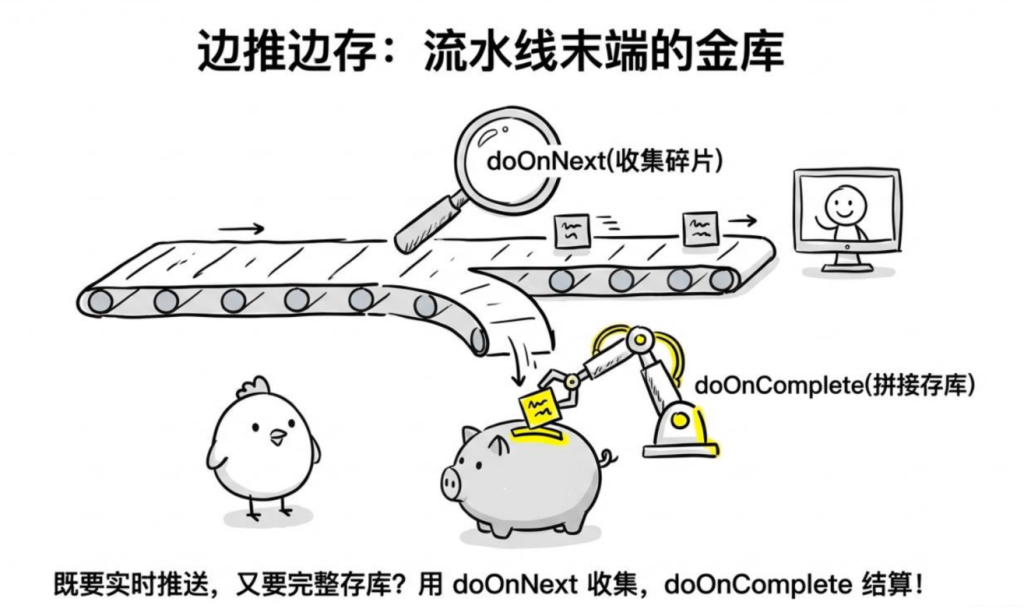
5.流式输出时拿完整响应
有时候大家既想流式推送给前端,又想在服务端收集完整的回复(比如存到数据库)。这俩需求不冲突,doOnNext 和 doOnComplete 是专门干这个的:
1
2
3
4
5
6
7
8
9
10
11
12
13
14
15
16
17
18
19
20
21
22
23
24
25
26
27
28
29
30
31
32
33
34
@RestController @RequestMapping ("/api/stream/save" )public class StreamSaveController { private static final Logger log = LoggerFactory .getLogger (StreamSaveController .class ); private final ChatClient chatClient; public StreamSaveController (ChatClient .Builder builder) { this .chatClient = builder.build (); } @GetMapping (produces = MediaType .TEXT_EVENT_STREAM_VALUE ) public Flux <String > chatAndSave ( @RequestParam String message, @RequestParam (defaultValue = "default" ) String conversationId ) { StringBuilder fullResponse = new StringBuilder (); return chatClient.prompt () .user (message) .stream () .content () .doOnNext (fullResponse ::append) .doOnComplete (() -> saveToDatabase (conversationId, message, fullResponse.toString ())); } private void saveToDatabase (String conversationId, String question, String answer log.info ("保存对话 conversationId={}, answer长度={}" , conversationId, answer.length ()); } }
1 curl "http://localhost:8080/api/stream/save?message=用三句话介绍Spring AI&conversationId=session001"
6.流式输出的错误处理
流式调用还有个地方容易踩坑:报错的时候前端已经开始收到数据了,没法返回 HTTP 400/500 状态码。正确做法是把错误信息也作为一条流数据推过去,然后结束流:
1
2
3
4
5
6
7
8
9
10
11
12
13
14
15
16
17
18
19
20
21
22
23
24
25
26
27
28
29
@RestController @RequestMapping("/api/stream/safe" ) public class StreamSafeController { private static final Logger log = LoggerFactory.getLogger(StreamSafeController.class ); private final ChatClient chatClient; public StreamSafeController(ChatClient.Builder builder) { this .chatClient = builder.build(); } @GetMapping(produces = MediaType.TEXT_EVENT_STREAM_VALUE) public Flux<String> streamChat(@RequestParam String message) { return chatClient.prompt() .user(message) .stream() .content() .timeout(Duration.ofSeconds(30 )) .onErrorResume(TimeoutException.class , e -> Flux.just("[响应超时,请重试]" )) .onErrorResume(e -> { log.error("流式调用出错: {}" , e.getMessage()); return Flux.just("[抱歉,生成过程中出现错误,请稍后重试]" ); }); } }
1 curl "http://localhost:8080/api/stream/safe?message=解释一下JVM内存模型"
7.Spring MVC vs WebFlux——怎么选
大家最后可能会纠结一个问题:到底用 MVC 还是 WebFlux?鸡哥的建议很简单:
场景
推荐
已有 Spring MVC 项目,只是加 AI 功能
Spring MVC + Flux 返回值(本课主要演示这种)
新项目,全异步响应式
Spring WebFlux
需要高并发流式连接(数千个同时)
Spring WebFlux
简单 CRUD + AI 功能
Spring MVC 即可
Spring MVC 也可以返回 Flux,框架会自动处理流式写入,不一定要全切 WebFlux。
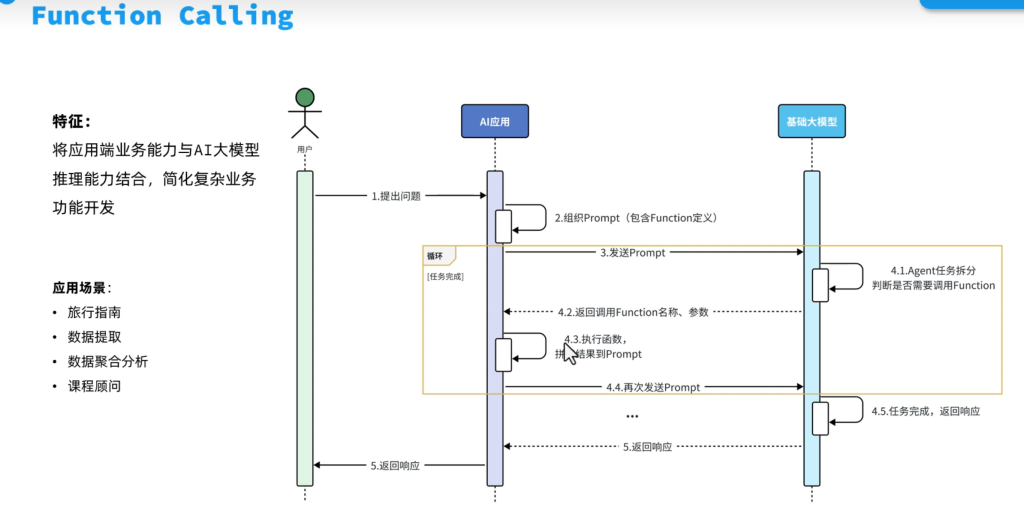
八.Function Calling ——让 AI 调用大家的代码
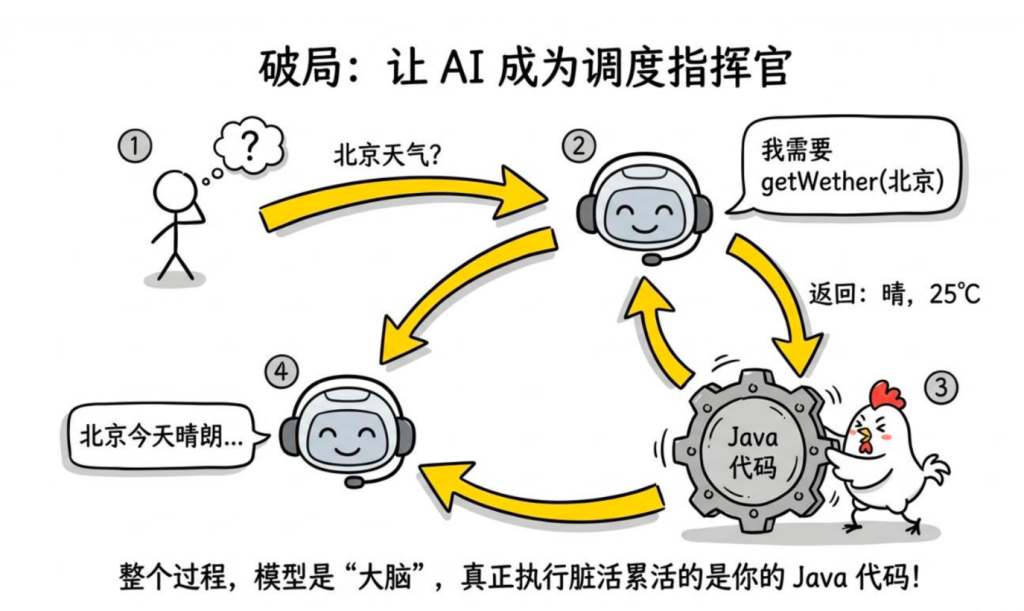
大模型有个根本缺陷:它只有训练截止日期前的知识 ,不知道实时信息,也不能执行操作。它不知道今天的天气,不能查大家的数据库,更不能发邮件。
Function Calling 就是解决这个问题的——把一些函数"告诉"模型,模型在需要的时候说"我需要调用这个函数,参数是这些",大家的代码执行函数拿到结果,再反馈给模型,模型用这个结果来回答用户。
1.工作流程
1
2
3
4
5
6
7
8
用户:今天北京天气怎么样? 模型(内部判断):我需要查天气,调用 getWeather 函数,参数 city =北京 我们的代码:执行 getWeather("北京" ) → 返回 "晴,25°C,北风3级" 模型:根据工具返回的信息,回复用户:"北京今天天气晴朗,气温25°C,北风3级,适合出行。"
整个过程模型是"调度者",真正执行的是大家写的 Java 代码。
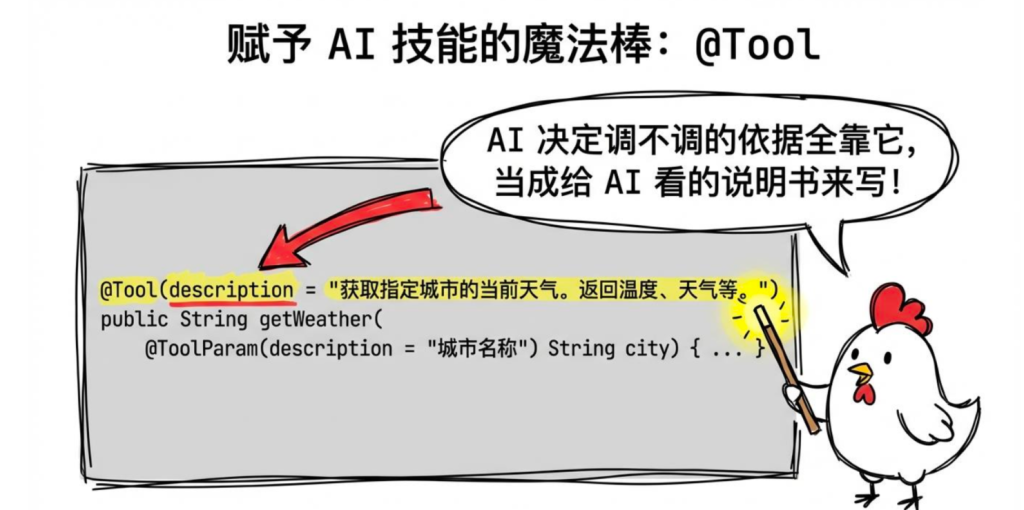
Spring AI 1.1.x 提供了 @Tool 注解,让定义工具函数变得非常简单。
定义工具类
1
2
3
4
5
6
7
8
9
10
11
12
13
14
15
16
17
18
19
20
21
22
23
24
25
26
27
28
29
30
31
32
33
34
35
36
37
@Component public class WeatherTools { /** * @Tool 注解把这个方法标记为 AI 可调用的工具 * description 是给模型看的,告诉模型这个工具做什么用,写清楚一点 */ @Tool(description = "获取指定城市的当前天气。返回温度、天气状况、风力等信息。" ) public String getWeather( @ToolParam(description = "城市名称,例如:北京、上海、广州" ) String city) { // 这里调用真实的天气 API,演示用假数据 return String.format (""" 城市:%s 温度:25°C 天气:晴 风力:北风3级 湿度:45%% 更新时间:%s """ , city, java.time.LocalDateTime.now()); } @Tool(description = "获取未来几天的天气预报" ) public String getWeatherForecast( @ToolParam(description = "城市名称" ) String city, @ToolParam(description = "预报天数,1-7天" ) int days) { // 模拟天气预报数据 StringBuilder sb = new StringBuilder(); sb.append(city).append(" 未来 " ).append(days).append(" 天天气预报:\n" ); String[] weathers = {"晴" , "多云" , "小雨" , "阴" , "大风" }; for (int i = 1 ; i <= days; i++) { sb.append(String.format ("第%d天:%s,20-%d°C\n" , i, weathers[i % weathers.length], 20 + i)); } return sb.toString(); } }
在 ChatClient 里注册工具
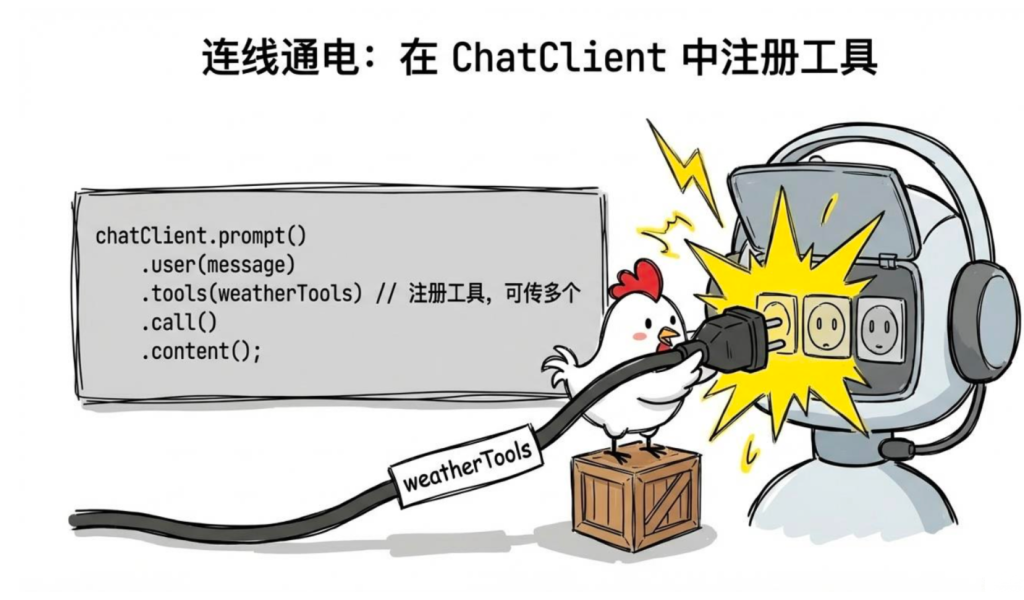
1
2
3
4
5
6
7
8
9
10
11
12
13
14
15
16
17
18
19
20
21
22
23
24
@RestController @RequestMapping("/api/weather" ) public class WeatherChatController { private final ChatClient chatClient; private final WeatherTools weatherTools; public WeatherChatController(ChatClient.Builder builder, WeatherTools weatherTools) { this .weatherTools = weatherTools; this .chatClient = builder .defaultSystem("你是一个天气助手,帮用户查询天气信息。不要编造天气数据,只根据工具返回的信息回答。" ) .build(); } @GetMapping public String chat(@RequestParam String message) { return chatClient.prompt() .user(message) .tools(weatherTools) .call() .content(); } }
1
2
curl "http://localhost:8080/api/weather?message=北京和上海今天天气怎么样" # 模型会自动调用 getWeather("北京" ) 和 getWeather("上海" ),然后综合回答
3.数据库查询工具
天气查询是演示用的,实际项目里更常见的场景是让 AI 能查询大家自己的数据库——比如订单系统、商品库存这类。下面把建表、实体、Repository、工具类完整跑一遍。
依赖(pom.xml)
1 2 3 4 5 6 7 8 9 <dependency > <groupId > org.springframework.boot</groupId > <artifactId > spring-boot-starter-data-jpa</artifactId > </dependency > <dependency > <groupId > com.mysql</groupId > <artifactId > mysql-connector-j</artifactId > <scope > runtime</scope > </dependency >
数据库配置(application.yml)
1
2
3
4
5
6
7
8
9
10
11
12
spring: datasource: url: jdbc:mysql:// localhost:3306 / jc-ai? useUnicode= true &characterEncoding= utf8&serverTimezone= Asia/Shanghai username: root password: your_password driver-class-name: com.mysql.cj.jdbc.Driver jpa: hibernate: ddl-auto: none show-sql: true open-in-view: false database-platform: org.hibernate.dialect.MySQLDialect
建表 SQL
1
2
3
4
5
6
7
8
9
10
11
12
13
14
15
16
17
18
19
20
21
22
23
24
25
26
27
28
29
30
31
32
33
34
35
36
37
38
39
40
41
42
CREATE DATABASE IF NOT EXISTS `jc-ai` DEFAULT CHARACTER SET utf8mb4;USE `jc-ai`; CREATE TABLE `order_info` ( `id` VARCHAR (32 ) NOT NULL COMMENT '订单号,如 ORD202401001' , `user_id` BIGINT NOT NULL COMMENT '用户ID' , `total_amount` DECIMAL (10 ,2 ) NOT NULL COMMENT '订单金额' , `status` VARCHAR (20 ) NOT NULL COMMENT '状态:PENDING/SHIPPED/DELIVERED/CANCELLED' , `tracking_number` VARCHAR (64 ) DEFAULT NULL COMMENT '物流单号' , `estimated_delivery` DATE DEFAULT NULL COMMENT '预计到达日期' , `created_at` DATETIME NOT NULL DEFAULT CURRENT_TIMESTAMP , `updated_at` DATETIME NOT NULL DEFAULT CURRENT_TIMESTAMP ON UPDATE CURRENT_TIMESTAMP , PRIMARY KEY (`id`), KEY `idx_user_id` (`user_id`) ) ENGINE=InnoDB DEFAULT CHARSET=utf8mb4 COMMENT ='订单表' ; CREATE TABLE `product` ( `id` BIGINT NOT NULL AUTO_INCREMENT, `name ` VARCHAR (128 ) NOT NULL COMMENT '商品名称' , `price` DECIMAL (10 ,2 ) NOT NULL COMMENT '价格' , `stock` INT NOT NULL DEFAULT 0 COMMENT '库存' , `rating` DECIMAL (2 ,1 ) NOT NULL DEFAULT 5.0 COMMENT '评分 0-5' , `description` VARCHAR (512 ) DEFAULT NULL COMMENT '商品描述' , `created_at` DATETIME NOT NULL DEFAULT CURRENT_TIMESTAMP , PRIMARY KEY (`id`), FULLTEXT KEY `ft_name_desc` (`name `, `description`) ) ENGINE=InnoDB DEFAULT CHARSET=utf8mb4 COMMENT ='商品表' ; INSERT INTO `order_info` VALUES ('ORD001' , 1001 , 599.00 , 'SHIPPED' , 'SF1234567890' , '2025-03-10' , NOW(), NOW()), ('ORD002' , 1001 , 1299.00 , 'PENDING' , NULL , NULL , NOW(), NOW()), ('ORD003' , 1002 , 299.00 , 'DELIVERED' , 'YT9876543210' , '2025-03-05' , NOW(), NOW()); INSERT INTO `product` VALUES (1 , 'iPhone 16 Pro 256G' , 8999.00 , 23 , 4.8 , '苹果最新旗舰,A18 Pro芯片' , NOW()), (2 , 'iPhone 16 Pro 512G' , 9999.00 , 5 , 4.8 , '苹果最新旗舰,大存储版本' , NOW()), (3 , '华为 Mate 70 Pro' , 6999.00 , 12 , 4.7 , '华为旗舰,麒麟芯片' , NOW()), (4 , 'AirPods Pro 2' , 1799.00 , 50 , 4.6 , '苹果降噪耳机' , NOW());
订单状态枚举
1
2
3
4
5
6
7
8
9
10
11
12
13
14
15
16
17
18
public enum OrderStatus { PENDING ("待处理" ), SHIPPED ("已发货" ), DELIVERED ("已签收" ), CANCELLED ("已取消" ); private final String displayName; OrderStatus (String displayName) { this .displayName = displayName; } public String getDisplayName () return displayName; } }
订单实体
1
2
3
4
5
6
7
8
9
10
11
12
13
14
15
16
17
18
19
20
21
22
23
24
25
26
27
28
29
30
31
32
33
34
35
36
@Entity @Table (name = "order_info" )public class Order { @Id private String id; @Column (name = "user_id" , nullable = false ) private Long userId; @Column (name = "total_amount" , nullable = false ) private BigDecimal totalAmount; @Enumerated (EnumType .STRING ) @Column (nullable = false ) private OrderStatus status; @Column (name = "tracking_number" ) private String trackingNumber; @Column (name = "estimated_delivery" ) private LocalDate estimatedDelivery; @Column (name = "created_at" ) private LocalDateTime createdAt; public String getId (return id; } public Long getUserId (return userId; } public BigDecimal getTotalAmount (return totalAmount; } public OrderStatus getStatus (return status; } public String getTrackingNumber (return trackingNumber; } public LocalDate getEstimatedDelivery (return estimatedDelivery; } public LocalDateTime getCreatedAt (return createdAt; } }
商品实体
1
2
3
4
5
6
7
8
9
10
11
12
13
14
15
16
17
18
19
20
21
22
23
24
25
26
27
28
29
@Entity @Table (name = "product" )public class Product { @Id @GeneratedValue (strategy = GenerationType .IDENTITY ) private Long id; @Column (nullable = false ) private String name; @Column (nullable = false ) private BigDecimal price; private Integer stock; private Double rating; private String description; public Long getId (return id; } public String getName (return name; } public BigDecimal getPrice (return price; } public Integer getStock (return stock; } public Double getRating (return rating; } public String getDescription (return description; } }
OrderRepository
1
2
3
4
5
public interface OrderRepository extends JpaRepository <Order , String > { List<Order> findByUserIdOrderByCreatedAtDesc(Long userId, Pageable pageable); }
ProductRepository
1
2
3
4
5
6
public interface ProductRepository extends JpaRepository Product , Long > @Query ("SELECT p FROM Product p WHERE p.name LIKE %:keyword% OR p.description LIKE %:keyword%" ) List<Product> searchByKeyword(@Param ("keyword" ) String keyword, Pageable pageable); }
1
2
3
4
5
6
7
8
9
10
11
12
13
14
15
16
17
18
19
20
21
22
23
24
25
26
27
28
29
30
31
32
33
34
35
36
37
38
39
40
41
42
43
44
45
46
47
48
49
50
51
52
53
54
55
56
57
58
59
60
61
62
63
64
65
66
67
68
69
70
71
72
73
74
75
76
77
78
79
80
81
82
83
@Component public class OrderQueryTools { private final OrderRepository orderRepository; private final ProductRepository productRepository; public OrderQueryTools(OrderRepository orderRepository, ProductRepository productRepository) { this .orderRepository = orderRepository; this .productRepository = productRepository; } @Tool(description = "根据订单号查询订单状态和物流信息" ) public String getOrderStatus( @ToolParam(description = "订单号,格式如:ORD001" ) String orderId) { Order order = orderRepository.findById(orderId).orElse(null ); if (order == null ) { return "未找到订单号为 " + orderId + " 的订单" ; } return String.format(""" 订单号:%s 状态:%s 金额:¥%.2f 创建时间:%s 预计到达:%s 物流单号:%s """ , order.getId(), order.getStatus().getDisplayName(), order.getTotalAmount(), order.getCreatedAt(), order.getEstimatedDelivery() != null ? order.getEstimatedDelivery() : "暂无" , order.getTrackingNumber() != null ? order.getTrackingNumber() : "暂无" ); } @Tool(description = "查询用户的历史订单列表,返回最近的订单记录" ) public String getUserOrders( @ToolParam(description = "用户ID" ) Long userId, @ToolParam(description = "查询条数,默认5条,最多20条" ) int limit) { int safeLimit = Math.min(limit, 20 ); List<Order> orders = orderRepository.findByUserIdOrderByCreatedAtDesc( userId, PageRequest.of(0 , safeLimit)); if (orders.isEmpty()) { return "该用户暂无历史订单" ; } StringBuilder sb = new StringBuilder("最近 " + orders.size() + " 条订单:\n" ); for (Order order : orders) { sb.append(String.format("- %s (%s) ¥%.2f - %s\n" , order.getId(), order.getCreatedAt().toLocalDate(), order.getTotalAmount(), order.getStatus().getDisplayName())); } return sb.toString(); } @Tool(description = "搜索商品信息,根据关键词查找商品名称和库存" ) public String searchProducts( @ToolParam(description = "搜索关键词,如商品名称" ) String keyword, @ToolParam(description = "最大返回数量,默认5个" ) int maxResults) { List<Product> products = productRepository.searchByKeyword( keyword, PageRequest.of(0 , Math.min(maxResults, 10 ))); if (products.isEmpty()) { return "没有找到与 \"" + keyword + "\" 相关的商品" ; } StringBuilder sb = new StringBuilder(); for (Product product : products) { sb.append(String.format("- %s:¥%.2f,库存%d件,评分%.1f\n" , product.getName(), product.getPrice(), product.getStock(), product.getRating())); } return sb.toString(); } }
客服 Controller:
1
2
3
4
5
6
7
8
9
10
11
12
13
14
15
16
17
18
19
20
21
22
23
24
25
26
27
28
29
30
31
32
33
34
35
36
37
38
39
40
41
42
43
44
@RestController @RequestMapping("/api/customer-service" ) public class CustomerServiceController { private final ChatClient chatClient; private final MessageWindowChatMemory chatMemory; public CustomerServiceController( ChatClient.Builder builder, OrderQueryTools orderQueryTools) { this .chatMemory = MessageWindowChatMemory.builder().maxMessages(10 ).build(); this .chatClient = builder .defaultSystem(""" 你是一个电商平台的智能客服助手。 你可以: - 查询订单状态和物流 - 查询用户历史订单 - 搜索商品信息 规则: - 只回答与订单、商品相关的问题 - 需要查询时直接调用工具,不要编造数据 - 对用户友好耐心 """ ) .defaultTools(orderQueryTools) .build(); } @PostMapping public String chat(@RequestBody CustomerServiceRequest request) { return chatClient.prompt() .user(request.message()) .advisors(MessageChatMemoryAdvisor.builder(chatMemory) .conversationId(request.userId().toString()) .build()) .call() .content(); } record CustomerServiceRequest(Long userId, String message) {} }
1
2
3
4
5
curl -X POST http://localhost:8080 /api/customer-service \ "Content-Type: application/json" \ "userId" : 1001 , "message" : "帮我查一下订单 ORD001 和 ORD002 的状态,顺便看看有没有 iPhone 16 Pro" }'
4.有返回值 vs 无返回值的工具
前面的工具都有返回值,模型会把返回内容读进去再回答。但有一类工具是纯操作型的——发邮件、发短信、创建日程,执行完就行,不需要返回什么内容给模型。这两种 Spring AI 都支持:
依赖(pom.xml)
发邮件需要加 Spring Mail:
1 2 3 4 <dependency > <groupId > org.springframework.boot</groupId > <artifactId > spring-boot-starter-mail</artifactId > </dependency >
邮件配置(application.yml)
1
2
3
4
5
6
7
8
9
10
11
spring: mail: host: smtp.qq.com port: 465 username: your@qq.com password: your_smtp_token properties: mail: smtp: ssl: enable: true
1
2
3
4
5
6
7
8
9
10
11
12
13
14
15
16
17
18
19
20
21
22
23
24
25
26
27
28
29
30
31
32
33
34
35
36
37
38
39
40
41
42
43
44
45
@Component public class NotificationTools { private static final Logger log = LoggerFactory .getLogger (NotificationTools .class ); private final JavaMailSender mailSender; private final Map <String , String > reminderStore = new ConcurrentHashMap <>(); public NotificationTools (JavaMailSender mailSender) { this .mailSender = mailSender; } @Tool (description = "发送邮件通知给指定邮箱" ) public void sendEmail ( @ToolParam (description = "收件人邮箱" ) String email, @ToolParam (description = "邮件主题" ) String subject, @ToolParam (description = "邮件正文" ) String body ) { SimpleMailMessage message = new SimpleMailMessage (); message.setTo (email); message.setSubject (subject); message.setText (body); mailSender.send (message); log.info ("邮件已发送至 {}" , email); } @Tool (description = "创建一个日程提醒,返回提醒ID" ) public String createReminder ( @ToolParam (description = "提醒内容" ) String content, @ToolParam (description = "提醒时间,格式:yyyy-MM-dd HH:mm" ) String reminderTime ) { String reminderId = "RMD-" + UUID .randomUUID ().toString ().substring (0 , 8 ).toUpperCase (); reminderStore.put (reminderId, reminderTime + " | " + content); log.info ("创建提醒 [{}]: {} at {}" , reminderId, content, reminderTime); return "提醒已创建,ID: " + reminderId + ",将于 " + reminderTime + " 提醒你:" + content; } }
Controller
1
2
3
4
5
6
7
8
9
10
11
12
13
14
15
16
17
18
19
20
21
22
23
24
25
26
27
@RestController @RequestMapping("/api/notify" ) public class NotificationController { private final ChatClient chatClient; private final NotificationTools notificationTools; public NotificationController(ChatClient.Builder builder, NotificationTools notificationTools) { this .notificationTools = notificationTools; this .chatClient = builder .defaultSystem(""" 你是一个助手,可以帮用户发送邮件或创建日程提醒。 需要操作时直接调用工具,不要编造结果。 操作完成后用自然语言告知用户结果。 """ ) .build(); } @GetMapping public String chat(@RequestParam String message) { return chatClient.prompt() .user(message) .tools(notificationTools) .call() .content(); } }
1 2 3 4 5 6 7 8 curl "http://localhost:8080/api/notify?message=帮我给 test@example .com 发一封邮件,主题是'会议通知',内容是'明天下午3点开会'" curl "http://localhost:8080/api/notify?message=帮我创建一个提醒,2025-12-31 09:00 提醒我跨年倒计时" curl "http://localhost:8080/api/notify?message=帮我给 boss@example .com 发邮件说明天请假,另外提醒我 2025-03-10 08:00 早点出门"
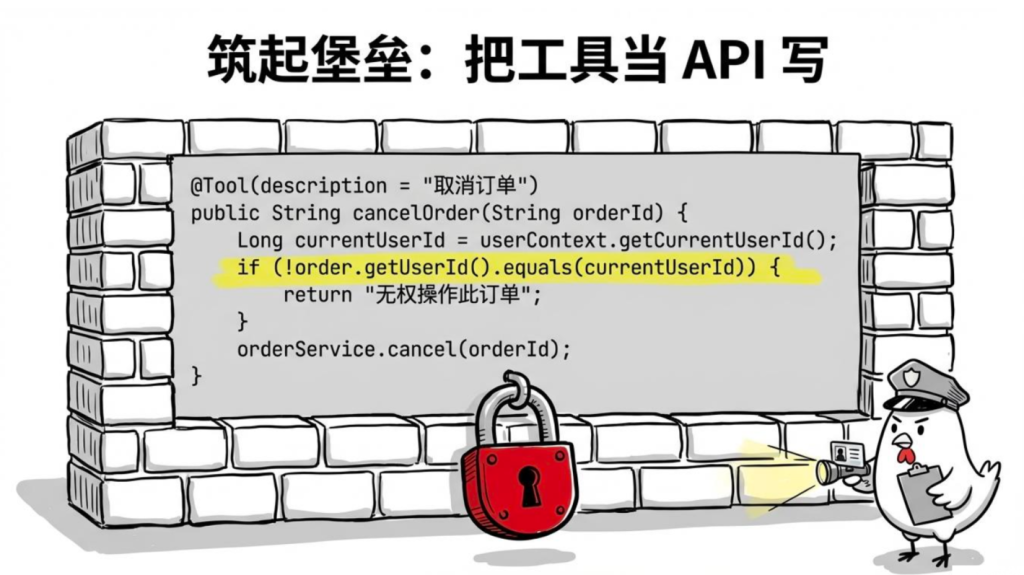
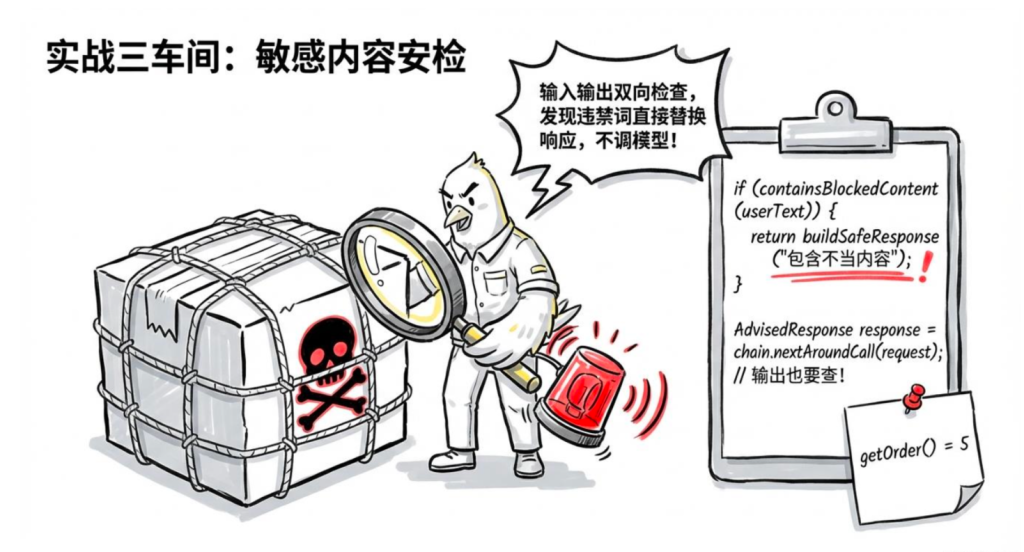
5.工具的安全边界
很多同学第一次用 Function Calling 容易忽略:模型是不可信的外部输入,工具执行的操作要做好安全控制 。
模型告诉大家要调用某个方法,不代表就应该无条件执行。万一用户构造了一个特殊问题,让模型帮他查别人的订单呢?
1
2
3
4
5
6
7
8
9
10
11
12
13
14
15
16
17
18
19
20
21
22
23
24
25
26
27
28
@Component public class SafeOrderTools { private final UserContext userContext; @Tool(description = "取消订单" ) public String cancelOrder( @ToolParam(description = "订单号" ) String orderId) { Order order = orderRepository.findById(orderId).orElse(null ); if (order == null ) return "订单不存在" ; Long currentUserId = userContext.getCurrentUserId(); if (!order.getUserId().equals(currentUserId)) { return "无权操作此订单" ; } if (!order.getStatus().isCancellable()) { return "订单状态为" + order.getStatus().getDisplayName() + ",无法取消" ; } orderService.cancel(orderId); return "订单 " + orderId + " 已成功取消" ; } }
核心原则:把工具当 API 写,该做的权限校验、数据校验一个不能少 。
6、同一次对话多次调用工具
还有一个大家可能会好奇的问题:如果用户一句话涉及多个工具怎么办?模型会自动判断,能并行的并行调用,需要串行的串行——大家不用写额外代码,Spring AI 把这个循环帮处理好了。
用前面定义的 WeatherTools 来完整演示:
1 2 3 4 5 6 7 8 9 10 11 12 13 14 15 16 17 18 19 20 21 22 23 24 25 26 27 28 @RestController @RequestMapping("/api/multi-tool" ) public class MultiToolController { private final ChatClient chatClient; private final WeatherTools weatherTools; public MultiToolController(ChatClient.Builder builder, WeatherTools weatherTools) { this .weatherTools = weatherTools; this .chatClient = builder .defaultSystem("你是一个天气助手,可以查询实时天气和天气预报。不要编造数据。" ) .build(); } @GetMapping public String chat(@RequestParam String message) { return chatClient.prompt() .user(message) .tools(weatherTools) .call() .content(); } }
一句话触发多次工具调用:
1 2 3 4 5 6 7 8 curl "http://localhost:8080/api/multi-tool?message=北京和上海今天天气怎么样" curl "http://localhost:8080/api/multi-tool?message=北京今天天气怎么样?另外给我看看上海未来3天的预报" curl "http://localhost:8080/api/multi-tool?message=帮我查一下北京、上海、广州今天的天气,对比一下哪个城市最适合出行"
调用流程
1
2
3
4
5
6
7
8
9
10
11
12
用户:帮我查一下北京、上海、广州今天的天气 Spring AI 内部循环: → 模型返回:需要调用 getWeather ("北京" ) → 执行工具,得到结果 → 模型返回:还需要调用 getWeather ("上海" ) → 执行工具,得到结果 → 模型返回:还需要调用 getWeather ("广州" ) → 执行工具,得到结果 → 模型返回:最终文字回答(综合三个城市的结果) 整个循环由 Spring AI 自动驱动,开发者无需写任何额外代码
九.Advisor机制**——Spring AI 的AOP 拦截器**
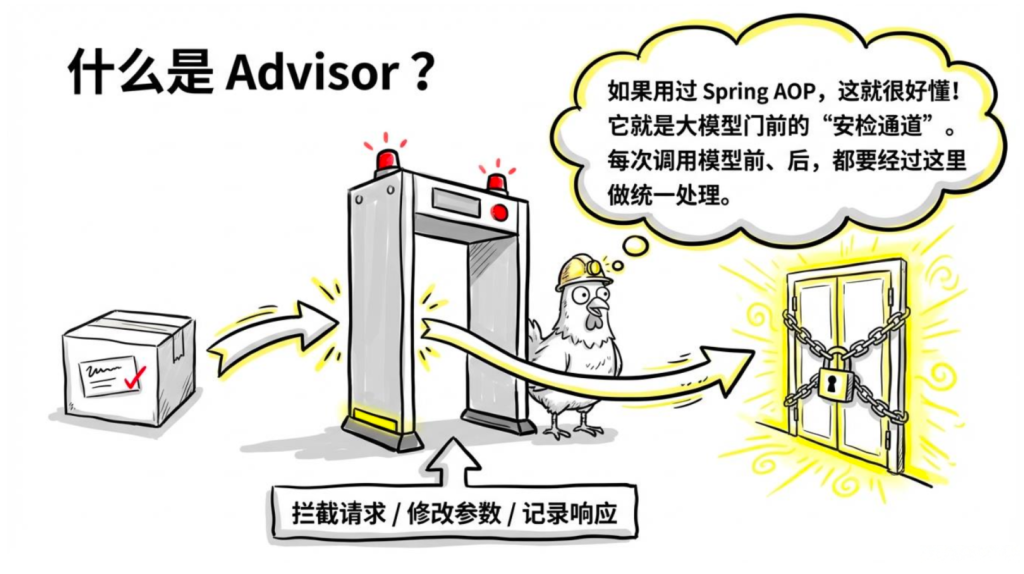
如果用过 Spring AOP,Advisor 的思路是一样的——在方法执行前后插入横切逻辑,但这里是针对 AI 调用链的。每次调用模型之前和之后,都可以经过 Advisor 做统一处理。
前面已经用过了一个 Advisor:MessageChatMemoryAdvisor(对话记忆)。这节带大家把 Advisor 机制讲透,然后自己写几个。
1.Advisor 的执行链
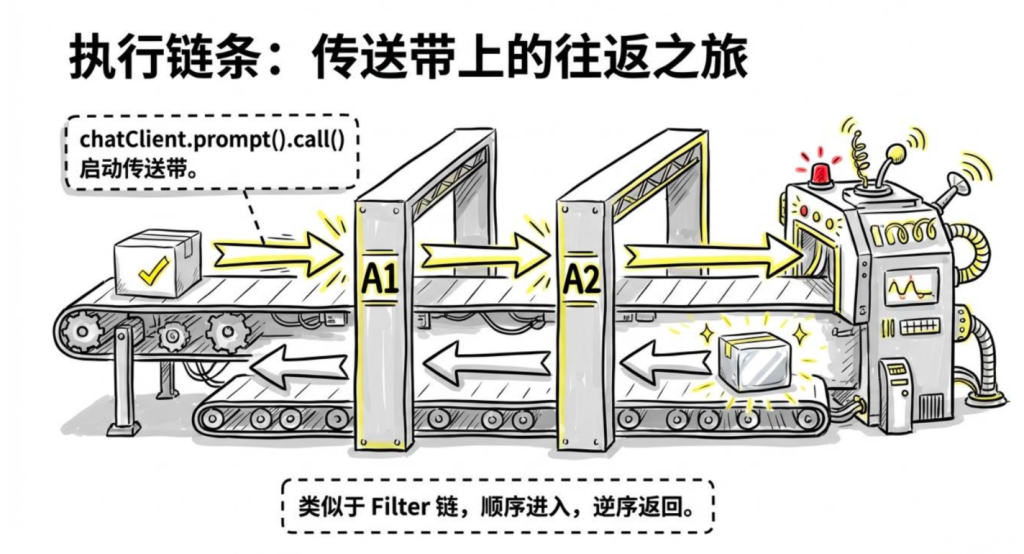
当大家调用 chatClient.prompt()...call() 时,请求会经过一个 Advisor 链:
1
2
3
4
5
6
请求 → Advisor1(前置处理) → Advisor2(前置处理) → 实际调用模型 → Advisor2(后置处理) → Advisor1(后置处理) → 返回响应
类似于 Filter 链或 AOP 链,顺序执行,支持修改请求和响应。
2.内置 Advisor
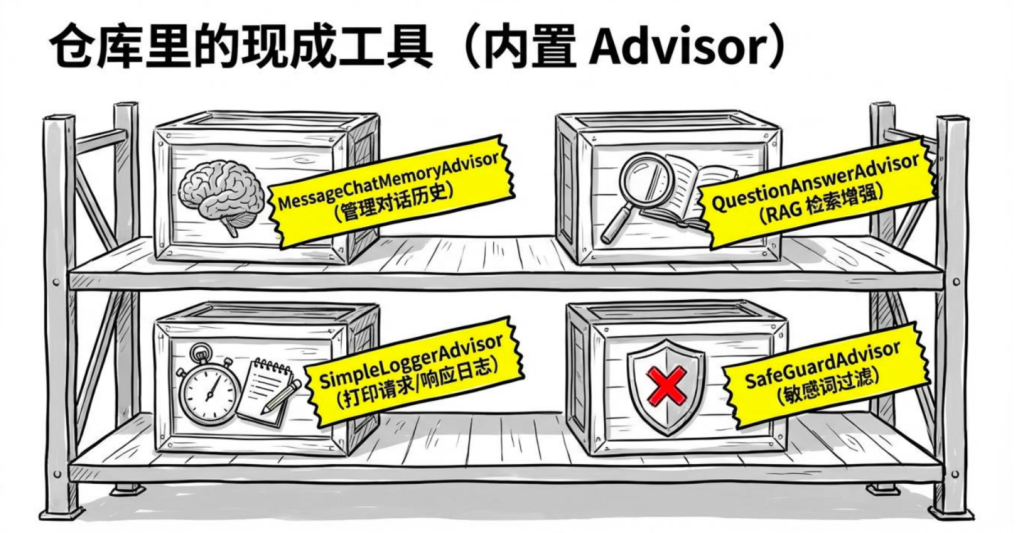
Spring AI 内置了几个常用的 Advisor:
Advisor
作用
MessageChatMemoryAdvisor自动管理对话历史(上节用过)
QuestionAnswerAdvisorRAG 检索增强(后面详细讲)
SimpleLoggerAdvisor打印请求和响应日志
SafeGuardAdvisor敏感词过滤
使用内置 Advisor
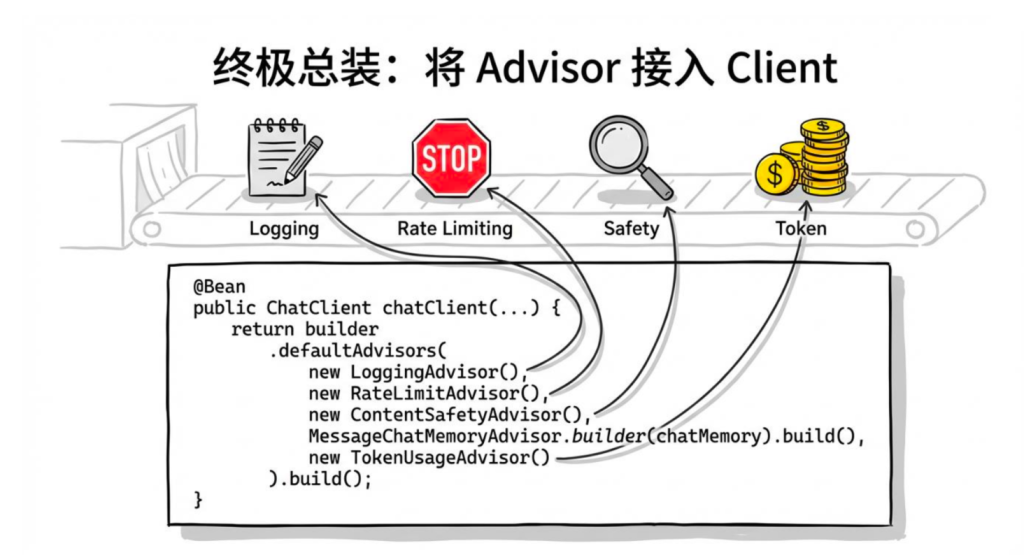
1
2
3
4
5
6
7
8
9
10
11
12
13
14
15
16
17
18
19
20
21
22
23
24
25
26
27
28
29
30
31
@RestController @RequestMapping("/api/advisor-demo" ) public class AdvisorDemoController { private final ChatClient chatClient; private final MessageWindowChatMemory chatMemory; public AdvisorDemoController(ChatClient.Builder builder) { this .chatMemory = MessageWindowChatMemory.builder().maxMessages(10 ).build(); this .chatClient = builder .defaultSystem("你是一个 Java 技术助手" ) .defaultAdvisors( new SimpleLoggerAdvisor(), MessageChatMemoryAdvisor.builder(chatMemory).build() ) .build(); } @GetMapping public String chat( @RequestParam String message, @RequestParam(defaultValue = "default" ) String conversationId) { return chatClient.prompt() .user(message) .advisors(MessageChatMemoryAdvisor.builder(chatMemory) .conversationId(conversationId) .build()) .call() .content(); } }
SimpleLoggerAdvisor 默认用 DEBUG 级别打日志,需要在 application.yml 里开启:
1
2
3
logging: level: org.springframework .ai .chat .client .advisor : DEBUG
测试
1
2
curl "http://localhost:8080/api/advisor-demo?message=你好&conversationId=user001"
多个 Advisor 按照注册顺序执行。
3.自定义 Advisor:接口说明
自定义 Advisor 需要实现 CallAdvisor(同步)或 StreamAdvisor(流式)接口:
1
2
3
4
5
6
public interface CallAdvisor extends Advisor { ChatClientResponse adviseCall(ChatClientRequest request, CallAdvisorChain chain); int getOrder(); }
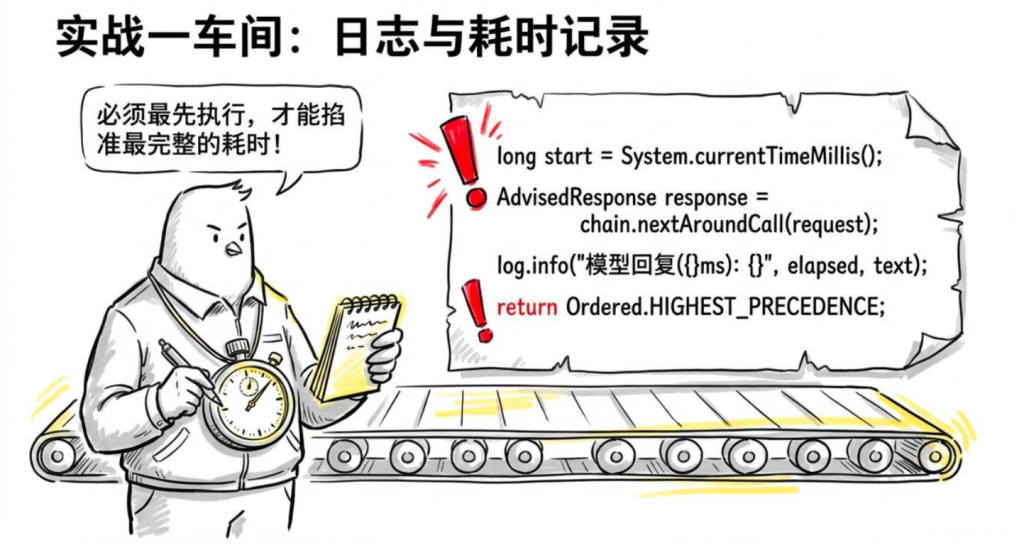
4.Advisor实战(一)-日志记录 Advisor
记录每次调用的请求内容、响应内容和耗时:
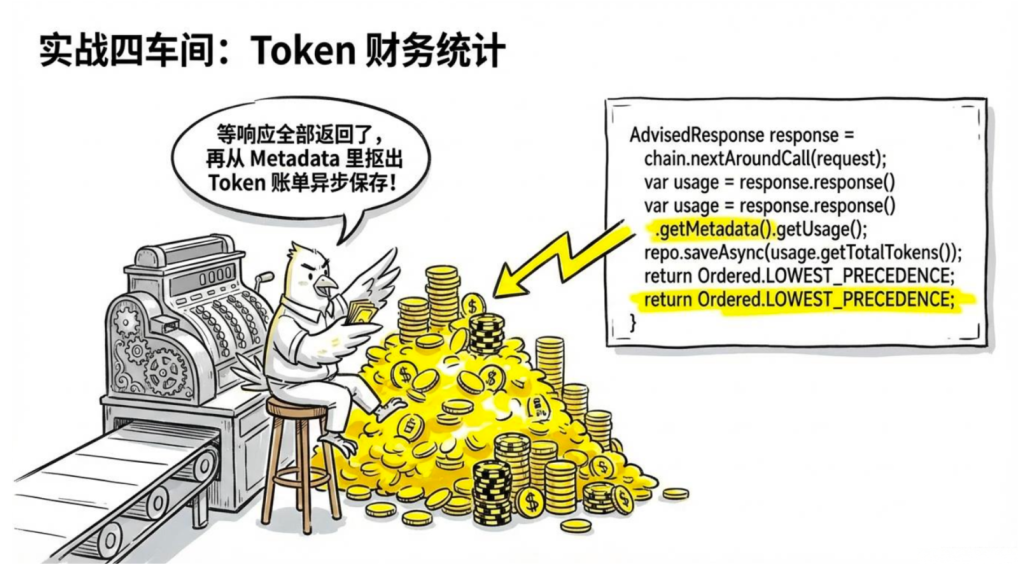
1
2
3
4
5
6
7
8
9
10
11
12
13
14
15
16
17
18
19
20
21
22
23
24
25
26
27
28
29
30
31
32
33
34
35
36
37
38
39
40
41
42
43
44
45
@Component public class LoggingAdvisor implements CallAdvisor , StreamAdvisor { private static final Logger log = LoggerFactory.getLogger(LoggingAdvisor.class); @Override public ChatClientResponse adviseCall (ChatClientRequest request, CallAdvisorChain chain) { long start = System.currentTimeMillis(); String userMessage = request.prompt().getContents(); log.info("[AI调用] 用户消息: {}" , userMessage); ChatClientResponse response = chain.nextCall(request); long elapsed = System.currentTimeMillis() - start; String aiReply = response.chatResponse().getResult().getOutput().getText(); log.info("[AI调用] 模型回复({}ms): {}" , elapsed, aiReply.length() > 100 ? aiReply.substring(0 , 100 ) + "..." : aiReply); return response; } @Override public Flux<ChatClientResponse> adviseStream (ChatClientRequest request, StreamAdvisorChain chain) { long start = System.currentTimeMillis(); log.info("[AI流式调用] 用户消息: {}" , request.prompt().getContents()); return chain.nextStream(request) .doOnComplete(() -> log.info("[AI流式调用] 完成,耗时 {}ms" , System.currentTimeMillis() - start)); } @Override public String getName () { return "LoggingAdvisor" ; } @Override public int getOrder () { return Ordered.HIGHEST_PRECEDENCE; } }
Controller(注入 LoggingAdvisor 使用)
1 2 3 4 5 6 7 8 9 10 11 12 13 14 15 16 17 18 19 20 21 @RestController @RequestMapping("/api/logging-advisor" ) public class LoggingAdvisorController { private final ChatClient chatClient; public LoggingAdvisorController(ChatClient.Builder builder, LoggingAdvisor loggingAdvisor) { this .chatClient = builder .defaultSystem("你是一个 Java 技术助手" ) .defaultAdvisors(loggingAdvisor) .build(); } @GetMapping public String chat(@RequestParam String message) { return chatClient.prompt() .user(message) .call() .content(); } }
测试:
1 curl "http://localhost:8080/api/logging-advisor?message=什么是Spring AI"
调用后控制台会输出
1 2 [AI 调用] 用户消息: 什么是Spring AI [AI 调用] 模型回复(1243 ms): Spring AI 是一个用于构建 AI 应用的 Java 框架...
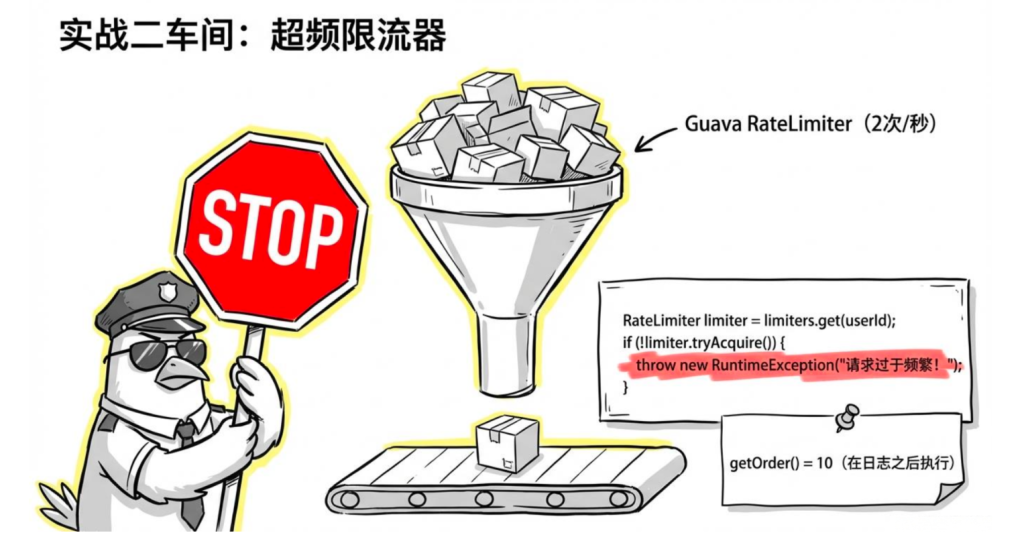
5.Advisor实战(二)-限流 Advisor
防止某个用户调用过于频繁,用 Guava 的 RateLimiter 实现。
依赖(pom.xml)
1 2 3 4 5 <dependency > <groupId > com.google.guava</groupId > <artifactId > guava</artifactId > <version > 33.2.1-jre</version > </dependency >
RateLimitAdvisor
1 2 3 4 5 6 7 8 9 10 11 12 13 14 15 16 17 18 19 20 21 22 23 24 25 26 27 28 29 30 31 32 33 34 @Component public class RateLimitAdvisor implements CallAdvisor { private static final double PERMITS_PER_SECOND = 2.0 ; private final Map <String , RateLimiter > limiters = new ConcurrentHashMap <>(); @Override public ChatClientResponse adviseCall (ChatClientRequest request, CallAdvisorChain chain String userId = (String ) request.context () .getOrDefault ("userId" , "anonymous" ); RateLimiter limiter = limiters.computeIfAbsent (userId, k -> RateLimiter .create (PERMITS_PER_SECOND )); if (!limiter.tryAcquire ()) { throw new RuntimeException ("请求过于频繁,请稍后再试" ); } return chain.nextCall (request); } @Override public String getName ( return "RateLimitAdvisor" ; } @Override public int getOrder ( return 10 ; } }
在 Controller 里传 userId
1 2 3 4 5 6 7 8 9 10 11 12 13 14 15 16 17 18 19 20 21 22 23 @RestController @RequestMapping("/api/rate-limit" ) public class RateLimitController { private final ChatClient chatClient; public RateLimitController(ChatClient.Builder builder, RateLimitAdvisor rateLimitAdvisor) { this .chatClient = builder .defaultSystem("你是一个 Java 技术助手" ) .defaultAdvisors(rateLimitAdvisor) .build(); } @GetMapping public String chat(@RequestParam String message, @RequestParam(defaultValue = "anonymous" ) String userId) { return chatClient.prompt() .user(message) .advisors(a -> a.param("userId" , userId)) .call() .content(); } }
测试(同一个 userId 快速连续请求会被限流):
1 2 3 4 5 6 curl "http://localhost:8080/api/rate-limit?message=你好&userId=user001" curl "http://localhost:8080/api/rate-limit?message=你好&userId=user001" &curl "http://localhost:8080/api/rate-limit?message=你好&userId=user001" &
6.Advisor实战(三)-敏感词过滤 Advisor
对输入和输出做内容安全检查:
1 2 3 4 5 6 7 8 9 10 11 12 13 14 15 16 17 18 19 20 21 22 23 24 25 26 27 28 29 30 31 32 33 34 35 36 37 38 39 40 41 42 43 44 45 46 47 48 49 50 51 52 53 54 55 56 @Component public class ContentSafetyAdvisor implements CallAdvisor { private static final List <String > BLOCKED_KEYWORDS = List .of ( "违禁词1" , "违禁词2" ); @Override public ChatClientResponse adviseCall (ChatClientRequest request, CallAdvisorChain chain String userText = request.prompt ().getContents (); if (containsBlockedContent (userText)) { return buildSafeResponse (request, "您的输入包含不当内容,请重新输入。" ); } ChatClientResponse response = chain.nextCall (request); String aiContent = response.chatResponse ().getResult ().getOutput ().getText (); if (containsBlockedContent (aiContent)) { return buildSafeResponse (request, "内容审核未通过,请换个问题试试。" ); } return response; } private boolean containsBlockedContent (String text if (text == null ) return false ; return BLOCKED_KEYWORDS .stream ().anyMatch (text ::contains); } private ChatClientResponse buildSafeResponse (ChatClientRequest request, String message AssistantMessage assistantMessage = new AssistantMessage (message); Generation generation = new Generation (assistantMessage); ChatResponse chatResponse = new ChatResponse (List .of (generation)); return ChatClientResponse .builder () .chatResponse (chatResponse) .context (request.context ()) .build (); } @Override public String getName ( return "ContentSafetyAdvisor" ; } @Override public int getOrder ( return 5 ; } }
Controller(注入 ContentSafetyAdvisor 使用)
1 2 3 4 5 6 7 8 9 10 11 12 13 14 15 16 17 18 19 20 21 22 @RestController @RequestMapping("/api/content-safety" ) public class ContentSafetyController { private final ChatClient chatClient; public ContentSafetyController(ChatClient.Builder builder, ContentSafetyAdvisor contentSafetyAdvisor) { this .chatClient = builder .defaultSystem("你是一个 Java 技术助手" ) .defaultAdvisors(contentSafetyAdvisor) .build(); } @GetMapping public String chat(@RequestParam String message) { return chatClient.prompt() .user(message) .call() .content(); } }
测试:
1 2 3 4 5 6 curl "http://localhost:8080/api/content-safety?message=什么是Spring AI" curl "http://localhost:8080/api/content-safety?message=违禁词1怎么用"
7.Advisor实战(四)-Token 用量统计 Advisor
统计每个用户的 Token 消耗,用于计费或监控:
1 2 3 4 5 6 7 8 9 10 11 12 13 14 15 16 17 18 19 20 21 22 23 24 25 26 27 28 29 30 31 32 33 34 35 36 37 38 39 40 41 42 43 44 45 46 47 48 49 50 51 52 53 54 @Component public class TokenUsageAdvisor implements CallAdvisor { private static final Logger log = LoggerFactory.getLogger(TokenUsageAdvisor.class); private final ConcurrentHashMap<String, LongAdder> userTokenCount = new ConcurrentHashMap <>(); @Override public ChatClientResponse adviseCall (ChatClientRequest request, CallAdvisorChain chain) { ChatClientResponse response = chain.nextCall(request); ChatResponse chatResponse = response.chatResponse(); if (chatResponse != null && chatResponse.getMetadata() != null && chatResponse.getMetadata().getUsage() != null ) { var usage = chatResponse.getMetadata().getUsage(); String userId = (String) request.context() .getOrDefault("userId" , "anonymous" ); long total = usage.getTotalTokens() != null ? usage.getTotalTokens() : 0L ; userTokenCount.computeIfAbsent(userId, k -> new LongAdder ()).add(total); log.info("[Token统计] userId={}, 本次 prompt={}, completion={}, total={}, 累计={}" , userId, usage.getPromptTokens(), usage.getCompletionTokens(), total, userTokenCount.get(userId).sum()); } return response; } public long getTotalTokens (String userId) { LongAdder adder = userTokenCount.get(userId); return adder != null ? adder.sum() : 0L ; } @Override public String getName () { return "TokenUsageAdvisor" ; } @Override public int getOrder () { return 20 ; } }
Controller(注入 TokenUsageAdvisor 使用)
1 2 3 4 5 6 7 8 9 10 11 12 13 14 15 16 17 18 19 20 21 22 23 24 25 26 27 28 29 30 31 32 33 @RestController @RequestMapping ("/api/token-usage" )public class TokenUsageController { private final ChatClient chatClient; private final TokenUsageAdvisor tokenUsageAdvisor; public TokenUsageController (ChatClient .Builder builder, TokenUsageAdvisor tokenUsageAdvisor) { this .tokenUsageAdvisor = tokenUsageAdvisor; this .chatClient = builder .defaultSystem ("你是一个 Java 技术助手" ) .defaultAdvisors (tokenUsageAdvisor) .build (); } @GetMapping public String chat (@RequestParam String message, @RequestParam (defaultValue = "anonymous" ) String userId ) { return chatClient.prompt () .user (message) .advisors (a -> a.param ("userId" , userId)) .call () .content (); } @GetMapping ("/stats" ) public String stats (@RequestParam String userId long total = tokenUsageAdvisor.getTotalTokens (userId); return String .format ("用户 %s 累计消耗 Token:%d" , userId, total); } }
测试:
1 2 3 4 5 6 7 8 9 10 11 curl "http://localhost:8080/api/token-usage?message=什么是Spring AI&userId=user001" curl "http://localhost:8080/api/token-usage?message=讲一下RAG&userId=user001" curl "http://localhost:8080/api/token-usage/stats?userId=user001"
8.Advisor实战(五)-组合使用所有 Advisor
把所有 Advisor 组合起来,提供一个完整的生产级对话接口:
1 2 3 4 5 6 7 8 9 10 11 12 13 14 15 16 17 18 19 20 21 22 23 24 25 26 27 28 29 30 31 32 33 34 35 36 37 38 39 40 41 42 43 44 45 46 47 48 49 50 51 52 @RestController @RequestMapping ("/api/full-advisor" )public class FullAdvisorController { private final ChatClient chatClient; private final MessageWindowChatMemory chatMemory; private final TokenUsageAdvisor tokenUsageAdvisor; public FullAdvisorController ( ChatClient .Builder builder, RateLimitAdvisor rateLimitAdvisor, ContentSafetyAdvisor contentSafetyAdvisor, TokenUsageAdvisor tokenUsageAdvisor) { this .tokenUsageAdvisor = tokenUsageAdvisor; this .chatMemory = MessageWindowChatMemory .builder ().maxMessages (10 ).build (); this .chatClient = builder .defaultSystem ("你是一个 Java 技术助手" ) .defaultAdvisors ( new LoggingAdvisor (), rateLimitAdvisor, contentSafetyAdvisor, tokenUsageAdvisor ) .build (); } @GetMapping public String chat ( @RequestParam String message, @RequestParam (defaultValue = "anonymous" ) String userId, @RequestParam (defaultValue = "default" ) String conversationId ) { return chatClient.prompt () .user (message) .advisors (a -> a.param ("userId" , userId)) .advisors (MessageChatMemoryAdvisor .builder (chatMemory) .conversationId (conversationId) .build ()) .call () .content (); } @GetMapping ("/token-usage" ) public String tokenUsage (@RequestParam String userId long total = tokenUsageAdvisor.getTotalTokens (userId); return String .format ("用户 %s 累计消耗 Token:%d" , userId, total); } }
测试:
1 2 3 4 5 6 7 8 9 10 11 12 13 curl "http://localhost:8080/api/full-advisor?message=什么是Spring AI&userId=user001&conversationId=session001" curl "http://localhost:8080/api/full-advisor?message=你好&userId=user001" &curl "http://localhost:8080/api/full-advisor?message=你好&userId=user001" curl "http://localhost:8080/api/full-advisor/token-usage?userId=user001" curl "http://localhost:8080/api/full-advisor?message=违禁词1怎么操作&userId=user001"
9、Advisor 的执行顺序
getOrder() 返回值越小,越先执行(对应 Spring 的 Ordered 接口)。
鸡哥建议的顺序:
日志 (HIGHEST_PRECEDENCE):记录完整的调用耗时限流 :快速拦截超频请求,避免浪费内容安全 :输入检查对话记忆 :注入历史消息RAG :注入检索到的相关内容Token 统计 (LOWEST_PRECEDENCE):统计完整的 Token 消耗