二.SpringMVC一站式Web框架篇
1.简介
两种开发模式
2.@RequestMapping路径映射
1.添加映射
@RequestMapping标注请求路径,将网络请求与方法相绑定
@ResponseBody表明直接返回该返回值数据 ,不加这个标注,返回值会被当做一个视图名称
1
2
3
4
5
6
7
8
@Controller public class HelloController { @RequestMapping("请求路径" ) @ResponseBody public String handle() { return "hello world" ; } }
@ResponseBody可以标在类上,或者直接标注@RestController(@ResponseBody+@Controller)
2.通配符的使用
原则:精确优先
无通配符 > 带 {} 路径变量 > ? 通配符 > * 通配符 > ** 通配符
?:匹配单个字符,如 /test? 可匹配 /test1 等。
* :匹配任意数量非 / 字符,如 /test/ 能匹配 /test/abc 等。
** :匹配任意数量含 / 字符,如 /test/ 可匹配 /test/abc/def 等。
正则表达式:精确匹配路径,如 /test/{id:[0-9]+} 仅匹配 id 为数字的 /test/123 等路径。
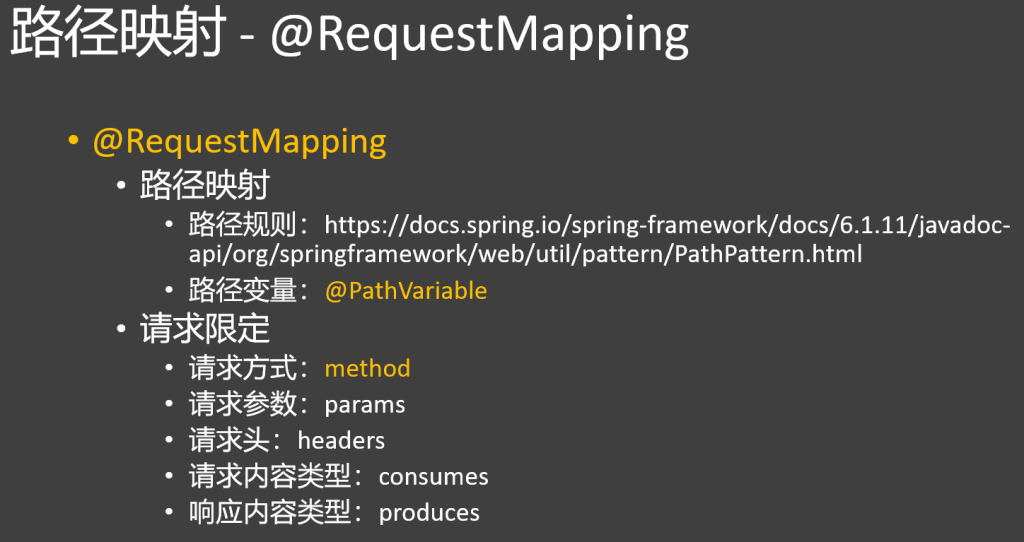
3.请求限定
请求方法:用method属性指定处理的请求类型,如GET、POST等。【可以使用GetMapping或者PostMapping代替RequestMapping】
请求参数:通过params属性规定请求必须包含的参数及值。
请求头:利用headers属性限定请求必须包含的请求头及值。
请求内容类型:使用consumes属性指定可处理的请求媒体类型。
application/x-www-form-urlencoded:表单数据默认编码,用于简单表单提交。
multipart/form-data:用于文件或含二进制数据的表单提交。
application/json:前后端分离开发常用,传输 JSON 数据。
application/xml:用于传输 XML 数据,适用于 SOAP 服务等。
text/plain:传输纯文本数据。
text/html:传输 HTML 格式数据,用于网页内容传输。
application/octet-stream:传输二进制数据,如文件、音视频等。
响应内容类型:借助produces属性指定返回响应的媒体类型
文本类:
text/plain:纯文本
text/html:HTML 网页
text/css:CSS 样式表
text/javascript:JS 脚本
数据交换类:
application/json:JSON 数据
application/xml:XML 数据
二进制类:
application/octet-stream:通用二进制文件
image/*:各类图片
audio/*:音频文件
video/*:视频文件
1
2
3
4
5
6
7
8
9
10
11
12
13
@RestController public class HelloController @RequestMapping (value = "/hello" , method = params = {"name" }, headers = {"Accept" }, consumes = {"application/json" }, produces = {"application/json" }) @ResponseBody public String handle() { return "hello world" ; } }
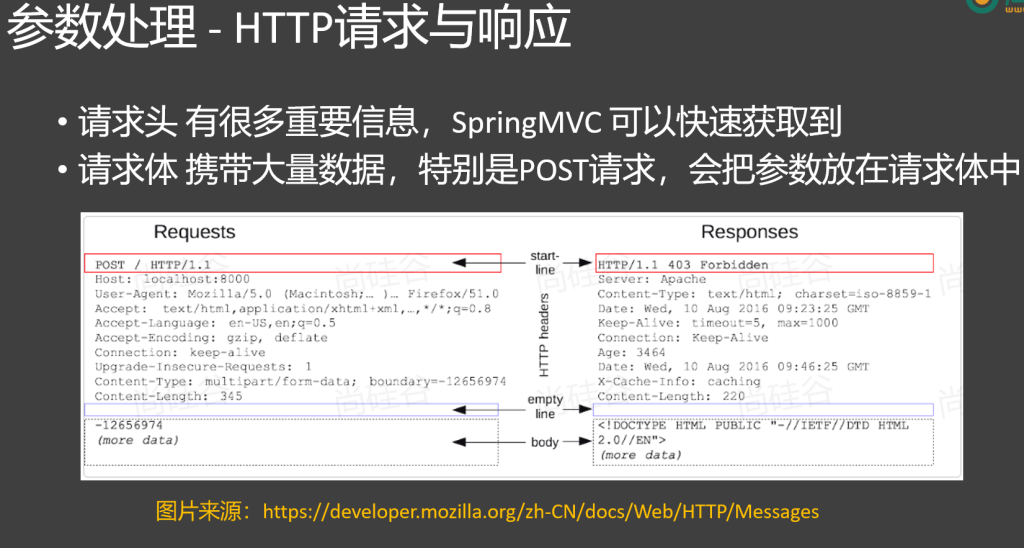
3.HTTP请求与响应
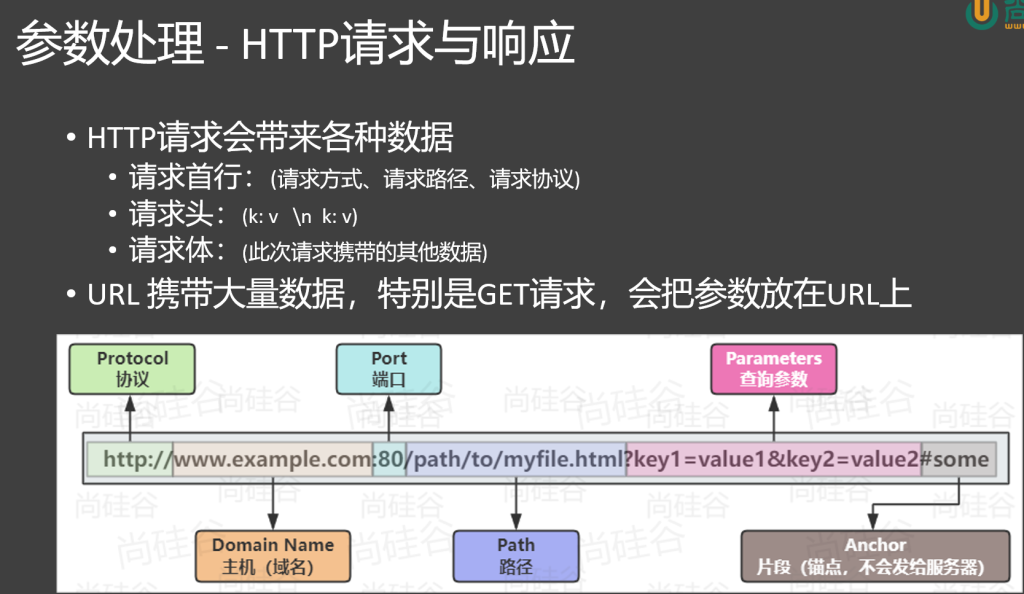
HTTP 请求会带来各种数据
请求首行:(请求方式、请求路径、请求协议)
请求头:(k: v \n k: v)
请求体:(此次请求携带的其他数据)
URL 携带大量数据,特别是 GET 请求,会把参数放在 URL 上
1 http:// www.example.com:8080 /path/ to/myfile.html?key1=value1&key2=value2
Protocol(协议):如http://,规定数据传输规则。
Domain Name(主机 / 域名) :如www.example.com ,网站地址标识。
Port(端口) :如:8080,网络通讯的出入口。
Path(路径) :如/path/to/myfile.html,定位服务器资源位置。
Parameters(查询参数) :如key1=value1&key2=value2,传递额外数据。
Anchor(片段 / 锚点) :如#some,用于网页内部定位,不发往服务器。
4.请求处理
实验1:使用普通变量,收集请求参数
1 2 3 4 5 6 7 8 9 10 11 12 13 14 15 16 17 18 @RequestMapping("/handle01") public String handle01(String username, String password , String cellphone, boolean agreement){ System .out .println(username); System .out .println(password ); System .out .println(cellphone); System .out .println(agreement); return "ok"; }
实验2:@RequestParam明确指定获取哪个参数
1 2 3 4 5 6 7 8 9 10 11 12 13 14 15 16 17 18 19 20 21 22 23 24 25 @RequestMapping ("/handle02" ) public String handle02 (@RequestParam ("username" ) String name, @RequestParam (value = "password" ,defaultValue = "123456" ) String pwd, @RequestParam ("cellphone" ) String phone, @RequestParam (value = "agreement" ,required = false ) boolean ok ){ System .out .println (name); System .out .println (pwd); System .out .println (phone); System .out .println (ok); return "ok" ; }
在body 和param 中均可使用**@RequestParam**接收
@RequestParam 可以省略不写
value 对应请求中参数名称defaultValue 表示默认值required 默认为true,表示一定要接收到该参数
其他类似注解:
1
2
@CookieValue @RequestHeader
实验3使用pojo封装
简单封装:
将多个属性封装为一个pojo类
1
2
3
4
5
@Data public class Person private String name; private int age; }
参数直接写pojo类,属性会按名称一 一对应装填进pojo类中
1 2 3 4 5 6 7 8 9 10 11 12 13 14 @RequestMapping ("/handle03" ) public String handle03 (Person person ){ System .out .println (person ); return "ok" ; }
1 2 3 4 5 6 7 8 9 10 11 12 13 @RequestMapping ("/handle04" ) public String handle04 (@RequestHeader (value = "host" ,defaultValue = "127.0.0.1" ) String host, @RequestHeader ("user-agent" ) String ua ){ System .out .println (host); System .out .println (ua); return "ok~" +host; }
实验5@CookieValue获取cookie值
1 2 3 4 5 6 7 8 9 @RequestMapping ("/handle05" )public String handle05 (@CookieValue ("haha" ) String haha return "ok:cookie是:" + haha; }
实验6pojo级联封装复杂属性
1
2
3
4
5
6
7
8
9
10
11
12
13
14
15
16
17
18
19
20
21
22
@Data public class Person { private String name; private int age; private address address; } @Data class address { private String city; private String street; } @RequestMapping ("/handle06" ) public String handle06 (Person person System .out .println (person); return "ok" ; }
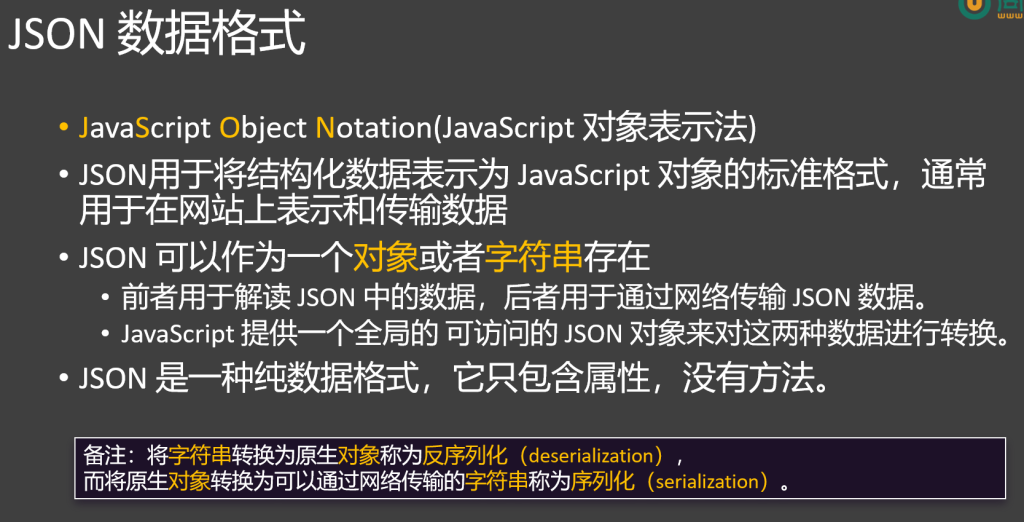
实验7@RequestBody接受json字符串并进行自动转换为对象
1 2 3 4 5 6 7 8 9 10 11 12 13 14 15 16 17 18 @RequestMapping("/handle07" ) public String handle07(@RequestBody Person person){ System.out .println(person); return "ok" ; }
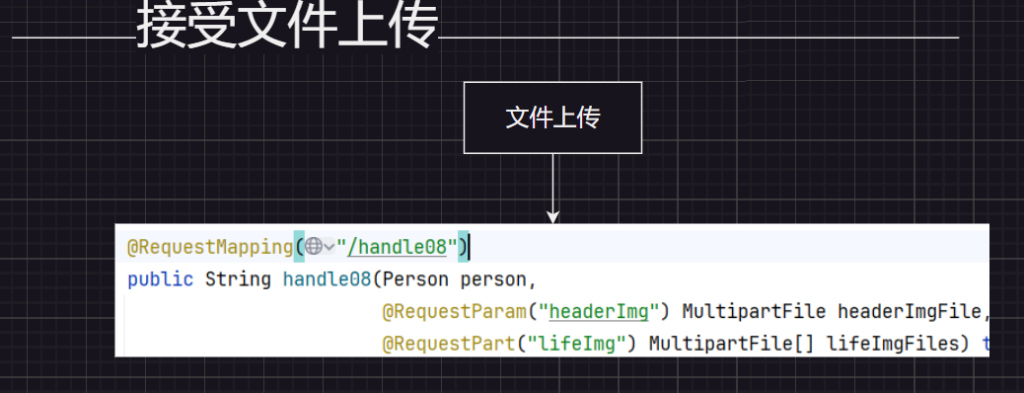
实验8文件上传
1 2 3 4 5 6 7 8 9 10 11 12 13 14 15 16 17 18 19 20 21 22 23 24 25 26 27 28 29 30 @RequestMapping("/handle08" ) public String handle08(Person person, @RequestParam("headerImg" ) MultipartFile headerImgFile, @RequestPart("lifeImg" ) MultipartFile[] lifeImgFiles) throws IOException { String originalFilename = headerImgFile.getOriginalFilename(); long size = headerImgFile.getSize(); InputStream inputStream = headerImgFile.getInputStream(); System.out .println(originalFilename + " ==> " + size); headerImgFile.transferTo(new File("D:\\img\\" + originalFilename)); System.out .println("===============以上处理了头像=================" ); if (lifeImgFiles.length > 0 ) { for (MultipartFile imgFile : lifeImgFiles) { imgFile.transferTo(new File("D:\\img\\" + imgFile.getOriginalFilename())); } System.out .println("=======生活照保存结束==========" ); } System.out .println(person); return "ok!!!" ; }
实验9HttpEntity-获取整个请求(包括体和头)
1 2 3 4 5 6 7 8 9 10 11 12 13 14 15 16 17 18 @RequestMapping ("/handle09" ) public String handle09 (HttpEntity <Person > entity ){ HttpHeaders headers = entity .getHeaders (); System .out .println ("请求头:" + headers ); Person body = entity .getBody (); System .out .println ("请求体:" + body ); return "Ok~~~" ; }
实验10传入原生API
1 2 3 4 5 6 7 8 9 10 11 12 13 14 @RequestMapping("/handle10") public void handle10(HttpServletRequest request, HttpServletResponse response, HttpMethod method ) throws IOException { System .out .println("请求方式:"+method ); String username = request.getParameter("username"); System .out .println(username); response.getWriter().write ("ok!!!"+username); }
5.响应处理
1.返回json
直接返回一个类,就能自动转化为json格式发送
1 2 3 4 5 6 7 8 9 10 11 12 13 14 15 16 17 18 19 @RequestMapping ("/resp01" ) public Person resp01 ( Person person = new Person (); person.setUsername ("张三" ); person.setPassword ("1111" ); person.setCellphone ("22222" ); person.setAgreement (false ); person.setSex ("男" ); person.setHobby (new String []{"足球" , "篮球" }); person.setGrade ("三年级" ); return person; }
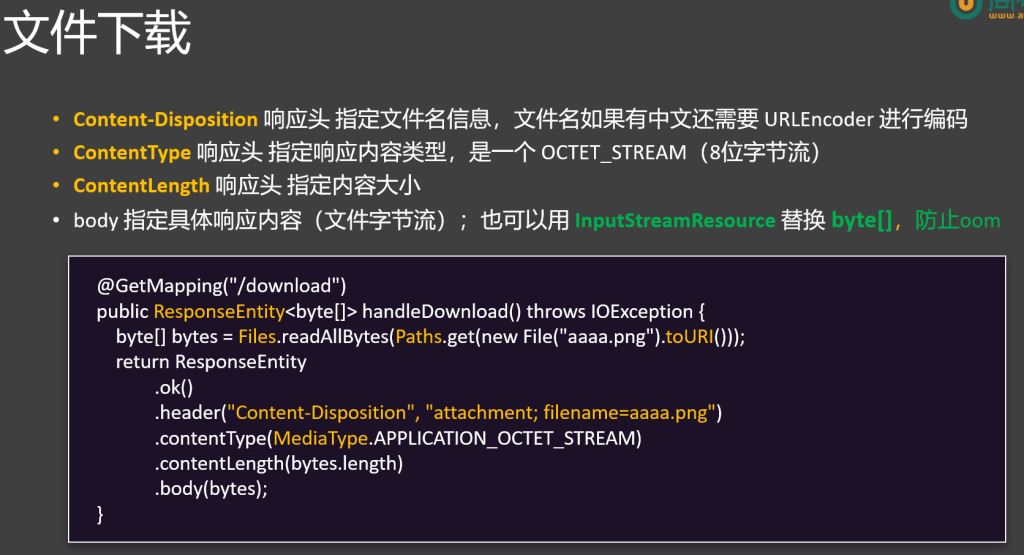
2.文件下载
1 2 3 4 5 6 7 8 9 10 11 12 13 14 15 16 17 18 19 20 21 22 23 24 25 26 27 28 @RequestMapping ("/download" ) public ResponseEntity <InputStreamResource > download() throws IOException { FileInputStream inputStream = new FileInputStream ("C:\\ Users\\ 53409\\ Pictures\\ Saved Pictures\\ 必应壁纸(1200张)\\ AutumnNeuschwanstein_EN-AU10604288553_1920x1080.jpg" ); String encode = URLEncoder .encode("哈哈美女.jpg" , "UTF-8" ); InputStreamResource resource = new InputStreamResource (inputStream); return ResponseEntity .ok() .contentType(MediaType .APPLICATION_OCTET_STREAM ) .contentLength(inputStream.available()) .header("Content-Disposition" , "attachment;filename=" + encode) .body(resource); }
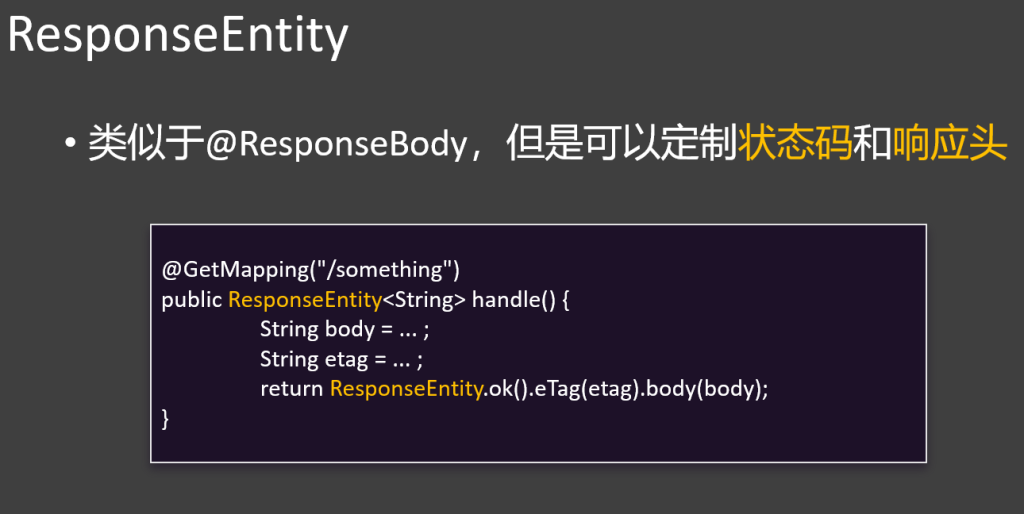
ResponseEntity.ok():创建一个 HTTP 响应实体,状态码为 200 OK,表示请求成功处理。
.contentType(MediaType.APPLICATION_OCTET_STREAM):设置响应的内容类型为 application/octet-stream,这是一种通用的二进制数据类型,常用于表示任意类型的文件。
.contentLength(inputStream.available()):设置响应体的字节长度,inputStream.available() 方法返回输入流中可读取的字节数。不过需要注意的是,这个方法返回的是当前可读取的字节数,而不是文件的总字节数,在某些情况下可能不准确。
.header(“Content-Disposition”, “attachment; filename=” + encode):设置响应头 Content-Disposition,告诉浏览器将响应内容作为附件下载,并指定文件名。encode 是经过 URL 编码后的文件名,避免中文文件名出现乱码。
.body(isr):将 InputStreamResource 对象 isr 作为响应体返回,该对象封装了文件的输入流。
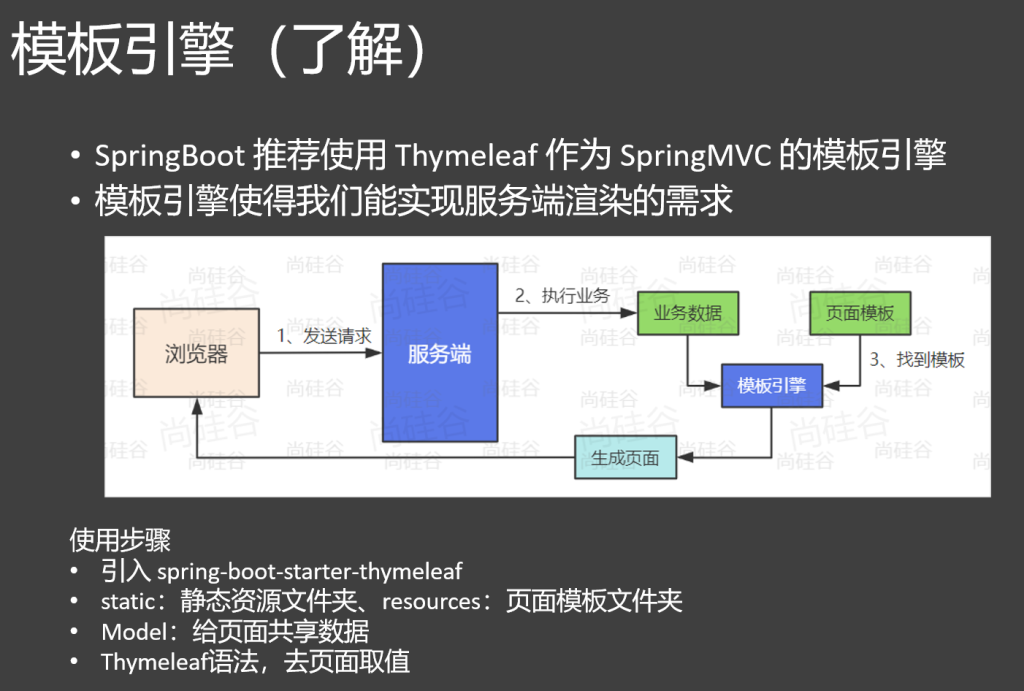
3.thymyleaf页面跳转
这部分简单了解就行,页面跳转交给前端来做
1.引入依赖
1 2 3 4 <dependency > <groupId > org.springframework.boot</groupId > <artifactId > spring-boot-starter-thymeleaf</artifactId > </dependency >
2.文件路径规则
页面:src/main/resources/templates
静态资源:src/main/resources/static
3.页面转发
默认会到templates 文件夹下面寻找资源
1
2
3
4
5
6
7
8
@Controller public class html { @RequestMapping("/" ) public String hello() { return "login" ; } }
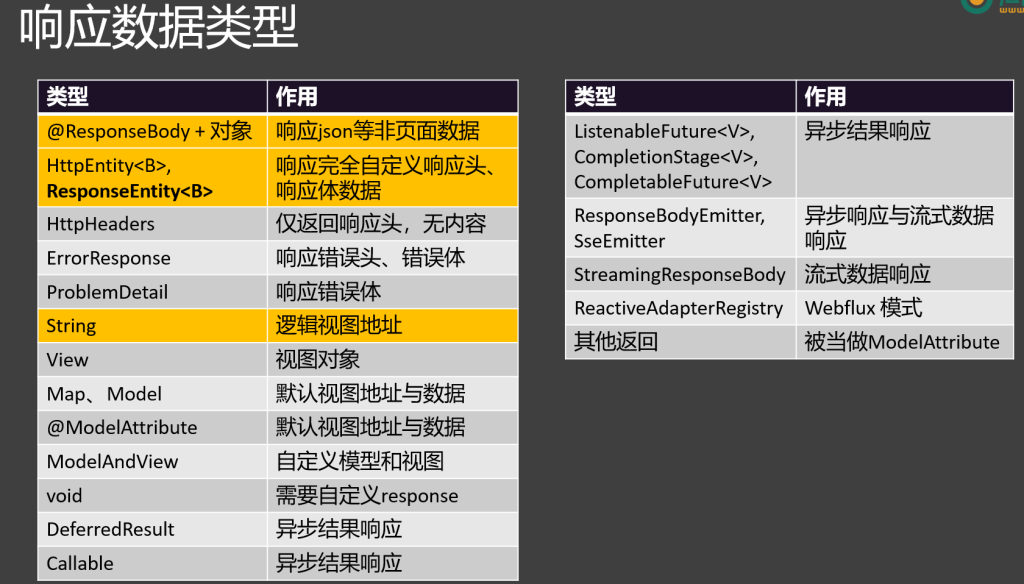
4.响应数据类型
6.RESTful
1.RESTful 介绍
REST(Representational State Transfer 表现层状态转移)是一种软件架构风格;
官网:https://restfulapi.net/
完整理解:Resource Representational State Transfer
Resource:资源
Representational:表现形式:比如用JSON,XML,JPEG等
State Transfer:状态变化:通过HTTP的动词(GET、POST、PUT、DELETE)实现
一句话:使用资源名作为URI,使用HTTP的请求方式表示对资源的操作
满足REST 风格的系统,我们称为是 RESTful 系统
2.RESTful API规划
RESTful API 以前,接口可能是这样的
/getEmployee?id=1:查询员工
/addEmployee?name=zhangsan&age=18:新增员工
/updateEmployee?id=1&age=20:修改员工
/deleteEmployee?id=1:删除员工 /getEmployeeList:获取所有员工
以 员工的 增删改查 为例,设计的 RESTful API 如下
URI 请求方式 请求体 作用 返回数据
/employee/{id}
GET
无
查询某个员工
Employee JSON
/employee
POST
employee json
新增某个员工
成功或失败状态
/employee
PUT
employee json
修改某个员工
成功或失败状态
/employee/{id}
DELETE
无
删除某个员工
成功或失败状态
/employees
GET
无/查询条件
查询所有员工
List JSON
/employees/page
GET
无/分页条件
查询所有员工
分页数据 JSON
补充概念
接口:对接的入口
API(接口):Web应用暴露出来的让别人访问的请求路径
调用别人的功能几种方式?
1.API:给第三方发请求,获取响应数据
2.SDK:导入的jar包
3.@PathVariable - 路径变量
/resources/{name}:最多使用
/resources/{*path}:
{} 中的值封装到 path 变量中
/resources/image.png: path = /image.png
/resources/css/spring.css:path = /css/spring.css
/resources/{filename:\w+}.dat:
{} 中的值封装到 filename 变量中; filename 满足 \w+ 正则要求
/resources/{filename:\w+}.dat
/resources/xxx.dat:xxx是一个或多个字母
4.CURD案例实现
需求:设计一个RESTful的 员工管理系统
规划 RESTful 接口
创建统一返回 R 对象
实现简单的 CRUD,暂不考虑复杂查询与分页查询
测试 CRUD 的功能
前端联动测试
找到 资料 中 nginx.zip,解压到 非中文无空格 目录下
运行 nginx.exe,访问 localhost 即可访问前端项目
前端项目源码为 rest-crud-vue.zip,学完前端工程化,就可以二次开发
注意:还要解决 跨域问题
创建数据库实体po
1
2
3
4
5
6
7
8
9
10
11
@Data public class Employee private Long id; private String name; private Integer age; private String email; private String gender; private String address; private BigDecimal salary; }
Dao层下:
EmployeeDao
1
2
3
4
5
6
7
8
9
10
11
12
13
14
15
16
17
18
19
20
21
22
23
24
25
26
27
28
29
30
31
32
33
34
35
36
public interface EmployeeDao { Employee getEmpById (Long id ) ; void addEmp (Employee employee ) void updateEmp (Employee employee ) void deleteById (Long id ) List<Employee> getList () ; }
EmployeeDaoImpl
1
2
3
4
5
6
7
8
9
10
11
12
13
14
15
16
17
18
19
20
21
22
23
24
25
26
27
28
29
30
31
32
33
34
35
36
37
38
39
40
41
42
43
44
45
46
47
48
49
50
51
52
53
54
55
56
@Component public class EmployeeDaoImpl implements EmployeeDao { @Autowired private JdbcTemplate jdbcTemplate; @Override public Employee getEmpById (Long id String sql = "select * from employee where id=?" ; Employee employee = jdbcTemplate.queryForObject (sql, new BeanPropertyRowMapper <>(Employee .class ), id); return employee; } @Override public void addEmp (Employee employee String sql = "insert into employee(name,age,email,gender,address,salary) values (?,?,?,?,?,?)" ; int update = jdbcTemplate.update (sql, employee.getName (), employee.getAge (), employee.getEmail (), employee.getGender (), employee.getAddress (), employee.getSalary ()); System .out .println ("新增成功,影响行数:" + update); } @Override public void updateEmp (Employee employee String sql = "update employee set name=?,age=?,email=?,gender=?,address=?,salary=? where id=?" ; int update = jdbcTemplate.update (sql, employee.getName (), employee.getAge (), employee.getEmail (), employee.getGender (), employee.getAddress (), employee.getSalary (), employee.getId ()); System .out .println ("更新成功,影响行数:" + update); } @Override public void deleteById (Long id String sql = "delete from employee where id=?" ; int update = jdbcTemplate.update (sql, id); } @Override public List <Employee > getList ( String sql = "select * from employee" ; List <Employee > list = jdbcTemplate.query (sql, new BeanPropertyRowMapper <>(Employee .class )); return list; } }
Service层:
1
2
3
4
5
6
7
8
9
10
11
12
13
14
15
16
17
18
19
20
21
22
23
24
25
26
27
28
29
30
31
32
33
34
35
public interface EmployeeService { Employee getEmp (Long id ) ; void updateEmp (Employee employee ) void saveEmp (Employee employee ) void deleteEmp (Long id ) List<Employee> getList () ; }
Impl:
1
2
3
4
5
6
7
8
9
10
11
12
13
14
15
16
17
18
19
20
21
22
23
24
25
26
27
28
29
30
31
32
33
34
35
36
37
38
39
40
41
42
43
44
45
46
47
48
49
50
51
52
53
54
55
56
57
58
59
60
61
62
63
64
65
66
67
68
69
70
71
72
73
74
@Service public class EmployeeServiceImpl implements EmployeeService { @Autowired EmployeeDao employeeDao; @Override public Employee getEmp (Long id Employee empById = employeeDao.getEmpById (id); return empById; } @Override public void updateEmp (Employee employee Long id = employee.getId (); if (id == null ){ return ; } Employee empById = employeeDao.getEmpById (id); if (StringUtils .hasText (employee.getName ())){ empById.setName (employee.getName ()); } if (StringUtils .hasText (employee.getEmail ())){ empById.setEmail (employee.getEmail ()); } if (StringUtils .hasText (employee.getAddress ())){ empById.setAddress (employee.getAddress ()); } if (StringUtils .hasText (employee.getGender ())){ empById.setGender (employee.getGender ()); } if (employee.getAge () != null ){ empById.setAge (employee.getAge ()); } if (employee.getSalary () != null ){ empById.setSalary (employee.getSalary ()); } employeeDao.updateEmp (empById); } @Override public void saveEmp (Employee employee employeeDao.addEmp (employee); } @Override public void deleteEmp (Long id employeeDao.deleteById (id); } @Override public List <Employee > getList ( return employeeDao.getList (); } }
Controller层
1
2
3
4
5
6
7
8
9
10
11
12
13
14
15
16
17
18
19
20
21
22
23
24
25
26
27
28
29
30
31
32
33
34
35
36
37
38
39
40
41
42
43
44
45
46
47
48
49
50
51
52
53
54
55
56
57
58
59
60
61
62
63
64
65
66
67
68
69
70
71
72
73
74
75
76
77
78
79
80
81
82
@CrossOrigin @RequestMapping("/api/v1" ) @RestController public class EmployeeRestController { @Autowired EmployeeService employeeService; @GetMapping("/employee/{id}" ) public R get (@PathVariable("id" ) Long id){ Employee emp = employeeService.getEmp(id); return R.ok(emp); } @PostMapping("/employee" ) public R add(@RequestBody Employee employee){ employeeService.saveEmp(employee); return R.ok(); } @PutMapping("/employee" ) public R update(@RequestBody Employee employee){ employeeService.updateEmp(employee); return R.ok(); } @DeleteMapping("/employee/{id}" ) public R delete(@PathVariable("id" ) Long id){ employeeService.deleteEmp(id); return R.ok(); } @GetMapping("/employees" ) public R all(){ List<Employee> employees = employeeService.getList(); return R.ok(employees); }
统一返回R对象
1
2
3
4
5
6
7
8
9
10
11
12
13
14
15
16
17
18
19
20
21
22
23
24
25
26
27
28
29
30
31
32
33
34
35
36
37
38
39
40
41
42
43
@Data public class R <T> { private Integer code; private String msg; private T data; public static <T> R<T> ok (T data ){ R<T> tr = new R<>(); tr.setCode (200 ); tr.setMsg ("ok" ); tr.setData (data); return tr; } public static R ok ( R tr = new R<>(); tr.setCode (200 ); tr.setMsg ("ok" ); return tr; } public static R error ( R tr = new R<>(); tr.setCode (500 ); tr.setMsg ("error" ); return tr; } public static R error (Integer code,String msg R tr = new R<>(); tr.setCode (code); tr.setMsg (msg); return tr; } public static R error (Integer code,String msg,Object data R tr = new R<>(); tr.setCode (code); tr.setMsg (msg); tr.setData (data); return tr; } }
跨域
1
2
3
4
5
6
7
8
9
10
11
12
13
14
15
16
17
18
19
20
/** * CORS policy:同源策略(限制ajax请求,图片,css,js); 跨域问题 * 跨源资源共享(CORS)(Cross-Origin Resource Sharing) * 浏览器为了安全,默认会遵循同源策略(请求要去的服务器和当前项目所在的服务器必须是同一个源[同一个服务器]),如果不是,请求就会被拦截 * 复杂的跨域请求会发送2次: * 1、options 请求:预检请求。浏览器会先发送options请求,询问服务器是否允许当前域名进行跨域访问 * 2、真正的请求:POST、DELETE、PUT等 * * * 浏览器页面所在的:http://localhost /employee/base * 页面上要发去的请求:http://localhost:8080 /api/v1/employees * /以前的东西,必须完全一样,一个字母不一样都不行。浏览器才能把请求(ajax)发出去。 * * 跨域问题: * 1、前端自己解决: * 2、后端解决:允许前端跨域即可 * 原理:服务器给浏览器的响应头中添加字段:Access-Control-Allow-Origin = * * * */
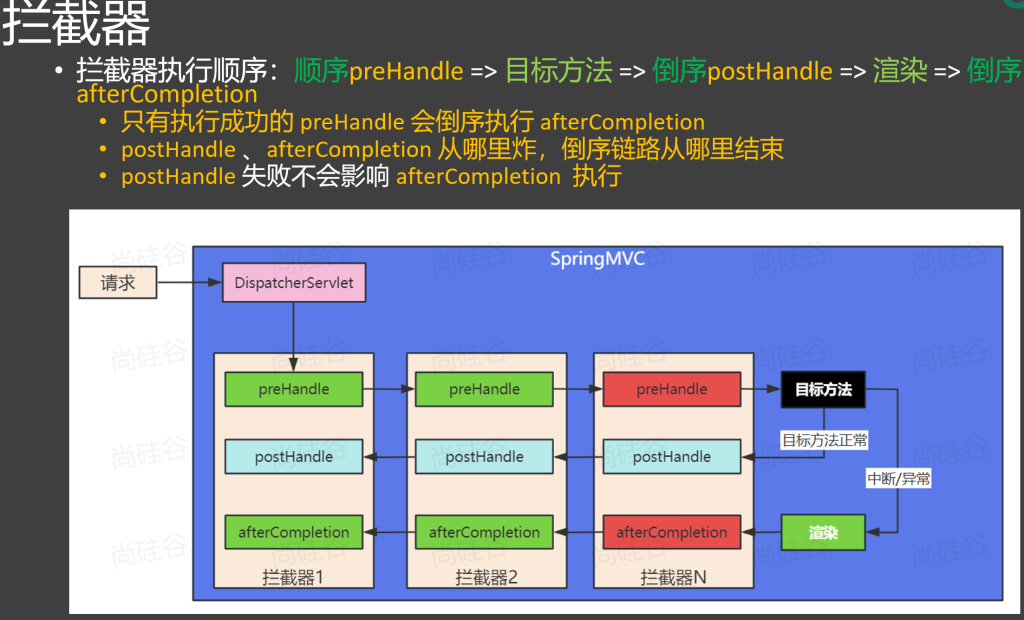
7.拦截器
SpringMVC 内置拦截器机制 ,允许在请求被目标方法处理的前后进行拦截,执行一些额外操作;比如:权限验证、日志记录、数据共享等…
1.拦截器的实现
要实现一个 SpringMVC 拦截器,需要创建一个类并实现 HandlerInterceptor 接口,该接口包含三个方法:
preHandle:在请求处理之前执行,返回 true 表示继续执行后续的处理流程,返回 false 表示中断请求处理。
postHandle:在请求处理之后,视图渲染之前执行。
afterCompletion:在整个请求处理完成后执行,通常用于资源清理等操作。
执行顺序:preHandle>>>目标方法>>>postHandle>>afterCompletion
1
2
3
4
5
6
7
8
9
10
11
12
13
14
15
16
17
18
19
20
21
22
23
@Component //拦截器还需要配置(告诉SpringMVC,这个拦截器主要拦截什么请求) public class MyHandlerInterceptor0 implements HandlerInterceptor { @Override public boolean preHandle(HttpServletRequest request, HttpServletResponse response, Object handler ) throws Exception { System .out .println("MyHandlerInterceptor0...preHandle..."); //放行; chain.doFilter(request,response); //String username = request.getParameter("username"); // response.getWriter().write ("No Permission!"); return true ; } @Override public void postHandle(HttpServletRequest request, HttpServletResponse response, Object handler , ModelAndView modelAndView) throws Exception { System .out .println("MyHandlerInterceptor0...postHandle..."); } @Override public void afterCompletion(HttpServletRequest request, HttpServletResponse response, Object handler , Exception ex) throws Exception { System .out .println("MyHandlerInterceptor0...afterCompletion..."); } }
2.拦截器的配置
1
2
3
4
5
6
7
8
9
10
11
12
13
@Configuration public class WebConfig implements WebMvcConfigurer { @Autowired MyHandlerIntercepter myHandlerIntercepter; @Override public void addInterceptors (InterceptorRegistry registry registry.addInterceptor (myHandlerIntercepter) .addPathPatterns ("/**" ) .excludePathPatterns ("/login" ); } }
3.多个拦截器的执行顺序
prehandle按顺序执行>>>目标方法>>>postHandle按倒序执行>>>afterCompletion按倒序执行
只要有一个拦截器拦截了,所有postHandle方法就不会执行
prehandle方法执行成功,则该prehandle方法必定有afterCompletion
4.拦截器vs过滤器
拦截器 过滤器
接口
HandlerInterceptor
Filter
定义
Spring 框架
Servlet 规范
放行
preHandle 返回 true 放行请求
chain.doFilter() 放行请求
整合性
可以直接整合Spring容器的所有组件
不受Spring容器管理,无法直接使用容器中组件 需要把它放在容器中,才可以继续使用
拦截范围
拦截 SpringMVC 能处理的请求
拦截Web应用所有请求
总结
SpringMVC的应用中,推荐使用拦截器
8.注解式异常处理
1.编程式vs声明式
编程式异常处理:
try - catch、throw、exception
声明式异常处理:
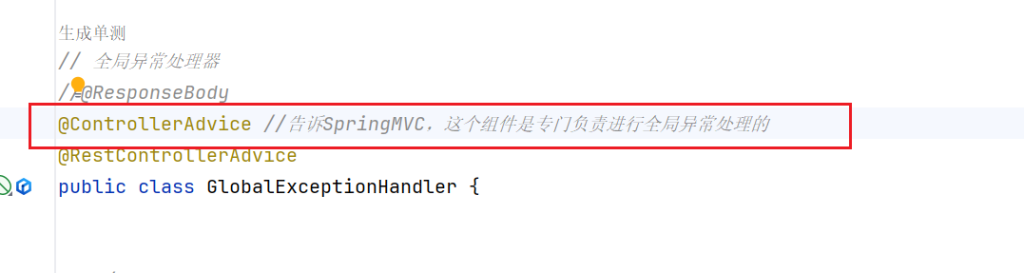
SpringMVC 提供了 @ExceptionHandler、@ControllerAdvice 等便捷的声明式注解来进行快速的异常处理
@ExceptionHandler:可以处理指定类型异常
@ControllerAdvice:可以集中处理所有Controller的异常
@ExceptionHandler + @ControllerAdvice: 可以完成全局统一异常处理
2.@ExceptionHandler-指定异常处理方法
单一类异常处理
在某类中添加异常处理方法 ,异常处理方法 只会处理该类的异常
1 2 3 4 5 6 7 8 9 10 11 12 13 14 15 16 17 18 19 20 21 22 23 24 25 26 @ResponseBody @ExceptionHandler(ArithmeticException.class) public R handleArithmeticException(ArithmeticException ex){ System.out .println("【本类】 - ArithmeticException 异常处理" ); return R.error(100 ,"执行异常:" + ex.getMessage()); } @ExceptionHandler(FileNotFoundException.class) public R handleException(FileNotFoundException ex){ System.out .println("【本类】 - FileNotFoundException 异常处理" ); return R.error(300 ,"文件未找到异常:" + ex.getMessage()); } @ExceptionHandler(Throwable.class) public R handleException02(Throwable ex){ System.out .println("【本类】 - Throwable 异常处理" ); return R.error(500 ,"其他异常:" + ex.getMessage()); }
3.@ControllerAdvice-全局异常处理
全局异常处理类 上添加注解@ControllerAdvice该类下的异常处理方法会处理所有异常
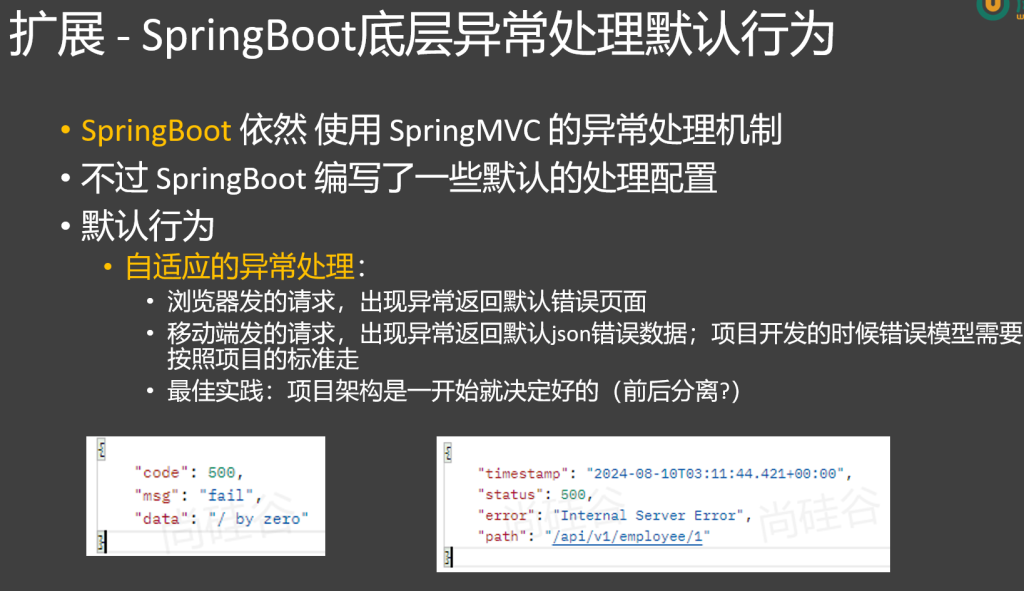
4.自适应处理
当异常未被处理时,SpringBoot底层对SpringMVC有一套自适应兜底机制
浏览器会响应页面,移动端会响应json
5.异常处理的最终方式
GlobalExceptionHandler
1 2 3 4 5 6 7 8 9 10 11 12 13 14 15 16 17 18 19 20 21 22 23 24 25 26 27 28 29 30 31 32 33 34 35 36 37 38 39 40 41 42 43 44 45 46 47 48 49 50 51 52 53 54 55 56 57 58 59 @RestControllerAdvice public class GlobalExceptionHandler { @ExceptionHandler (ArithmeticException .class ) public R error (ArithmeticException e System .out .println ("【全局】 - ArithmeticException 处理" ); return R.error (500 , e.getMessage ()); } @ExceptionHandler (BizException .class ) public R handleBizException (BizException e Integer code = e.getCode (); String msg = e.getMsg (); return R.error (code, msg); } @ExceptionHandler (value = MethodArgumentNotValidException .class ) public R methodArgumentNotValidException (MethodArgumentNotValidException ex BindingResult result = ex.getBindingResult (); List <FieldError > errors = result.getFieldErrors (); Map <String , String > map = new HashMap <>(); for (FieldError error : errors) { String field = error.getField (); String message = error.getDefaultMessage (); map.put (field, message); } return R.error (500 , "参数错误" , map); } @ExceptionHandler (Throwable .class ) public R error (Throwable e System .out .println ("【全局】 - Exception处理" + e.getClass ()); return R.error (500 , e.getMessage ()); } }
EmployeeServiceImpl
1
2
3
4
5
6
7
8
9
10
11
12
13
14
15
16
17
18
19
20
21
22
23
24
25
26
27
28
29
30
31
32
33
34
35
36
37
38
39
40
41
42
43
44
45
46
47
48
49
50
51
52
53
54
55
56
57
58
59
60
61
62
63
64
65
66
67
68
69
70
71
72
73
74
75
76
@Service public class EmployeeServiceImpl implements EmployeeService { @Autowired EmployeeDao employeeDao; @Override public Employee getEmp (Long id Employee empById = employeeDao.getEmpById (id); return empById; } @Override public void updateEmp (Employee employee Long id = employee.getId (); if (id == null ){ throw new BizException (BizExceptionEnume .ORDER_CLOSED ); } Employee empById = employeeDao.getEmpById (id); if (StringUtils .hasText (employee.getName ())){ empById.setName (employee.getName ()); } if (StringUtils .hasText (employee.getEmail ())){ empById.setEmail (employee.getEmail ()); } if (StringUtils .hasText (employee.getAddress ())){ empById.setAddress (employee.getAddress ()); } if (StringUtils .hasText (employee.getGender ())){ empById.setGender (employee.getGender ()); } if (employee.getAge () != null ){ empById.setAge (employee.getAge ()); } if (employee.getSalary () != null ){ empById.setSalary (employee.getSalary ()); } employeeDao.updateEmp (empById); } @Override public void saveEmp (Employee employee employeeDao.addEmp (employee); } @Override public void deleteEmp (Long id employeeDao.deleteById (id); } @Override public List <Employee > getList ( return employeeDao.getList (); } }
BizException
1
2
3
4
5
6
7
8
9
10
11
12
13
14
15
16
17
18
19
20
21
22
23
24
25
26
27
28
29
30
31
32
33
34
35
36
37
38
39
40
41
42
43
44
45
46
47
48
49
50
51
52
53
54
55
56
57
58
59
60
package com.atguigu.practice.exception; import lombok.Data; /** * 业务异常 * 大型系统出现以下异常:异常处理文档,固化 * 1、订单 1xxxx * 10001 订单已关闭 * 10002 订单不存在 * 10003 订单超时 * ..... * 2、商品 2xxxx * 20001 商品已下架 * 20002 商品已售完 * 20003 商品库存不足 * ...... * 3、用户 * 30001 用户已注册 * 30002 用户已登录 * 30003 用户已注销 * 30004 用户已过期 * * 4、支付 * 40001 支付失败 * 40002 余额不足 * 40003 支付渠道异常 * 40004 支付超时 * * 5、物流 * 50001 物流状态错误 * 50002 新疆得加钱 * 50003 物流异常 * 50004 物流超时 * * 异常处理的最终方式: * 1、必须有业务异常类:BizException * 2、必须有异常枚举类:BizExceptionEnume 列举项目中每个模块将会出现的所有异常情况 * 3、编写业务代码的时候,只需要编写正确逻辑,如果出现预期的问题,需要以抛异常的方式中断逻辑并通知上层。 * 4、全局异常处理器:GlobalExceptionHandler; 处理所有异常,返回给前端约定的json数据与错误码 */ @Data public class BizException extends RuntimeException { private Integer code; //业务异常码 private String msg; //业务异常信息 public BizException(Integer code, String message) { super(message); this.code = code; this.msg = message; } public BizException(BizExceptionEnume exceptionEnume) { super(exceptionEnume.getMsg()); this.code = exceptionEnume.getCode(); this.msg = exceptionEnume.getMsg(); } }
BizExceptionEnume
1
2
3
4
5
6
7
8
9
10
11
12
13
14
15
16
17
18
19
20
21
22
23
24
25
26
27
28
29
public enum BizExceptionEnume { ORDER_CLOSED(10001 , "订单已关闭" ), ORDER_NOT_EXIST(10002 , "订单不存在" ), ORDER_TIMEOUT(10003 , "订单超时" ), PRODUCT_STOCK_NOT_ENOUGH(20003 , "库存不足" ), PRODUCT_HAS_SOLD(20002 , "商品已售完" ), PRODUCT_HAS_CLOSED(20001 , "商品已下架" ); @Getter private Integer code; @Getter private String msg; private BizExceptionEnume(Integer code, String msg) { this .code = code; this .msg = msg; } }
总结:
异常处理的最终方式:
定义枚举类:定义异常枚举,每个常量含异常码和信息,提供获取方法。
自定义异常类:继承 RuntimeException,接收枚举参数,记录异常码。
业务抛异常:业务逻辑中按不同情况用枚举抛出自定义异常。
捕获处理:在控制器或全局处理器捕获,将异常信息格式化返回。
9.数据校验
1.JSR303校验注解、@Valid、BindingResult
JSR 303 是 Java 为 Bean 数据合法性校验 提供的标准框架,它已经包含在 JavaEE 6.0 标准中。JSR 303 通过在 Bean 属性上 标注 类似于 @NotNull、@Max 等标准的注解指定校验规则,并通过标准的验证接口对Bean进行验证。
1.导包
1 2 3 4 <dependency > <groupId > org.springframework.boot</groupId > <artifactId > spring-boot-starter-validation</artifactId > </dependency >
2.数据校验使用流程
1、引入校验依赖:spring-boot-starter-validation
2、定义封装数据的Bean
3、给Bean的字段标注校验注解,并指定校验错误消息提示
4、使用@Valid、@Validated开启校验
5、使用 BindingResult 封装校验结果
6、使用自定义校验注解 + 校验器(implements ConstraintValidator) 完成gender字段自定义校验规则
7、结合校验注解 message属性 与 i18n 文件,实现错误消息国际化
8、结合全局异常处理,统一处理数据校验错误
3.编写注释校验
注解加在属性上面
1
2
3
4
5
6
7
8
9
10
11
12
13
14
15
@NotNull :被注释的元素不能为 null。@NotEmpty :被注释的字符串、集合、数组等不能为 null 且长度必须大于 0 。@NotBlank :被注释的字符串不能为 null,且去除首尾空格后长度大于 0 。@Size :被注释的元素大小必须在指定范围内。@Min :被注释的元素必须是一个数字,其值必须大于等于指定的最小值。@Max :被注释的元素必须是一个数字,其值必须小于等于指定的最大值。@Pattern :被注释的元素必须符合指定的正则表达式。@Email :被注释的元素必须是一个有效电子邮箱
注解括号中可以写message 属性,校验不通过时提醒前端
1 @NotNull(message="这是提示" )
@Valid开启校验
在参数前添加@Valid注解,不添加就不会校验
1 public void add (@RequestBody @Valid Employee employee)
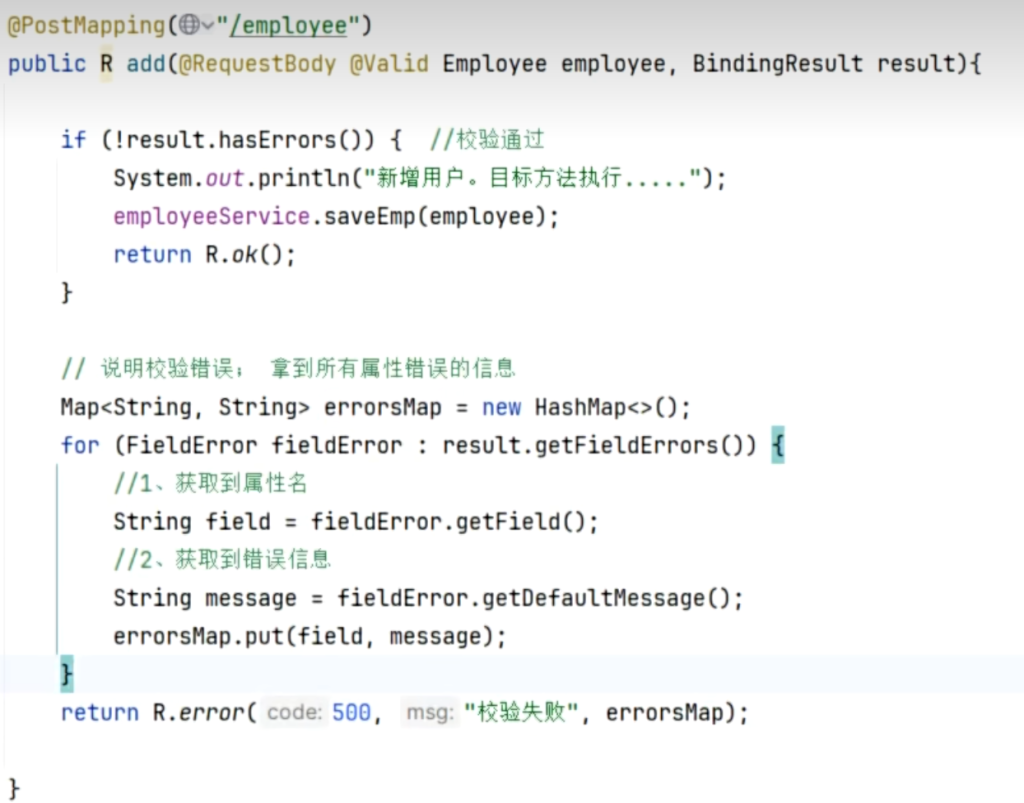
4.BingdingResult校验结果
默认结果:如果校验不通过,方法不执行 ,并且会返回一长串默认的json
修改结果:添加BindingResult 参数,校验不通过,方法也会照常执行 ,错误结果会封装到BindingResult当中
5.全局异常处理器(不用BingdingResult,推荐这个)
MethodArgumentNotValidException 异常 会在使用 @Valid 注解进行验证且验证失败时抛出。
1
2
3
4
5
6
7
8
9
10
11
12
13
@Component public class ExceptionHandlers { @ExceptionHandler(MethodArgumentNotValidException.class ) public String bindException(MethodArgumentNotValidException ex) { BindingResult result = ex.getBindingResult(); List<FieldError> fieldErrors = result.getFieldErrors(); Map <String , String > map = new HashMap<>(); for (FieldError fieldError : fieldErrors) { map .put(fieldError.getField(), fieldError.getDefaultMessage()); } return "异常方法" ; } }
这样就可以统一处理所有的校验异常
数据校验:1 、导入校验包2 、JavaBean 编写校验注解3 、使用 @Valid 告诉 SpringMVC 进行校验效果 1 4 【以后不用】、在 @Valid 参数后面,紧跟一个 BindingResult 参数,封装校验结果效果 2 *: 全局异常处理机制5 【推荐】:编写一个全局异常处理器,处理* MethodArgumentNotValidException *(校验出错的异常),统一返回校验失败的提示消息6 :自定义校验* = 自定义校验注解 + 自定义校验器
2.自定义校验
定义一个类实现ConstraintValidator 接口
isValid 就是校验方法
1
2
3
4
5
6
7
8
9
10
11
12
13
14
15
public class GenderValidator implements ConstraintValidator <Gender , String > { @Override public boolean isValid (String value, ConstraintValidatorContext context return "男" .equals (value) || "女" .equals (value); }
1.自定义校验注解
1 2 3 4 5 6 7 8 9 10 11 12 13 14 15 @Constraint (validatedBy = { myvalidator.class })@Target ({ ElementType.FIELD , ElementType.METHOD , ElementType.PARAMETER })@Retention (RetentionPolicy.RUNTIME)@Documented public @interface validatorInterface { String message () default "自定义校验失败"; Class<?>[] groups () default {}; Class<? extends Payload>[] payload () default {}; }
2.国际化错误消息
1.基本使用
在messages.properties 中定义错误消息
1 名称(例如:gender.message)= 错误消息
在方法中调用错误消息
1 message = "{gender.message}"
2.国际化用法
配置文件messages后添加国家区域代码
例如中国:
1 messages_zh_CN.properties
在不同国家环境读取不同配置文件
10.xxO对象的使用
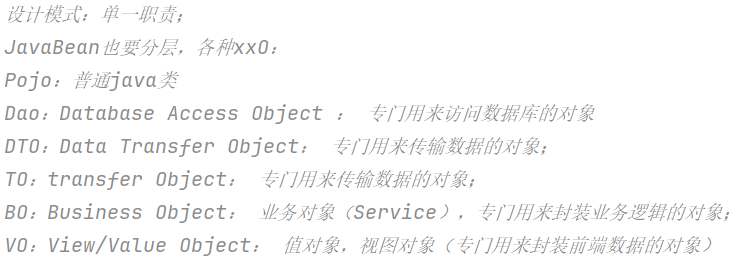
POJO(Plain Old Java Object) 定义:简单Java对象,无特殊框架依赖,有属性及getter/setter等方法。 用途:用于数据表示与传递。
DO(Domain Object) 定义:面向领域模型,抽象业务概念,包含业务数据与行为。 用途:封装业务逻辑,表达业务概念,是领域层核心。
DAO(Data Access Object) 定义:数据访问对象。 用途:负责与数据库交互,实现数据增删改查,分离业务与数据访问逻辑。
VO(Value Object) 定义:值对象。 用途:为前端展示提供合适数据结构。
DTO(Data Transfer Object) 定义:数据传输对象。 用途:在不同层间传输数据,减少传输量,保护业务对象结构。
BO(Business Object) 定义:业务对象。 用途:封装业务逻辑,分离业务与数据访问逻辑。
PO(Persistent Object) 定义:持久化对象。 用途:与数据库表对应,用于ORM框架实现数据映射。
VO的使用
1 2 3 4 5 6 7 8 9 10 11 12 13 14 15 16 17 18 19 20 21 22 23 24 25 @Operation(summary="获取所有员工信息" ) @GetMapping("/employees" ) public R all(){ List<Employee> employees = employeeService.getList(); List<EmployRespVo> collect = employees.stream() .map(employee -> { EmployRespVo vo = new EmployRespVo(); BeanUtils.copyProperties(employee, vo); return vo; }).collect(Collectors.toList()); return R.ok(collect); }
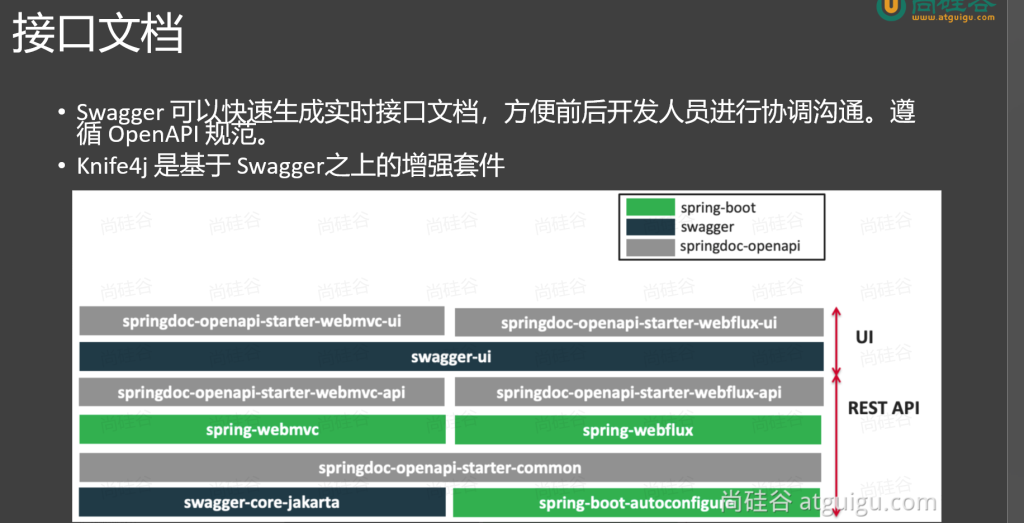
11.接口文档
1.简介
2.引入依赖
1 2 3 4 5 <dependency > <groupId > com.github.xiaoymin</groupId > <artifactId > knife4j-openapi3-jakarta-spring-boot-starter</artifactId > <version > 4.4.0</version > </dependency >
3.yaml配置文件
1 2 3 4 5 6 7 8 9 10 11 12 13 14 15 16 17 springdoc: swagger-ui: path: /swagger-ui.html tags-sorter: alpha operations-sorter: alpha api-docs: path: /v3/api-docs group-configs: - group: 'default' paths-to-match: '/**' packages-to-scan: com.xiaominfo.knife4j.demo.web knife4j: enable: true setting: language: zh_cn
4.标签用法
1
2
3
4
@Tag (name = "" )@Operation (summary = "" )@Schema (description = "" )@Parameter (name = "参数名" , description = "描述" , in = "参数位置" , required = true/false)
注解 标注位置 作用
@Tag
controller 类
描述 controller 作用
@Parameter
参数
标识参数作用
@Parameters
参数
参数多重说明
@Schema
model 层的 JavaBean
描述模型作用及每个属性
@Operation
方法
描述方法作用
@ApiResponse
方法
描述响应状态码等
数据转换
•@JsonFormat:日期处理
源码-SpringMVC底层原理
1.DispatcherServlet九大组件
了解 DispatcherServlet 请求处理流程
关注点:
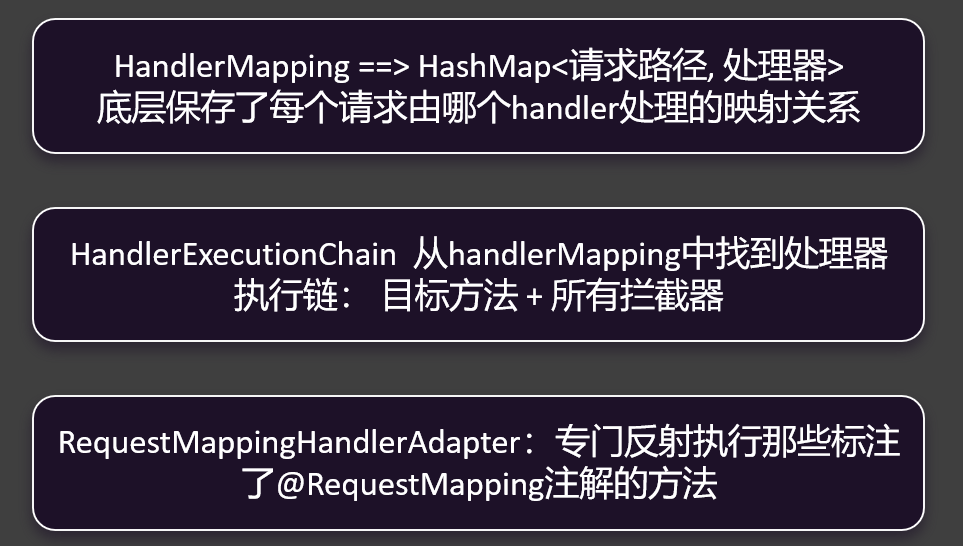
HandlerMapping
HandlerAdapter
参数处理器 返回值处理器
九大组件
MultipartResolver LocaleResolver
ThemeResolver
List List List RequestToViewNameTranslator
FlashMapManager List
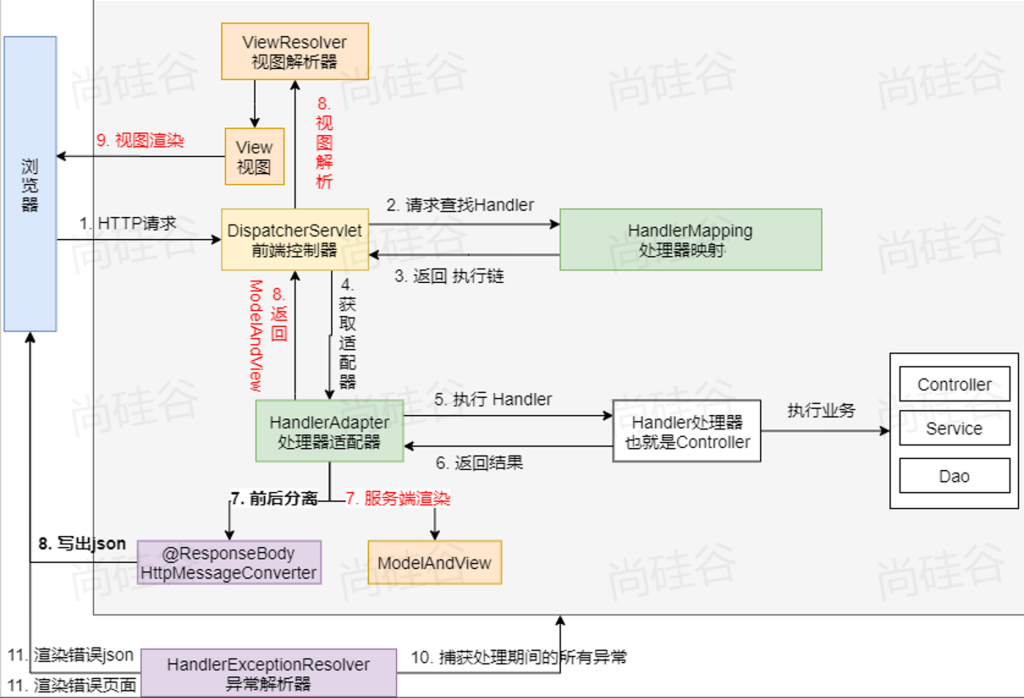
2.运行流程
简要版
浏览器一进来,请求发过来,由DispatcherServlet处理,它会去HandlerMapping里边,根据每一个请求路径的这个map去找这个请求由谁处理,找到由谁处理以后会返回执行链,根据执行链会得到一个适配器,什么样的请求处理得到什么样的适配器,适配器就是大型反射工具,适配器在执行目标方法之前,其实会有一个拦截器的流程(前置)然后再执行目标方法,目标方法执行完后再执行拦截器的后置,执行完这个流程后得到目标方法的返回结果,如果你是页面跳转就会有ModelAndView这一套,这一套就交给视图解析器,得到视图进行页面渲染。如果是前后端分离交给消息转换器,消息转换器把这个JSON写出去。如果在这期间出现任何异常,异常解析器就会捕获处理期间的所有异常,得到错误的异常内容,再返回
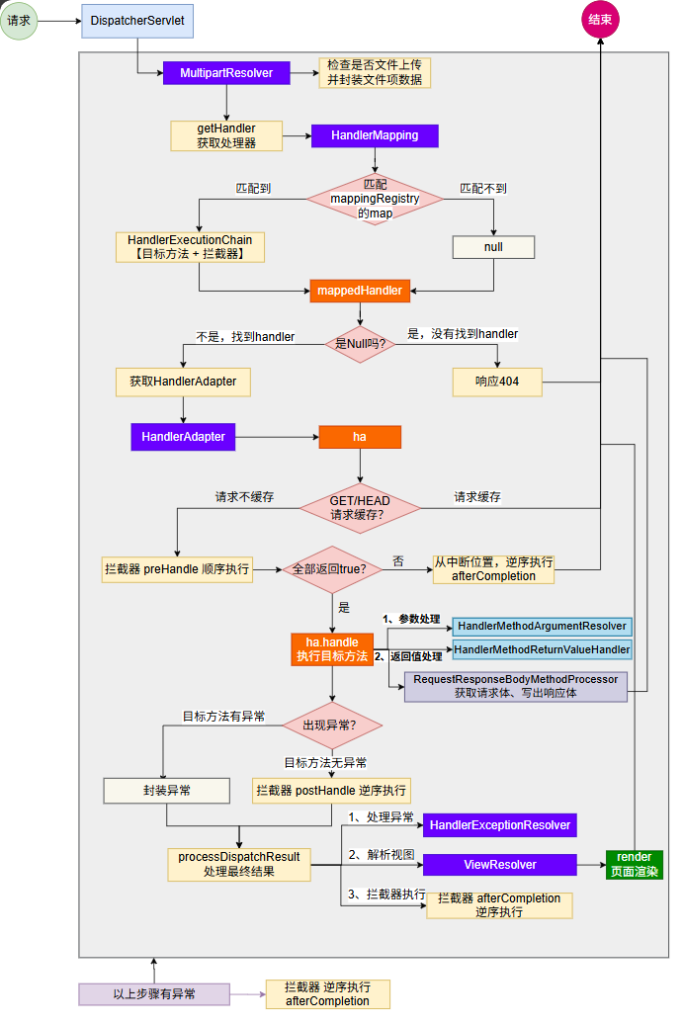
完整版
DispatcherServlet进来先是文件上传解析器,判定是不是文件上传请求,在这里做处理,然后再获取处理器,从HandlerMapping里边挨个找映射,如果找到了就会拿到目标方法的执行链,找不到响应404,最终把找到还是找不到封装到mappedHandler,如果它是Null就代表没找到,即404,找到了就再找到它的适配器,适配器最终处理目标方法,处理目标方法之前它还会判断是否有请求缓存,如果请求缓存就直接结束,如果请求不缓存就接着往下走,看拦截器是不是preHandle,但凡有一个返回false,代表拦截器炸了,炸了之后从中断位置执行afterCompletion然后结束,如果全部返回true,就往下走,执行目标方法,目标方法里边参数处理会有参数解析器,返回值处理会有返回值解析器,这两个目标方法执行完如果目标方法执行完出现了异常咋办,有异常会把异常封装起来,没异常逆序执行拦截器postHandler。无论有无异常最终都会执行最终处理processDispatchResult,有异常是封装异常,没异常执行postHandler,最后都会来到processDispatchResult,最终处理的话有异常处理异常,有页面渲染页面,在以上所有步骤中,但凡有异常,拦截器逆序执行afterCompletion
SpringMVC完结