一.Spring篇-企业级一站式框架
1.Spring介绍
Spring体系
官网:spring.io
广义:
•Spring是Spring体系
狭义:
•Spring是Spring Framework
Spring Framework
Spring是一个 IOC(DI) 和 AOP 框架
Spring有很多优良特性
非侵入式:基于Spring开发的应用中的对象可以不依赖于Spring的API
依赖注入:DI(Dependency Injection)是反转控制(IOC)最经典的实现
面向切面编程:Aspect Oriented Programming - AOP
容器:Spring是一个容器,包含并管理应用对象的生命周期
组件化:Spring通过将众多简单的组件配置组合成一个复杂应用。
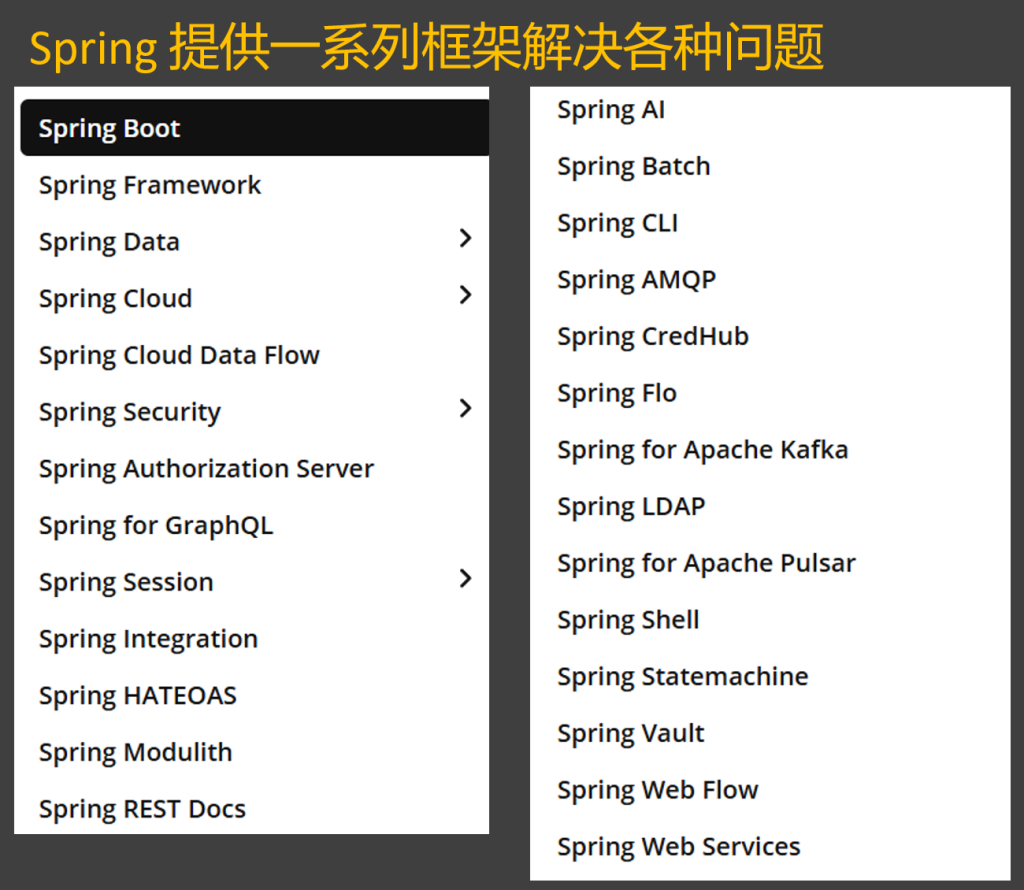
一站式:Spring提供了一系列框架,解决了应用开发中的众多问题
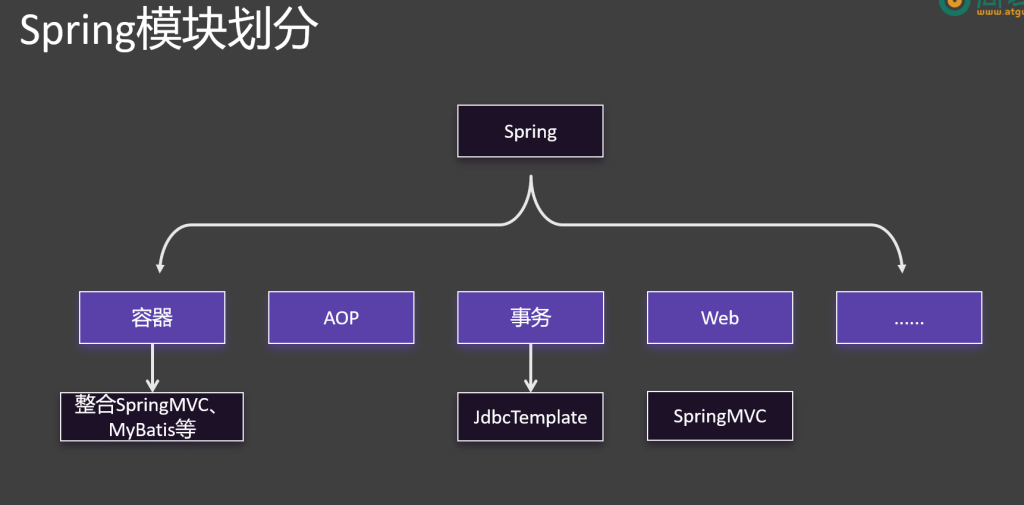
Spring模块划分
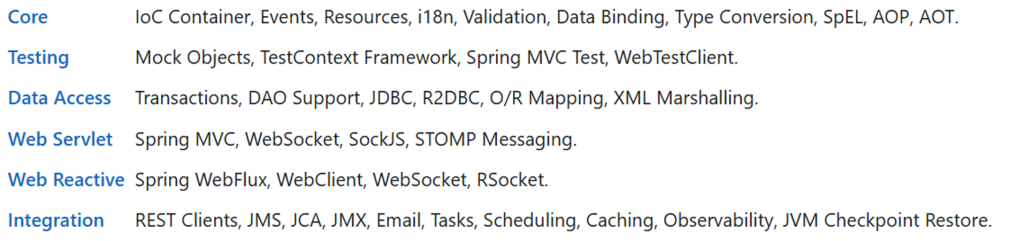
Core(核心):IoC容器、事件、资源、国际化、数据校验、数据绑定、类型转换、SpEL、AOP、AOT
Testing(测试):对象模拟、测试框架、SpringMVC测试、WebTestClient
Data Access(数据访问):事务、DAO 支持、JDBC、R2DBC、对象关系映射、XML转换
Web Servlet(Servlet式Web):SpringMVC、WebSocket、SockJS、STOMP 消息
Web Reactive(响应式Web):Spring WebFlux、WebClient、WebSocket、RSocket
Integration(整合):REST 客户端、Java消息服务、Java 缓存抽象、Java 管理扩展、邮件、任务、调度、缓存、可观测性、JVM 检查点恢复
2.容器篇
1.基本概念
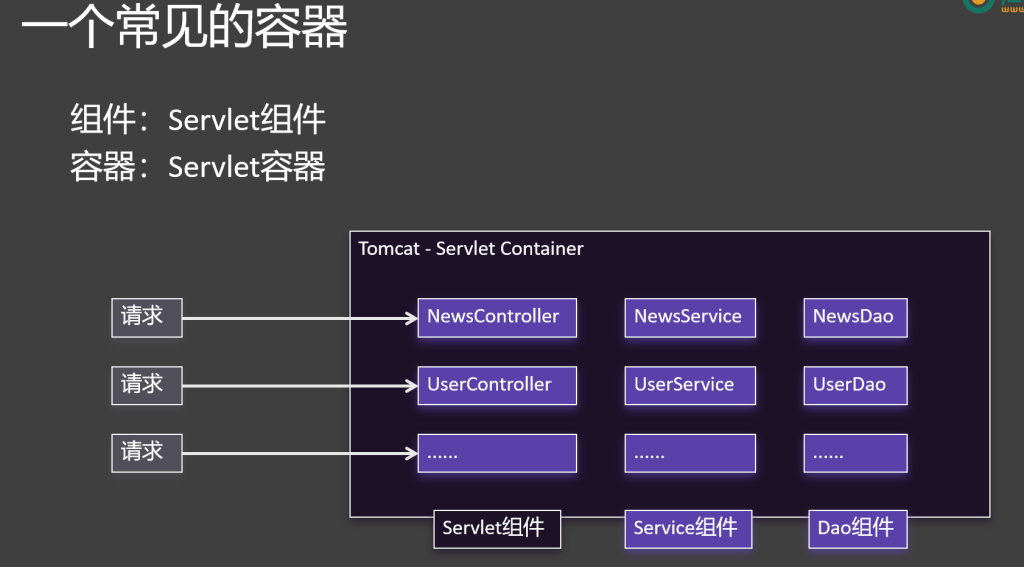
组件:具有一定功能的对象
容器:管理组件(创建、获取、保存、销毁)
IOC:Inversion of Control(控制反转)
控制:资源的控制权-资源的创建、获取、销毁
反转:和传统方式不同
DI:Dependency Injection(依赖注入)
依赖:组件的依赖关系,如NewsController依赖于NewsService
注入:通过setter方法、构造器、等方式自动的注入(赋值)
一个常见的容器
2.组件注册
一共有13个实验,前九个常见
实验1:@Bean-把组件放到容器
1.主类
运行时返回ioc容器-ApplicationContext:Spring应用上下文对象
1 2 3 4 5 6 7 8 @SpringBootApplication public class Demo01Application { public static void main (String[] args ) ConfigurableApplicationContext ioc = SpringApplication.run(Demo01Application.class , args ); } }
2.使用以下命令获得所有组件名称-spring启动会有很多默认组件
1 2 //2 .获取容器中所有组件的名字,spring启动会有很多默认组件 String[] beanNames = ioc.getBeanDefinitionNames()
3.准备我们自己的组件
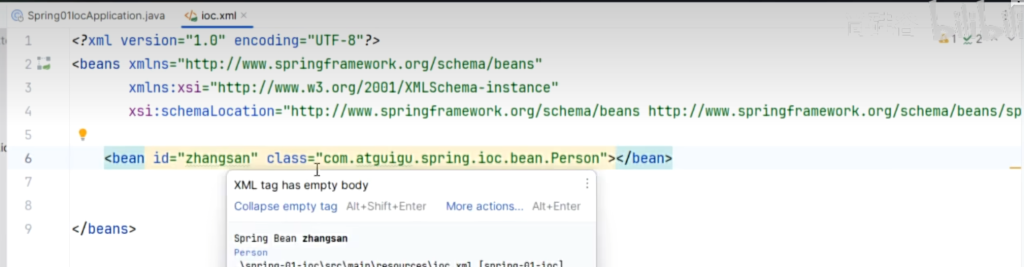
注册bean组件
首先在bean文件夹中创建类(@Data注解为lombok自动补全)
1
2
3
4
5
6
@Data public class Person private String name; private int age; private String gender; }
然后在主类中创建方法,返回该类
加上@Bean(“名字”)注解,此时组件就注册好了,组件名默认是方法名
1 2 3 4 5 6 7 8 9 @Bean public Person zhangsan () { Person person = new Person (); person.setName("zhang" ); person.setAge(18 ); person.setGender("男" ); return person; }
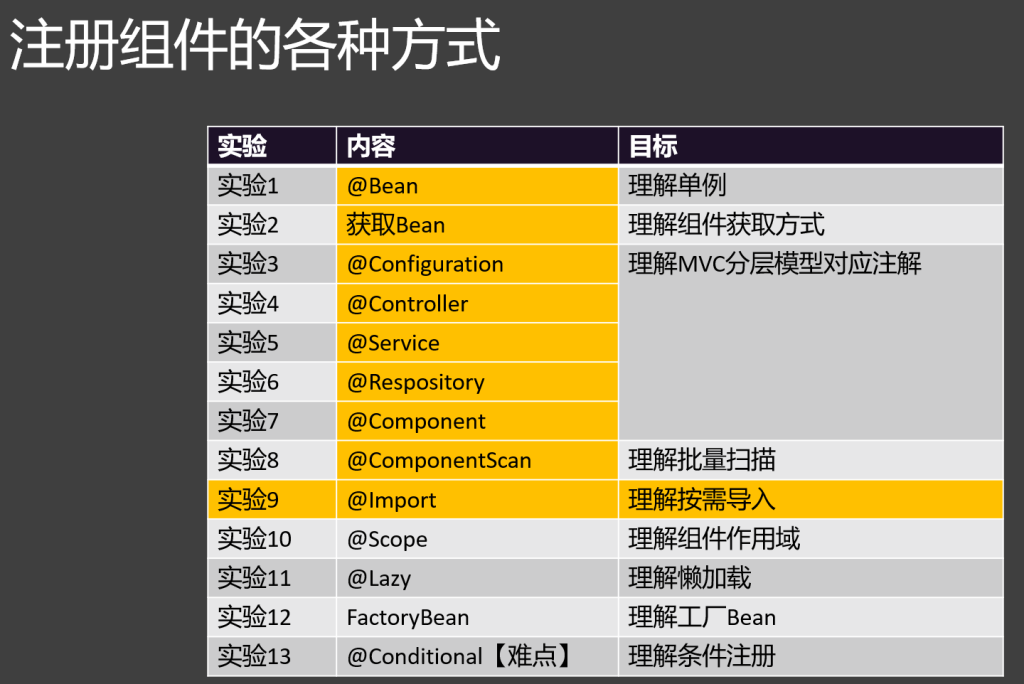
组件的创建时期:容器的启动过程中 就会创建组件对象
组件的默认模式:单例
实验2:从容器中获取组件-按照名字、类型
手动获取bean组件
组件的四大特性:(名字、类型)、对象、作用域
组件名字要全局唯一
按名字 获取bean组件,默认为object对象,需要时可以强转为指定类型
1 Object zhangsan = ioc.getBean("zhangsan" )
按类型 获取单一 bean组件,默认为原类型,无须强转
1 Person bean = ioc.getBean(Person.class)
按类型 获取所有 bean组件,默认为map集合
1 Map <String , Person> beansOfType = ioc.getBeansOfType(Person.class );
按照类型+名字 获取单一bean组件,默认原类型
Person bean = ioc.getBean(zhangsan,Person.class);
异常情况:
组件不存在,抛异常:NoSuchBeanDefinitionException
组件不唯一
按类型 只获取一个组件,抛异常:NoUniqueBeanDefinitionException
按名字 只获取一个组件,不会抛异常,如果组件名不唯一,组件名相同谁先注册就是谁
实验2补充-组件创建时机和单例特性
组件的创建时机:容器启动过程中就会创建组件对象
单实例特性:所有组件默认是单例的,每次获取直接从容器中拿,容器提前会创建组件
实现3 @Configuration-配置类
@Configuration 标注配置类,可用于配置bean组件
1
2
3
4
5
6
7
@Configuration public class PersonConfig { @Bean public Person zhangsan ( return new Person ("zhangsan" , 20 , "男" ); } }
实验4-7 @Controller、@Service、@Repository、@Component-mvc分层注解
1
2
3
4
@Controller 控制层@Service 服务层@Repository 持久层@Component 组件
给人看的,实际都是Component
实验8 @ComponentScan-批量扫描
默认:分层注解能起作用的前提是,这些组件必须在主程序所在的包及其子包结构下
非默认情况下用@ComponentScan
1 @ComponentScan(basePackages = "com.zhang.demo1" )
写在配置类上
扫描当前包及其子包,注册了的组件
实验9:@import-导入第三方组件
第三方组件都是只读文件没办法标分层注解
对于导入第三方组件有两种办法:
第一种就是自己new出来,在头上加上@Bean
第二种就是用@import导入,写在配置类上
实现10:@Scope-调整组件作用域
1
2
3
4
@Scope ("prototype" )非单实例@Scope ("singleton" )单实例,默认值@Scope ("request" )同一请求单实例@Scope ("session" )同一会话单实例
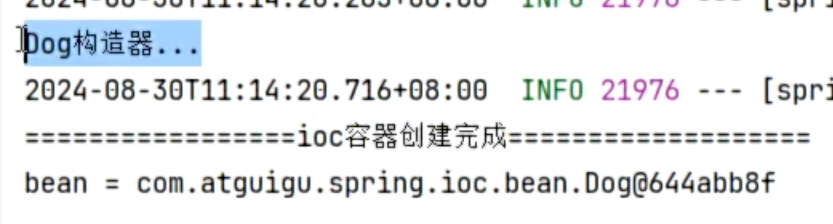
单实例:多次获取打印同一对象(hash地址一样)->容器启动的时候就会创建单实例组件的对象,容器启动完成之前就会创建好
多实例:容器启动的时候不会创建非单实例组件的对象,什么时候获取什么时候创建
实现11:@Lazy-单例情况下的懒加载
默认为饿汉式 加载,修改为懒汉式 加载
容器启动完成之前不会创建懒加载组件的对象,什么时候获取什么时候创建
标注在**@Bean的上方**
懒汉加载是指在首次使用时才创建对象 实例,而饿汉加载则是在类加载时就创建对象实例。
实现12:FactoryBean-利用工厂制造复杂Bean
代替@Bean 注解标注组件
适用场景:制造对象复杂 的时候,利用工厂方法进行创建
FactoryBean在容器中放的组件的类型,是接口中泛型指定的类型,组件的名字是工厂自己的名字
1
2
3
4
5
6
7
8
9
10
11
12
13
14
15
16
17
18
@Component public class BYD implements FactoryBean { @Override public Object getObject () throws Exception { return new Car (); } @Override public Class <?> getObjectType ( return Car .class ; } @Override public boolean isSingleton ( return FactoryBean .super .isSingleton (); } }
实验13.@Conditional-条件注册
标注在**@bean的上方**,需要添加一个条件类
1
2
3
4
5
6
public class windowsCondition implements Condition { @Override public boolean matches (ConditionContext context, AnnotatedTypeMetadata metadata return context.getEnvironment ().getProperty ("os" ).contains ("mac" ); } }
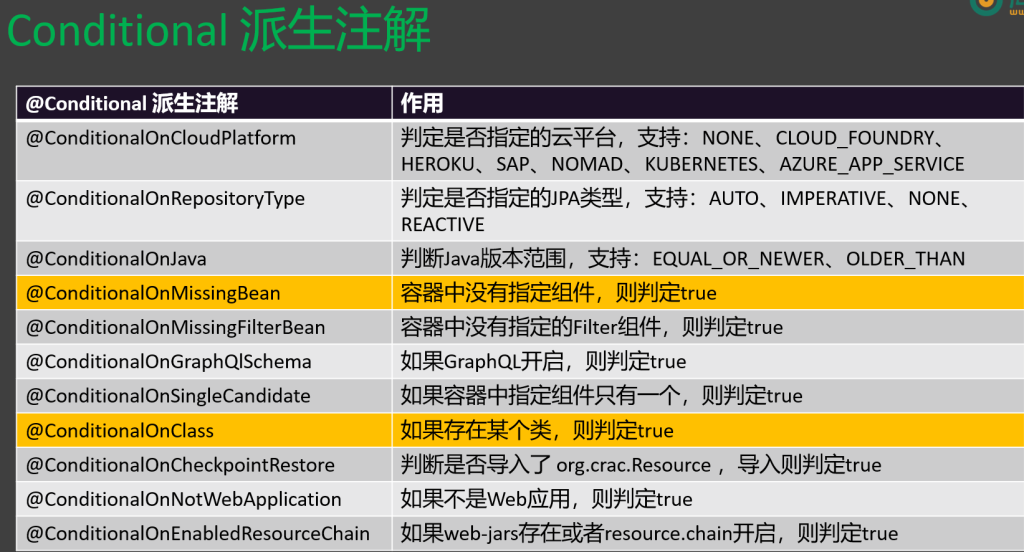
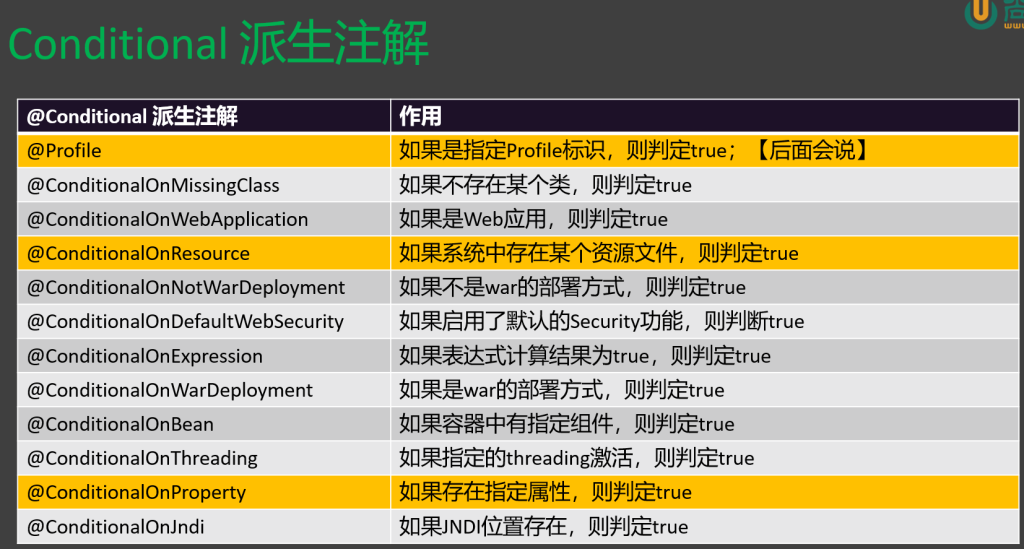
实验13补充@Conditional派生注解
@Conditional:这是最基本的条件注解,它可以接受一个或多个Condition接口的实现类作为参数。只有当所有条件都满足时,才会创建或注册Bean。
@ConditionalOnBean:这个注解用于检查指定的Bean是否存在于Spring容器中。如果存在,则创建或注册当前Bean。
@ConditionalOnMissingBean:与@ConditionalOnBean相反,这个注解用于检查指定的Bean是否不存在于Spring容器中。如果不存在,则创建或注册当前Bean。
@ConditionalOnClass:这个注解用于检查指定的类是否存在于类路径中。如果存在,则创建或注册当前Bean。
@ConditionalOnMissingClass:与@ConditionalOnClass相反,这个注解用于检查指定的类是否不存在于类路径中。如果不存在,则创建或注册当前Bean。
@ConditionalOnProperty:这个注解用于检查指定的属性是否存在于配置文件中,并且其值是否满足指定的条件。如果满足条件,则创建或注册当前Bean。
@ConditionalOnResource:这个注解用于检查指定的资源是否存在于类路径中。如果存在,则创建或注册当前Bean。
@ConditionalOnWebApplication:这个注解用于检查当前应用是否是一个Web应用。如果是,则创建或注册当前Bean。
@ConditionalOnNotWebApplication:与@ConditionalOnWebApplication相反,这个注解用于检查当前应用是否不是一个Web应用。如果不是,则创建或注册当前Bean。
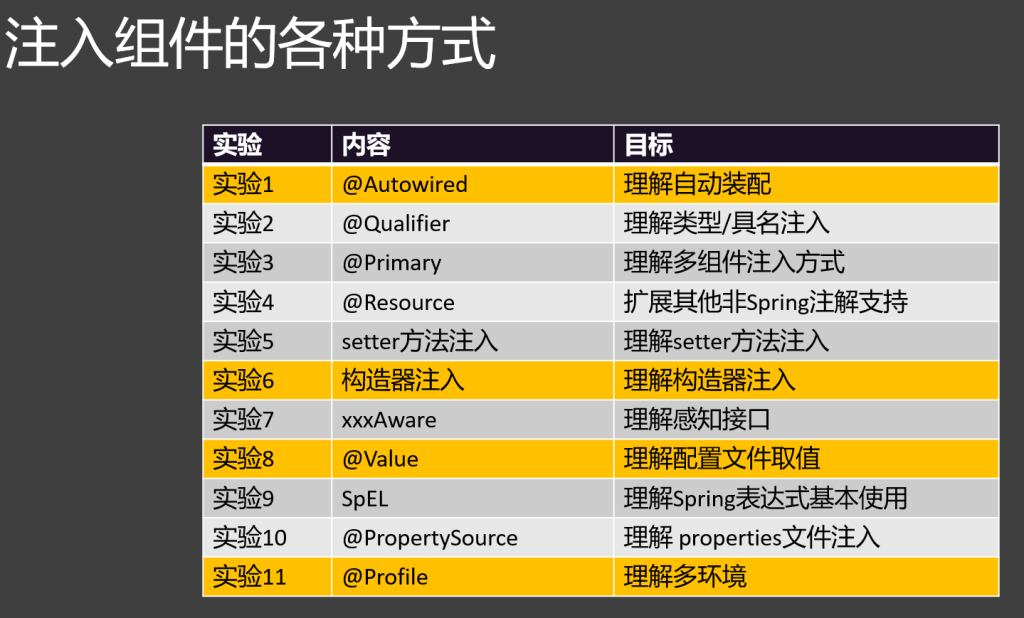
3.组件注入
实验1-4 基本注解
@Autowired: 注入方式:默认按照
类型
(byType)进行注入。如果有多个相同类型的Bean,Spring
会尝试按照名称(byName)进行注入
。如果仍然无法确定唯一的Bean,Spring会抛出异常。 使用场景:适用于大多数情况,尤其是当只有一个匹配的Bean时。
@Autowired Person zhangsan;//优先类型找,找到多个名字找
@Resource: 注入方式:默认按照名称 (byName)进行注入。如果没有找到匹配的名称,则按照类型(byType)进行注入。 使用场景:适用于需要明确指定名称进行注入的情况,或者在Java标准库中使用。
@Qualifier: 注入方式:与@Autowired或@Inject一起使用,用于指定具体要注入的Bean。 使用场景:当有多个相同类型的Bean时,通过指定名称或其他限定符来明确注入的Bean。
@Primary: 注入方式:当有多个相同类型的Bean时,使用@Primary注解来指定首选的Bean。当没有使用@Qualifier注解时,Spring会优先注入使用@Primary注解的Bean。 使用场景:适用于有多个相同类型的Bean,但希望有一个默认的首选Bean的情况。
实验5:Setter方法注入
1
2
3
4
5
6
Dog haha;@Autowired public void setDog (Dog dog system.out .println ("setDog..." +dog); this .haha = dog ; }
实验6:构造器注入
1
2
3
4
5
6
7
8
@Component public class dog { private Person person; public dog(Person person) { this .person = person; } }
组件中可以根据构造方法的参数自动注入
在参数前可以用@Qualifier精确指定
实验7:xxxAware感知接口
1
2
3
4
5
6
7
8
@Component public class dog implements EnvironmentAware { @Override public void setEnvironment (Environment environment } }
BeanNameAware:获取Bean的名称。
BeanFactoryAware:获取BeanFactory实例。
ApplicationContextAware:获取ApplicationContext实例。
MessageSourceAware:获取国际化消息源。
ApplicationEventPublisherAware:获取事件发布器。
ResourceLoaderAware:获取资源加载器
实验8:@Value给属性赋值
加在组件的属性上方
1.直接赋值
2.从配置文件xxx.properties获取值
3.进行计算赋值
4.调用方法赋值
1 @Value("'zhangsan'.toUpperCase()")
5.静态调用类赋值
1 @Value("T(java.lang.Math).random()")
6.设置默认值
以:分割,当取不到cat.name时,默认为Tom
1 @Value("${cat.name:Tom} " )
实验9:@PropertySpurce属性来源
写在类上,注明@Value取值的文件
classpath:从项目路径下找
classpath*:从所有包路径下找
1 2 3 4 5 6 7 @PropertySource("classpath:cat.properties" ) pubic class Cat { @Value("${cat.name} " ) private String name;@Value("${cat.age} " ) private int age;}
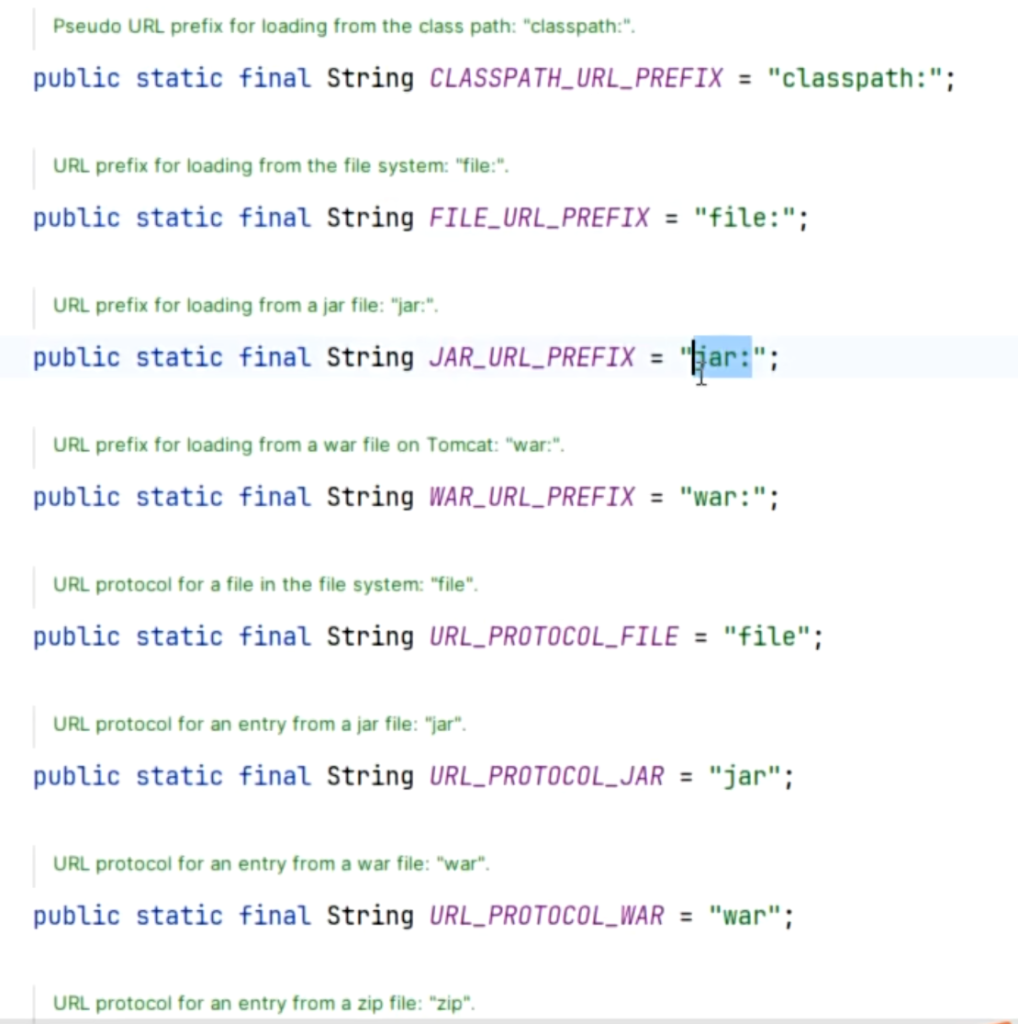
实验10 ResourceUtils-获取资源
1
2
3
4
File file = ResourceUtils.getFile("classpath:abc.jpg" );System.out.println ("file = " + file ); int available = new FileInputStream(file ).available();System.out.println ("available = " + available);
支持很多类路径
实验11:@Profile多环境
在指定环境下加载组件
在类或者方法上标注
1 @Profile("环境标识" ) ,当这个环境被激活的时候,才会加入如下组件
@Profile中自带Conditional
项目默认为default环境
可以在配置文件中修改为自己定义的环境
1 spring.profiles.active =dev
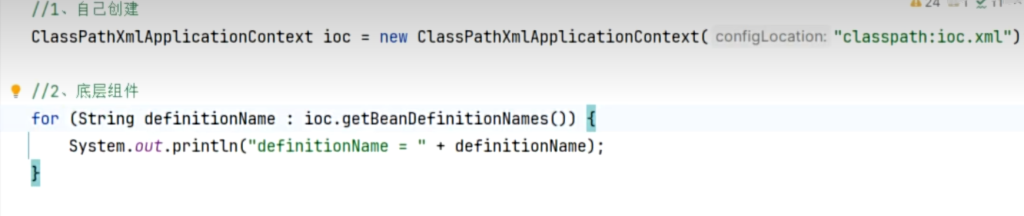
源码-原生方式使用容器-ClassPathXmlApplicationContext
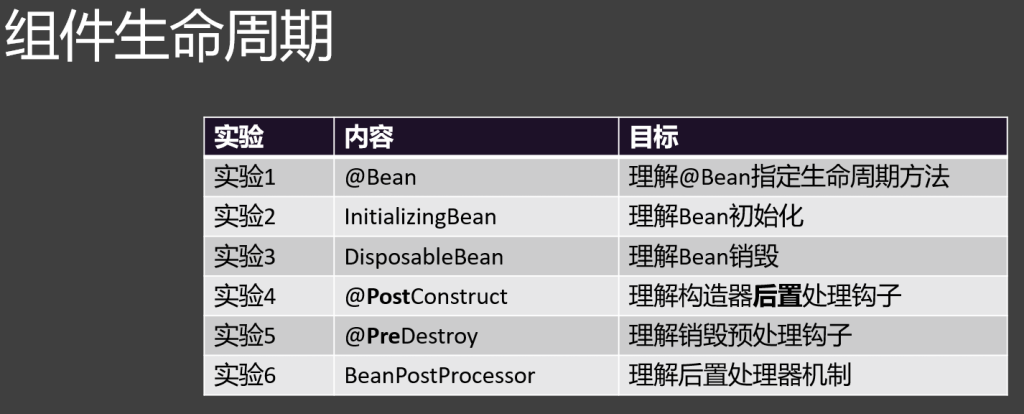
4.组件生命周期
实验1@Bean 指定生命周期初始化和销毁方法
在User组件类中定义相关方法
1
2
3
4
5
6
7
public void initUser () System.out .println("初始化---------------" ); } public void destroyUser () System.out .println("销毁----------------" ); }
在UserConfig中用@Bean注册为组件时,指明方法
1
2
3
4
@Bean (initMethod = "initUser" , destroyMethod = "destroyUser" , name = "myUser" )public Users user ( return new Users (); }
实验2-3.intializingBean,disposableBean接口
intializingBean:在init之前执行
disposableBean:在destory之前执行
1
2
3
4
5
6
7
8
9
10
11
12
13
14
15
@Data public class Users implements InitializingBean , DisposableBean private String name; private int age; @Override public void afterPropertiesSet () throws Exception System.out.println("初始化" ); } @Override public void destroy () throws Exception System.out.println("销毁" ); } }
实验4-5.@PostConstruct,@PreDestory方法
@PostConstruct:在intializingBean之前
@PreDestory:在disposableBean之前
1
2
3
4
5
6
7
8
9
@PostConstruct public void init () System.out .println("PostConstruct" ); } @PreDestroy public void destroy () System.out .println("PreDestroy" ); }
实验6BeanPostProcessor后置处理器
BeanPostProcessor是一个拦截所有Bean 的后置处理器
1
2
3
4
5
6
7
8
9
10
11
12
13
14
@Component public class beanPost implements BeanPostProcessor @Override public Object postProcessBeforeInitialization (Object bean, String beanName) throws BeansException { System.out.println("postProcessBeforeInitialization=====" +beanName); return BeanPostProcessor.super .postProcessBeforeInitialization(bean, beanName); } @Override public Object postProcessAfterInitialization (Object bean, String beanName) throws BeansException { System.out.println("postProcessAfterInitialization=====" +beanName); return BeanPostProcessor.super .postProcessAfterInitialization(bean, beanName); } }
将其实现后放到容器中,将拦截所有 注册的Bean
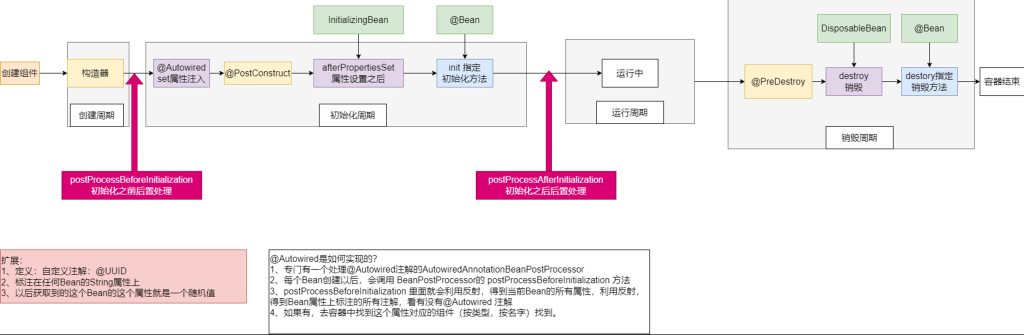
生命周期完整流程
@Bean创建对象
调用类构造器
postProcessBeforeInitialization
@Autowired set属性注入
PostConstruct
InitializingBean(afterPropertiesSet属性设置之后)
init
postProcessAfterInitialization
-----------------ioc容器创建完毕-------------------
PreDestroy
DisposableBean
destroy
创建周期2 初始化周期4-7 运行周期9 销毁周期10-12
@Autowired 是如何实现的?
每个 Bean 创建以后,会调用BeanPostProcessor的postProcessBeforeInitialization方法。
postProcessBeforeInitialization里面就会利用反射,得到当前 Bean 的所有属性,利用反射,得到 Bean 属性上标注的所有注解,看有没有@Autowired注解。
如果有,去容器中找到这个属性对应的组件(按类型,按名字)找到。
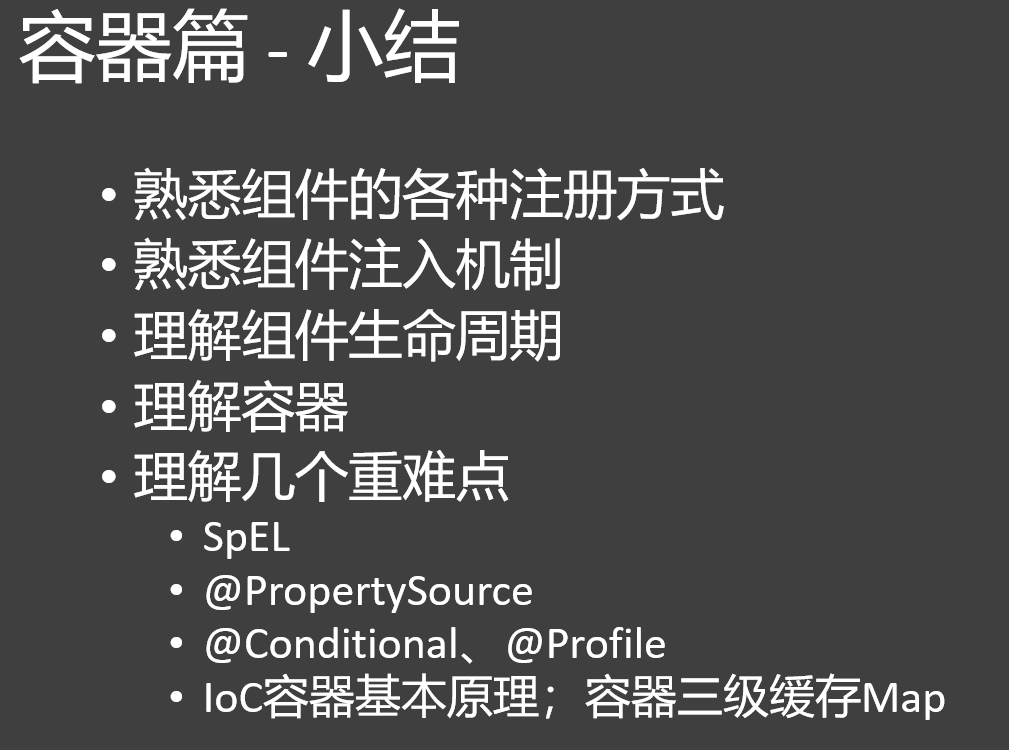
5.容器篇小结
3.AOP篇
AOP 场景
专业术语
AOP 实现
AOP 细节
1.基本概念
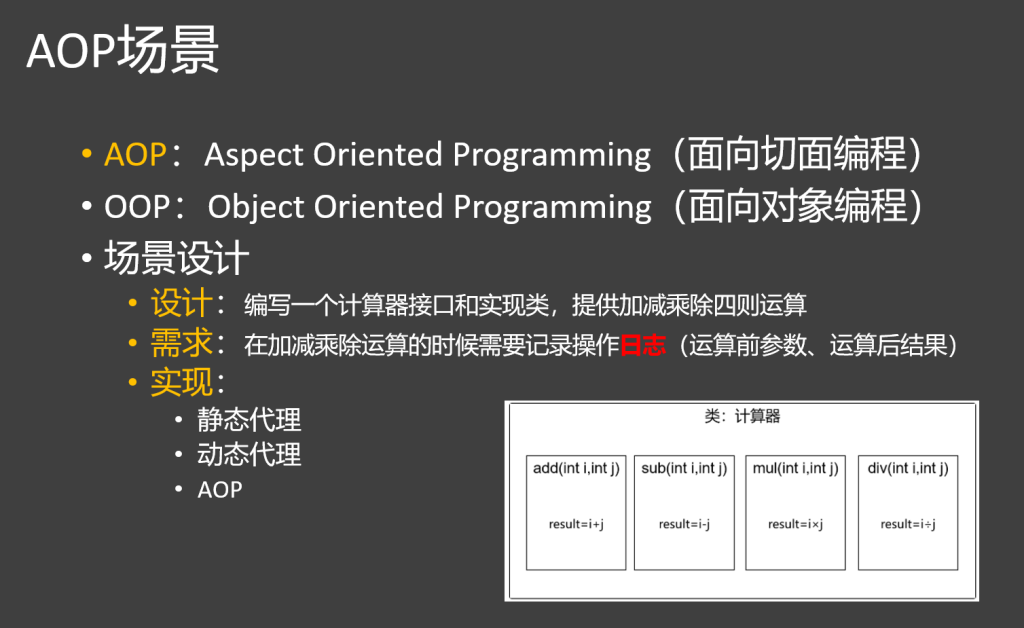
AOP :Aspect Oriented Programming(面向切面编程)
OOP :Object Oriented Programming(面向对象编程)
2.AOP日志
完成上述场景设计
1.硬编码-不推荐
MathCalculator.java
1
2
3
4
5
6
7
8
9
10
11
12
13
14
15
16
17
package com.atguigu.spring.aop.calculator; public interface MathCalculator { int add(int i,int j); int sub(int i,int j); int mul(int i,int j) ; int div(int i,int j); }
MathCalculatorImpl
1
2
3
4
5
6
7
8
9
10
11
12
13
14
15
16
17
18
19
20
21
22
23
24
25
26
27
28
29
30
31
32
33
34
35
36
37
38
39
40
41
42
43
44
45
46
47
48
49
50
package com.atguigu.spring.aop.calculator.impl; import com.atguigu.spring.aop.calculator.MathCalculator;import org.springframework.stereotype.Component;@Component public class MathCalculatorImpl implements MathCalculator { @Override public int add (int i, int j) { // System .out .println("【日志】add 开始:参数:"+i+","+j); int result = i + j; System .out .println("结果:"+result); // System .out .println("【日志】add 返回:结果:"+result); return result; } @Override public int sub(int i, int j) { int result = i - j; return result; } @Override public int mul(int i, int j) { int result = i * j; return result; } @Override public int div(int i, int j) { System .out .println("目标方法执行...."); int result = i / j; return result; } }
2.静态代理
基本概念:
定义:代理对象,是目标对象的接口的子类型,代理对象本身并不是目标对象,而是将目标对象作为自己的属性
优点:同一种类型的所有对象都能代理
缺点:范围太小,只能负责部分接口的代理
实现:
首先定义一个包含方法的接口
1
2
3
public interface MathCalculator { public int add(int a, int b); }
然后实现这个接口
1
2
3
4
5
6
public class MathCalculatorImpl implements MathCalculator @Override public int add(int a, int b) { return a + b; } }
现在定义一个静态代理类,同样实现接口
静态代理类接收目标对象,在重写接口方法时直接调用该对象的方法
1
2
3
4
5
6
7
8
9
10
11
12
13
14
15
16
17
18
19
20
21
22
23
24
25
26
27
28
29
30
31
32
33
34
35
36
37
38
39
40
41
42
43
44
45
46
47
48
49
50
51
52
53
54
package com.atguigu.spring.aop.proxy.statics;import com.atguigu.spring.aop.calculator.MathCalculator;import lombok.Data;import org.springframework.stereotype.Component;@Data public class CalculatorStaticProxy implements MathCalculator private MathCalculator target ; public CalculatorStaticProxy (MathCalculator mc) this .target = mc; } @Override public int add (int i, int j) System.out.println("【日志】add 开始:参数:" +i+"," +j); int result = target .add(i, j); System.out.println("【日志】add 返回:结果:" +result); return result; } @Override public int sub (int i, int j) int result = target .sub(i,j); return result; } @Override public int mul (int i, int j) int result = target .mul(i,j); return result; } @Override public int div (int i, int j) int result = target .div(i,j); return result; } }
这样就可以在测试的同时打印日志
3.动态代理
基本概念:
定义:目标对象在执行期间会被动态拦截,插入指定逻辑
优点:可以代理世间万物
缺点:
不好写
目标对象必须要有接口,代理的也只是接口规定的方法
实现:
1
2
3
4
5
6
7
8
9
10
11
12
13
14
15
16
17
18
19
20
21
22
23
24
25
26
27
28
29
30
31
32
33
34
35
36
37
38
39
40
41
42
43
44
45
46
47
48
49
50
51
52
53
54
@Test void test02 () MathCalculator target = new MathCalculatorImpl(); MathCalculator chenglong = new MathCalculatorImpl(); MathCalculator lilianjie = new MathCalculatorImpl(); MathCalculator wangyuan = new MathCalculatorImpl(); InvocationHandler h = new InvocationHandler() { @Override public Object invoke (Object proxy, Method method, Object[] args ) throws Throwable System.out .println("瞅瞅参数:" + Arrays.asList(args )); args [1 ] = 0 ; System.out .println("改后参数:" + Arrays.asList(args )); Object result = method.invoke(wangyuan, args ); return result; } }; MathCalculator proxyInstance = (MathCalculator) Proxy.newProxyInstance( target.getClass().getClassLoader(), target.getClass().getInterfaces(), h ); int add = proxyInstance.add (1 , 2 ); System.out .println("最终结果..." +add ); }
可以使用lamda表达式简化
1
2
3
4
5
6
7
8
9
10
11
12
13
public static Object getProxyInstance(Object target) { return Proxy.newProxyInstance( target.getClass().getClassLoader(), target.getClass().getInterfaces(), (proxy, method , args) -> { System .out .println("Before method: " + method .getName()); Object result = method .invoke(target, args); System .out .println("Result: " + result); System .out .println("After method: " + method .getName()); return result; } ); }
4.日志工具类
可以写一个日志工具类,统一日志功能,简化开发
1
2
3
4
5
6
7
8
9
10
11
12
13
14
15
16
17
18
19
20
21
22
23
24
25
26
27
28
29
30
31
32
public class LogUtils { private static final DateTimeFormatter FORMATTER = DateTimeFormatter.ofPattern ("yyyy-MM-dd HH:mm:ss" ); public static void info (String message) log ("INFO" , message); } public static void warn (String message) log ("WARN" , message); } public static void error (String message) log ("ERROR" , message); } private static void log (String level, String message) String timestamp = LocalDateTime.now ().format(FORMATTER); System.out.printf ("[%s] [%s] %s%n" , timestamp, level, message); } }
3.AOP初步实现
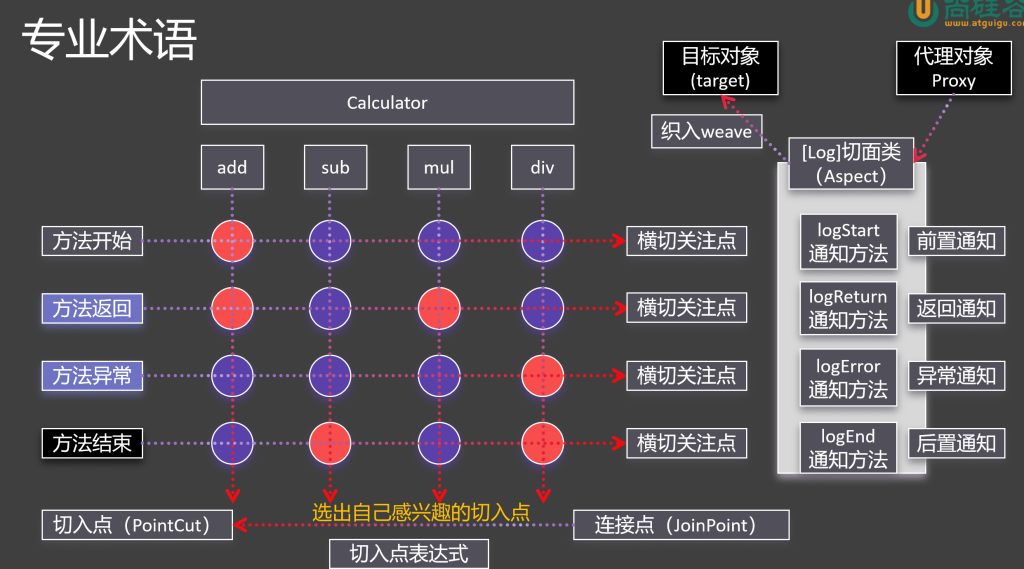
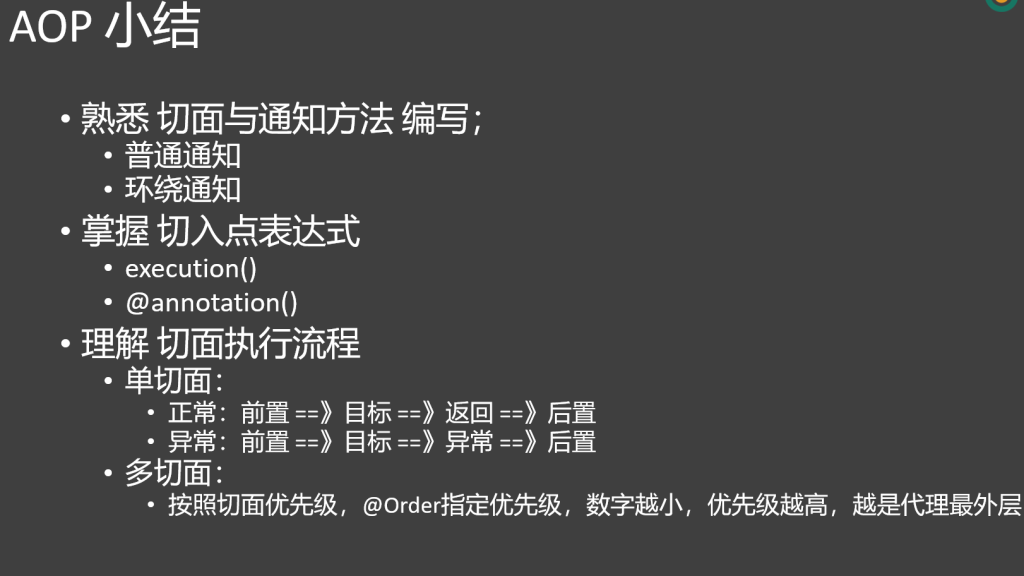
1.专业术语:
切面(Aspect):封装横切逻辑的模块,包含通知和切入点。
连接点(Join Point):程序执行中可插入切面的点,如方法调用、异常抛出。
切入点(Pointcut):一组连接点的表达式,指定哪些连接点会被增强。
通知(Advice):切面在连接点执行的代码,有前置、后置、环绕、异常、最终通知。
目标对象(Target Object):被切面增强的对象。
代理(Proxy):AOP框架为目标对象生成的包含增强逻辑的对象。
织入(Weaving):将切面应用到目标对象创建代理的过程,分编译、类加载、运行时织入。
步骤
2.导入依赖:
1 2 3 4 <dependency > <groupId > org.springframework.boot</groupId > <artifactId > spring-boot-starter-aop</artifactId > </dependency >
3.切入方法的实现
创建单独的切面类,@Component,@Aspect
为四个切面(开始,结束,返回,抛错)定义方法,并加上注释
匹配切入方法:“execution(返回值类型 方法全签名(参数类型))”
execution中支持使用通配符(*代表省略一个,…代表省略多个)
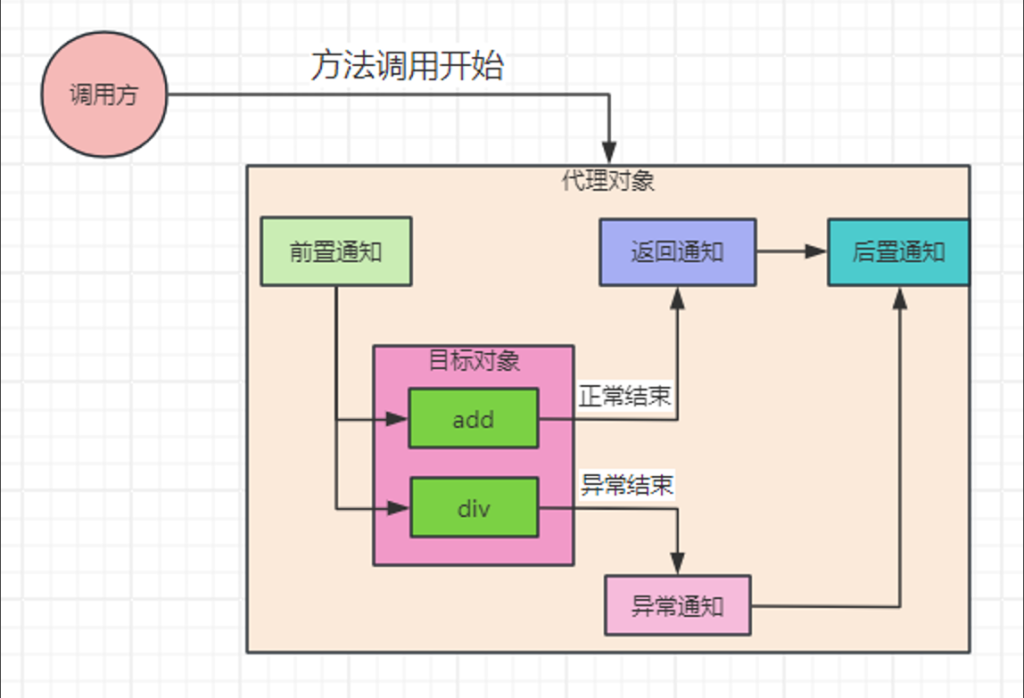
方法被切后目标对象就会被包装为代理对象
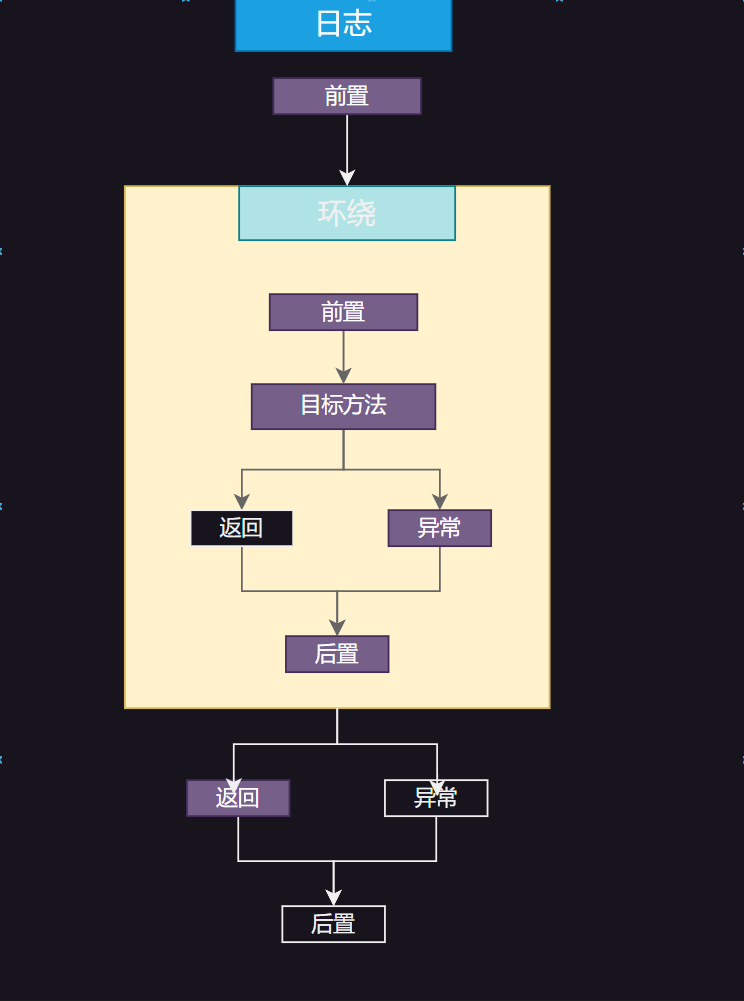
流程:前置>>>目标方法>>>返回/异常>>>后置
1
2
3
4
5
6
7
8
9
10
11
12
13
14
15
16
17
18
19
20
21
22
23
24
@Component @Aspect public class LogAspect { @Before("execution(int com.example.demo.calculator.Impl.MathCalculatorImpl.*(int ,int))") public void logStart () { System.out.println("start" ); } @After("execution(int com.example.demo.calculator.Impl.MathCalculatorImpl.*(int,int))") public void logEnd () { System.out.println("end" ); } @AfterReturning("execution(int com.example.demo.calculator.Impl.MathCalculatorImpl.*(int,int))") public void logReturn () { System.out.println("return" ); } @AfterThrowing("execution(int com.example.demo.calculator.Impl.MathCalculatorImpl.*(int,int))") public void logThrow () { System.out.println("throw" ); } }
•通知方法的执行顺序
•正常:前置通知 ==》目标方法 ==》返回通知 ==》后置通知
•异常:前置通知 ==》目标方法 ==》异常通知 ==》后置通知
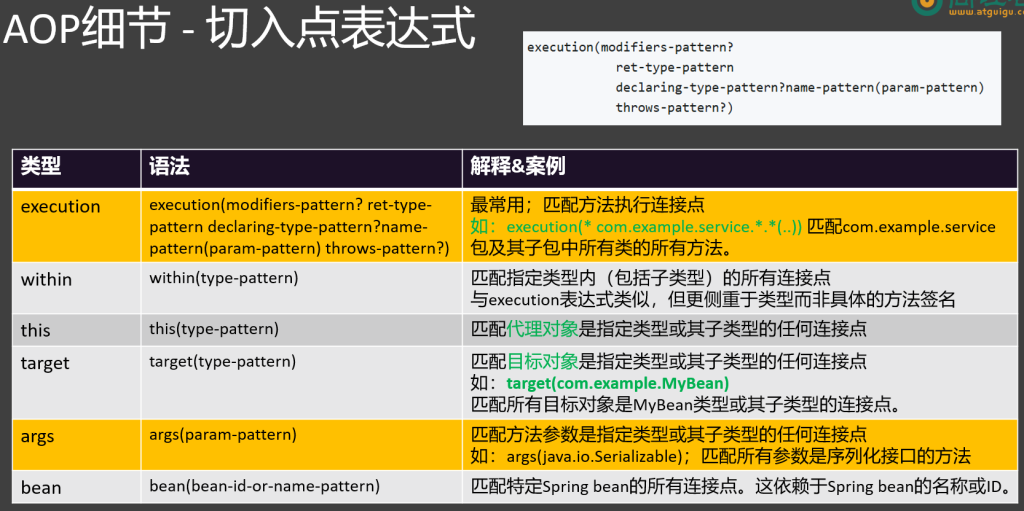
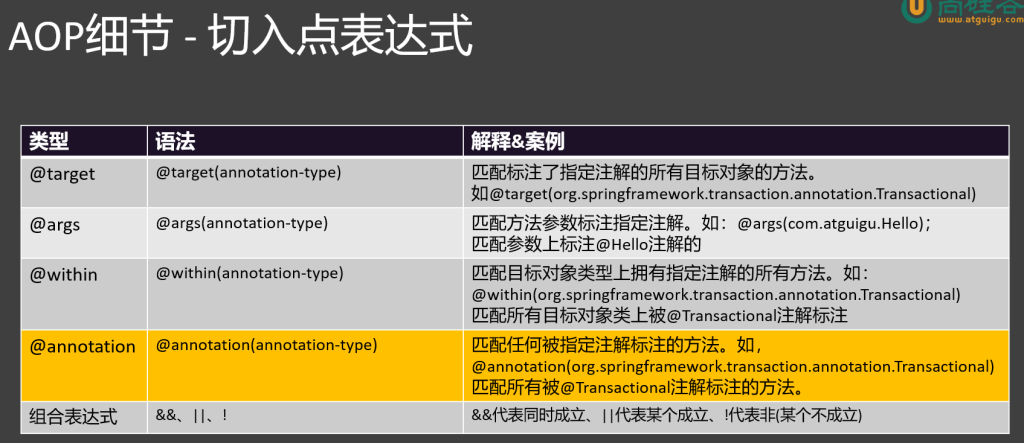
4.AOP细节-切入点表达式
execution:基于方法签名匹配 语法:execution(修饰符? 返回类型 类路径?方法名(参数) throws 异常?) 示例: execution(public * com.example.service…(…)):匹配com.example.service包下所有类的所有公共方法。 execution(* com.example.dao…(int, int)):匹配com.example.dao包下所有类接收两个int类型参数的方法。
@annotation:基于注解匹配 语法:@annotation(注解全限定名) 示例:@annotation(com.example.annotation.MyAnnotation):匹配带有MyAnnotation注解的方法。
within:基于类或包匹配 语法:within(类或包路径) 示例:within(com.example.service.*):匹配com.example.service包下所有类的所有方法。
this 和 target:基于代理对象和目标对象类型匹配 语法:this(类型全限定名) 或 target(类型全限定名) 示例: this(com.example.service.MyService):匹配代理对象是MyService类型的方法。 target(com.example.service.MyService):匹配目标对象是MyService类型的方法。
args:基于运行时参数类型匹配 语法:args(参数类型列表) 示例: args(int, int):匹配运行时传入两个int类型参数的方法。 execution(* com.example.service…(…)) && args(String, int):匹配com.example.service包下所有类的方法,且运行时传入参数为一个String类型和一个int类型。
组合表达式 使用&&(与)、||(或)、!(非)组合多个切入点表达式。 示例:execution(* com.example.service…(…)) && @annotation(com.example.annotation.MyAnnotation) && args(int):匹配com.example.service包下所有带有MyAnnotation注解且运行时传入一个int类型参数的方法。
5.切入方法参数:
JoinPoint获取连接点
1
2
3
4
@Before("execution(..)") public void logStart (JoinPoint jp) { System.out.println("start" ); }
通过JoinPoint可以获得方法的各种信息
Returning指定返回值接收
1 2 3 4 @AfterReturning(value = "execution(..)",returning = "result") public void logReturn(Object result){ System .out .println("return"); }
可以指定目标对象接收方法的返回值
throwing指定异常接收
1
2
3
4
@AfterThrowing ("execution(..)" ,throwing = "e" )public void logThrow (Throwable e System .out .println ("throw" ); }
6.@PointCut封装匹配方法
1
2
@Pointcut("execution(..)") public void pppcut () {}
封装好后切入注解可以直接引用
7.完整的Aspect
LogAspect
1
2
3
4
5
6
7
8
9
10
11
12
13
14
15
16
17
18
19
20
21
22
23
24
25
26
27
28
29
30
31
32
33
34
35
36
37
38
39
40
41
42
43
44
45
46
47
48
49
50
51
52
53
54
55
56
57
58
59
60
61
62
63
64
65
66
67
68
69
70
71
72
73
74
75
76
77
78
79
80
81
82
83
84
85
86
87
88
89
90
91
92
93
94
95
96
97
98
99
100
101
102
103
104
105
106
107
108
109
110
package com.atguigu.spring.aop.aspect;import org.aspectj.lang.JoinPoint;import org.aspectj.lang.annotation.*;import org.aspectj.lang.reflect.MethodSignature;import org.springframework.core.annotation.Order;import org.springframework.stereotype.Component;import java.util.Arrays;@Order(10000) @Component @Aspect public class LogAspect { @Pointcut("execution(int com.atguigu.spring.aop.calculator.MathCalculator.*(..))") public void pointCut () {}; @Before("pointCut()") public void logStart (JoinPoint joinPoint) { MethodSignature signature = (MethodSignature) joinPoint.getSignature(); String name = signature.getName(); Object[] args = joinPoint.getArgs(); System.out.println("【切面 - 日志】【" +name+"】开始:参数列表:【" + Arrays.toString(args) +"】" ); } @After("pointCut()") public void logEnd (JoinPoint joinPoint) { MethodSignature signature = (MethodSignature) joinPoint.getSignature(); String name = signature.getName(); System.out.println("【切面 - 日志】【" +name+"】后置..." ); } @AfterReturning(value = "pointCut()", returning = "result") public void logReturn (JoinPoint joinPoint,Object result) { MethodSignature signature = (MethodSignature) joinPoint.getSignature(); String name = signature.getName(); System.out.println("【切面 - 日志】【" +name+"】返回:值:" +result); } @AfterThrowing( value = "pointCut()", throwing = "e" //throwing="e" 获取目标方法抛出的异常 ) public void logException (JoinPoint joinPoint,Throwable e) { MethodSignature signature = (MethodSignature) joinPoint.getSignature(); String name = signature.getName(); System.out.println("【切面 - 日志】【" +name+"】异常:错误信息:【" +e.getMessage()+"】" ); } public void haha () { System.out.println("【切面 - 日志】哈哈哈..." ); } public void hehehe () { System.out.println("【切面 - 日志】呵呵呵..." ); } public void test () { System.out.println("【切面 - 日志】MyAn测试..." ); } }
AuthAspect
1
2
3
4
5
6
7
8
9
10
11
12
13
14
15
16
17
18
19
20
21
22
23
24
25
26
27
28
29
30
31
32
33
34
35
36
37
38
package com.atguigu.spring.aop.aspect;import org.aspectj.lang.annotation.*;import org.springframework.core.annotation.Order;import org.springframework.stereotype.Component;@Order(100) @Aspect @Component public class AuthAspect { @Pointcut("execution(int com.atguigu.spring.aop.calculator.MathCalculator.*(..))") public void pointCut () {}; @Before("pointCut()") public void before () { System.out.println("【切面 - 权限】前置" ); } @After("pointCut()") public void after () { System.out.println("【切面 - 权限】后置" ); } @AfterReturning("pointCut()") public void afterReturning () { System.out.println("【切面 - 权限】返回" ); } @AfterThrowing("pointCut()") public void afterThrowing () { System.out.println("【切面 - 权限】异常" ); } }
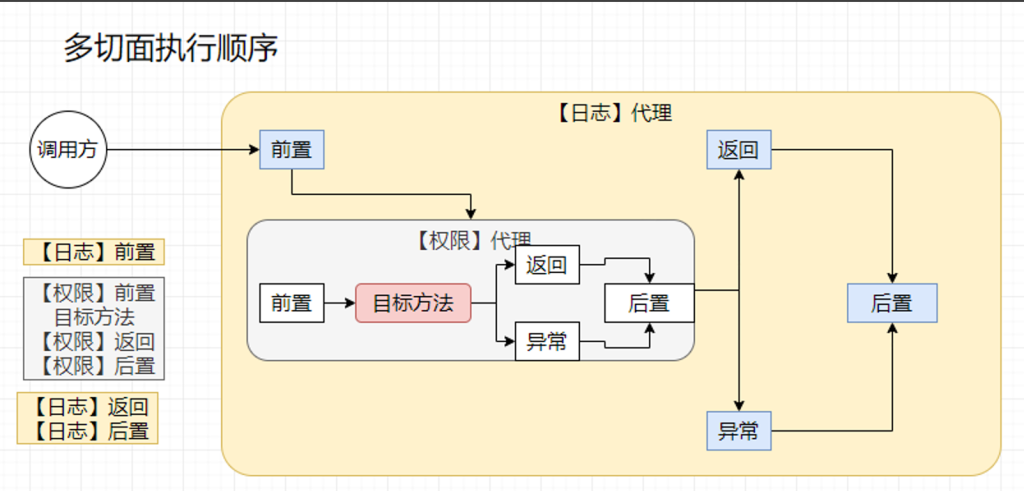
8.多切面执行顺序
代理对象封装目标方法(前置>>>目标方法>>>返回/异常>>>后置)
代理对象又作为新的目标方法被封装(前置>>>原代理对象>>>返回/异常>>>后置)
@Order(数字)可以指定优先级
数字越小越先执行,越处于外层
补充Spring家AOP有很多工具类有很多方法可以简化开发AnnotationUtils,ClassUtils
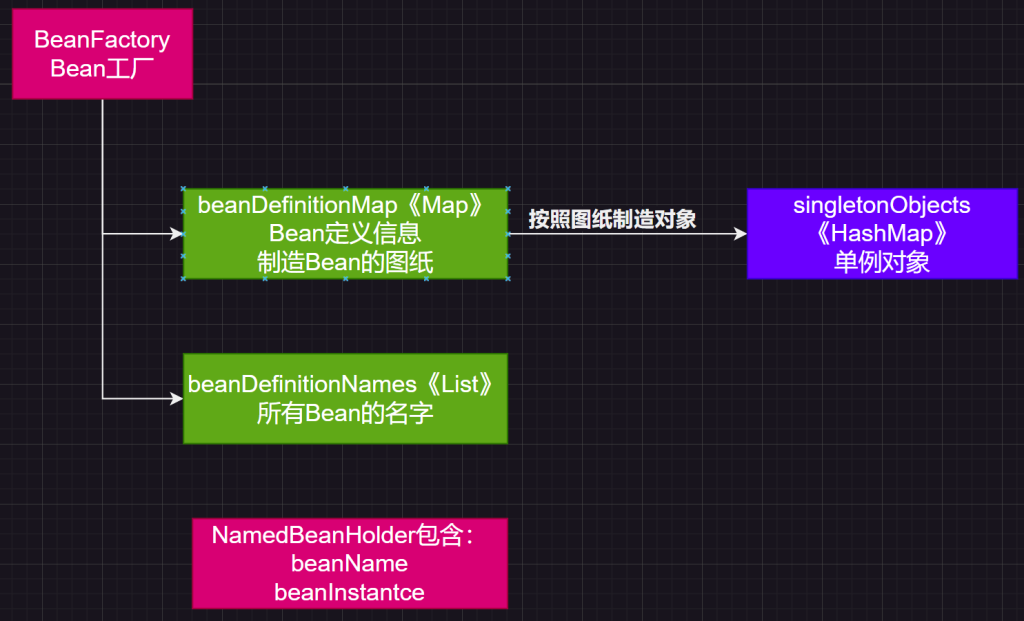
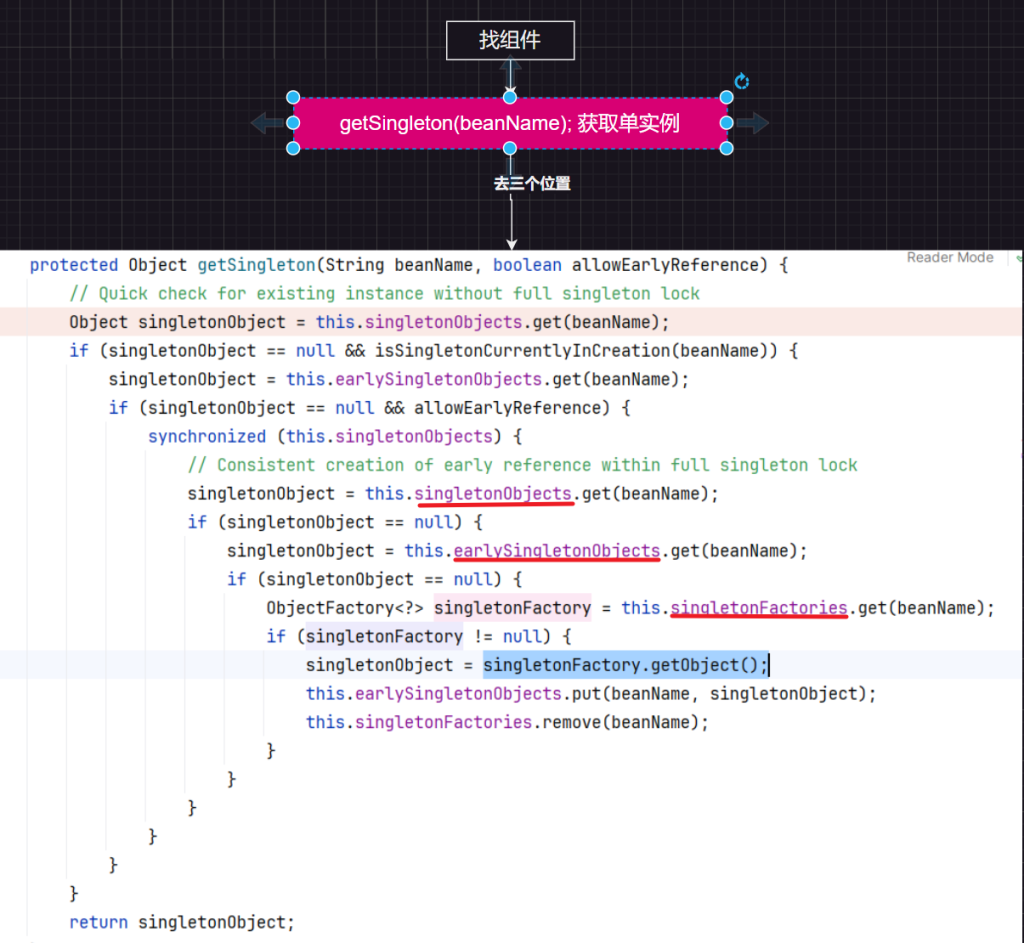
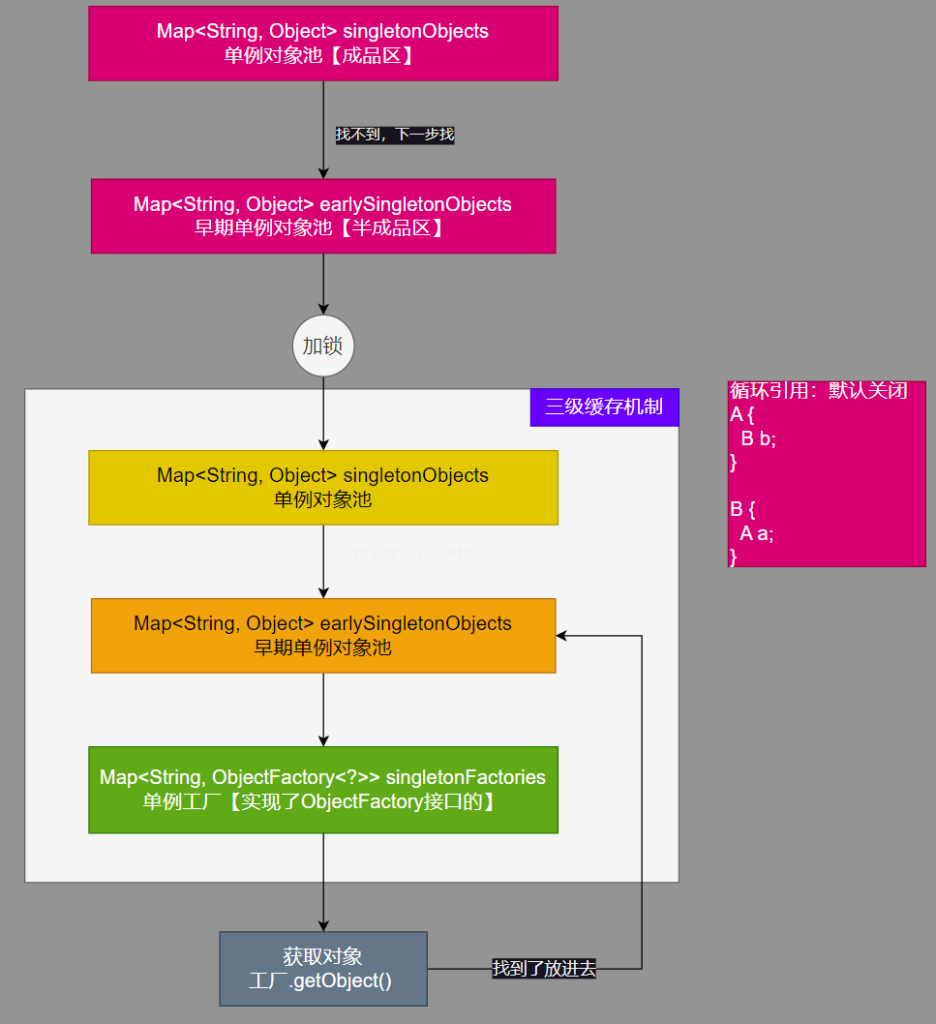
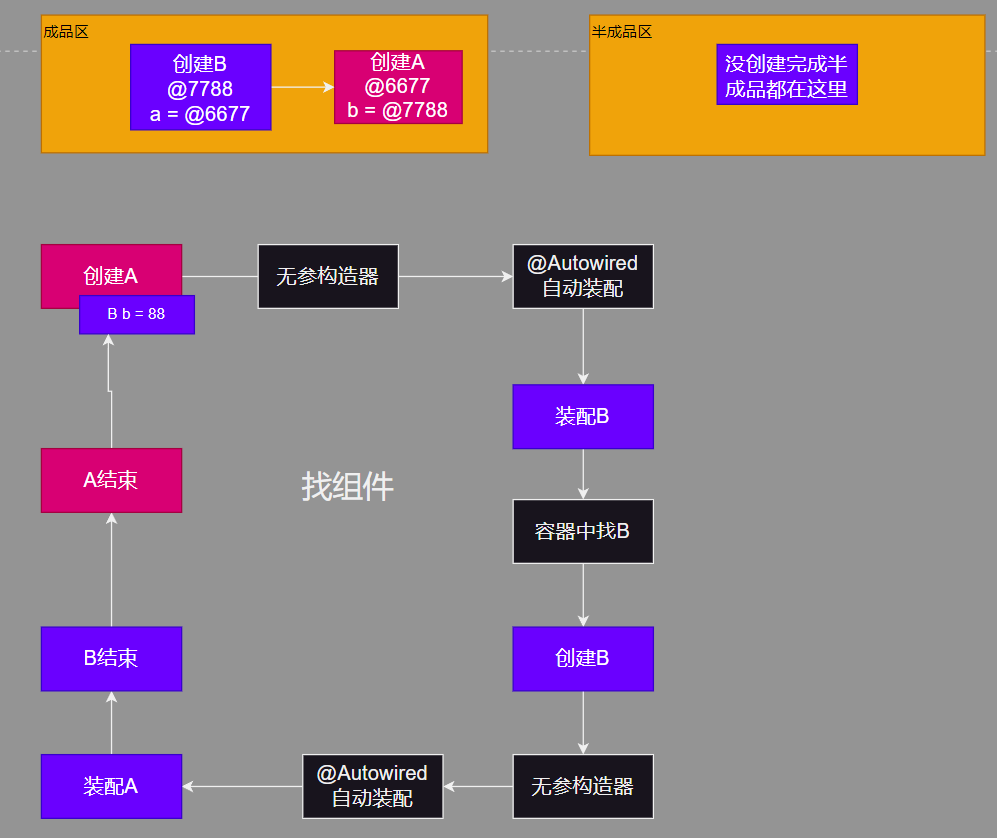
源码-BeanFactory里面的核心集合
源码-Spirng容器底层就是三个Map,三级缓存机制
成品区和半成品区避免了死锁,解决了循环引用(循环依赖)
4.环绕通知
作用:上述方法只能感知对象,不能修改对象,环绕通知则可以修改目标对象的参数,执行结果 等
1
2
3
4
5
6
7
8
9
10
11
12
13
14
15
16
17
18
19
20
21
22
23
24
25
26
27
28
29
30
31
32
33
34
@Aspect @Component public class AroundAspect @Pointcut ("execution(int com.atguigu.spring.aop.calculator.MathCalculator.*(..))" ) public void pointCut () @Around ("pointCut()" ) public Object aroundAdvice (ProceedingJoinPoint pjp) throws Throwable { Object[] args = pjp.getArgs(); System.out.println("环绕 - 前置通知:参数" + Arrays.toString(args)); Object proceed = null ; try { proceed = pjp.proceed (args); System.out.println("环绕 - 返回通知:返回值:" +proceed ); }catch (Throwable e){ System.out.println("环绕 - 异常通知:" +e.getMessage()); throw e; }finally { System.out.println("环绕 - 后置通知" ); } return proceed ; } }
建议一定抛出异常,方便多切面情况下异常感知链路是通的
5.AOP使用场景
1
2
3
4
5
6
7
8
9
10
11
12
13
14
15
16
17
18
19
20
21
22
23
24
25
常用的有:
日志记录:在方法前后记录操作信息,便于调试与监控。
事务管理:统一管理事务的开启、提交和回滚。
权限验证:执行方法前检查用户权限,保障系统安全。
性能监控:统计方法执行时间,定位性能瓶颈。
缓存管理:先查缓存,无结果则执行方法并缓存结果。
6.AOP小结
4.声明式事务篇
JdbcTemplate
声明式事务
隔离级别
传播行为
前言
【声明式】 vs 【编程式】
声明式:通过注解等方式,告诉框架,我要做什么,框架会帮我做什么。
编程式:通过代码的方式,告诉框架,我要做什么,需要自己写代码实现。
1.整合jdbc和数据源
1.基本概念
DataSource :Java 标准接口,负责管理数据库连接,像配置连接池、获取物理连接。
JdbcTemplate :Spring 工具类,基于 DataSource 简化 JDBC 操作,处理 SQL 执行和结果集
2.导入依赖
mysql驱动 和 jdbc
1 2 3 4 5 6 7 8 9 <dependency > <groupId > com.mysql</groupId > <artifactId > mysql-connector-j</artifactId > <scope > runtime</scope > </dependency > <dependency > <groupId > org.springframework.boot</groupId > <artifactId > spring-boot-starter-data-jdbc</artifactId > </dependency >
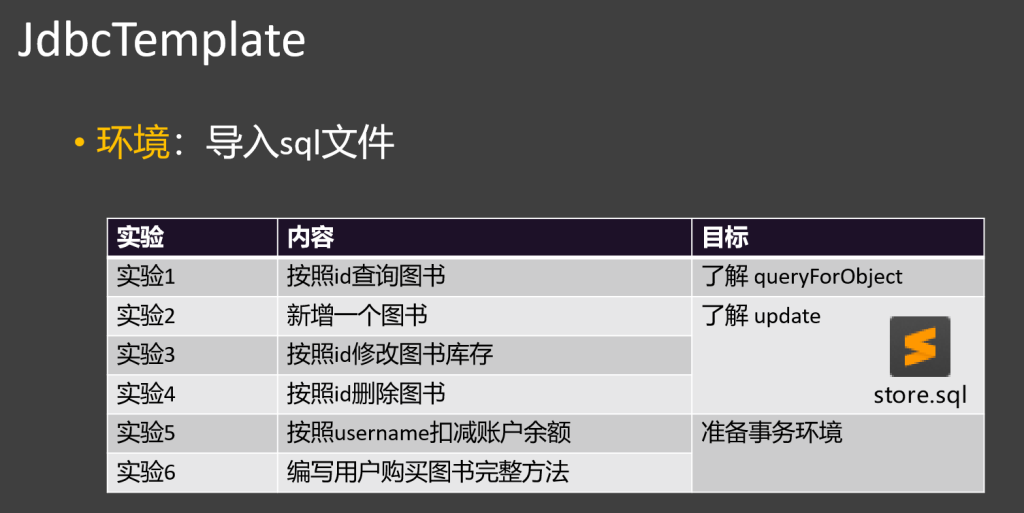
3.配置环境
在application.properties中书写
1
2
3
4
spring.datasource.url =jdbc:mysql://localhost:3306 /数据名称spring.datasource.username =rootspring.datasource.password =123456 spring.datasource.driver-class-name =com.mysql.cj.jdbc.Driver
配置好后,就可以使用JdbcTemplate与数据库进行交互了
jdbcTemplate内置了对数据库增删改查的操作
2.封装Dao
1.基本概念
DAO (Data Access Object)是一种将数据访问逻辑封装起来,与业务逻辑分离,以提高代码可维护性、可测试性、可复用性并增强安全性的设计模式
2.创建数据对象
属性与数据库中表呈对应关系
1 2 3 4 5 6 7 @Data public class Book { private Integer id; private String bookName; private BigDecimal price; private Integer stock; }
3.创建DAO
其中问号类似于占位符,可添加多个
1
2
3
4
5
6
7
8
9
10
11
12
13
14
15
16
17
18
19
20
21
22
23
24
25
26
27
28
29
30
31
@Component public class BookDao { @Autowired JdbcTemplate jdbcTemplate; public Book getBookById (Integer id String sql = "select * from book where id = ?" ; Book book = jdbcTemplate.queryForObject (sql, new BeanPropertyRowMapper <>(Book .class ), id); return book; } public void updateStock (Integer id String sql = "update book set stock = stock - 1 where id = ?" ; jdbcTemplate.update (sql, id); } public void insert (Book book String sql = "insert into book(book_name,price,stock) values(?,?,?)" ; jdbcTemplate.update (sql, book.getBookName (), book.getPrice (), book.getStock ()); } public void delete (Integer id String sql = "delete from book where id =?" ; jdbcTemplate.update (sql, id); } }
3.@Transactional事务绑定
1.事务管理器原理
控制事务的获取、提交、回滚。
原理:
底层默认使用哪个事务管理器?默认使用 JdbcTransactionManager。
事务管理器:TransactionManager,控制提交和回滚。
事务拦截器:TransactionInterceptor,控制何时提交和回滚
completeTransactionAfterThrowing(txInfo, ex); 在这个时候回滚。
commitTransactionAfterReturning(txInfo); 在这个时候提交。
2.开启事务
在主类 上方添加注解,开启事务自动化管理
1 @EnableTransactionManagement
在方法 上添加注解,为方法添加事务
3.timeout超时控制
1 @Transactional(timeout = 3)
超时时间是指从方法开始,到最后一次数据库操作结束的时间
4.readOnly只读优化
当事务只涉及读 的操作,开启后数据库会进行一些优化操作
1 @Transaction (readOnly = true )
5.rollbackFor指明回滚异常
不是 所有异常都一定引起事务回滚
异常:
运行时异常(unchecked exception【非收受检异常】)
编译时异常(checked exception【受检异常】)
回滚默认机制:
手动指明异常回滚
1 @Transcation(rollbackFor = {IOException.class } )
或者
1 @Transcation(rollbackForClassName = "IOException" )
手动指明异常不会滚
1 @Transcation(noRollbackFor = {IOException.class } )
或者
1 @Transcation(noRollbackForClassName = "IOException" )
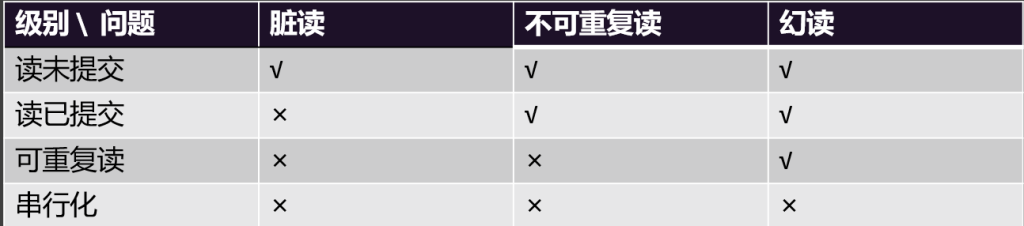
6.隔离级别isolation
读未提交(READ_UNCOMMITTED):能读未提交数据,有脏读问题,并发高但一致性差。
读已提交(READ_COMMITTED):只能读已提交数据,避免脏读,有不可重复读问题。
可重复读(REPEATABLE_READ):多次读同一数据结果一致,避免脏读和不可重复读,有幻读问题,mysql默认级别。
串行化(SERIALIZABLE):事务依次执行,无并发问题,数据一致性最高,但并发性能最差。
脏读(Dirty Read)是数据库并发操作中出现的一种问题,指一个事务读取到了另一个事务未提交的数据。由于未提交的数据可能会被回滚,所以读取到的这些数据可能是无效的、“脏”的,这就违背了数据的一致性原则。
幻读(Phantom Read)是数据库并发控制中的一种现象,它发生在一个事务内多次执行相同的查询时,由于其他事务插入或删除了符合查询条件的记录,导致该事务在不同时间点执行相同查询得到的结果集不一致,就好像出现了“幻影”记录一样
不可重复读(Non-Repeatable Read)是数据库并发操作中出现的一种问题。它指的是在一个事务内,多次读取同一数据时,由于其他事务对该数据进行了修改并提交,导致每次读取的结果不一致
1 @Transactional(isolation = Isolation.REPEATABLE_READ)
7.传播行为propagation
Spring 事务管理有 7 种传播行为:
REQUIRED(默认):有事务则加入,无则创建新事务。
SUPPORTS:有事务加入,无则非事务执行。
MANDATORY:有事务加入,无则抛异常。
REQUIRES_NEW:无论有无,都创建新事务,挂起当前事务。
NOT_SUPPORTED:非事务执行,有事务则挂起。
NEVER:非事务执行,有事务抛异常。
NESTED:有事务则嵌套执行,无则创建新事务。
案例分析
1
2
3
4
5
6
7
8
9
10
11
12
13
14
15
16
17
18
19
20
21
22
23
24
25
26
27
28
29
30
31
32
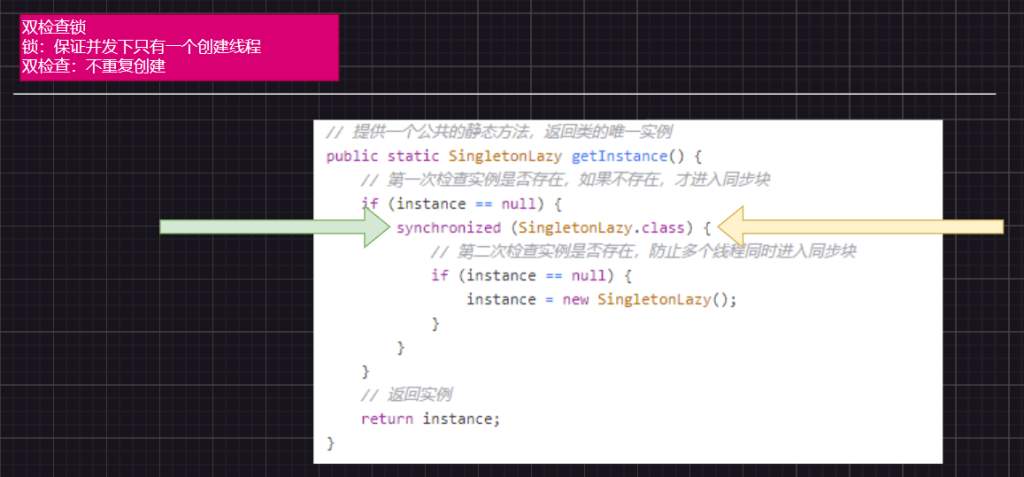
源码-双检查锁机制
双检查锁
锁:保证并发下只有一个创建线程
双检查:不重复创建
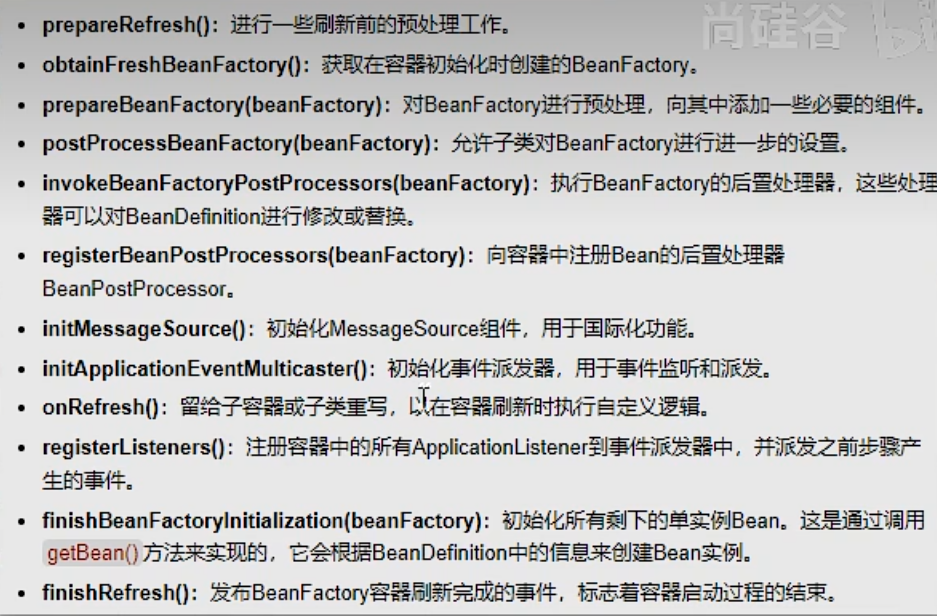
源码-IOC容器启动12大步
Spring篇完结