三.MyBatis篇
1.简介
MyBatis 是一个半自动化的 ORM(对象关系映射)框架,允许开发者手动编写 SQL 语句,从而能够更好地控制 SQL 的执行,提高性能。MyBatis 可以将 SQL 语句与 Java 代码分离,存储在 XML 文件或者注解中,让代码结构更清晰。
2.初步使用
1.导入依赖
1 2 3 4 5 <dependency > <groupId > org.mybatis.spring.boot</groupId > <artifactId > mybatis-spring-boot-starter</artifactId > <version > 3.0.0</version > </dependency >
2.创建Do对象
此处为基本数据对象
1
2
3
4
5
6
7
8
9
10
@Data public class EmpDo private Long id; private S tring name; private Integer age; private String email; private String gender; private String address; private BigDecimal salary; }
3.Dao层创建Mapper接口
@Mapper注解告诉mybatis 这是一个Mapper接口
1
2
3
4
@Mapper public interface EmpMapper EmpDo getEmpById (Integer id) ; }
4.生成xml配置文件
namespace写Mapper对象的全类名
1
2
3
4
5
<?xml version="1.0" encoding="UTF-8" ?> <!DOCTYPE mapper PUBLIC "-//mybatis.org//DTD Mapper 3.0//EN" "http://mybatis.org/dtd/mybatis-3-mapper.dtd" > <mapper namespace ="com.zhang.mybatis.dao.EmpMapper" > //此处添加sql方法 </mapper >
还需要在application.properties中指明xml配置文件的位置
1 mybatis.mapper-locations =classpath:mapper/**.xml
5.编写sql
1 2 3 4 5 6 7 8 9 10 11 12 <select id="getEmpById" resultType="com.zhang.mybatis.bean.EmpDo" > select * from employee where id = #{id} </select > <insert id="addEmp" > insert into employee(last_name,email,gender) values (#{lastName},#{email},#{gender}) </insert > <update id="updateEmp" > update employee set last_name = #{lastName},email = #{email},gender = #{gender} where id = #{id} </update > <delete id="deleteEmpById" > delete from employee where id = #{id} </delete >
id对应Mapper对象 的方法名
resultType对应返回值
括号间为sql语言
接下来就可以直接调用Mapper方法了
6.开启自增id
1 <insert id ="addEmp" useGeneratedKeys ="true" keyProperty ="id" ></insert>
useGeneratedKeys表示是否开始自增id
keyProperty指定自动生成的id在Do中对应的属性,把自动生成的id封装回Emp对象的id属性中
7.命名规则转化
java和mysql数据库采用了不同的命名规则:
java采用驼峰命名(userName)
数据库采用蛇形命名(user_name)
在配置文件中开启命名规则自动转换,才能使名称一 一对应上
1 2 mybatis.configuration .map-underscore-to -camel-case =true logging.level .com.atguigu.mybatis.mapper=debug //开SQL 日志
8.细节
每个Dao 接口 对应一个 XML 实现文件
Dao 实现类 是一个由 MyBatis 自动创建出来的代理对象
XML 中 namespace 需要绑定 Dao 接口 的全类名
XML 中使用 select、update、insert、delete 标签来代表增删改查
每个 CRUD 标签 的 id 必须为Dao接口的方法名
每个 CRUD标签的 resultType 是Dao接口的返回值类型全类名
未来遇到复杂的返回结果封装,需要指定 resultMap 规则
以后 xxxDao 我们将按照习惯命名为 xxxMapper,这样更明显的表示出 持久层是用 MyBatis 实现的
3.参数处理
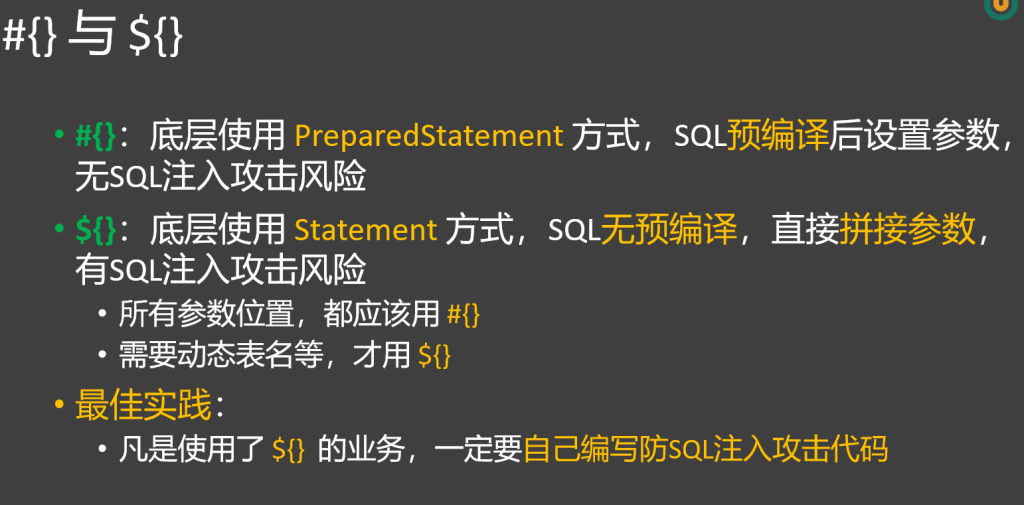
1.占位符#{}和${}的区别
1
2
3
select * from employee where id = select * from employee where id = ${id }
#{} :这是MyBatis中预编译的占位符,用于将参数值安全地插入到SQL语句中。在SQL执行前,MyBatis会将#{} 替换为?,然后使用PreparedStatement来设置参数值,有效防止了sql注入问题。
1
2
3
4
Connection connection = dataSource.getConnection();String sql = "select * from employee where id=?"; PreparedStatement ps = connection .prepareStatement(sql ); ps.setString(1 , "admin");
${}:这是字符串替换占位符,MyBatis会直接将${} 替换为实际的参数值,而不进行预编译,会引发sql注入问题。
只有参数位置动态取值才可以用#{},jdbc层面表名等位置不支持预编译,只能用${}。
总结:能用#{}大括号的地方就用,不能用#{}的地方用${}
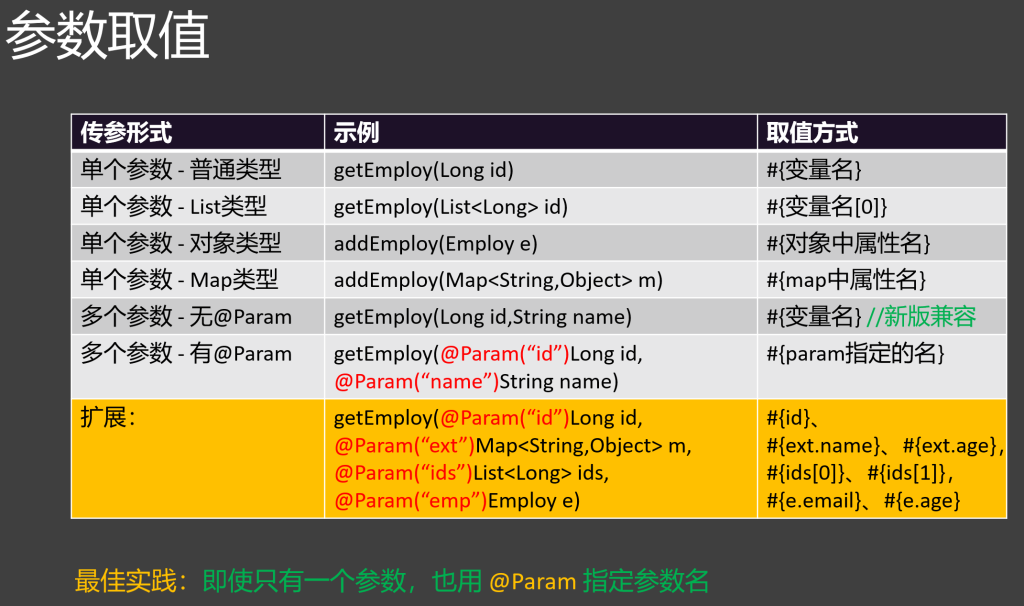
2.单参数取值
1 select * from employee where id =
list取值:使用索引
1 select * from employee where id =
map取值: 使用key值
1 select * from employee where id =
3.多参数取值
新版mybatis 支持直接使用**#{参数名}**
老版mybatis 需要在参数前使用**@Param**指定参数名
1
2
Emp getEmployByIdAndName(@Param("id" ) Long id, @Param("empName" ) Employee emp) select * from Employee where id = #{id} and name = #{emp.name}
最佳实践:即使只有一个参数,也用 @Param 指定参数名
4.返回值-结果封装
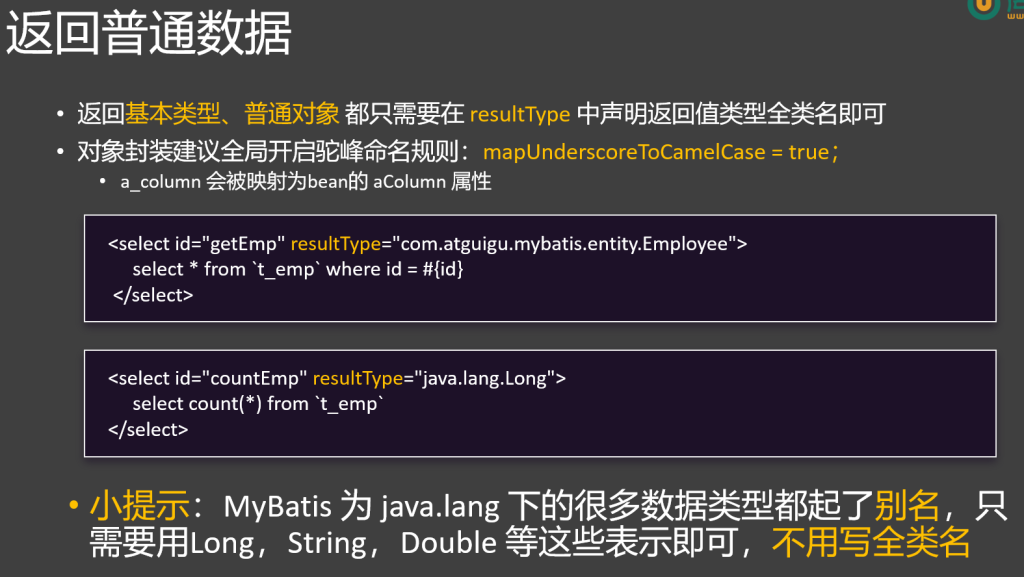
1.一般返回:
1 2 3 <select id ="getEmpById" resultType="com.zhang.mybatis.bean.EmpDo" > select * from employee where id = </select>
resultType规定返回值类型
2.返回map:
mapper方法中使用**@Mapper(“”)**指定key值,key默认从对象属性值中取
1
2
@Mapper ("id" )Map<Integer,Emp> getAllMap ();
返回值的value实际上不是指定类(Emp),而是一个HashMap ,
resultType不写map,写指定类,value值才为指定类
3.自定义结果集- ResultMap
数据库的字段 如果和 Bean的属性 不能一一对应,有两种办法
1、如果符合驼峰命名,则开启驼峰命名规则
2、编写自定义结果集(ResultMap) 进行封装
1
2
3
4
5
<resultMap id= "EmpResultMap" type= "com.atguigu.mybatis.entity.Employee" > <id column= "emp_id" property= "empId" /> <result column= "emp_name" property= "empName" /> <result column= "emp_salary" property= "empSalary" /> </resultMap>
**默认封装规则(resultType):**JavaBean中的属性名 去数据库表中 找对应列名的值,一一映射封装。
**自定义封装规则(resultMap):**明确指定每一列如何封装到JavaBean中
id 标签:必须指定主键列映射规则
result 标签:指定普通列映射规则
collection 标签:指定自定义集合封装规则
association 标签:指定自定义对象封装规则
1 2 3 4 5 6 7 <resultMap id ="EmpRM" type ="com.zhang.mybatis.bean.EmpDo" > <id property ="id" column ="id" > </id > <result property ="name" column ="name" > </result > <result property ="age" column ="age" > </result > </resultMap >
在方法中根据ResultMap的id使用对照规则
1 2 3 <select id ="getEmpById" resultMap="EmpRM" > select * from employee where id = </select>
4.关联查询
一对一关系封装
association 标签:指定自定义对象封装规则,一般用户联合查询一对一关系的封装。比如一个用户对应一个订单
javaType:指定关联的Bean的类型
select:指定分步查询调用的方法
column:指定分步查询传递的参数列
按照id查询订单以及下单的客户信息
1 2 3 4 5 <select id="getOrderById" resultType="com.zhang.mybatis.bean.Order" > select * from orders left join customer on orders.customer_id = customer.id where orders.id = #{id} </select >
使用默认封装(resultType)无法将连接的对象正确装填(customer将返回为null)
1 Order(id =1, address =chengdu, amount =5000, customerId =1, customer =null )
这时候要在自定义封装(resultMap)中使用association标签
1
2
3
4
5
6
7
8
9
10
<resultMap id ="OrderRM" type="com.zhang.mybatis.bean.Order" > <id property ="id" column="id" ></id > <result property ="address" column="address" ></result > <result property ="amount" column="amount" ></result > <result column="customer_id" property ="customerId" ></result > <association property ="customer" javaType="com.zhang.mybatis.bean.Customer" > <id property ="id" column="id" ></id > <result property ="name" column="name" ></result > </association> </resultMap>
左连接时,association标签 中定义了右表的封装关系
一对多关系封装
collection 标签:指定自定义对象封装规则,一般用户联合查询一对一关系的封装。比如一个用户对应一个订单
ofType:指定集合中每个元素的类型
select:指定分步查询调用的方法
column:指定分步查询传递的参数列
按照id查询客户以及下的所有订单
1
2
3
4
5
6
7
8
9
10
<resultMap id ="CustomerRM" type="com.zhang.myb atis.bean.Customer" > <id property ="id" column="id" ></id > <result property ="name" column="name" ></result > <collection property ="orders" ofType="com.zhang.mybatis.bean.Order" > <id property ="id" column="id" ></id > <result property ="address" column="address" ></result > <result property ="amount" column="amount" ></result > <result column="customer_id" property ="customerId" ></result > </collection> </resultMap>
property对应集合,ofType对应单一类
5.分步查询
在 association 和 collection 的封装过程中,可以使用 select + column 指定分步查询逻辑
select:指定分步查询调用的方法
column:指定分步查询传递的参数
传递单个:直接写列名,表示将这列的值作为参数传递给下一个查询
传递多个:column=“{prop1=col1,prop2=col2}”,下一个查询使用prop1、prop2取值
1.手动分步查询
1 2 3 4 5 6 Order order = orderDao.getOrderById(1 );Customer customer = OrderDao.getCustomerById(order .getCustomerId()); order .setCustomer(customer);
2.自动分步查询
1
2
3
4
5
6
7
8
9
10
11
12
<resultMap id ="OrderRM" type="com.zhang.mybatis.bean.Order" > <id property ="id" column="id" ></id > <result property ="address" column="address" ></result > <result property ="amount" column="amount" ></result > <result property ="customerId" column="customer_id" ></result > <collection property ="customers" select="com.zhang.mybatis.dao.OrderDao.getCustomerById" column="customer_id" > </collection> </resultMap>
在collection 或者association 中使用select 属性告诉mybatis在装填该项时使用另一个查询方法
column 指定传递的参数,当出现多个参数时,使用以下格式
1 column = "{userName=user_name,userAge=user_age}"
3.超级分步问题
问题:当实体类之间存在循环引用时,例如 A 类关联 B 类,B 类又关联 A 类,分步查询可能会陷入无限循环,最终导致栈溢出错误。
解决办法:使用嵌套查询,把分步查询改成嵌套查询,在一个 SQL 语句里完成所有关联查询。不过这样可能会让 SQL 语句变得复杂,降低可读性。
6.延迟加载
分步查询 有时候并不需要立即运行,我们希望在用到的时候再去查询,可以开启延迟加载的功能
全局配置:
mybatis.configuration.lazy-loading-enabled=true//开启 MyBatis 的延迟加载特性。
mybatis.configuration.aggressive-lazy-loading=false//禁用积极延迟加载。
7.动态sql
1.简介
动态 SQL 是 MyBatis 的强大特性之一。如果你使用过 JDBC 或其它类似的框架,你应该能理解根据不同条件拼接 SQL 语句有多痛苦,例如拼接时要确保不能忘记添加必要的空格,还要注意去掉列表最后一个列名的逗号。利用动态 SQL,可以彻底摆脱这种痛苦。
使用动态 SQL 并非一件易事,但借助可用于任何 SQL 映射语句中的强大的动态 SQL 语言,MyBatis 显著地提升了这一特性的易用性。
mybatis中动态sql 默认事务回滚开启
真正和事务相关的不是 MyBatis,而是它运行所在的环境。
比如在 Spring 中,@Transactional 注解会开启事务,出现 运行时异常 (RuntimeException) 或 Error 时,默认会自动回滚。
MyBatis 在 原生使用 SqlSession 时,也会在你没有显式调用 commit() 之前,默认处于一个事务中(不自动提交)。如果执行出错,它会回滚。
动态 SQL 只是拼接 SQL,不影响事务; MyBatis 的 SqlSession 默认不会自动提交事务,只有在调用 commit() 时才提交;
如果在执行过程中抛出异常(比如 SQL 拼接错误、数据库约束异常),事务就会回滚;
在 Spring + MyBatis 中,如果用了 @Transactional,Spring 会接管事务管理,默认规则同样是运行时异常触发回滚。
2.标签
if、where 标签
需求:按照 empName 和 empSalary 查询员工。
注意:前端不一定携带所有条件
1 2 3 4 5 6 7 8 9 10 11 <select id ="selectEmployeeByCondition" resultType="employee" > select emp_id,emp_name,emp_salary from t_emp <where > <if test ="empName != null" > or emp_name=#{empName} </if> <if test ="empSalary !=null" > or emp_salary>#{empSalary} </if> </where> </select>
set标签
需求:修改 empName 和 empSalary
注意:前端不一定携带所有条件
1 2 3 4 5 6 7 8 9 10 11 12 <update id ="updateEmployeeDynamic" > update t_emp <set > <if test ="empName != null" > emp_name=# {empName} , </if > <if test ="empSalary < 3000" > emp_salary=# {empSalary} , </if > </set > where emp_id=# {empId} </update >
trim标签
trim 可以实现 set 去掉多余逗号,where 去掉多余and/or 的功能, 不过写起来比较麻烦
1 2 3 4 5 6 7 8 9 10 11 12 13 14 15 16 17 <select id ="selectEmployeeByConditionByTrim" resultType ="com.atguigu.mybatis.entity.Employee" > select emp_id,emp_name,emp_age,emp_salary,emp_gender from t_emp <trim prefix ="where" suffixOverrides ="and|or" > <if test ="empName != null" > emp_name=# {empName} and </if > <if test ="empSalary > 3000" > emp_salary># {empSalary} and </if > <if test ="empAge < = 20" > emp_age=# {empAge} or </if > <if test ="empGender=='male'" > emp_gender=# {empGender} </if > </trim > </select >
当标签中存在内容时,为该内容添加前缀(prefix)或者 后缀(suffix)
1 <trim prefix ="前缀" suffix ="后缀" ></trim>
标签体中最终生成的字符串如果以指定前缀(prefixOverrides)或者 后缀(suffixOverrides)开始,就将该前缀 覆盖为空串
1 <trim prefixOverrides ="前缀" suffixOverrides ="后缀" ></trim>
choose/when/otherwise标签
1 2 3 4 5 6 7 8 9 <select id ="selectEmployeeByConditionByChoose" resultType ="com.atguigu.mybatis.entity.Employee" > select emp_id,emp_name,emp_salary from t_emp where <choose > <when test ="empName != null" > emp_name=# {empName} </when > <when test ="empSalary < 3000" > emp_salary < 3000</when > <otherwise > 1=1</otherwise > </choose > </select >
:作为根标签,包裹多个 和一个可选的 标签,用于表示一组条件选择逻辑。
1 2 3 4 5 6 7 8 9 10 11 12 <choose > <when test ="condition1" > </when > <when test ="condition2" > </when > <otherwise > </otherwise > </choose >
foreach标签
用来遍历,循环;常用于批量插入场景;批量单个SQL
1 2 3 4 5 6 7 8 9 10 11 12 13 <foreach collection ="empList" item ="emp" separator ="," open ="values" index ="myIndex" > (# {emp.empName} ,# {myIndex} ,# {emp.empSalary} ,# {emp.empGender} ) </foreach >
IN子句:查询多ID记录,生成如 (id1, id2)。
1 2 3 4 5 6 7 8 <select id="getOrdersByIds" resultMap="OrderRM"> SELECT * FROM orders WHERE id IN <foreach item="item" index ="index" collection="orderIds" open ="(" separator="," close =")"> #{item} </foreach > </select >
1 2 3 4 5 6 7 8 <insert id="batchInsertOrders"> INSERT INTO orders (address, amount, customer_id) VALUES <foreach item="order" index ="index" collection="orderList" separator=","> (#{order .address}, #{order .amount}, #{order .customerId}) </foreach > </insert >
1 2 3 4 5 <update id="batchUpdateOrders" > <foreach collection ="emps" item="e" separator=";" > update t_emp set emp_name = #{e .empName} where id = #{e .id} </foreach> </update >
sql片段
•抽取可以复用的SQL片段
1
2
3
4
5
6
7
8
9
<sql id ="empColumn" > emp_id,emp_name,emp_age,emp_salary,emp_gender </sql> <select id ="getEmp" resultType="com.atguigu.mybatis.entity.Employee" > select <include refid="empColumn" /> from `t_emp` where id = </select>
8.特殊字符
•以后在xml中,以下字符需要用转义字符,不能直接写
原始字符 转义字符
&
&
<
<
>
>
"
"
’
'
9.MyBais 扩展
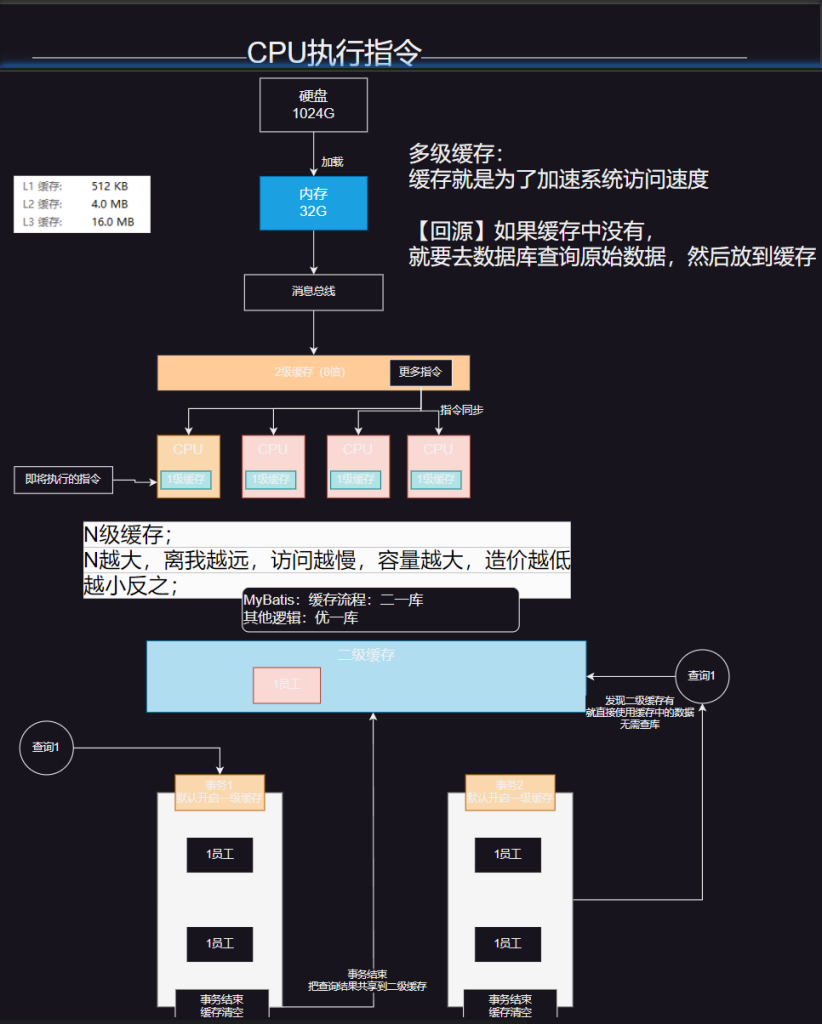
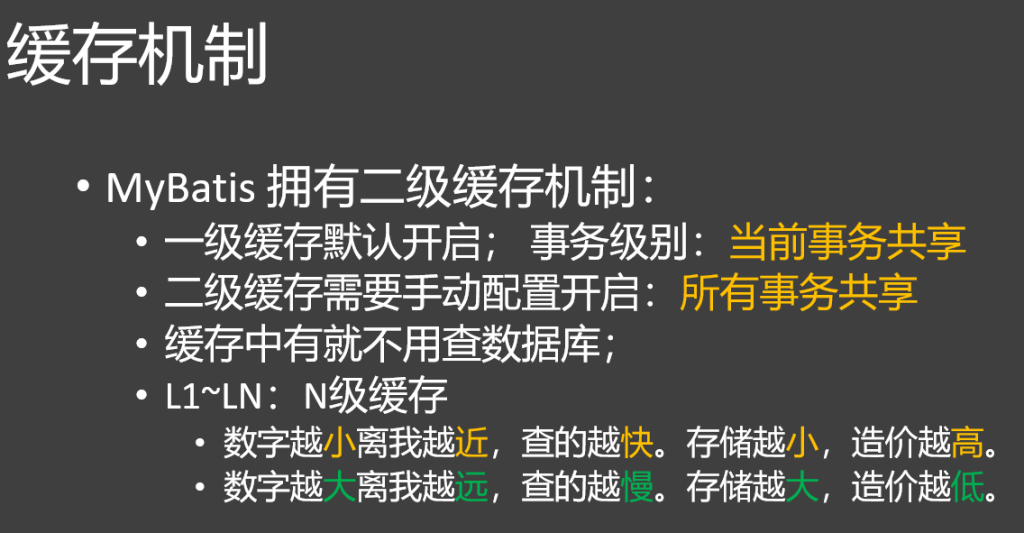
1.缓存机制
MyBatis 拥有二级缓存机制:
一级缓存默认开启; 事务级别:当前事务共享
二级缓存需要手动配置开启:所有事务共享
缓存中有就不用查数据库;
L1~LN:N级缓存
数字越小离我越近,查的越快。存储越小,造价越高。
数字越大离我越远,查的越慢。存储越大,造价越低。
一级缓存
作用域:一级缓存也称为会话(SqlSession)级缓存,它的作用域是单个 SqlSession。在同一个 SqlSession 中,执行相同的 SQL 查询时,MyBatis 会优先从一级缓存中获取数据,而不是再次查询数据库。
原理:当一个 SqlSession 执行查询操作时,MyBatis 会将查询结果存储在该 SqlSession 的缓存中。如果后续再次执行相同的查询(相同的 SQL 语句和参数),MyBatis 会直接从缓存中返回结果,而不会再次访问数据库。
失效情况:当 SqlSession 执行插入、更新、删除操作,或者调用 SqlSession 的 clearCache() 方法时,一级缓存会被清空。
示例代码:
1
2
3
4
5
6
7
8
try (SqlSession session = sqlSessionFactory.openSession()) { UserMapper mapper = session.getMapper(UserMapper.class) // 第一次查询 User user1 = mapper.getUserById(1 ) // 第二次查询,使用缓存 User user2 = mapper.getUserById(1 ) System.out.println(user1 = = user2) }
二级缓存
作用域:二级缓存也称为命名空间(Mapper)级缓存,它的作用域是同一个命名空间(Mapper 接口)。不同的 SqlSession 可以共享二级缓存中的数据,只要它们操作的是同一个 Mapper 接口。
原理:MyBatis 的二级缓存是基于 Mapper 命名空间的,每个 Mapper 都有自己独立的二级缓存。当一个 SqlSession 执行查询操作并将结果存储在二级缓存中后,其他 SqlSession 执行相同的查询时,可以直接从二级缓存中获取数据。
开启方式:要开启二级缓存,需要在 Mapper XML 文件中添加 标签,或者在 Mapper 接口上添加 @CacheNamespace 注解。
失效情况:当 Mapper 对应的 SqlSession 执行插入、更新、删除操作时,该 Mapper 的二级缓存会被清空。
示例代码
1 2 3 4 5 6 7 8 9 10 11 12 13 14 15 16 17 <mapper namespace ="com.example.mapper.UserMapper" > <cache /> <select id ="getUserById" resultType ="com.example.entity.User" > SELECT * FROM user WHERE id = # {id } </select > </mapper > try (SqlSession session1 = sqlSessionFactory.openSession(); SqlSession session2 = sqlSessionFactory.openSession()) { UserMapper mapper1 = session1.getMapper(UserMapper.class); UserMapper mapper2 = session2.getMapper(UserMapper.class); // 第一次查询,存入二级缓存 User user1 = mapper1.getUserById(1 ); // 第二次查询,从二级缓存获取 User user2 = mapper2.getUserById(1 ); System.out.println(user1 == user2); // 输出 false ,但数据内容相同 }
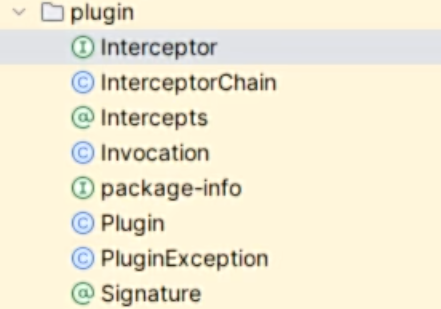
2.插件机制
MyBatis 底层使用 拦截器机制提供插件功能,方便用户在SQL执行前后进行拦截增强。
拦截器:Interceptor
拦截器可以拦截 四大对象 的执行
ParameterHandler(参数处理器):处理SQL的参数对象
ResultSetHandler(结果集处理器):处理SQL的返回结果集
StatementHandler(语句处理器):数据库的处理对象,用于执行SQL语句
Executor(执行器):MyBatis的执行器,用于执行增删改查操作
10.PageHelper
PageHelper 是可以用在 MyBatis 中的一个强大的分页插件
分页插件就是利用MyBatis 插件机制,在底层编写了 分页Interceptor,每次SQL查询之前会自动拼装分页数据
select * from emp limit 0,10
分页重点:
前端 第1页: limit 0,10
前端 第2页: limit 10,10
前端 第3页: limit 20,10
前端 第N页:limit startIndex,pageSize
计算规则: pageNum = 1, pageSize = 10
startIndex = (pageNum - 1)*pageSize
官网:https://pagehelper.github.io
使用
在 pom.xml 中添加如下依赖:
1 2 3 4 5 <dependency > <groupId > com.github.pagehelper</groupId > <artifactId > pagehelper</artifactId > <version > 最新版本</version > </dependency >
配置拦截器插件
1
2
3
4
5
6
7
8
9
10
11
12
13
14
15
16
17
@MapperScan("com.atguigu.mybatis.mapper") @Configuration public class MyBatisConfig { @Bean PageInterceptor pageInterceptor () { PageInterceptor interceptor = new PageInterceptor (); Properties properties = new Properties (); properties.setProperty("reasonable" , "true" ); interceptor.setProperties(properties); return interceptor; } }
测试类
1
2
3
4
5
6
7
8
9
10
11
12
13
14
15
16
17
18
19
20
21
22
23
24
25
26
27
28
29
30
31
32
33
34
35
36
37
38
39
40
41
42
43
44
45
46
47
48
49
50
51
52
53
54
55
56
57
58
59
60
61
62
63
64
65
66
67
68
69
70
71
72
73
@SpringBootTest public class PageTest { @Autowired EmpService empService; @Test void test02(){ //后端收到前端传来的页码 //响应前端需要的数据: //1 、总页码、总记录数 //2 、当前页码 //3 、本页数据 PageHelper.startPage(3 ,5 ); // 紧跟着 startPage 之后 的方法就会执行的 SQL 分页查询 List<Emp> all = empService.getAll(); System .out .println("============"); //以后给前端返回它 PageInfo<Emp> info = new PageInfo<>(all ); //当前第几页 System .out .println("当前页码:"+info .getPageNum()); //总页码 System .out .println("总页码:"+info .getPages()); //总记录 System .out .println("总记录数:"+info .getTotal()); //有没有下一页 System .out .println("有没有下一页:"+info .isHasNextPage()); //有没有上一页 System .out .println("有没有上一页:"+info .isHasPreviousPage()); //本页数据 System .out .println("本页数据:"+info .getList()); } @Test void test01(){ PageHelper.startPage(3 ,5 ); // 紧跟着 startPage 之后 的方法就会执行的 SQL 分页查询 List<Emp> all = empService.getAll(); for (Emp emp : all ) { System .out .println(emp); } System .out .println("==============="); List<Emp> all1 = empService.getAll(); System .out .println(all1.size()); } } @GetMapping("/emp/page") public PageInfo getPage(@RequestParam(value = "pageNum",defaultValue = "1") Integer pageNum){ PageHelper.startPage(pageNum, 5 ); List<Emp> all = empService.getAll(); return new PageInfo<>(all ); }
MyBatis篇完结