JUC并发编程下篇
下篇
8.共享模型之工具
8.1线程池
基本概述
线程池:一个容纳多个线程的容器,容器中的线程可以重复使用,省去了频繁创建和销毁线程对象的操作
线程池作用:
- 降低资源消耗,减少了创建和销毁线程的次数,每个工作线程都可以被重复利用,可执行多个任务
- 提高响应速度,当任务到达时,如果有线程可以直接用,不会出现系统僵死
- 提高线程的可管理性,如果无限制的创建线程,不仅会消耗系统资源,还会降低系统的稳定性,使用线程池可以进行统一的分配,调优和监控
线程池的核心思想:线程复用,同一个线程可以被重复使用,来处理多个任务
池化技术 (Pool) :一种编程技巧,核心思想是资源复用,在请求量大时能优化应用性能,降低系统频繁建连的资源开销
一、自定义线程池
线程池不是越大越好,要与CPU核数适配
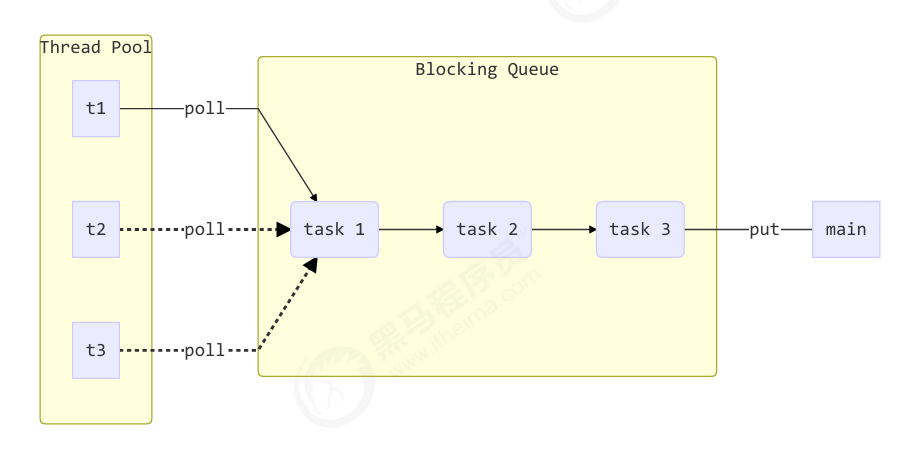
一步步手写线程池-阻塞队列
1.创建基本类和方法
1 | class BlockingQueue<T> { |
2.带超时的阻塞获取
1 | //带超时的阻塞获取 |
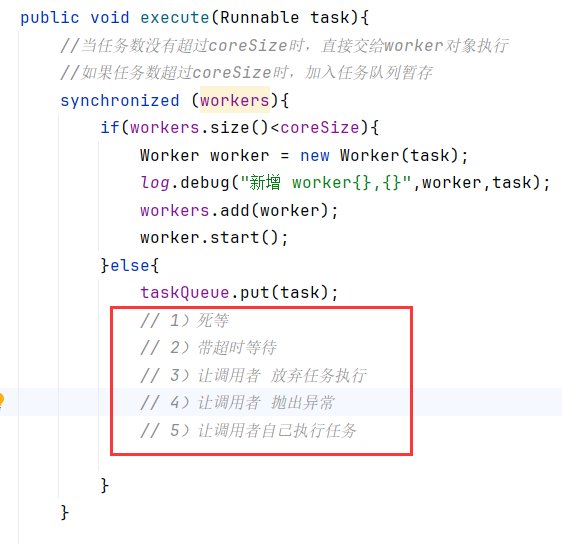
3.下面是线程池的基本框架:
1 | class ThreadPool { |
4.完善任务提交 Worker实现
1 | @Slf4j(topic="c.ThreadPool") |
下面是执行方法:
1 |
|
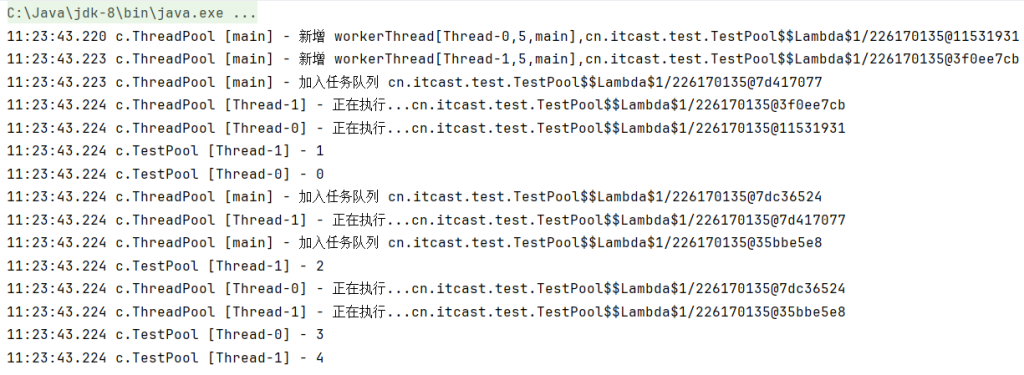
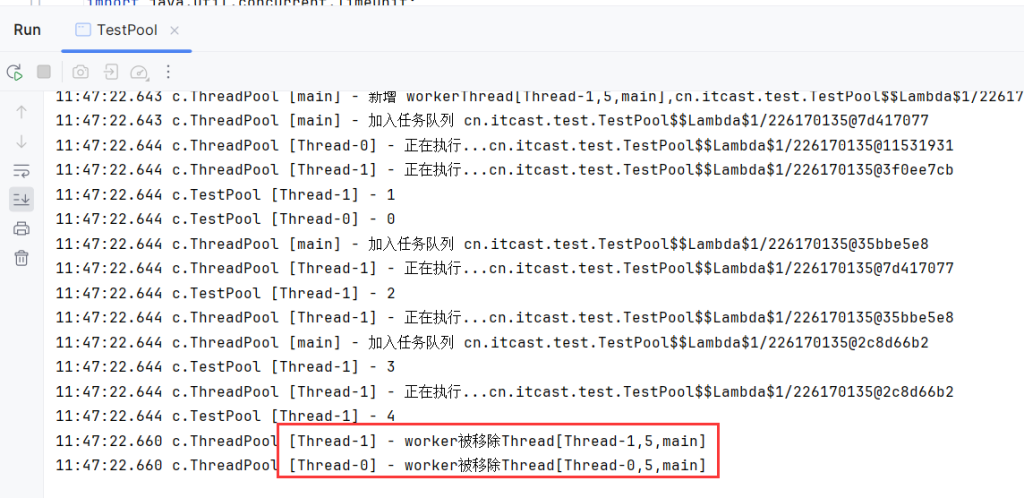
因为线程池线程数为2,所以是创建了2个worker线程。
然后把创建出来的2个线程加入到任务队列中等待执行。
然后Thread1和Thread2分别执行。输出结果1和0
执行完一个任务,新的任务会被继续加入任务队列。
总共设置了5个任务,全部比线程执行完毕。
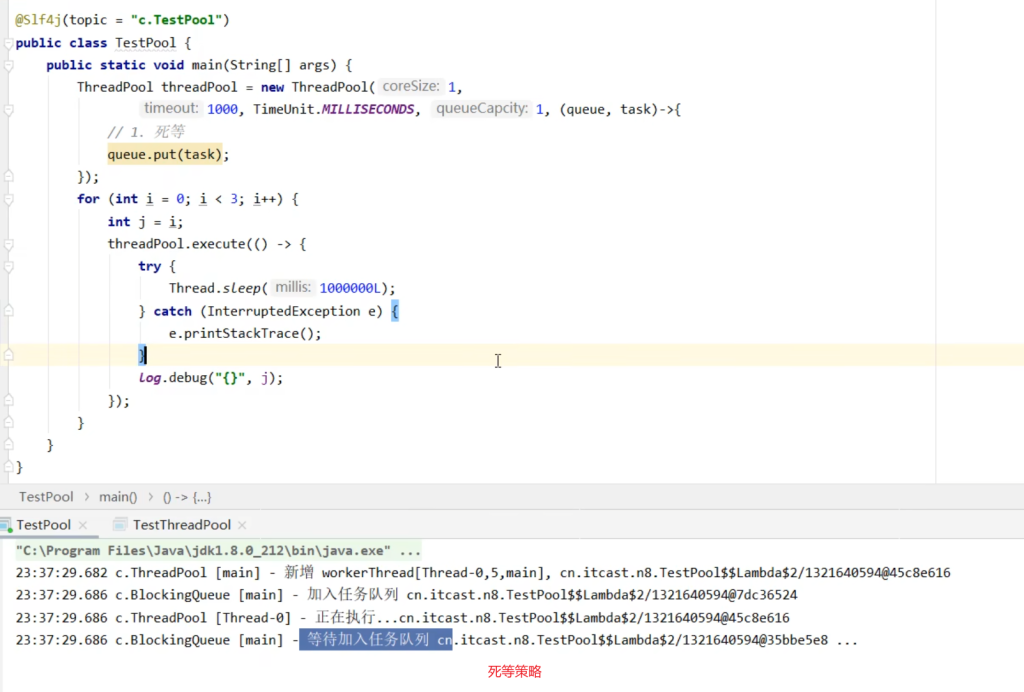
现在有一个问题,线程会无限死等:
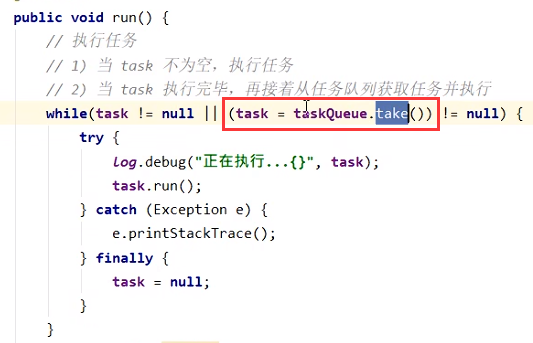
只需要把take方法替换为poll方法即可:
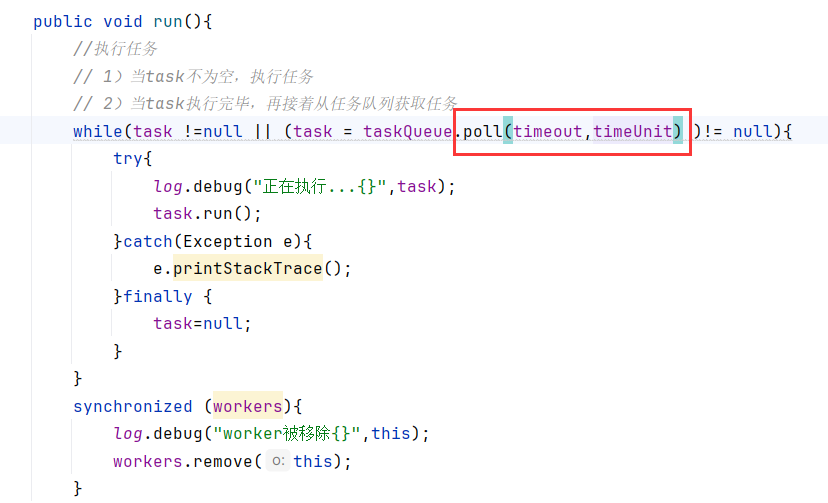
自动停止:
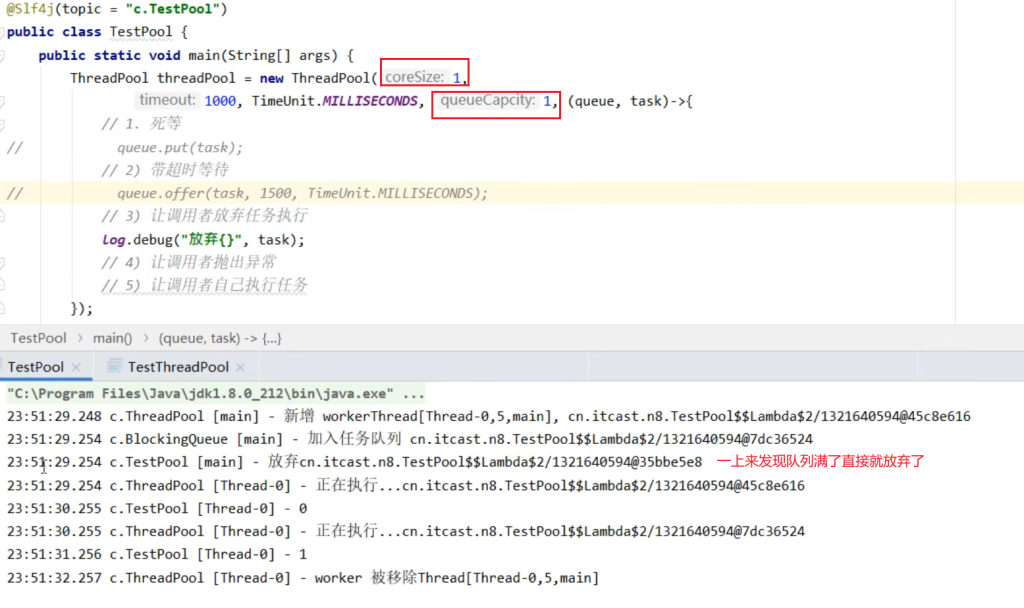
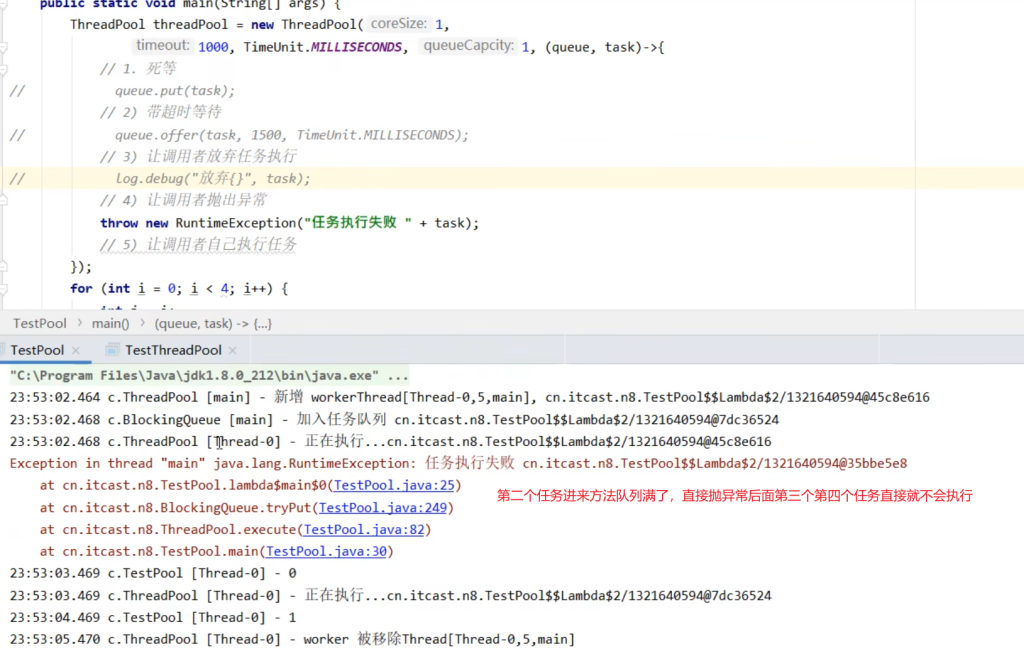
5.当任务队列已满
现在假如核心线程数为2,队列容量大小为10,假如处理一个任务的耗时很长,生成了15个任务,必然会有10个任务在任务队列中阻塞,而有3个任务等待加入任务队列。
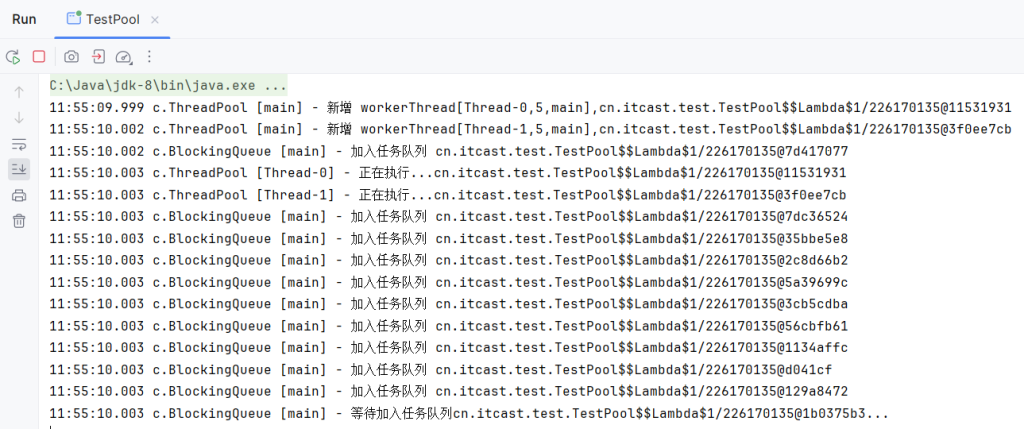
应该添加一个拒绝策略。
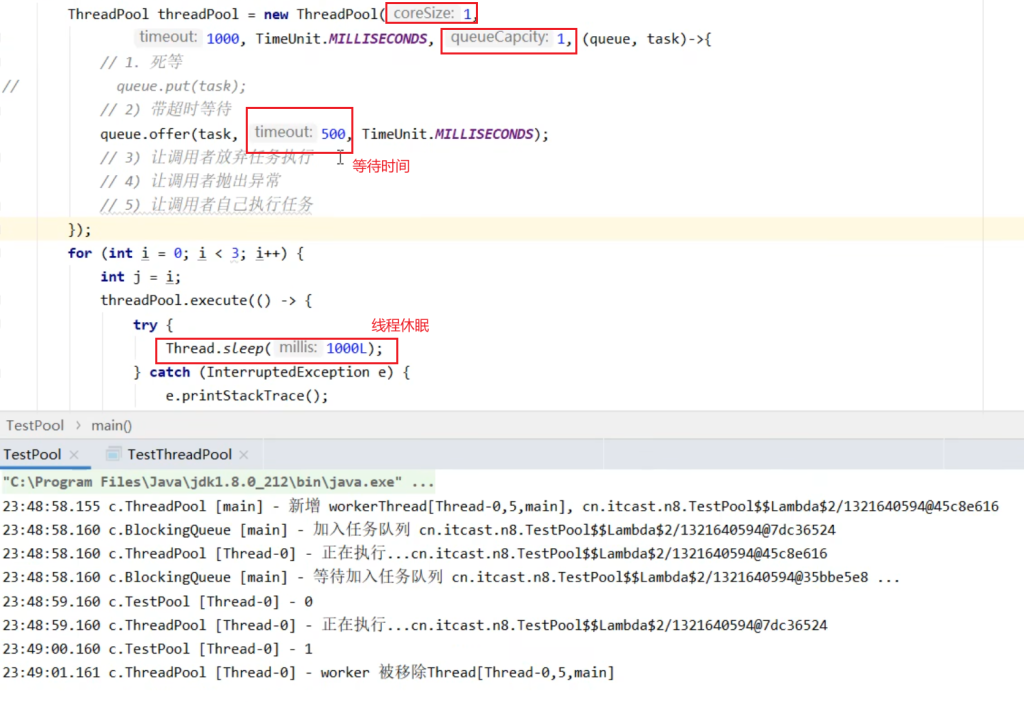
6. offer增强
1 | //带超时时间的阻塞添加 |
7.拒绝策略
如果把拒绝策略写死在执行方法里需要很多的if-else判断,现在的思路是将拒绝策略的选择交给用户端,由用户来决定要用哪种拒绝策略。
现在可以用策略模式,把操作抽象为接口,具体的实现由调用者传递进来。
主要是修改main方法和execute方法:
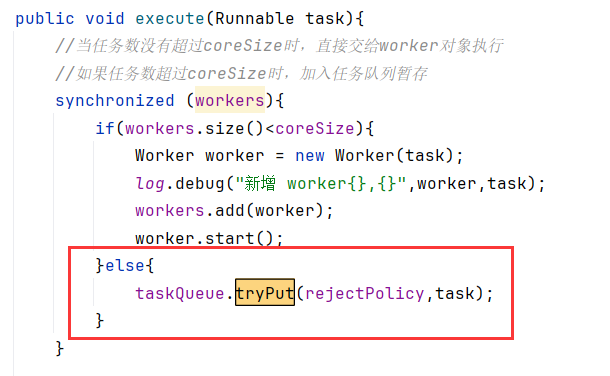
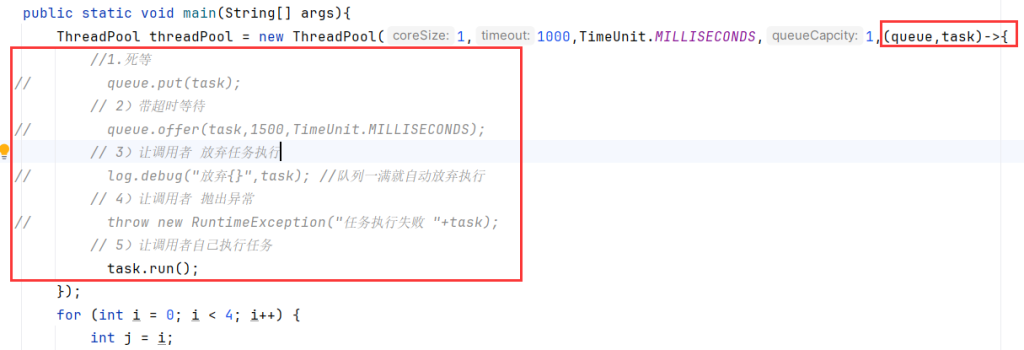
首先是死等策略,只要队列还有任务就一直死等
第二种带超时等待

第三种,让调用者放弃任务执行
第四种让调用者抛出异常
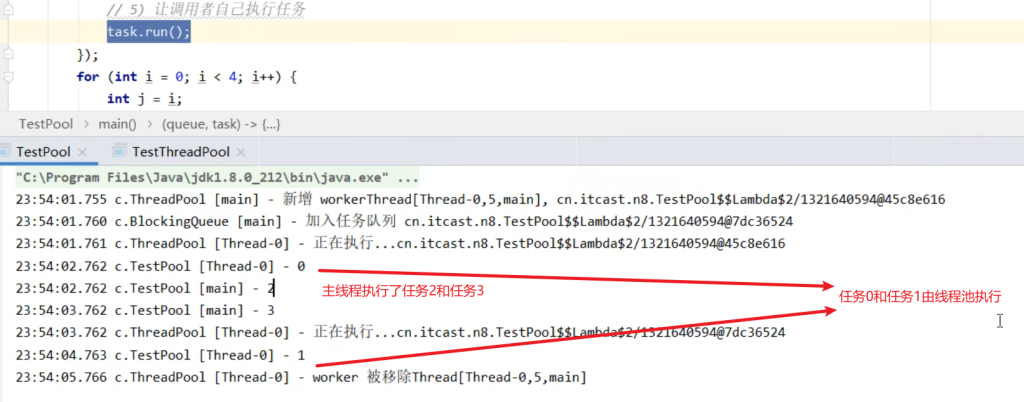
第五种让调用者自己执行任务
1 | @Slf4j(topic="c.TestPool") |
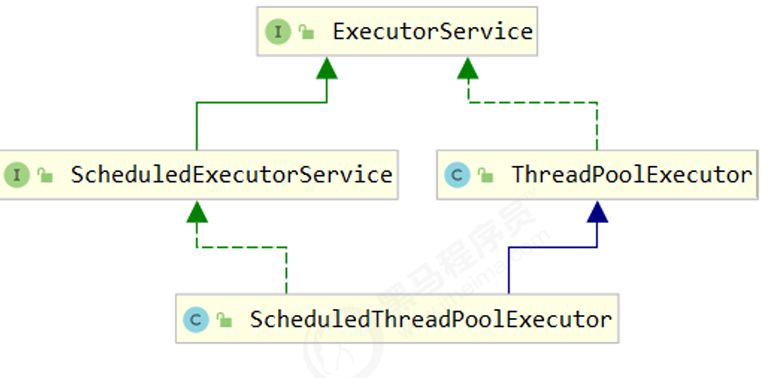
二、JDK为我们提供的线程池ThreadPoolExecutor
ThreadPoolExecutor 是什么?
ThreadPoolExecutor 是 Java 提供的最基础、最灵活的线程池实现类,几乎所有线程池的底层实现都是基于它来构建的。比如:
Executors.newFixedThreadPool()就是基于它创建固定线程池Executors.newCachedThreadPool()是可缓存线程池ScheduledThreadPoolExecutor是它的子类,支持定时调度任务
说明:
- ScheduledThreadPoolExecutor是带调度的线程池
- ThreadPoolExecutor是不带调度的线程池
1.线程池状态
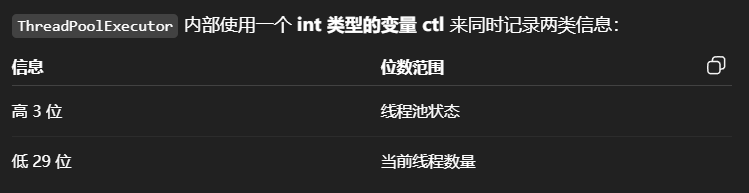
| 状态名 | 高3位 | 接收新任务 | 处理队列任务 | 描述 |
|---|---|---|---|---|
| RUNNING | 111 | ✅ | ✅ | 正常运行中 |
| SHUTDOWN | 000 | ❌ | ✅ | 拒绝新任务,但会继续执行队列中的任务 |
| STOP | 001 | ❌ | ❌ | 拒绝所有任务,并中断正在执行的任务 |
| TIDYING | 010 | 无意义 | 无意义 | 所有任务已清空,活动线程为 0,准备彻底关闭 |
| TERMINATED | 011 | 无意义 | 无意义 | 已彻底终止 |
从数字上比较,TERMINATED > TIDYING > STOP > SHUTDOWN > RUNNING
为何这样设计?
将状态信息与线程数量合并在一起(原子变量ctl),可以通过一次原子操作(CAS)同时更新状态与线程数,提升性能,减少同步成本。
1 | // c 为旧值, ctlOf 返回结果为新值 |
2.构造方法
1 | public ThreadPoolExecutor(int corePoolSize, |
- corePoolSize 核心线程数目 (常驻线程数)
- maximumPoolSize 最大线程数目(救急线程上限)
- keepAliveTime 生存时间 - 针对救急线程(
救急线程多久无任务会销毁) - unit 时间单位 - 针对救急线程
- workQueue 阻塞队列(任务队列,存储待处理任务)
- threadFactory 线程工厂 - 可以为线程创建时起个好名字(创建线程的工厂,常用于设置线程名)
- handler 拒绝策略(任务无法处理时的行为)
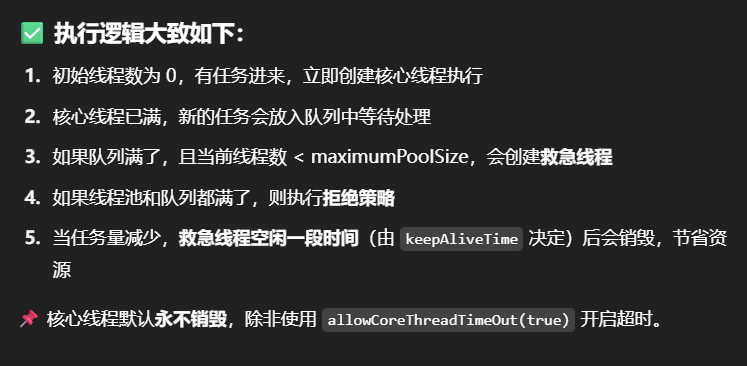
3.工作方式
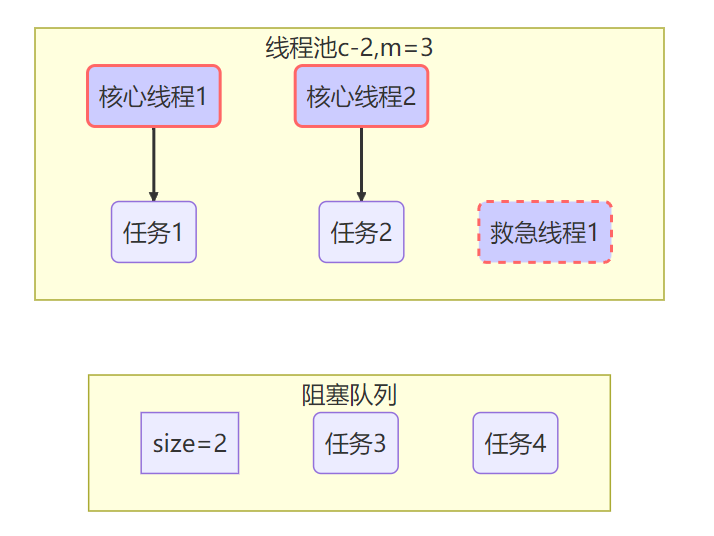
- 线程池中刚开始没有线程,当一个任务提交给线程池后,线程池会创建一个新线程来执行任务。
- 当线程数达到 corePoolSize 并没有线程空闲,这时再加入任务,新加的任务会被加入workQueue 队列排 队,直到有空闲的线程。
- 如果队列选择了有界队列,那么任务超过了队列大小时,会创建 maximumPoolSize - corePoolSize 数目的线程来救急。
- 如果线程到达 maximumPoolSize 仍然有新任务这时会执行拒绝策略。拒绝策略 jdk 提供了 4 种实现,其它著名框架也提供了实现
- AbortPolicy 让调用者抛出 RejectedExecutionException 异常,这是默认策略
- CallerRunsPolicy 让调用者运行任务
- DiscardPolicy 放弃本次任务
- DiscardOldestPolicy 放弃队列中最早的任务,本任务取而代之
- Dubbo 的实现,在抛出 RejectedExecutionException 异常之前会记录日志,并 dump 线程栈信息,方 便定位问题
- Netty 的实现,是创建一个新线程来执行任务
- ActiveMQ 的实现,带超时等待(60s)尝试放入队列,类似我们之前自定义的拒绝策略
- PinPoint 的实现,它使用了一个拒绝策略链,会逐一尝试策略链中每种拒绝策略
- 当高峰过去后,超过corePoolSize 的救急线程如果一段时间没有任务做,需要结束节省资源,这个时间由 keepAliveTime 和 unit 来控制。
拒绝策略(RejectedExecutionHandler)
| 策略名 | 行为说明 |
|---|---|
| AbortPolicy(默认) | 抛出 RejectedExecutionException 异常 |
| CallerRunsPolicy | 由提交任务的线程(调用者)自己执行任务 |
| DiscardPolicy | 直接丢弃该任务,不抛异常 |
| DiscardOldestPolicy | 丢弃队列中最早的任务,然后执行当前任务 |
| 自定义策略 | 框架常见实现,如:Dubbo、Netty、ActiveMQ、Pinpoint 等 |

根据这个构造方法,JDK Executors 类中提供了众多工厂方法来创建各种用途的线程池。
Executors 工厂方法(快速创建线程池)
| 工厂方法 | 内部使用 ThreadPoolExecutor |
|---|---|
newFixedThreadPool(n) |
固定核心线程数,任务多时进入队列 |
newCachedThreadPool() |
没有限制的线程池,空闲线程会被回收 |
newSingleThreadExecutor() |
单线程池,串行执行任务 |
newScheduledThreadPool(n) |
定时线程池(用 ScheduledThreadPoolExecutor) |
4.Executors 固定大小线程池newFixedThreadPool
1 | public static ExecutorService newFixedThreadPool(int nThreads) { |
线程池特性
- 核心线程数 = 最大线程数 = n
- 没有救急线程,不涉及超时销毁逻辑
- 队列为无界队列(
LinkedBlockingQueue) - 拒绝策略:默认抛异常(
AbortPolicy)
适用场景
任务量已知且较重,适合持久运行的任务处理,例如日志记录、I/O 任务等。
5. Executors 带缓冲线程池newCachedThreadPool
核心线程数为0,最大线程数为Integer.Max_VALUE
1 | public static ExecutorService newCachedThreadPool() { |
特点
- 核心线程数是 0, 最大线程数是 Integer.MAX_VALUE,救急线程的空闲生存时间是 60s,
- 意味着全部都是救急线程(60s 后可以回收)
- 救急线程可以无限创建
- 队列采用了 SynchronousQueue 实现特点是,它没有容量,没有线程来取是放不进去的(一手交钱、一手交货)
1 | SynchronousQueue<Integer> integers = new SynchronousQueue<>(); |
输出
1 | 11:48:15.500 c.TestSynchronousQueue [t1] - putting 1 |
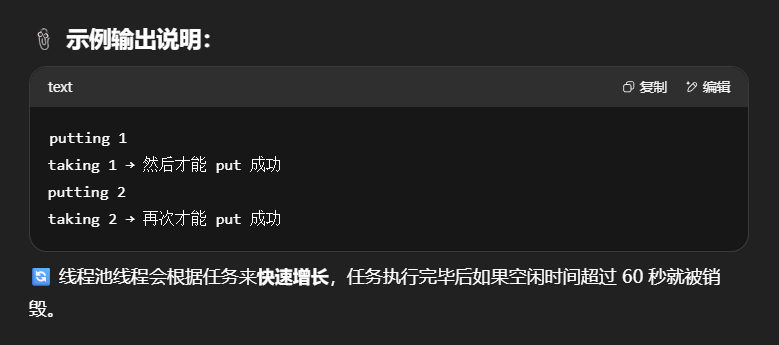
评价 整个线程池表现为线程数会根据任务量不断增长,没有上限,当任务执行完毕,空闲 1分钟后释放线程。 适合任务数比较密集,但每个任务执行时间较短的情况
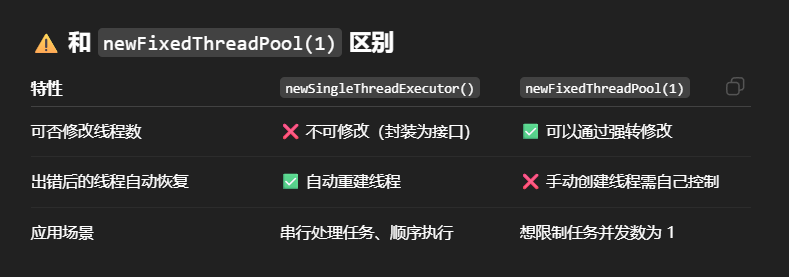
6.Executors 单线程线程池newSingleThreadExecutor
特性说明:
- 核心线程数 = 最大线程数 = 1
- 无救急线程,线程死后自动补一个
- 使用
LinkedBlockingQueue,任务串行排队
1 | public static ExecutorService newSingleThreadExecutor() { |
使用场景:
希望多个任务排队执行。线程数固定为 1,任务数多于 1 时,会放入无界队列排队。任务执行完毕,这唯一的线程 也不会被释放。
区别:
- 自己创建一个单线程串行执行任务,如果任务执行失败而终止那么没有任何补救措施,而线程池还会新建一个线程,保证池的正常工作
- Executors.newSingleThreadExecutor() 线程个数始终为1,不能修改
- FinalizableDelegatedExecutorService 应用的是装饰器模式,在调用构造方法时将ThreadPoolExecutor对象传给了内部的ExecutorService接口。只对外暴露了 ExecutorService 接口,因此不能调用 ThreadPoolExecutor 中特有的方法,也不能重新设置线程池的大小。
- Executors.newFixedThreadPool(1) 初始时为1,以后还可以修改
- 对外暴露的是 ThreadPoolExecutor 对象,可以强转后调用 setCorePoolSize 等方法进行修改
为什么使用 FinalizableDelegatedExecutorService?
- 它包装了 ThreadPoolExecutor,只暴露出
ExecutorService接口,屏蔽修改线程数的能力,防止用户破坏单线程语义。
总结Executors 工厂类提供的三种线程池工具方法
| 方法 | 核心线程 | 最大线程 | 队列类型 | 特点 | 适用场景 |
|---|---|---|---|---|---|
newFixedThreadPool(n) |
n | n | 无界队列 | 固定线程数,不会销毁线程 | 任务量已知、执行时间较长 |
newCachedThreadPool() |
0 | ∞ | SynchronousQueue | 救急线程多、空闲销毁 | 短任务量大、并发压力突发 |
newSingleThreadExecutor() |
1 | 1 | 无界队列 | 单线程串行执行,线程异常会被重建 | 顺序执行任务、串行日志写入等 |
7.ThreadPoolExecutor 中任务的提交方法(submit/invokeAll/invokeAny)
execute(Runnable)— 最简单提交任务(无结果)
- 没有返回值
- 适用于只关心任务是否运行,而不关心其结果的情况
1 | pool.execute(() -> System.out.println("do work")); |
2.submit(Callable) — 提交任务并获得结果(Future)
可使用 future.get() 阻塞等待结果
返回 Future<T> 可异步获取执行结果(Callable与Runnable的差异在于,Callable会返回结果。)

1 | Future<String> future = pool.submit(() -> { |
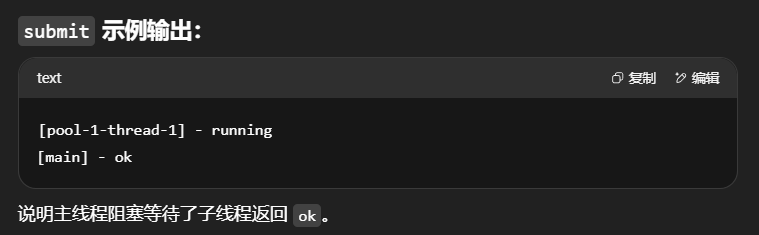
特点:
Callable支持返回值,优于Runnableget()方法会阻塞直到结果返回,或异常抛出
3.invokeAll(...) — 提交一组任务,等待全部完成
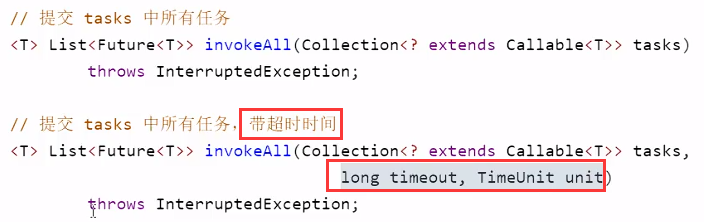
1 | List<Future<String>> results = pool.invokeAll(tasks); |
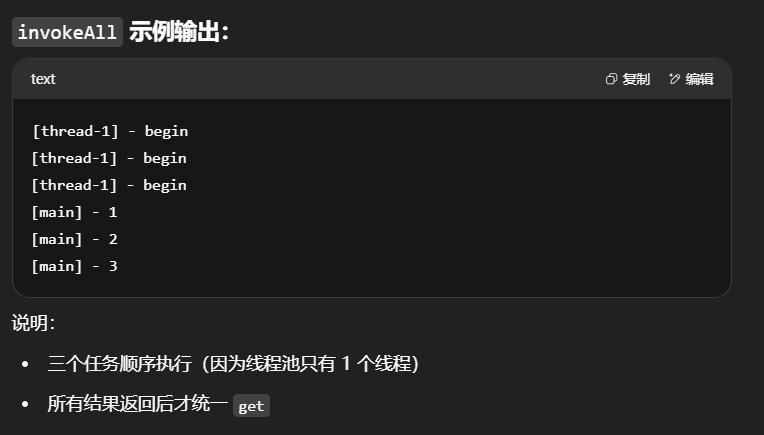
特点:
- 所有任务并发执行
- 会阻塞直到所有任务完成
- 可设置超时时间,超时任务会被取消
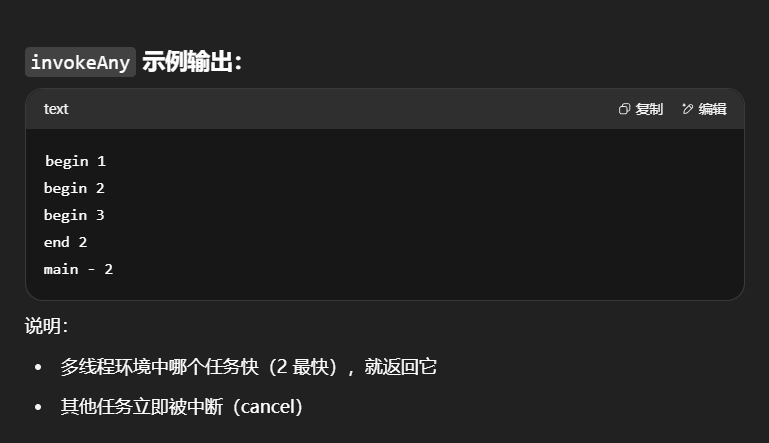
4.invokeAny(...) — 提交一组任务,谁先成功就返回谁的结果
1 | String result = pool.invokeAny(tasks); |
特点:
- 返回第一个完成的任务结果
- 其它任务取消
- 遇到异常或全部失败会抛异常
- 可设置超时限制
1 | @Slf4j(topic = "c.Test1") |
8.线程池关闭机制
线程池一旦关闭不能再提交任务,否则抛出 RejectedExecutionException。
1.shutdown() — 平缓关闭
- 拒绝新任务
- 执行完队列中的任务
- 不会中断正在执行的线程
1 | pool.shutdown(); |
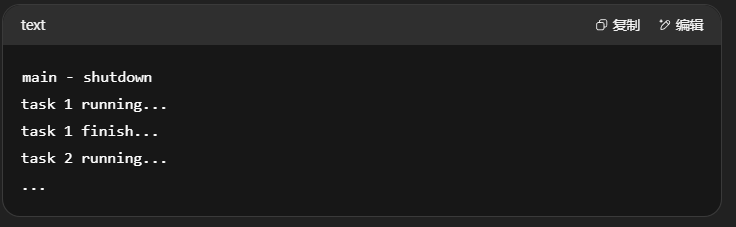
下面的例子可以说明:调用shutdown之后,已经提交的任务会执行完,但不能加入新的任务:
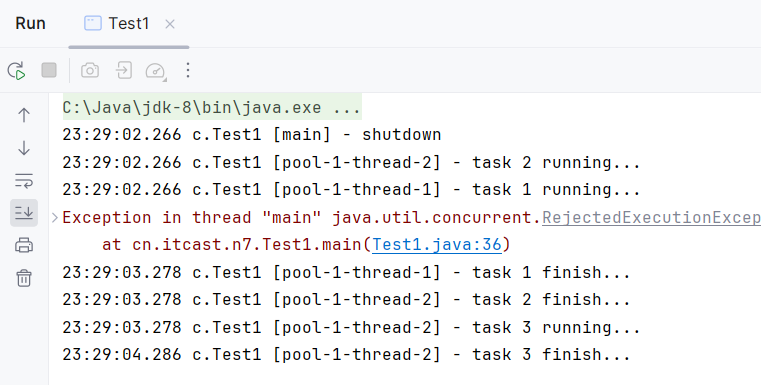
2.shutdownNow() — 立即强制关闭
- 拒绝新任务
- 中断正在执行的线程
- 返回队列中尚未执行的任务
1 | List<Runnable> pending = pool.shutdownNow(); |
如下图可见调用shutdownNow之后已有的任务便不会再执行,也不会再加入新的任务:
3.awaitTermination(timeout) — 等待线程池完全终止
- 阻塞调用线程直到线程池关闭
- 返回是否在规定时间内成功终止
1 | pool.shutdow(); |
总结:
| 方法 | 特点 | 是否阻塞主线程 | 是否返回结果 |
|---|---|---|---|
execute() |
无返回值,提交 Runnable | ❌ | ❌ |
submit() |
返回 Future,可调用 get() |
✅(通过 get) | ✅ |
invokeAll() |
一组任务,等待全部完成 | ✅ | ✅ |
invokeAny() |
一组任务,返回第一个成功结果 | ✅ | ✅ |
关闭方法:
| 关闭方法 | 拒绝新任务 | 取消运行中任务 | 等待已有任务 |
|---|---|---|---|
shutdown() |
✅ | ❌ | ✅ |
shutdownNow() |
✅ | ✅ | ❌(立即返回) |

9.任务调度线程池
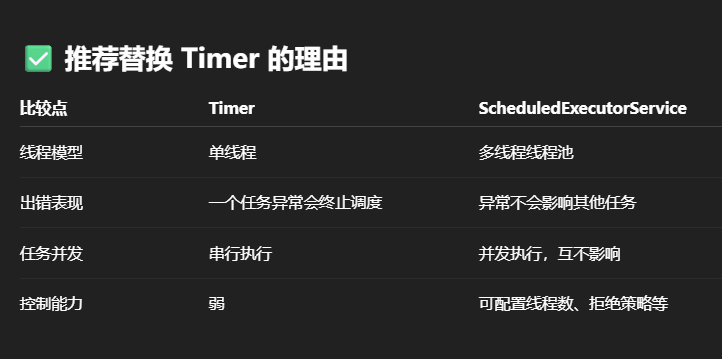
主要是 ScheduledExecutorService 的使用方式和替代传统 Timer 的优势。
定时任务的前世今生
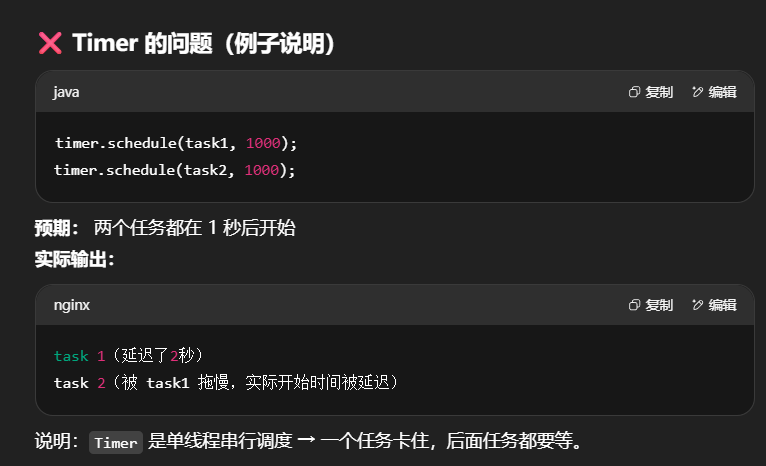
1.java.util.Timer(早期做法)
- 最早用于 JDK 1.3 之前的定时任务调度工具
- 所有任务由同一个线程顺序执行:一个任务阻塞会导致下一个任务延迟
- 无法应对任务执行时间不确定、异常等复杂情况
所有任务都是由同一个线程来调度,因此所有的任务都是串行执行的。
只要前面有任务存在延迟或者异常,都会影响到后面的任务。

Timer的问题
2.现代替代:ScheduledExecutorService
JDK 1.5 引入,解决 Timer 缺陷,支持线程池执行定时任务。
1 | ScheduledExecutorService executor = Executors.newScheduledThreadPool(2); |
- 多线程调度,互不阻塞
- 支持延时执行、周期执行
- 可设置固定速率或固定延迟
1 | @Slf4j(topic = "c.Test1") |
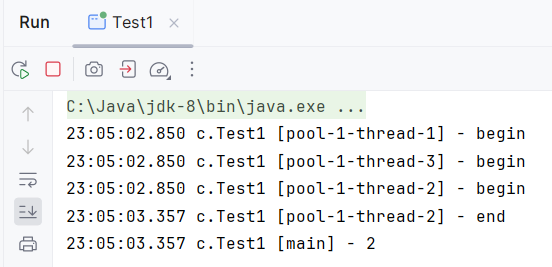
可以发现尽管任务1存在延时,但两个线程都是并行执行的。
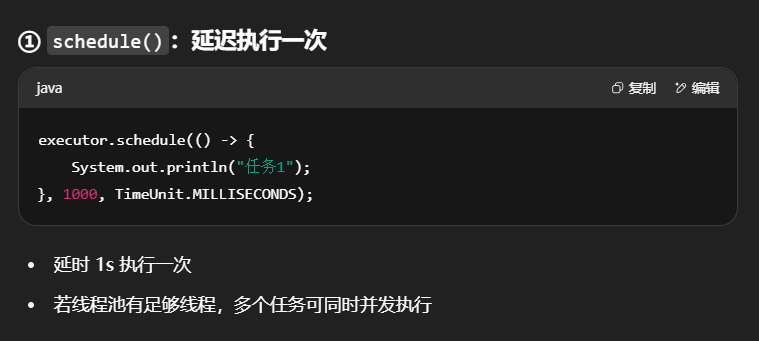
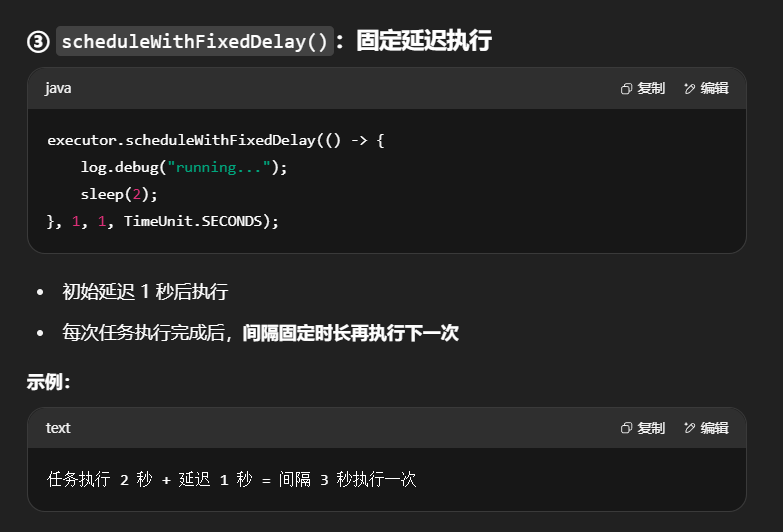
3.三种使用方式讲解

| 方法 | 启动延时 | 间隔计算方式 | 特点 |
|---|---|---|---|
schedule() |
✅ | 仅执行一次 | 延时执行一次 |
scheduleAtFixedRate() |
✅ | 固定周期调度(不考虑任务执行时间) | 任务慢会被“挤压” |
scheduleWithFixedDelay() |
✅ | 每次任务执行完后延迟一段时间再执行 | 任务执行完再计时,稳定不堆积 |
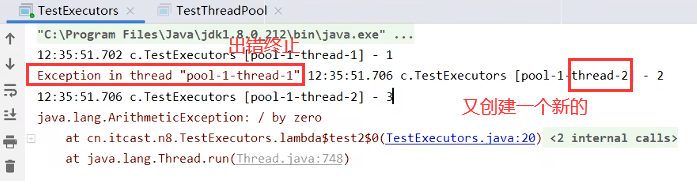
10.线程池中如何正确处理任务执行过程中发生的异常
默认情况下,Java 线程池并不会直接抛出任务执行的异常,而是悄悄“吞掉”了,如果不做额外处理就会导致异常“沉没”,不利于排查 bug 或做出补偿机制。
1.问题现象回顾
线程池中任务出错,不会抛异常?
当你用线程池执行任务,任务内部抛出异常时:
- 控制台不会显示错误
- 主线程不会收到通知
- 没有
try/catch或get()的话,异常就“消失了”
2.两种正确处理方式
方法一:主动在任务中 try-catch 捕获异常
这是最直接、推荐的方式。
1 | ExecutorService pool = Executors.newFixedThreadPool(1); |
输出
1 | [pool-1-thread-1] - task1 |
优点:
- 能看到错误堆栈
- 可进行日志记录、报警、重试等处理
- 最通用、最灵活的方式
方法二:借助 Future.get() 捕获异常
适用于你通过 submit() 提交任务,并希望在主线程中统一处理异常的场景。
1 | Future<Boolean> f = pool.submit(() -> { |
输出:
1 | [pool-1-thread-1] - task1 |
特点:
- 如果任务抛异常,
Future.get()会包装成ExecutionException抛出 - 可以在调用
get()的地方统一处理异常
注意:
若 lambda 中没有返回值,就不会自动识别为 Callable,那返回的 Future 实际上没法获取到异常。
3.总结
| 方式 | 是否能看到异常 | 异常处理位置 | 推荐场景 |
|---|---|---|---|
| try-catch 包裹任务体 | ✅ | 任务线程内部 | 日志记录、补偿逻辑等需要 |
| Future.get() 捕获 | ✅ | 提交任务的主线程 | 多任务批量处理统一异常汇总 |
| 不做任何处理 | ❌ | 无法获取 | 非推荐方式,会导致“异常沉没” |
4.建议
- 所有通过线程池执行的任务,都应保证异常被显式处理
- 如果是并发场景,推荐结合
Future.get()做统一异常控制和聚合 - 复杂系统中,可封装统一的线程池提交工具类,内部统一捕获/记录异常
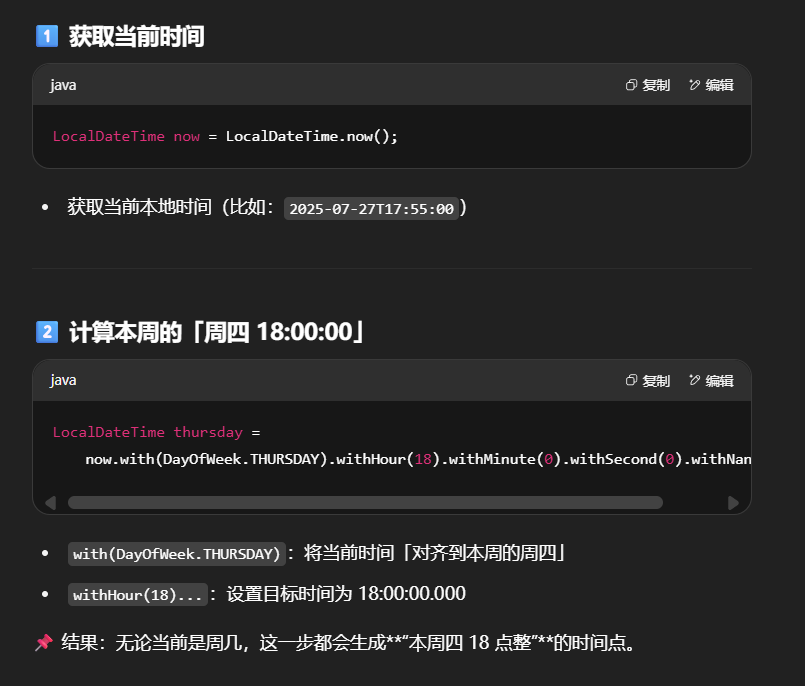
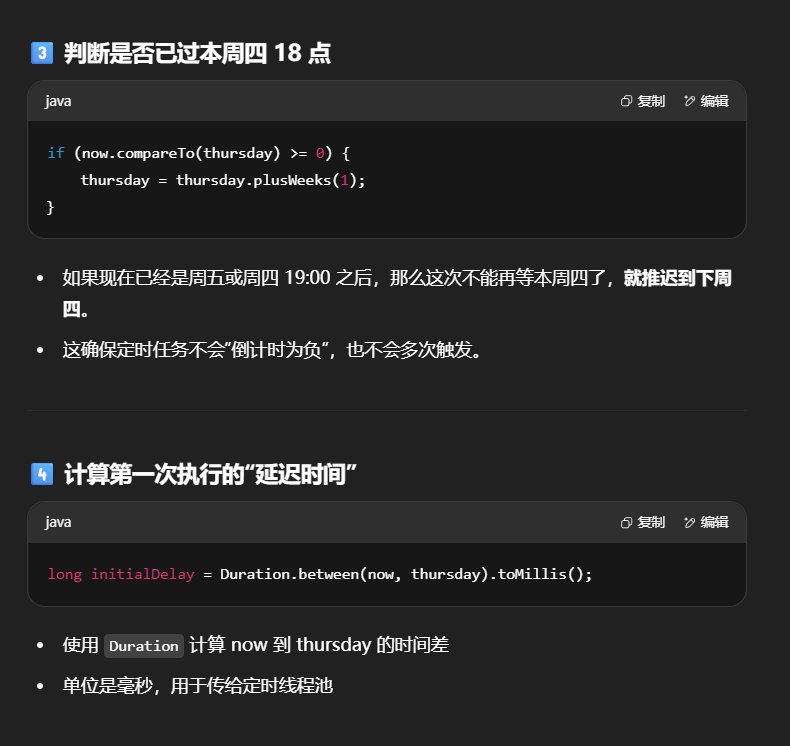
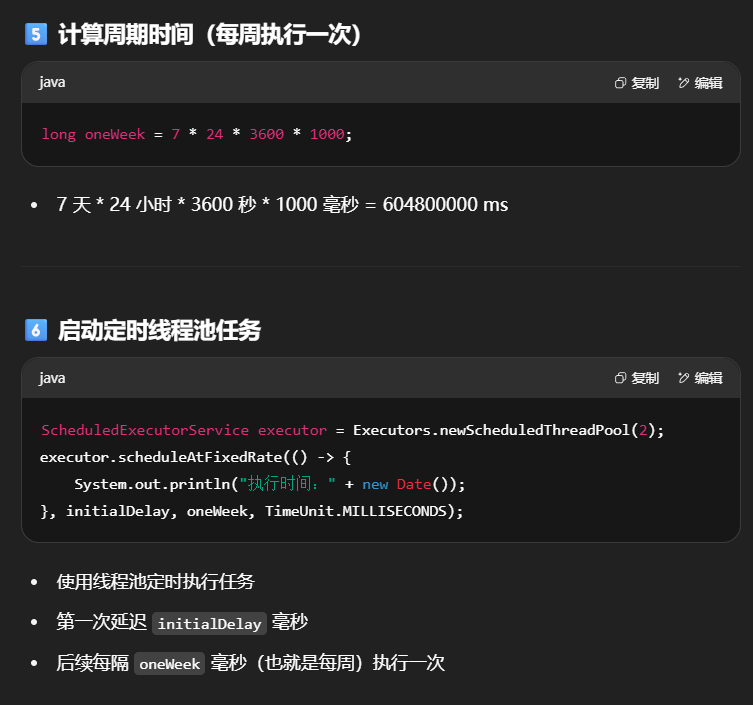
11.应用之定时任务
如何让每周四 18:00:00 定时执行任务?
1 | // 获得当前时间 |

12.Tomcat 线程池
1.Tomcat 中线程池的整体架构
Tomcat 在哪里用到了线程池呢
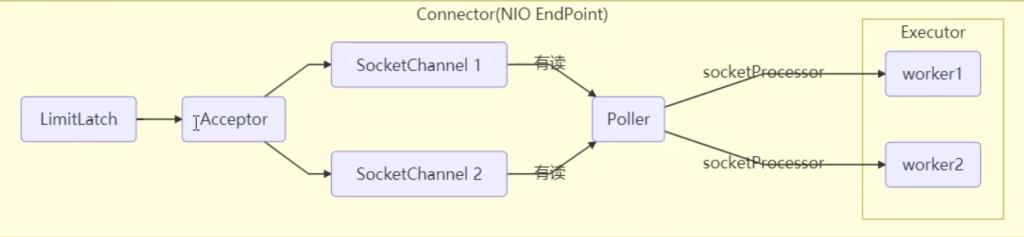
模块角色说明:
| 模块 | 职责说明 |
|---|---|
Acceptor |
只负责接收 socket 连接(监听端口) |
Poller |
监听连接的 I/O 事件(是否可读),基于 NIO |
Executor |
线程池,负责真正处理请求逻辑(servlet 调用等) |
图中流程说明:
- 用户连接发起请求
Acceptor接收连接Poller发现可读,封装为SocketProcessor- 提交
SocketProcessor到Executor线程池 - 线程池中工作线程处理业务逻辑
- LimitLatch 用来限流,可以控制最大连接个数,类似 J.U.C 中的 Semaphore 后面再讲
- Acceptor 只负责【接收新的 socket 连接】
- Poller 只负责监听 socket channel 是否有【可读的 I/O 事件】
- 一旦可读,封装一个任务对象(socketProcessor),提交给 Executor 线程池处理
- Executor 线程池中的工作线程最终负责【处理请求】
2.Tomcat 的线程池行为特点
Tomcat 的 Executor 本质上是对 ThreadPoolExecutor 的扩展
行为稍有不同:

相关源码分析:
源码 tomcat-7.0.42
1 | public void execute(Runnable command, long timeout, TimeUnit unit) { |
重点理解:
force()是 Tomcat 特有逻辑,不是 Java 原生线程池的默认行为- 它可以避免请求高峰时任务被直接拒绝,提高系统的鲁棒性和服务承载能力
3.连接器 Connector 配置解析
Tomcat 通过 <Connector> 和 <Executor> 进行线程池配置。
Connector 中可调参数(简版)
| 配置项 | 默认值 | 说明 |
|---|---|---|
acceptorThreadCount |
1 | 负责 accept socket 的线程数量 |
pollerThreadCount |
1 | 负责监听 socket channel 的线程数 |
minSpareThreads |
10 | 核心线程数(corePoolSize) |
maxThreads |
200 | 最大线程数(maximumPoolSize) |
executor |
- | 对应的 Executor 名称 |
Executor 中可调参数(高级配置)
| 配置项 | 默认值 | 说明 |
|---|---|---|
threadPriority |
5 | 线程优先级 |
deamon |
true | 是否守护线程 |
minSpareThreads |
25 | 核心线程数,即corePoolSize |
maxThreads |
200 | 最大线程数,即 maximumPoolSize |
maxIdleTime |
60000 | 线程生存时间( 线程闲置多久可回收),单位是毫秒,默认值即 1 分钟 |
maxQueueSize |
Integer.MAX_VALUE | 任务队列容量(默认无限) |
prestartminSpareThreads |
false | 是否在启动时预热核心线程 |

图中展示的是 Tomcat 请求到达后的处理流程:
- 客户端发起连接
- Acceptor 接收后传给 Poller
- Poller 监听读事件后将任务包装为
SocketProcessor - 提交到线程池(Executor)
- 线程池中的工作线程开始执行实际的 Servlet 处理逻辑
整个模型体现了解耦 + 高并发分工的思想。
4.总结
| 模块 | 作用 | 特点 |
|---|---|---|
Acceptor |
只接连接 | 非阻塞,高性能 |
Poller |
NIO监听,触发事件 | I/O 线程 |
Executor |
真正业务处理 | 可调线程池,支持拒绝策略优化 |
Tomcat 的线程池不仅支持核心线程池扩容机制,还支持通过 force() 增强容错能力,非常适合大并发场景。
三、Fork/Join
1.Fork/Join概念
Fork/Join 是 JDK 1.7 加入的新的线程池实现,它体现的是一种分治思想,适用于能够进行任务拆分的 cpu 密集型运算
Fork/Join 是 Java 提供的一种分治并发编程模型,通过将一个大任务递归拆分成多个小任务并行执行,最后合并结果,提高效率。
| 特性 | 说明 |
|---|---|
| 分治思想 | 将大任务分解成子任务,递归执行 |
| 多线程并行 | 每个子任务可以并行执行 |
| 工作窃取算法 | 空闲线程会从其他线程偷任务做,提高资源利用率 |
| 自动任务调度 | 线程池自动调度任务执行,开发者无需干预 |
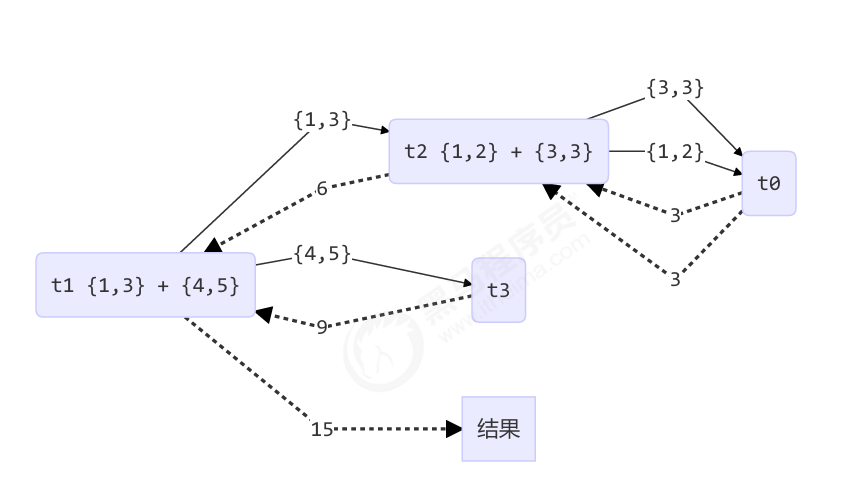
2.应用之求和
交给 Fork/Join 线程池的任务需要继承 RecursiveTask(有返回值)或 RecursiveAction(没有返回值),例如下 面定义了一个对 1~n 之间的整数求和的任务
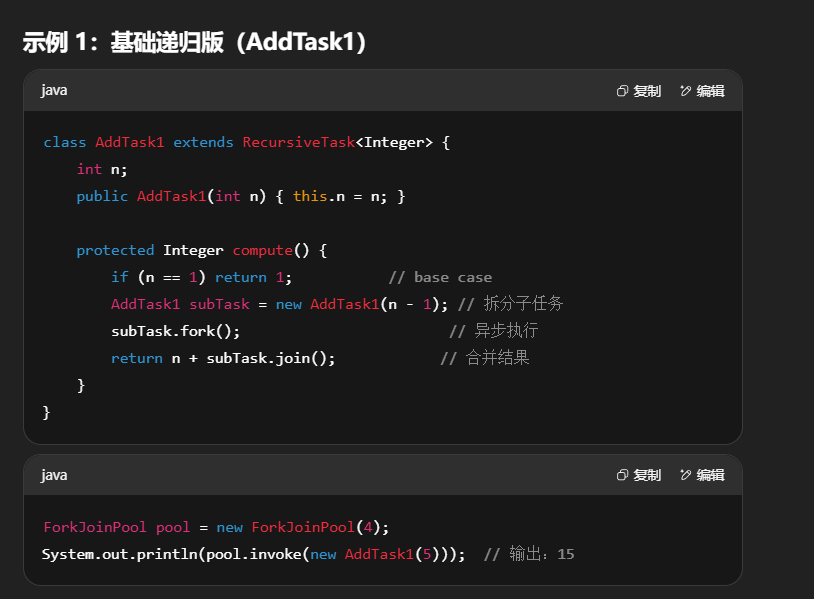
结果
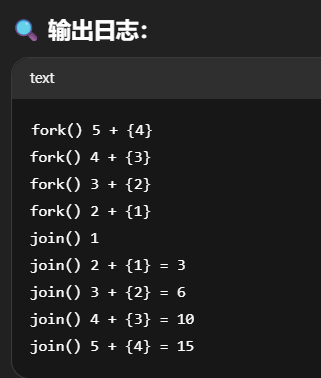
用图来表示
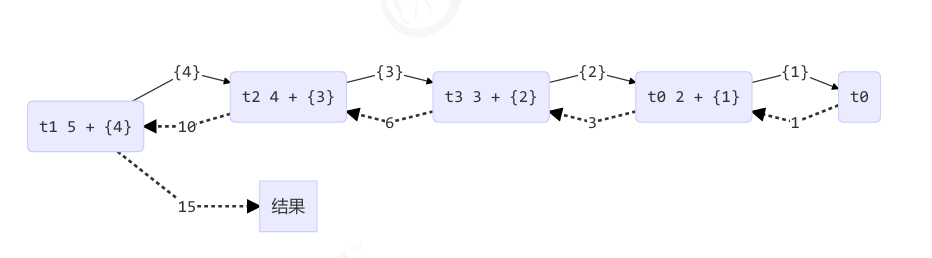
- 每次拆一个子任务(深度递归)
- 形成一条长链,不利于并发
问题:
这个版本虽然用了 fork/join,但每次只 fork 一个子任务,线程利用率不高,多核 CPU 难以发挥。
优化版本:区间划分递归(AddTask3)
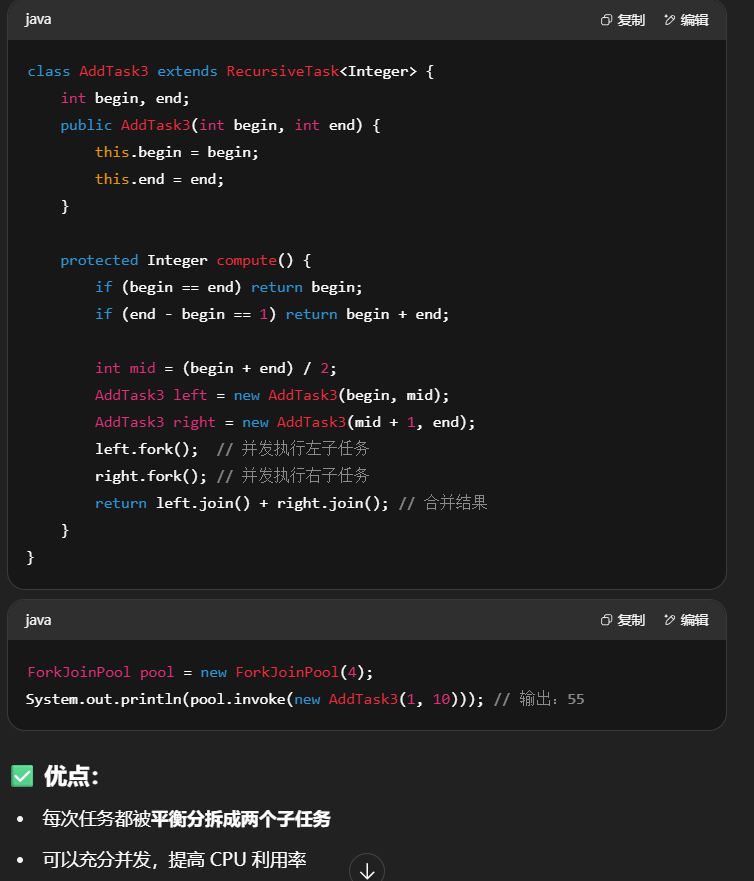
用图来表示
- 每次拆成两半(平衡递归)
- 构成二叉树状,线程可并发执行左右子任务,效率更高
补充:异步模式之工作线程模式
重点在于:
- 工作线程的基本思想
- 饥饿问题的出现及示例
- 线程池分工的优化方案
- 如何根据任务类型(CPU密集型 vs I/O密集型)合理配置线程池大小
1.什么是 Worker Thread 模式?
定义:
让有限数量的工作线程轮流处理无限的任务。
这是线程池(ThreadPoolExecutor)的核心思想,也是一种资源复用、任务分发的经典设计模式。
- 每个请求不再配备一个线程(那样太浪费)
- 而是通过线程池的几个线程重复复用,轮流处理任务
- 类似“服务员”轮流为不同的顾客点餐
举例类比:
- 海底捞只有几个服务员(线程)
- 客人很多(任务)
- 服务员轮流接待,完成“点餐 → 上菜”的整个流程
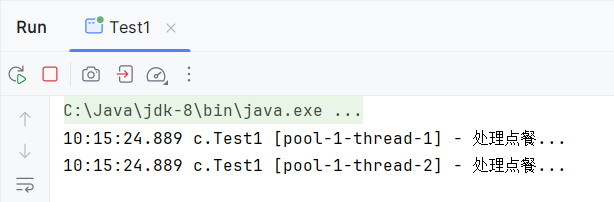
2.饥饿问题(Deadlock-like starvation)
问题引入:
你定义了一个固定大小的线程池,假设线程数是 2。
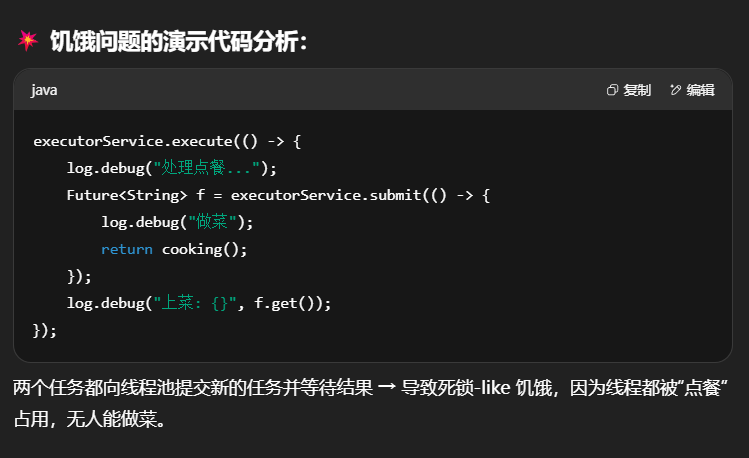
1 | ExecutorService executorService = Executors.newFixedThreadPool(2); |
你设计的工作流是:
- 线程 A:处理“点餐”任务,并提交“做菜”任务(再由其他线程做)
- 点餐线程等待“做菜”任务的结果(调用
.get()) - 如果此时两个线程都在做“点餐”任务,那么就没人能做菜了 ——> 饥饿!
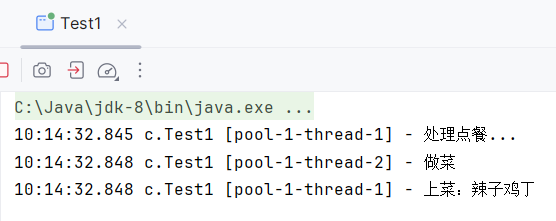
1 | @Slf4j(topic = "c.Test1") |
一个客人可以完美处理,2个客人就处理不动了:
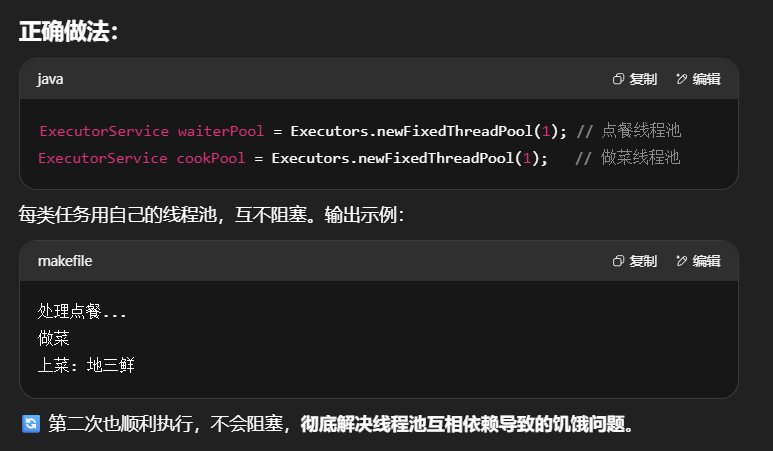
3.解决方案:任务分类,线程池分工
可以设置2种类型的线程池:
1 | @Slf4j(topic = "c.Test1") |
4.线程池大小如何设置最合适?
过小的问题:
- 线程不够 → 任务堆积 → 饥饿、延迟、吞吐低
过大的问题:
- 线程上下文切换成本大
- 内存占用高,可能 OOM
一般建议:
1)CPU 密集型任务(比如加解密、计算):
- 线程数 = CPU 核数 + 1
- 额外线程是为了防止调度/IO 阻塞带来的 CPU 空转
2)I/O 密集型任务(比如数据库、文件、网络):
经验公式:
1 | 线程数 = 核数 * 期望利用率 * (计算时间 + 等待时间) / 计算时间 |
举例:
- 4 核 CPU,计算时间 10%,等待时间 90%
1 | 线程数 = 4 * 1 * (10% + 90%) / 10% = 40 |
| 场景 | 建议线程数配置 | 原因 |
|---|---|---|
| CPU 密集型任务 | 核心数 + 1 |
保证 CPU 不空闲 |
| I/O 密集型任务 | 看公式(一般远大于核心数) | 利用 IO 等待时 CPU 空闲时间 |
| 任务依赖嵌套时 | 分多个线程池 | 避免线程池内部递归调用导致饥饿 |
8.2JUC
1.AQS原理
概述
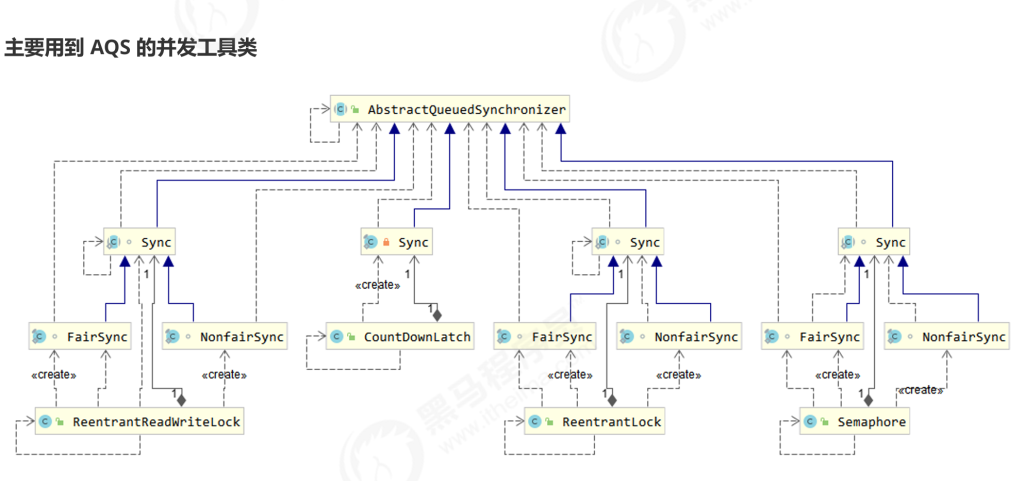
AQS 全称是 AbstractQueuedSynchronizer,它是 JDK 提供的一个构建锁和同步器的基础框架,很多并发工具类(如 ReentrantLock、Semaphore、CountDownLatch 等)都基于它构建。
特点:
- 用 state 属性来表示资源的状态(分独占模式和共享模式),子类需要定义如何维护这个状态,控制如何获取 锁和释放锁
- getState - 获取 state 状态
- setState - 设置 state 状态
- compareAndSetState - cas 机制设置 state 状态
- 独占模式是只有一个线程能够访问资源,而共享模式可以允许多个线程访问资源

- 提供了基于 FIFO 的等待队列,类似于 Monitor 的 EntryList
- 条件变量来实现等待、唤醒机制,支持多个条件变量,类似于 Monitor 的 WaitSet
核心思想:状态 + 队列 + 阻塞
| 模块 | 描述 |
|---|---|
state |
用于表示资源状态(如 0 表示未占用,1 表示被占用) |
| FIFO 队列 | 等待线程都会被构造成节点挂入队列(CLH 队列) |
park/unpark |
用来阻塞/唤醒线程,替代废弃的 suspend/resume |
子类主要实现这样一些方法(默认抛出 UnsupportedOperationException)
- tryAcquire
- tryRelease
- tryAcquireShared
- tryReleaseShared
- isHeldExclusively
获取锁的姿势(独占模式)
1 | if (!tryAcquire(arg)) { |
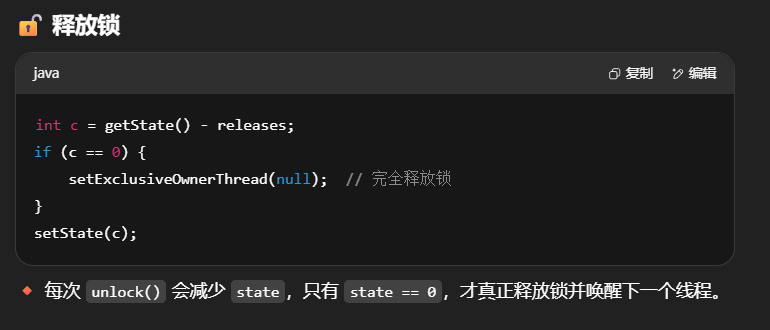
释放锁的姿势(独占模式)
1 | if (tryRelease(arg)) { |
自定义不可重入锁实现
通过自定义同步器 MySync 继承 AQS:
1 | final class MySync extends AbstractQueuedSynchronizer { |
自定义锁
有了自定义同步器,很容易复用 AQS ,实现一个功能完备的自定义锁
1 | class MyLock implements Lock { |
测试一下
1 | MyLock lock = new MyLock(); |
输出
1 | 22:29:28.727 c.TestAqs [t1] - locking... |
输出说明:
- t1 先获取锁并持有 1 秒
- t2 阻塞等待,直到 t1 释放后再执行
不可重入测试
如果改为下面代码,会发现自己也会被挡住(只会打印一次 locking)
1 | lock.lock(); |
AQS 队列模型(基于 CLH)
目标
AQS 要实现的功能目标
- 阻塞版本获取锁 acquire 和非阻塞的版本尝试获取锁 tryAcquire
- 获取锁超时机制
- 通过打断取消机制
- 独占机制及共享机制
- 条件不满足时的等待机制
要实现的性能目标
Instead, the primary performance goal here is scalability: to predictably maintain efficiency even, or especially, when synchronizers are contended.
设计
AQS 的基本思想其实很简单
获取锁的逻辑
1 | while(state 状态不允许获取) { |
释放锁的逻辑
1 | if(state 状态允许了) { |
要点
- 原子维护 state 状态
- 阻塞及恢复线程
- 维护队列
-
state 设计
- state 使用 volatile 配合 cas 保证其修改时的原子性
- state 使用了 32bit int 来维护同步状态,因为当时使用 long 在很多平台下测试的结果并不理想
-
阻塞恢复设计
- 早期的控制线程暂停和恢复的 api 有 suspend 和 resume,但它们是不可用的,因为如果先调用的 resume 那么 suspend 将感知不到
- 解决方法是使用 park & unpark 来实现线程的暂停和恢复,具体原理在之前讲过了,先 unpark 再 park 也没 问题
- park & unpark 是针对线程的,而不是针对同步器的,因此控制粒度更为精细
- park 线程还可以通过 interrupt 打断
-
队列设计
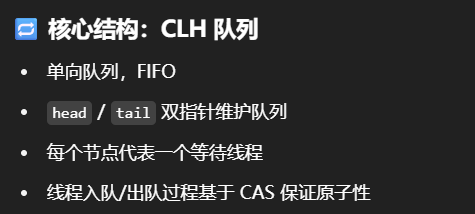
- 使用了 FIFO 先入先出队列,并不支持优先级队列
- 设计时借鉴了 CLH 队列,它是一种单向无锁队列
- 类似一个链表结构,每个线程通过节点 Node 加入队列
- 使用
park/unpark方式挂起/唤醒线程,效率更高、可中断
队列中有 head 和 tail 两个指针节点,都用 volatile 修饰配合 cas 使用,每个节点有 state 维护节点状态 入队伪代码,只需要考虑 tail 赋值的原子性
1 | do { |
出队伪代码
1 | // prev 是上一个节点 |
CLH 好处:
- 无锁,使用自旋
- 快速,无阻塞
AQS 在一些方面改进了 CLH
1 | private Node enq(final Node node) { |
主要用到 AQS 的并发工具类
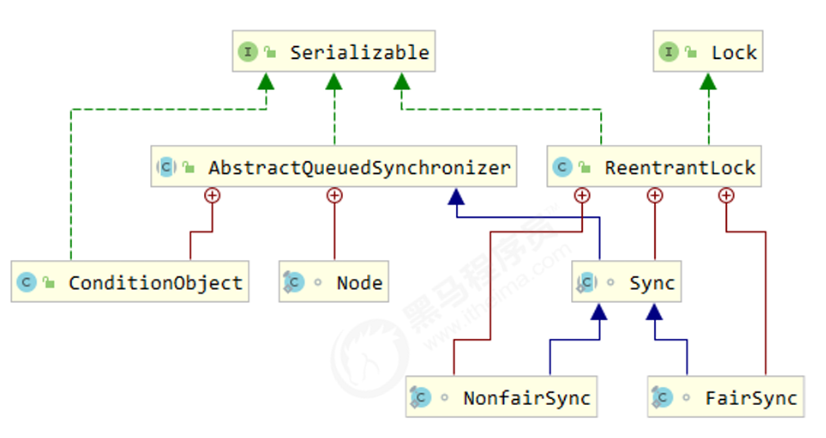
2.ReentrantLock 原理
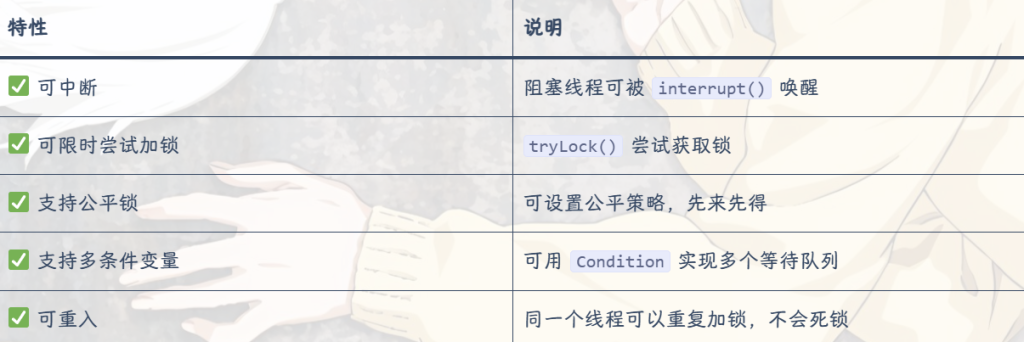
先回顾一下上篇学过的ReentrantLock的特性
非公平锁实现原理
什么是非公平锁?
非公平锁指的是线程在获取锁时不关心队列中是否有等待线程,只要锁是空闲的,谁先 CAS 成功谁就获得锁。
ReentrantLock 默认是 非公平锁:
1 | public ReentrantLock() { |
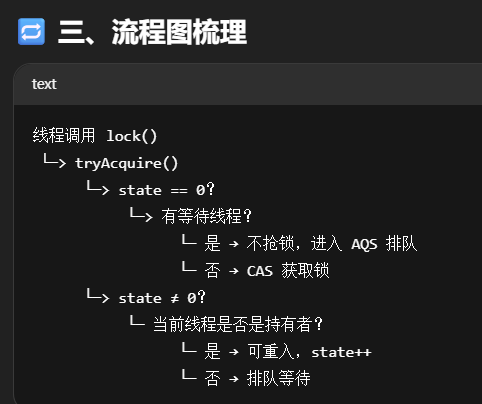
加锁解锁流程
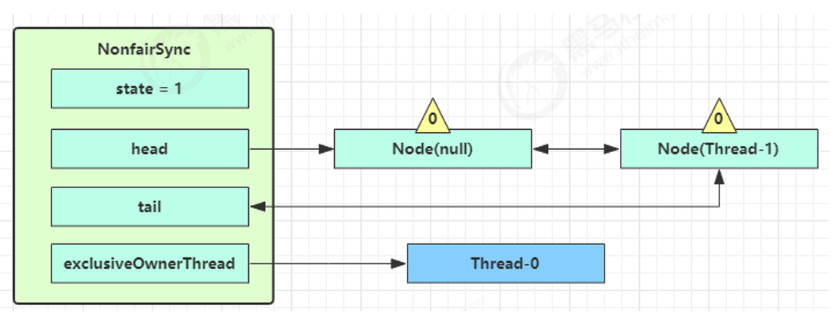
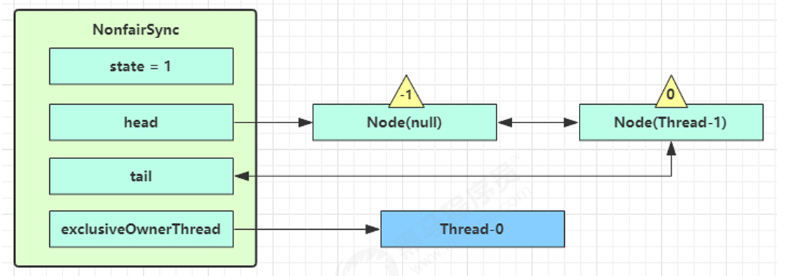
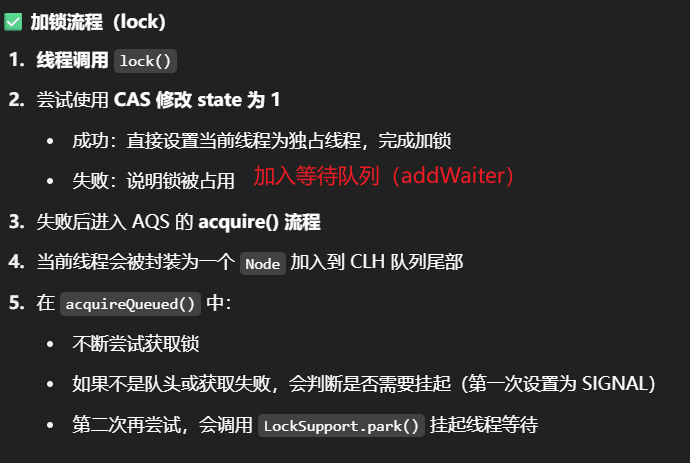
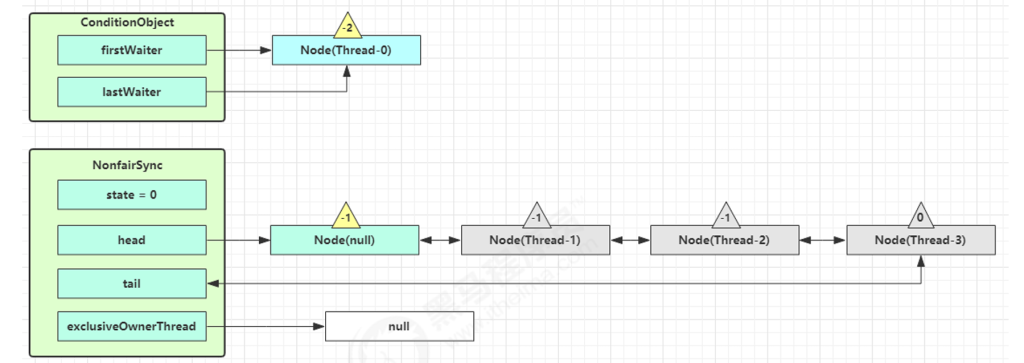
NonfairSync 继承自 AQS 没有竞争时
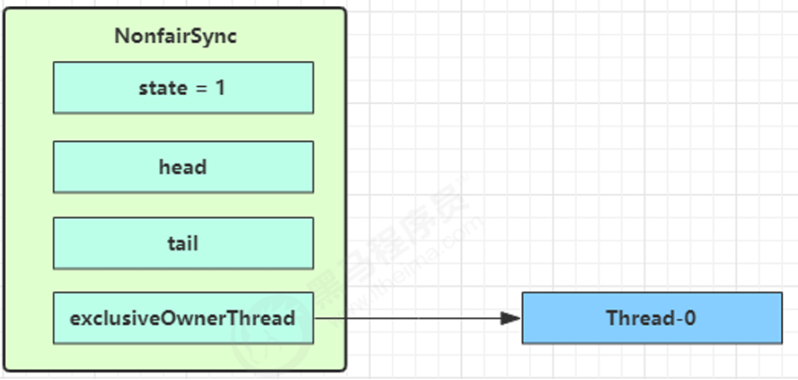
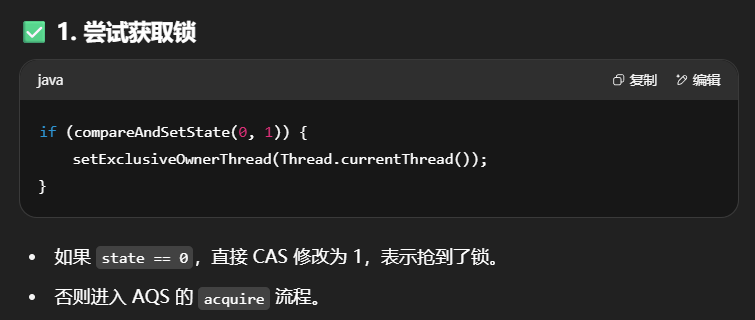
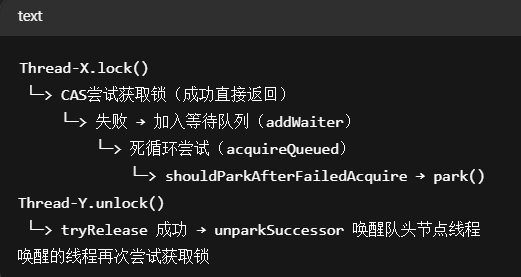
第一个竞争出现时

Thread-1 执行了
- CAS 尝试将 state 由 0 改为 1,结果失败
- 进入 tryAcquire 逻辑,这时 state 已经是1,结果仍然失败
3.接下来进入 addWaiter 逻辑,构造 Node 队列
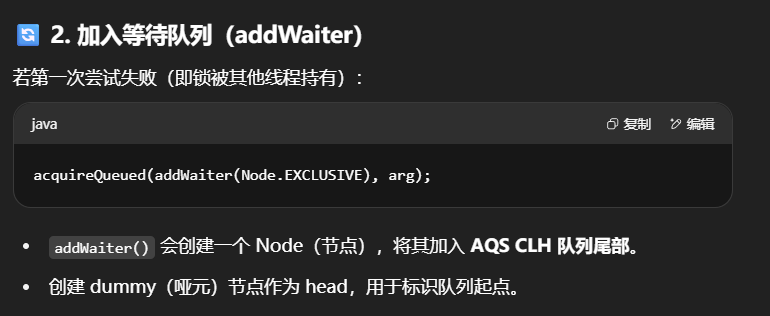
图中黄色三角表示该 Node 的 waitStatus 状态,其中 0 为默认正常状态
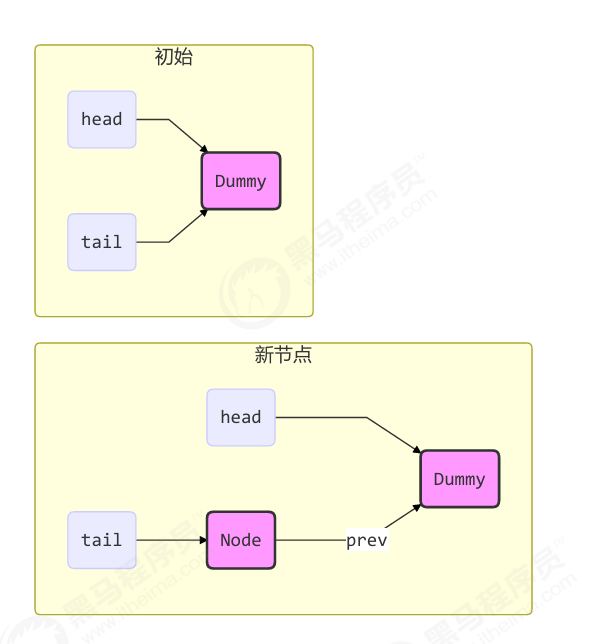
Node 的创建是懒惰的
其中第一个 Node 称为 Dummy(哑元)或哨兵,用来占位,并不关联线程
4.当前线程进入 acquireQueued 逻辑
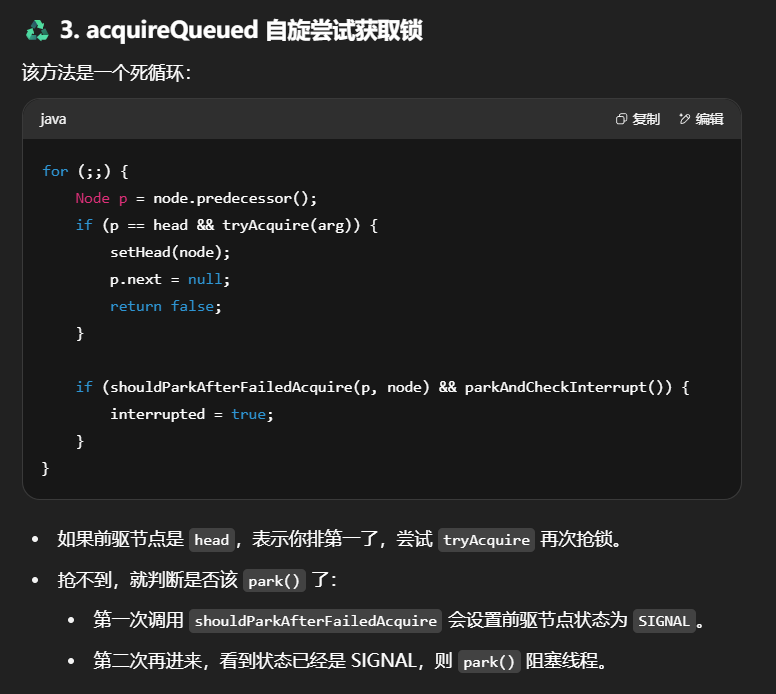
1.acquireQueued 会在一个死循环中不断尝试获得锁,失败后进入 park 阻塞
2.如果自己是紧邻着 head(排第二位),那么再次 tryAcquire 尝试获取锁,当然这时 state 仍为 1,失败
3.进入 shouldParkAfterFailedAcquire 逻辑,将前驱 node,即 head 的 waitStatus 改为 -1,这次返回 false
4.shouldParkAfterFailedAcquire 执行完毕回到 acquireQueued ,再次 tryAcquire 尝试获取锁,当然这时 state 仍为 1,失败
5.当再次进入 shouldParkAfterFailedAcquire 时,这时因为其前驱 node 的 waitStatus 已经是 -1,这次返回 true
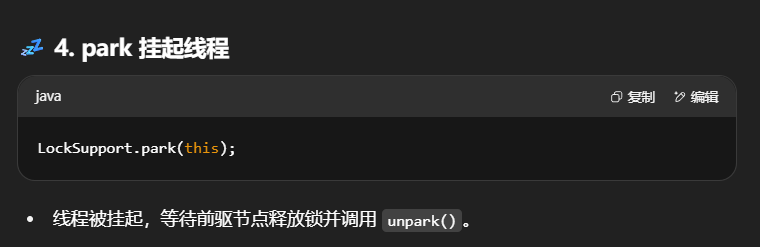
6.进入 parkAndCheckInterrupt, Thread-1 park(灰色表示)

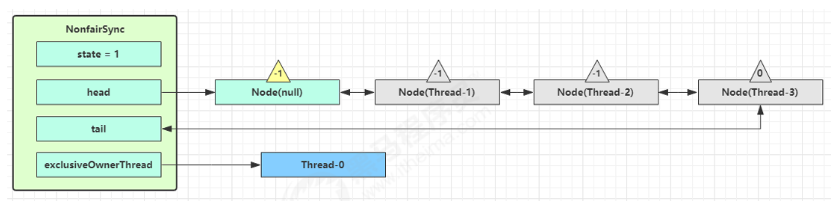
再次有多个线程经历上述过程竞争失败,变成这个样子
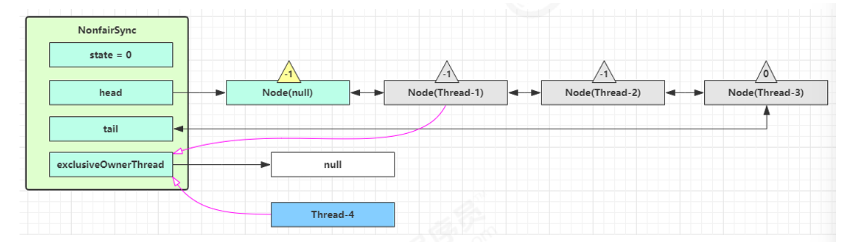
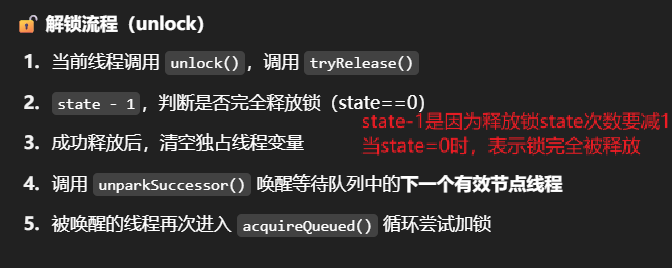
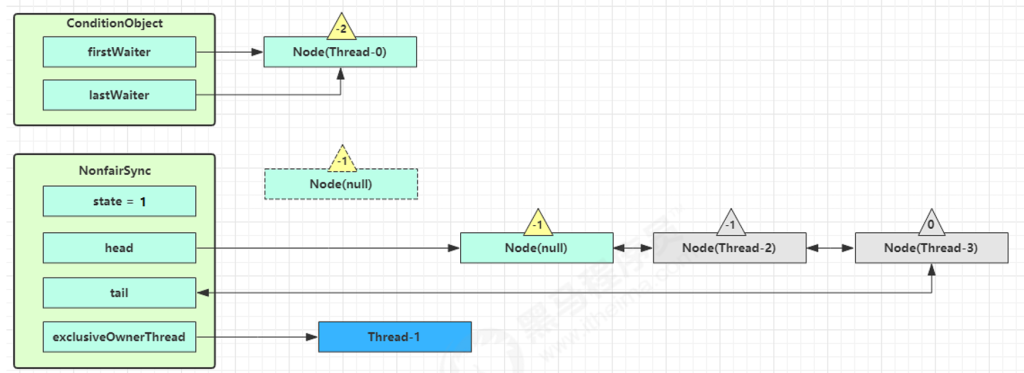
Thread-0 释放锁,进入 tryRelease 流程,如果成功
- 设置 exclusiveOwnerThread 为 null
- state = 0
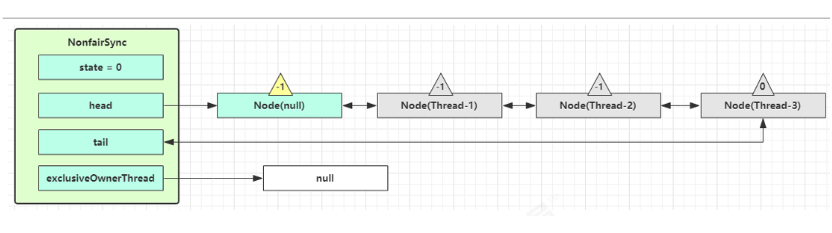
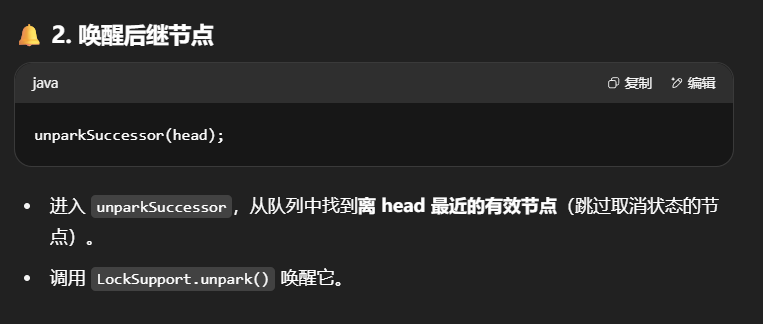
当前队列不为 null,并且 head 的 waitStatus = -1,进入 unparkSuccessor 流程
找到队列中离 head 最近的一个 Node(没取消的),unpark 恢复其运行,本例中即为 Thread-1
回到 Thread-1 的 acquireQueued 流程
如果加锁成功(没有竞争),会设置
- exclusiveOwnerThread 为 Thread-1,state = 1
- head 指向刚刚 Thread-1 所在的 Node,该 Node 清空 Thread
- 原本的 head 因为从链表断开,而可被垃圾回收
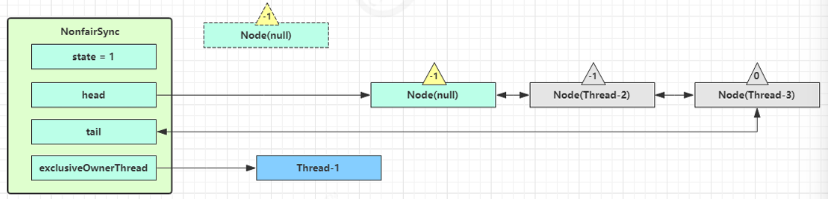
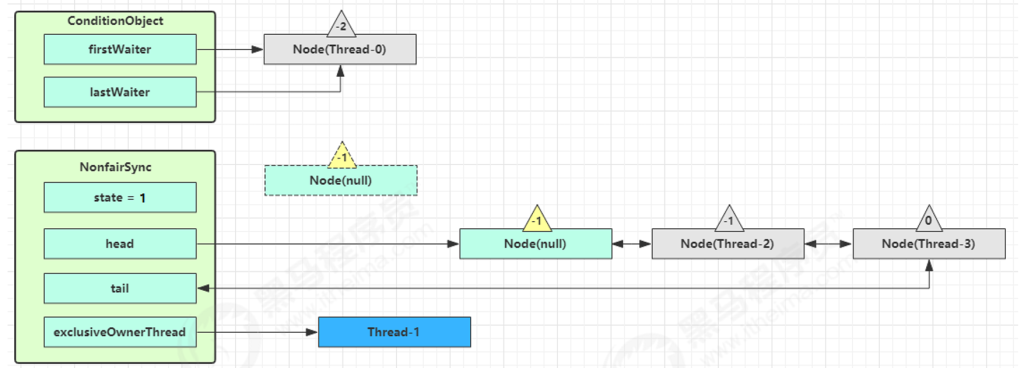
如果这时候有其它线程来竞争(非公平的体现),例如这时有 Thread-4 来了
如果不巧又被 Thread-4 占了先
- Thread-4 被设置为 exclusiveOwnerThread,state = 1
- Thread-1 再次进入 acquireQueued 流程,获取锁失败,重新进入 park 阻塞
加锁源码
1 | // Sync 继承自 AQS |
注意
是否需要 unpark 是由当前节点的前驱节点的 waitStatus == Node.SIGNAL 来决定,而不是本节点的 waitStatus 决定
总结:
-
调用
1
lock
,尝试将state从0修改为1
-
成功:将owner设为当前线程
-
失败:调用
1
acquire
->
1
tryAcquire
->
1
nonfairTryAcquire
,判断state=0则获得锁,或者state不为0但当前线程持有锁则重入锁,以上两种情况
1
tryAcquire
返回true,剩余情况返回false。
-
true:获得锁
-
false:调用
1
acquireQueued(addWaiter(Node.EXCLUSIVE), arg)
,其中
1
addwiter
将关联线程的节点插入AQS队列尾部,进入
1
acquireQueued
中的for循环:
- 如果当前节点是头节点,并尝试获得锁成功,将当前节点设为头节点,清除此节点信息,返回打断标记。
- 调用
shoudParkAfterFailure,第一次调用返回false,并将前驱节点改为-1,第二次循环如果再进入此方法,会进入阻塞并检查打断的方法。
-
-
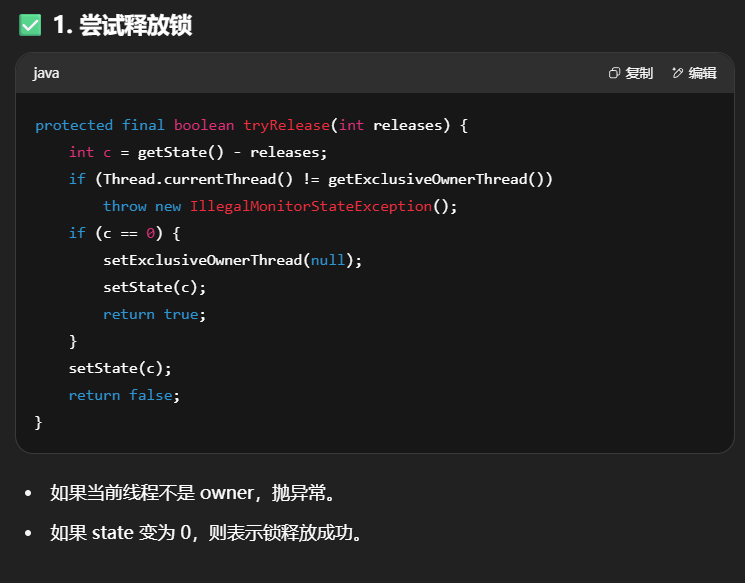
解锁源码
1 | // Sync 继承自 AQS |
总结:
-
unlock->syn.release(1)->tryRelease(1),如果当前线程并不持有锁,抛异常。state减去1,如果之后state为0,解锁成功,返回true;如果仍大于0,表示解锁不完全,当前线程依旧持有锁,返回false。 -
返回true:检查AQS队列第一个节点状态图是否为
1
SIGNAL
(意味着有责任唤醒其后记节点),如果有,调用
1
unparkSuccessor
。
- 再
unparkSuccessor中,不考虑已取消的节点, 从 AQS 队列从后至前找到队列最前面需要 unpark 的节点,如果有,将其唤醒。
- 再
-
返回false:
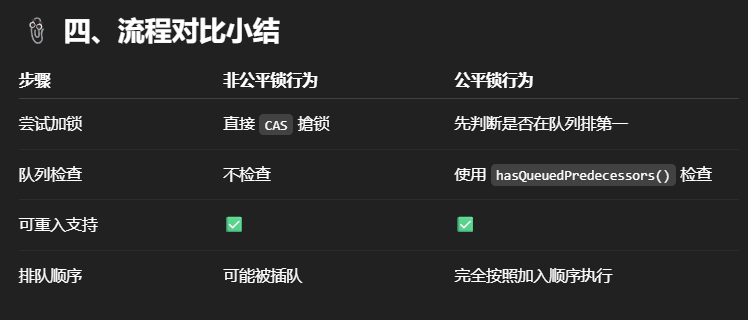
非公平性体现在哪?
非公平锁不会保证队列中“排在最前面的线程”优先获取锁。
例如,当 Thread-1 刚被唤醒,还未再次抢到锁时,若这时 Thread-4 新来并立即执行 compareAndSetState(0, 1) 成功,Thread-1 就要继续排队,Thread-4 获得锁。
state为锁的重入量
| 阶段 | 方法 | 说明 |
|---|---|---|
| 加锁入口 | lock() |
非公平锁尝试获取锁 |
| CAS失败 | acquire(1) |
进入 AQS 获取流程 |
| 加入队列 | addWaiter(Node.EXCLUSIVE) |
将当前线程包装成 Node 入队 |
| 自旋尝试 | acquireQueued(...) |
死循环中不断尝试获取锁 |
| 是否阻塞 | shouldParkAfterFailedAcquire |
判断是否该 park 当前线程 |
| 阻塞当前线程 | parkAndCheckInterrupt |
线程进入等待 |
| 解锁入口 | unlock() |
调用 release(1) |
| 成功释放 | tryRelease() |
修改 state,并唤醒 |
| 唤醒队列 | unparkSuccessor() |
找到下一个有效节点并唤醒 |
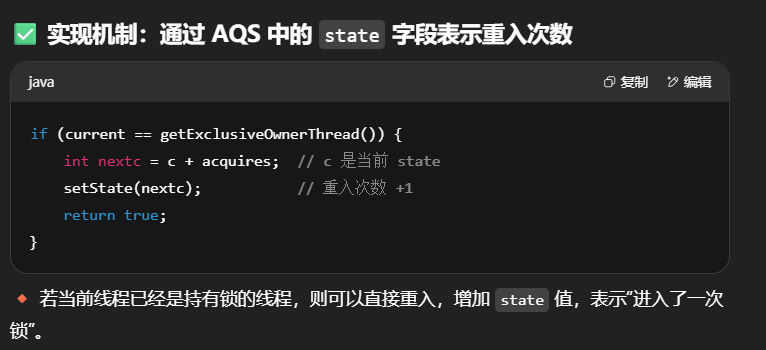
可重入原理
可重入锁表示:一个线程获取了锁后,如果再次请求该锁,不会被阻塞,而是会直接获得锁并将计数加一。释放锁时则需多次 unlock(),直到重入次数清零。
当持有锁的线程再次尝试获取锁时,会将state的值加1,state表示锁的重入量。
1 | static final class NonfairSync extends Sync { |
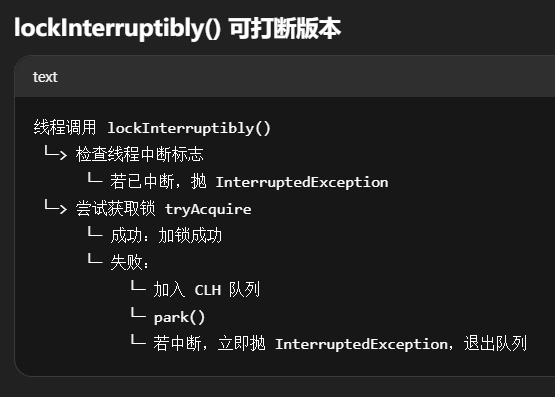
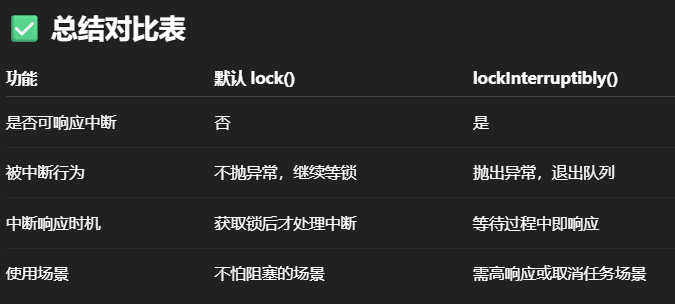
可打断原理
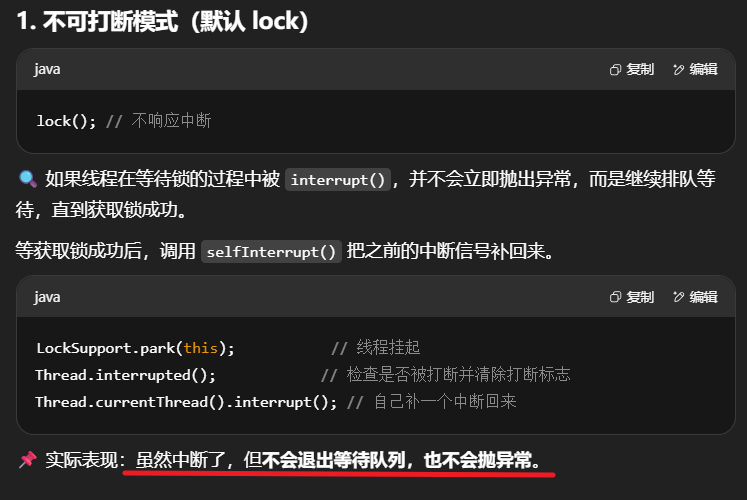
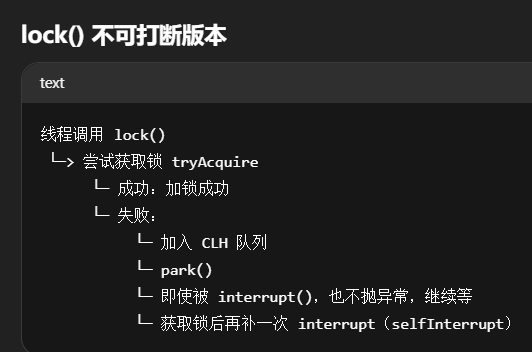
1.不可打断模式(默认 lock)
在此模式下,即使它被打断,仍会驻留在 AQS 队列中,并将打断信号存储在一个interrupt变量中。一直要等到获得锁后方能得知自己被打断了,并且调用selfInterrupt方法打断自己。
1 | // Sync 继承自 AQS |
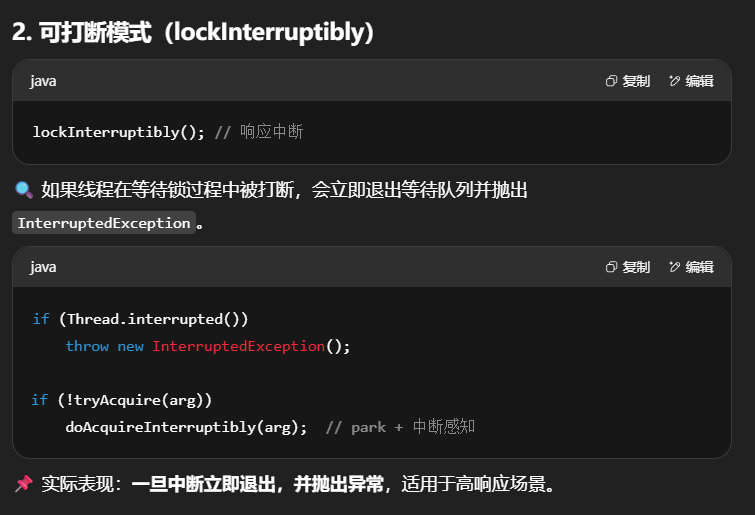
可打断模式
此模式下即使线程在等待队列中等待,一旦被打断,就会立刻抛出打断异常。
1 | static final class NonfairSync extends Sync { |
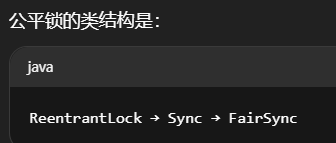
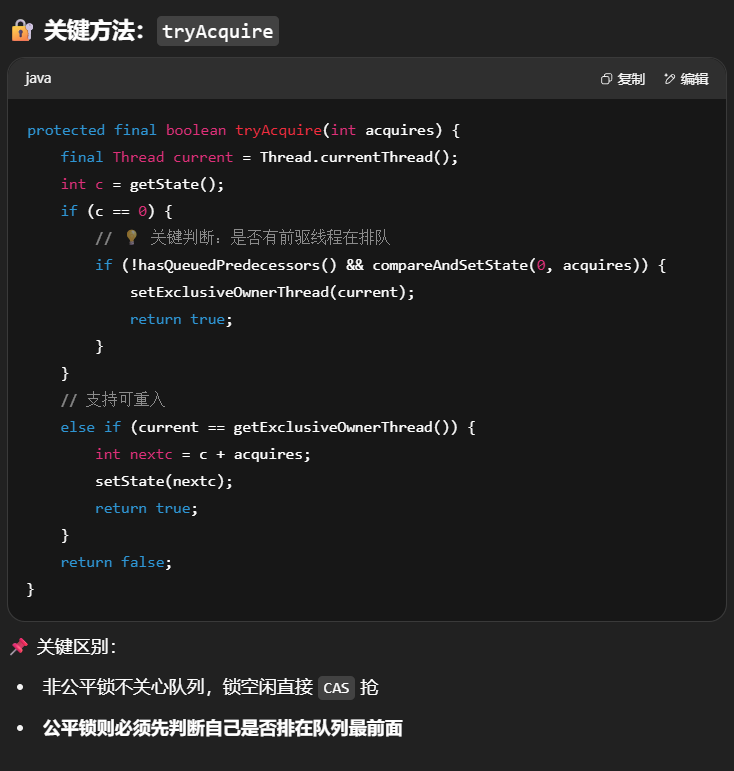
公平锁实现原理
与之前默认的非公平锁(NonfairSync)相比,公平锁(FairSync)的核心变化在于它避免“插队”,遵循“先来先得”原则。
简而言之,公平与非公平的区别在于,公平锁中的tryAcquire方法被重写了,新来的线程即便得知了锁的state为0,也要先判断等待队列中是否还有线程等待,只有当队列没有线程等待式,才获得锁。
公平锁 VS 非公平锁的区别
| 特性 | 非公平锁(默认) | 公平锁 |
|---|---|---|
| 锁竞争策略 | 可以直接抢锁 | 必须排队 |
| 插队行为 | 允许插队 | 禁止插队 |
| tryAcquire 是否判断队列 | 否 | ✅是(核心) |
1 | static final class FairSync extends Sync { |
代码解读:

条件变量Condition实现原理
什么是 Condition?
Condition 是配合 ReentrantLock 使用的一个等待/通知机制。每个 Condition 维护了一个条件等待队列(单向链表结构),称为 Condition队列。
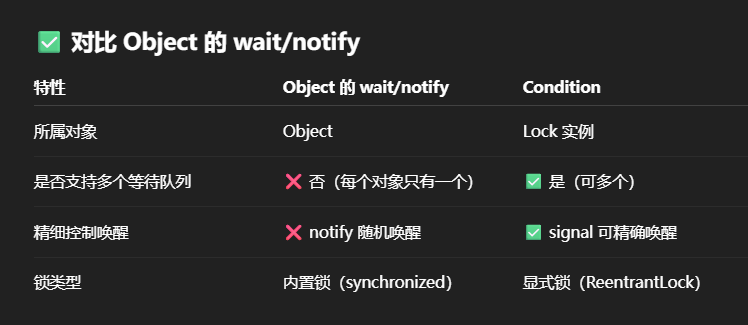
每个条件变量其实就对应着一个等待队列,其实现类是 ConditionObject
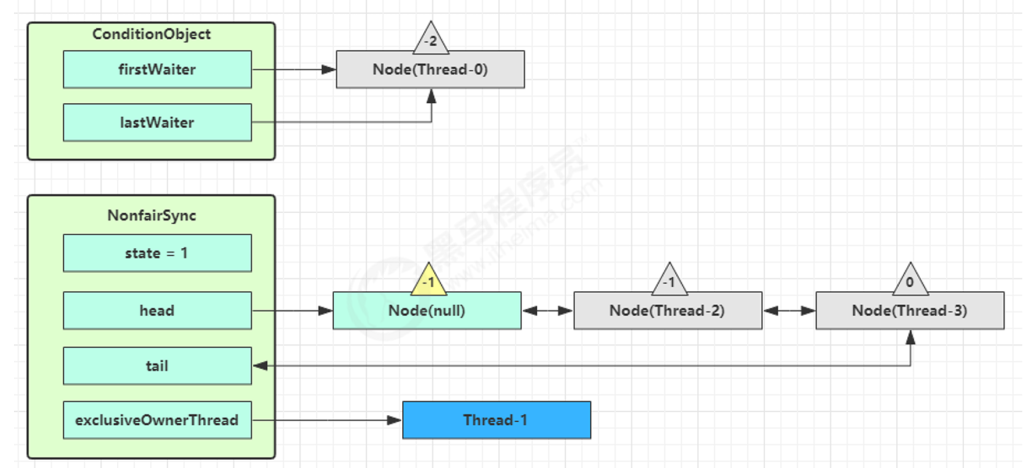
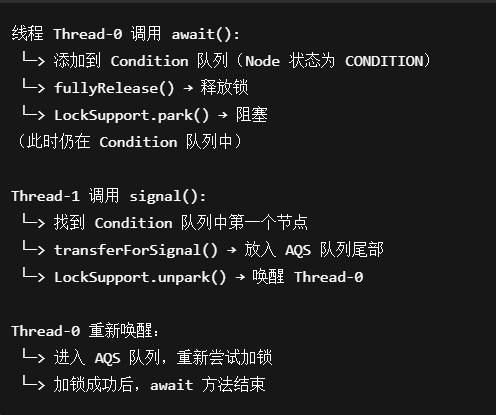
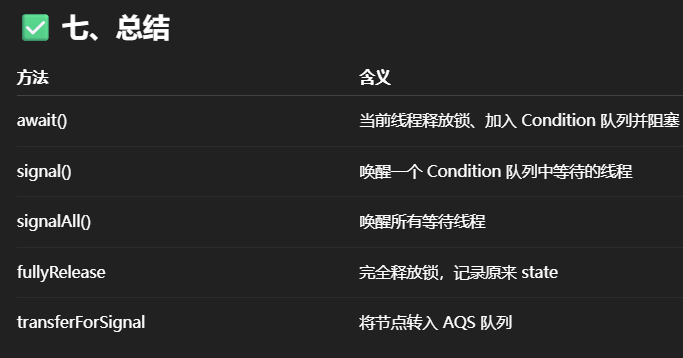
await 流程
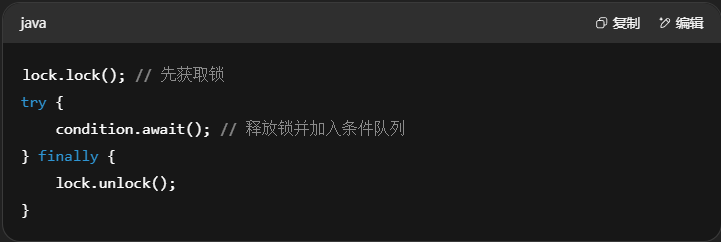
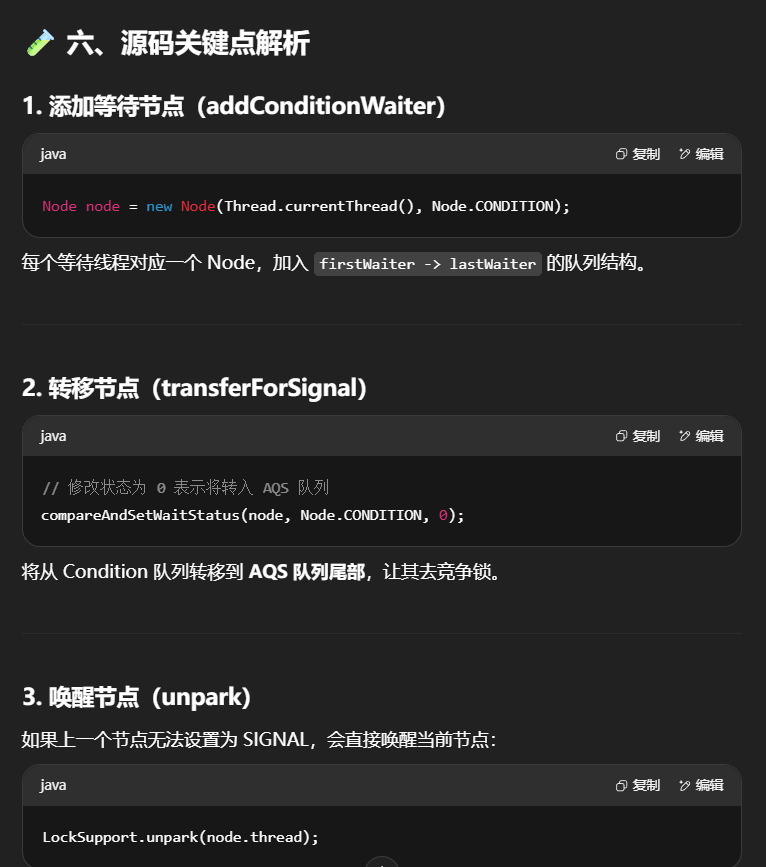
开始 Thread-0 持有锁,调用 await,进入 ConditionObject 的 addConditionWaiter 流程
创建新的 Node 状态为 -2(Node.CONDITION),关联 Thread-0,加入等待队列尾部

接下来进入 AQS 的 fullyRelease 流程,释放同步器上的锁
unpark AQS 队列中的下一个节点,竞争锁,假设没有其他竞争线程,那么 Thread-1 竞争成功
park 阻塞 Thread-0
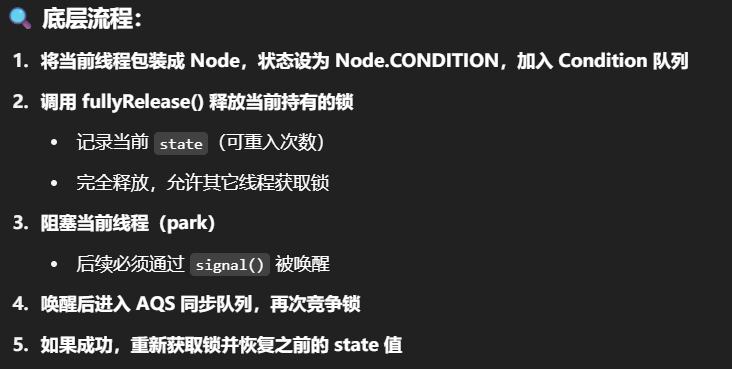
总结:
- 创建一个节点,关联当前线程,并插入到当前Condition队列的尾部
- 调用
fullRelease,完全释放同步器中的锁,并记录当前线程的锁重入数 - 唤醒(park)AQS队列中的第一个线程
- 调用park方法,阻塞当前线程。
signal 流程
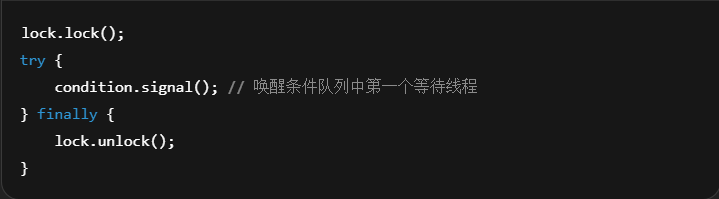
假设 Thread-1 要来唤醒 Thread-0
进入 ConditionObject 的 doSignal 流程,取得等待队列中第一个 Node,即 Thread-0 所在 Node
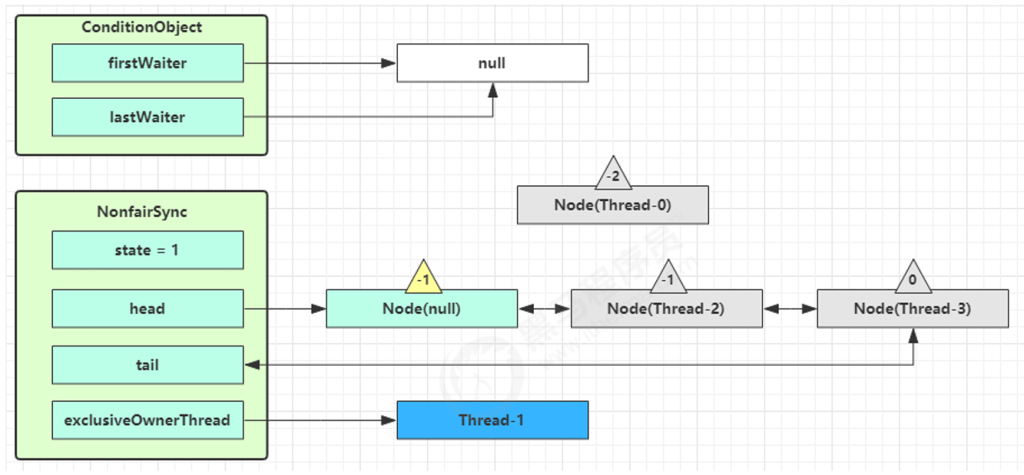
执行 transferForSignal 流程,将该 Node 加入 AQS 队列尾部,将 Thread-0 的 waitStatus 改为 0,Thread-3 的 waitStatus 改为 -1

Thread-1 释放锁,进入 unlock 流程,略

总结:
- 当前持有锁的线程唤醒等待队列中的线程,调用doSignal或doSignalAll方法,将等待队列中的第一个(或全部)节点插入到AQS队列中的尾部。
- 将插入的节点的状态从Condition设置为0,将插入节点的前一个节点的状态设置为-1(意味着要承担唤醒后一个节点的责任)
- 当前线程释放锁,parkAQS队列中的第一个节点线程。
源码
1 | public class ConditionObject implements Condition, java.io.Serializable { |
两类等待队列对比
| 类型 | 队列名称 | 作用 |
|---|---|---|
| Condition 队列 | firstWaiter |
保存 await 的线程 |
| AQS 队列 | CLH 队列 | 正在等待锁的线程 |
重要:await 线程必须先从 Condition 队列被 signal 唤醒 → 再转移到 AQS 队列参与锁竞争。
3.读写锁之ReentrantReadWriteLock
ReentrantReadWriteLock介绍
什么是 ReentrantReadWriteLock
1.定义
它将锁分为两种类型:
- 读锁 ReadLock:多个线程可以同时获得,适用于只读操作。
- 写锁 WriteLock:同一时刻只能被一个线程获得,适用于写操作。
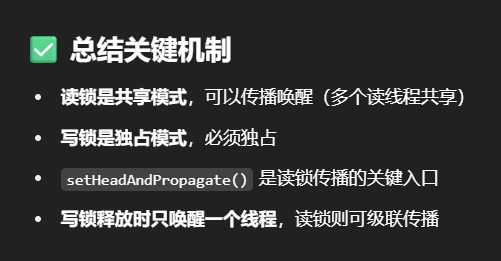
读-读不互斥,读-写/写-写互斥
当读操作远远高于写操作时,这时候使用读写锁让读-读可以并发,提高性能。 类似于数据库中的select ... from ... lock in share mode
2.读写锁的应用:数据容器示例
提供一个数据容器类内部分别使用读锁保护数据的 read() 方法,写锁保护数据的 write() 方法
测试
1 | class DataContainer { |

(1)测试读锁-读锁可以并发
1 | DataContainer dataContainer = new DataContainer(); |
输出结果,从这里可以看到 Thread-0 锁定期间,Thread-1 的读操作不受影响(说明 读-读不互斥)
1 | 14:05:14.341 c.DataContainer [t2] - 获取读锁... |
(2)测试读锁-写锁相互阻塞
1 | DataContainer dataContainer = new DataContainer(); |
输出结果(写线程必须等待读线程释放锁后才能进行)
1 | 14:04:21.838 c.DataContainer [t1] - 获取读锁... |
(3)写锁-写锁也是相互阻塞的,这里就不测试了
3.注意事项
- 读锁不支持条件变量
你不能对 readLock() 使用 await() / signal(),仅写锁支持条件等待机制。
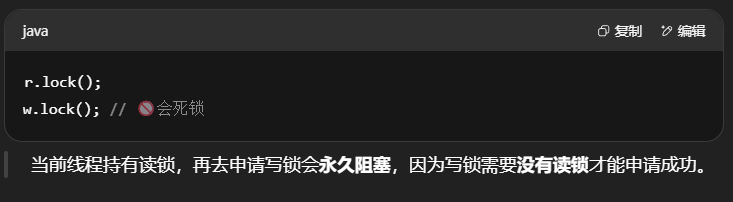
- 重入时升级不支持(读 → 写):即持有读锁的情况下去获取写锁,会导致获取写锁永久等待
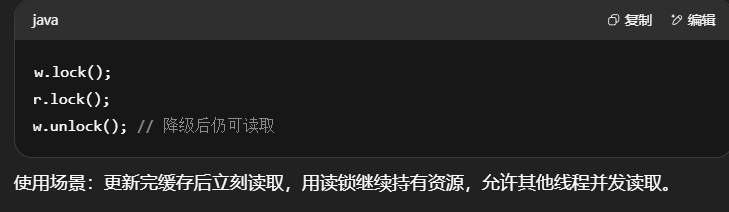
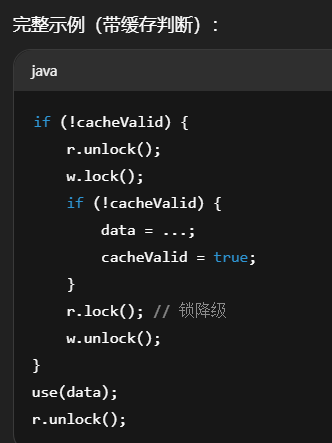
- 重入时降级支持(写 → 读):即持有写锁的情况下去获取读锁
1 | class CachedData { |
总结:
| 情况 | 是否互斥 | 特性 |
|---|---|---|
| 读 vs 读 | 否 | 并发执行 |
| 读 vs 写 | 是 | 写操作等待 |
| 写 vs 写 | 是 | 排他操作 |
| 读 → 写升级 | ❌ 死锁 | 不允许 |
| 写 → 读降级 | ✅ | 支持缓存优化等场景 |
| 读锁支持条件变量 | ❌ | 不支持 await/signal |
| 写锁支持条件变量 | ✅ | 可用于线程协调 |
ReentrantReadWriteLock应用到缓存
这部分内容讲的是使用 ReentrantReadWriteLock 实现一致性缓存 的应用示例,同时也探讨了“缓存更新策略”的两个选择:先删缓存 vs 先改数据库
缓存更新策略
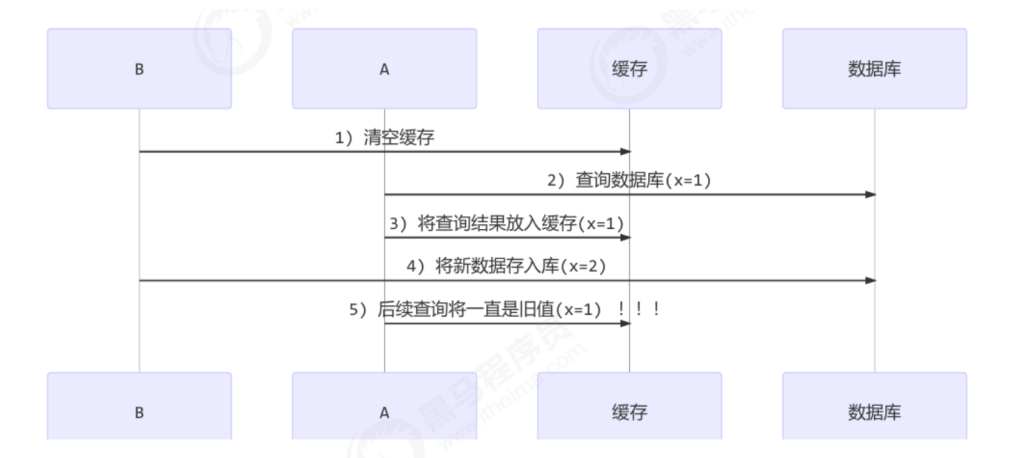
1.先删缓存,再改数据库(推荐)
- 流程:先删除缓存 → 更新数据库
- 可能的问题:
- 删除缓存后,还没来得及更新数据库,此时有查询请求进入,查不到缓存就去查数据库,查到旧值后又写入缓存,造成脏数据回写缓存
即“缓存被删 + 查询刚好到达”的小概率问题
先删缓存,写库慢
→脏数据写回缓存
查询请求刚好穿透缓存失效(假设查询线程 A 查询数据时恰好缓存数据由于时间到期失效,或是第一次查询)
→缓存脏回写(极小概率)

2.先改数据库,再删缓存
- 流程:先更新数据库 → 删除缓存
- 可能的问题:
- 如果删除缓存失败(例如 Redis 宕机),新旧数据同时存在于缓存和数据库,造成数据不一致
先更新数据库,删缓存失败
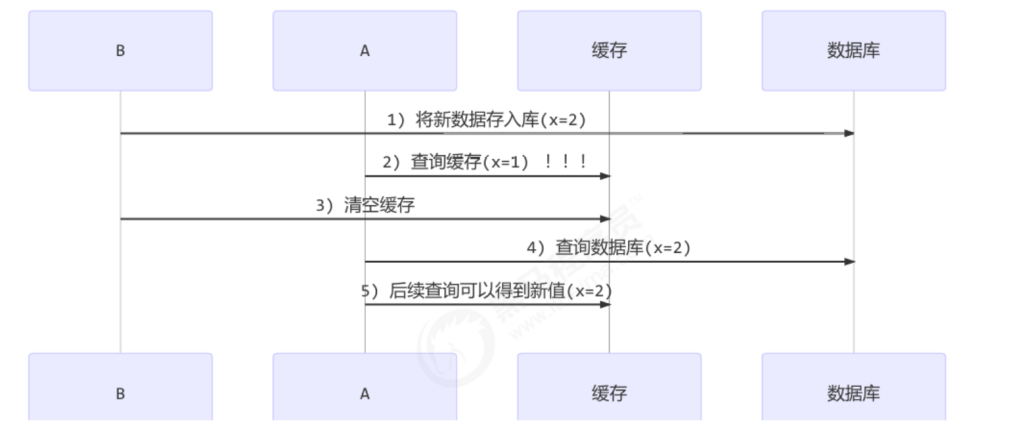
→ 数据不一致
使用 ReentrantReadWriteLock 实现缓存一致性
基本设计思路:
- 使用
HashMap作为缓存,非线程安全 → 用读写锁保护 - 写操作加写锁: 只能一个线程写入缓存(或清空缓存)
- 读操作加读锁: 允许多个线程同时读缓存
- 如果缓存未命中:
- 升级为写锁,再次检查缓存
- 如果依旧未命中 → 查询数据库 → 写入缓存
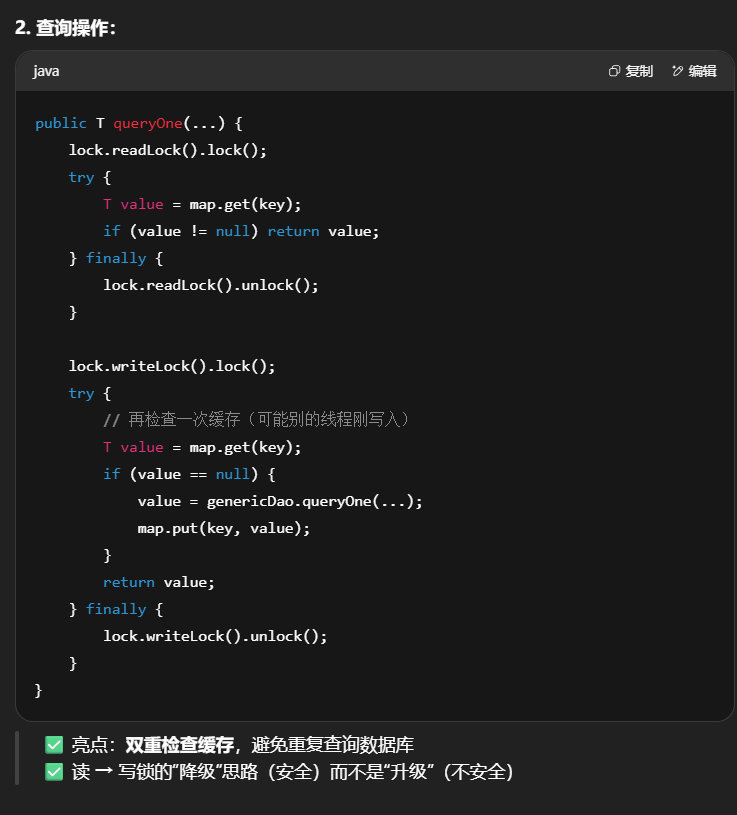
1 | class GenericCachedDao<T> { |
核心代码解读
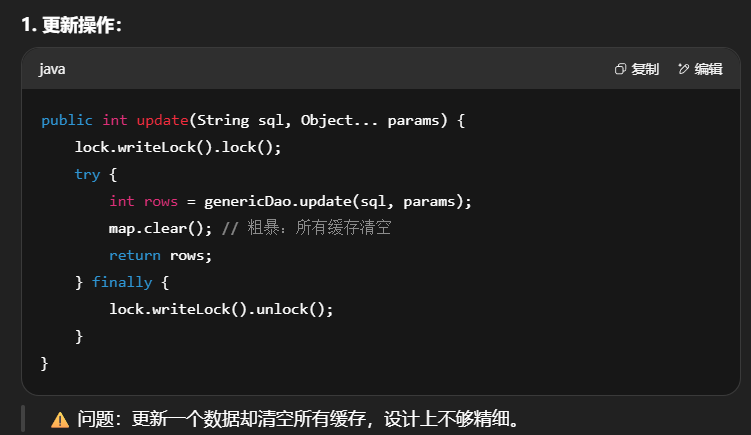
存在的问题
| 问题点 | 描述 |
|---|---|
| 写频繁性能低 | 写锁独占,阻塞所有读操作 |
| 粗暴清缓存 | 每次写操作都清空整个 map,效率差 |
| 缓存无容量控制 | 可能 OOM |
| 无过期机制 | 数据一直驻留内存 |
| 单机可用 | 不适合分布式部署 |
| 并发不高 | 所有数据共用一把锁,容易成为瓶颈 |
| 无缓存更新粒度 | 可以设计更细的 key 维度 |
ReentrantReadWriteLock原理
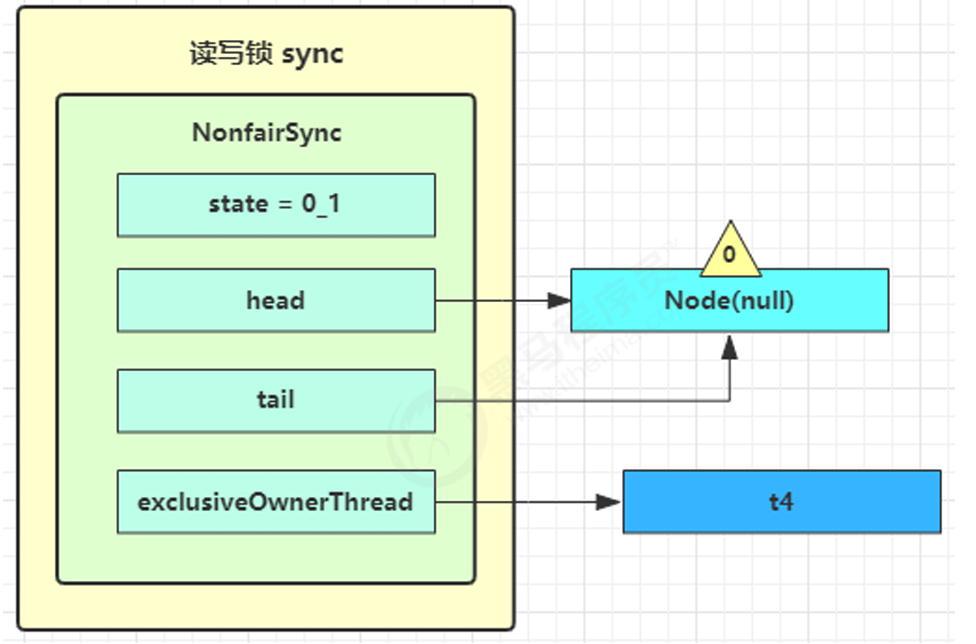
核心原理回顾
ReentrantReadWriteLock读写锁使用同一个Sync同步器(继承自 AQS)。- 状态 state 的高 16 位用于读锁计数,低 16 位用于写锁计数。
- 所有锁请求(读或写)都排队进入 AQS 的等待队列(双向链表结构)。
图解流程
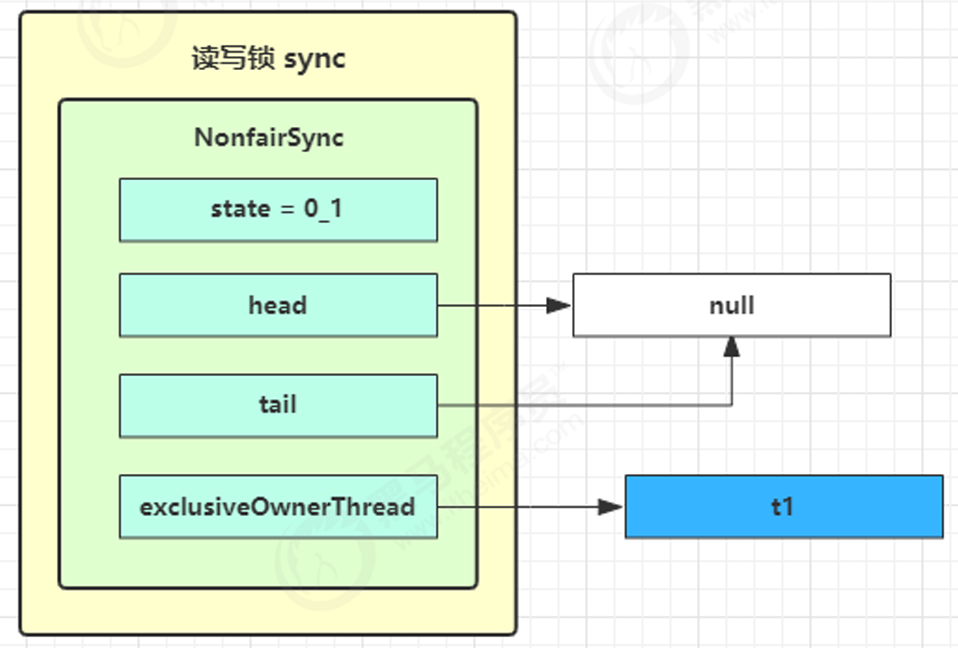
读写锁用的是同一个 Sycn 同步器,因此等待队列、state 等也是同一个
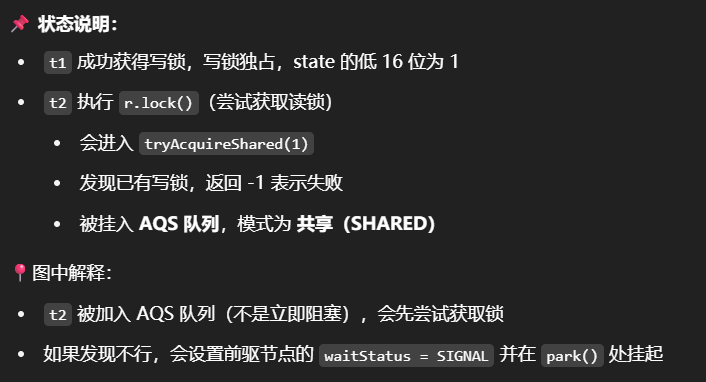
阶段 1:t1 获取写锁,t2 尝试获取读锁失败 t1 w.lock,t2 r.lock
1) t1 成功上锁,流程与 ReentrantLock 加锁相比没有特殊之处,不同是写锁状态占了 state 的低 16 位,而读锁使用的是 state 的高 16 位
2)t2 执行 r.lock,这时进入读锁的 sync.acquireShared(1) 流程,首先会进入 tryAcquireShared 流程。如果有写锁占据,那么 tryAcquireShared 返回 -1 表示失败
tryAcquireShared 返回值表示
- -1 表示失败
- 0 表示成功,但后继节点不会继续唤醒
- 正数表示成功,而且数值是还有几个后继节点需要唤醒,读写锁返回 1
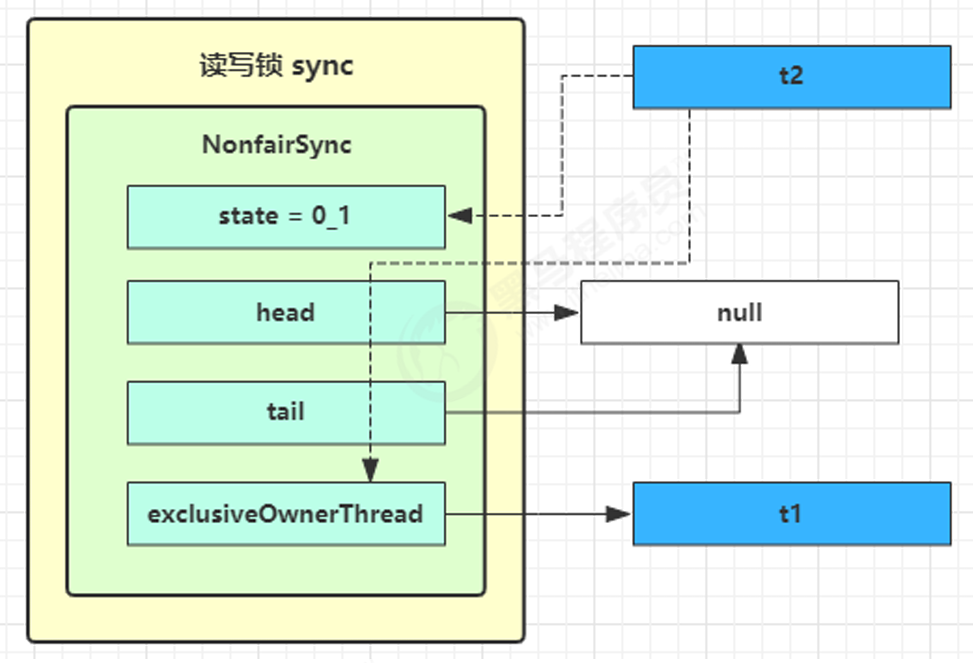
3)这时会进入 sync.doAcquireShared(1) 流程,首先也是调用 addWaiter 添加节点,不同之处在于节点被设置为 Node.SHARED 模式而非 Node.EXCLUSIVE 模式,注意此时 t2 仍处于活跃状态
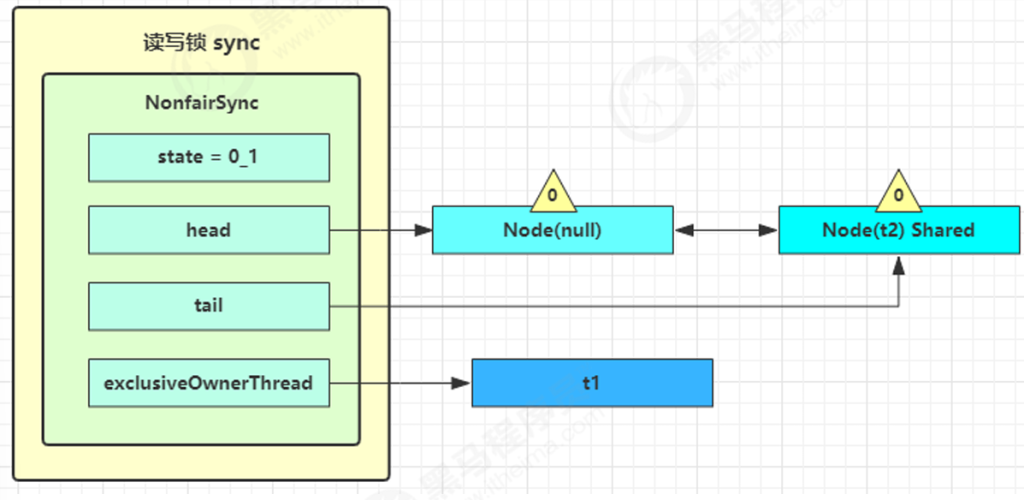
4)t2 会看看自己的节点是不是老二,如果是,还会再次调用 tryAcquireShared(1) 来尝试获取锁
5)如果没有成功,在 doAcquireShared 内 for (;;) 循环一次,把前驱节点的 waitStatus 改为 -1,再 for (;;) 循环一 次尝试 tryAcquireShared(1) 如果还不成功,那么在 parkAndCheckInterrupt() 处 park

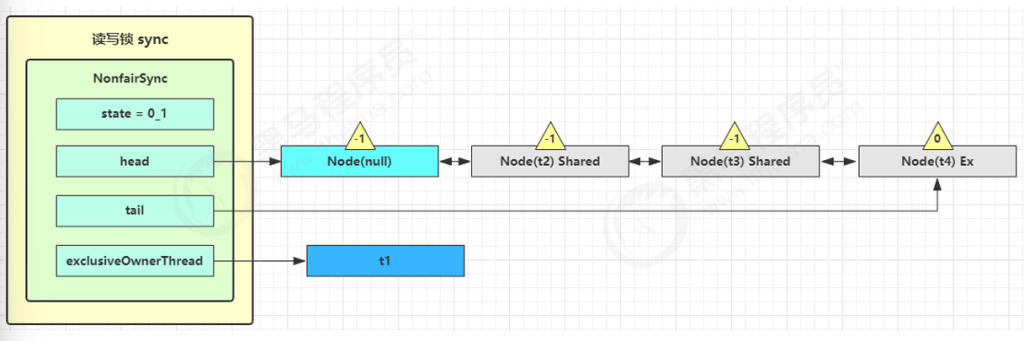
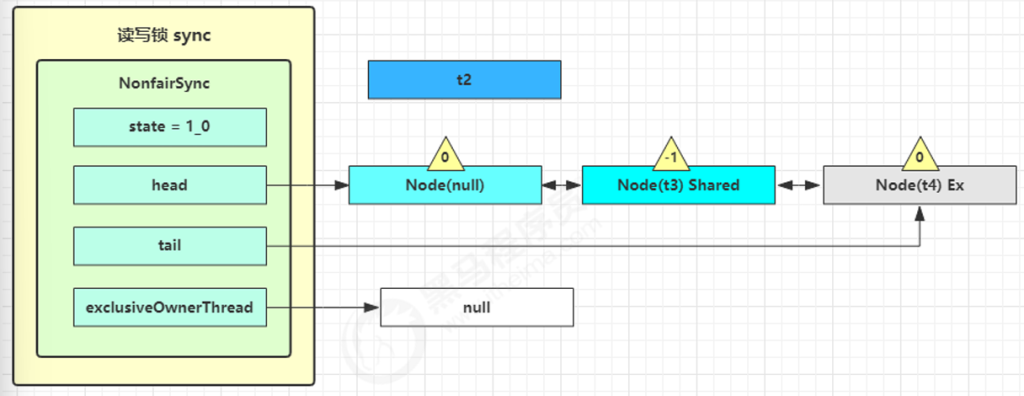
阶段 2:t3 再次尝试获取读锁,t4 尝试获取写锁 t3 r.lock,t4 w.lock
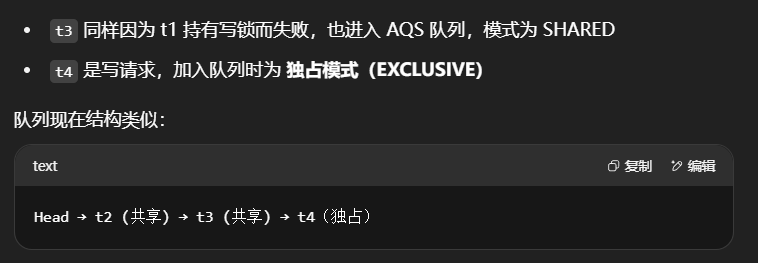
这种状态下,假设又有 t3 加读锁和 t4 加写锁,这期间 t1 仍然持有锁,就变成了下面的样子
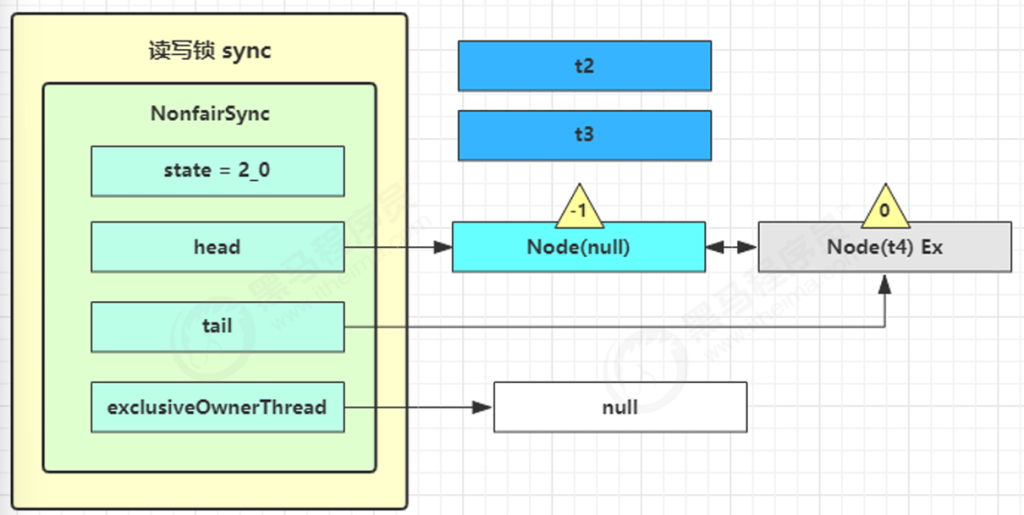
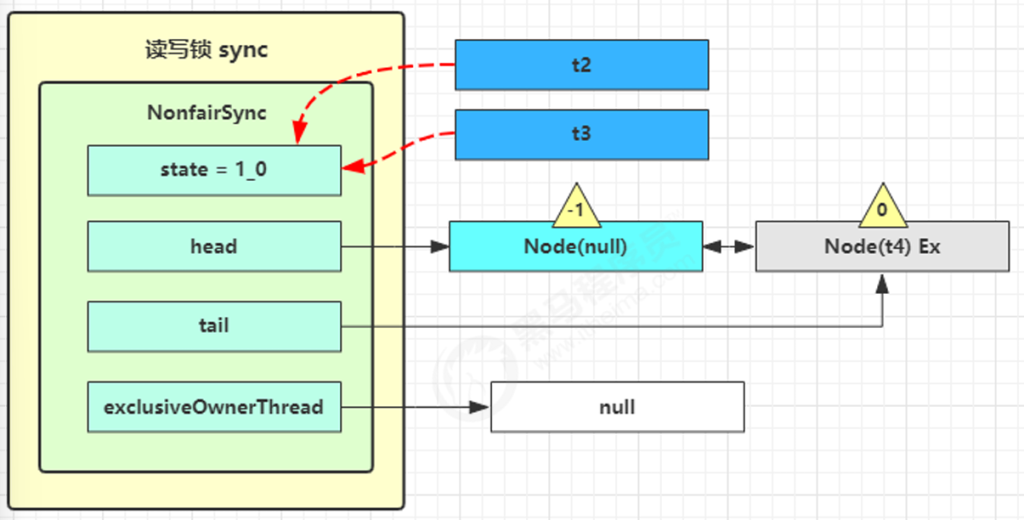
阶段 3:t1 释放写锁,唤醒后继节点(t2) t1 w.unlock
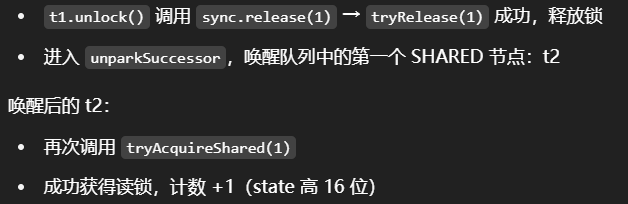
这时会走到写锁的 sync.release(1) 流程,调用 sync.tryRelease(1) 成功,变成下面的样子

接下来执行唤醒流程 sync.unparkSuccessor,即让老二恢复运行,这时 t2 在 doAcquireShared 内 parkAndCheckInterrupt() 处恢复运行
这回再来一次 for (;;) 执行 tryAcquireShared 成功则让读锁计数加一
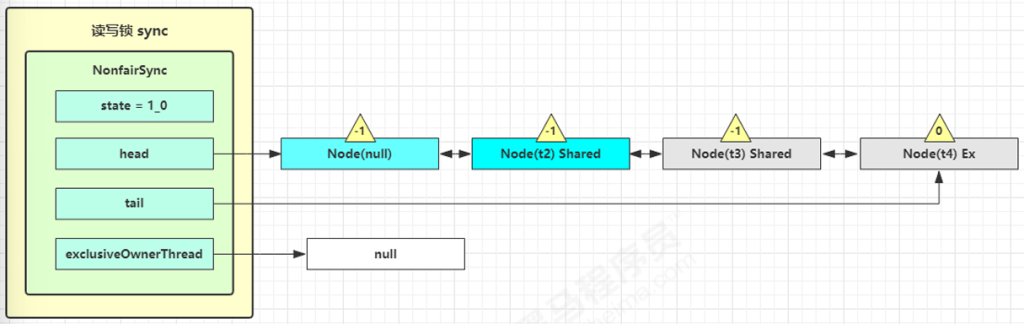
阶段 4:t2 调用 setHeadAndPropagate() 传播唤醒
这时 t2 已经恢复运行,接下来 t2 调用 setHeadAndPropagate(node, 1),它原本所在节点被置为头节点
事情还没完,在 setHeadAndPropagate 方法内还会检查下一个节点是否是 shared,如果是则调用 doReleaseShared() 将 head 的状态从 -1 改为 0 并唤醒老二,这时 t3 在 doAcquireShared 内 parkAndCheckInterrupt() 处恢复运行
这回再来一次 for (;;) 执行 tryAcquireShared 成功则让读锁计数加一

这时 t3 已经恢复运行,接下来 t3 调用 setHeadAndPropagate(node, 1),它原本所在节点被置为头节点
下一个节点不是 shared 了,因此不会继续唤醒 t4 所在节点
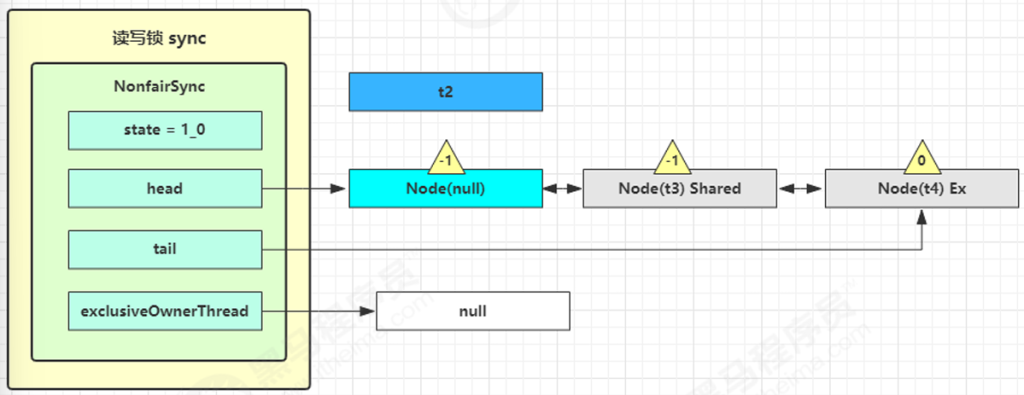
阶段 5:t2 和 t3 分别释放读锁 t2 r.unlock,t3 r.unlock

t2 进入 sync.releaseShared(1) 中,调用 tryReleaseShared(1) 让计数减一,但由于计数还不为零
t3 进入 sync.releaseShared(1) 中,调用 tryReleaseShared(1) 让计数减一,这回计数为零了,进入 doReleaseShared() 将头节点从 -1 改为 0 并唤醒老二,即
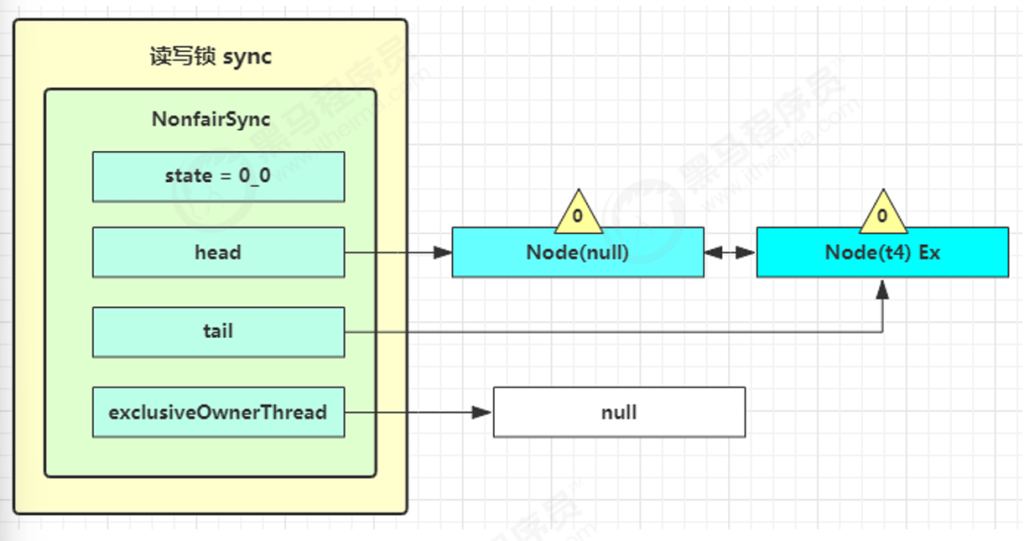
阶段 6:t4 是写锁请求,被唤醒后获取锁成功
之后 t4 在 acquireQueued 中 parkAndCheckInterrupt 处恢复运行,再次 for (;;) 这次自己是老二,并且没有其他 竞争,tryAcquire(1) 成功,修改头结点,流程结束
关键词理解
| 概念 | 含义 |
|---|---|
state |
高 16 位是读锁计数,低 16 位是写锁计数 |
tryAcquireShared() |
读锁尝试获取逻辑,-1 表示失败 |
doAcquireShared() |
读锁失败后入队,并阻塞等待 |
unparkSuccessor() |
唤醒队列中下一个节点 |
setHeadAndPropagate() |
设置新 head 并传播唤醒 |
Node.SHARED |
AQS 共享节点标记 |
【阶段 1】t1 获取写锁成功
├── 状态:state = 0x0001(低 16 位为写锁计数 = 1)
├── 锁持有者:t1(独占写锁)
└── t2 尝试获取读锁失败 → 进入 AQS 队列(共享模式)
当前队列:Head → t2[共享]
【阶段 2】t3 和 t4 相继加入队列
├── t3 获取读锁失败 → 加入 AQS 队列(共享模式)
├── t4 获取写锁失败 → 加入 AQS 队列(独占模式)
└── 所有尝试都会 CAS 修改前驱节点的 waitStatus = SIGNAL 并阻塞
当前队列:Head → t2[共享] → t3[共享] → t4[独占]
【阶段 3】t1 释放写锁(unlock)
├── tryRelease 成功 → state = 0x0000(写锁计数归 0)
├── 进入 unparkSuccessor → 唤醒 t2(第一个等待节点)
└── t2 醒来后调用 tryAcquireShared 成功 → 获取读锁
更新状态:
- state = 0x00010000(高 16 位读锁计数 = 1)
- 锁持有者:t2(共享读锁)
当前队列:Head → t3[共享] → t4[独占]
【阶段 4】t2 执行 setHeadAndPropagate
├── 把自己设为新的 head 节点
├── 判断下一个节点 t3 是共享模式
└── 直接唤醒 t3(共享传播)
t3 醒来后:
- 再次尝试获取读锁,成功
- state = 0x00020000(读锁计数 +1)
- 锁持有者:t2、t3(共享)
当前队列:Head → t4[独占]
【阶段 5】t2、t3 分别释放读锁
├── t2 调用 unlock → state = 0x00010000(仍有 1 个读锁)
│ └── 不传播唤醒
├── t3 调用 unlock → state = 0x00000000(全部读锁释放)
└── doReleaseShared() → 唤醒后继节点 t4
当前队列:Head → t4[独占]
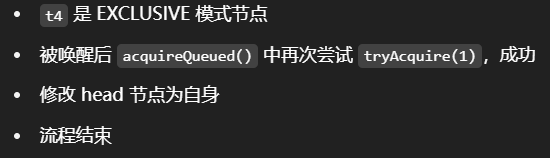
【阶段 6】t4 被唤醒后获取写锁
├── t4 醒来后调用 tryAcquire(独占)成功
├── 更新 state = 0x0001(写锁计数 = 1)
└── 锁持有者:t4(独占写锁)
AQS 队列为空,流程结束
源码分析
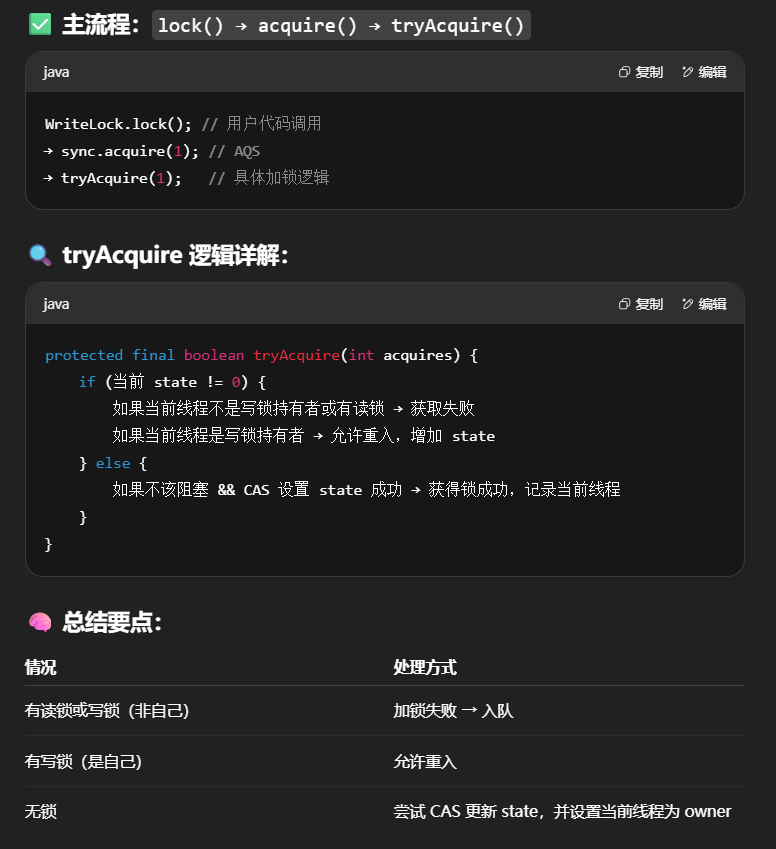
写锁上锁流程(非公平)
1 | static final class NonfairSync extends Sync { |
总结:
-
locksyn.acquire1
2
3
->tryAquire1
2
3
->1
2
3
4
5
6
7
8
9
10
11
12
13
14
15
16
17
- 如果有锁:
- 如果是写锁或者锁持有者不为自己,返回false
- 如果时写锁且为自己持有,则重入
- 如果无锁:
- 判断无序阻塞并设置state成功后,将owner设为自己,返回true
- 成功,则获得了锁
- 失败:
- 调用`acquireQueued(addWaiter(Node.EXCLUSIVE), arg)`进入阻塞队列,将节点状态设置为EXCLUSIVE,之后的逻辑与之前的aquireQueued类似。
**写锁释放流程**
static final class NonfairSync extends Sync {
// … 省略无关代码
// WriteLock 方法, 方便阅读, 放在此处
public void unlock() {
sync.release(1);
}
// AQS 继承过来的方法, 方便阅读, 放在此处
public final boolean release(int arg) {
// 尝试释放写锁成功
if (tryRelease(arg)) {
// unpark AQS 中等待的线程
Node h = head;
if (h != null && h.waitStatus != 0)
unparkSuccessor(h);
return true;
}
return false;
}
// Sync 继承过来的方法, 方便阅读, 放在此处
protected final boolean tryRelease(int releases) {
if (!isHeldExclusively())
throw new IllegalMonitorStateException();
int nextc = getState() - releases;
// 因为可重入的原因, 写锁计数为 0, 才算释放成功
boolean free = exclusiveCount(nextc) == 0;
if (free) {
setExclusiveOwnerThread(null);
}
setState(nextc);
return free;
}
}
1 |
|
->
1 | syn.release |
->
1 | tryRelease |
-
state状态减少
- 如果减为零,表示解锁成功,返回true
- 没有减为0,当前线程依旧持有锁
-
成功:解锁成功
- 如果ASQ队列不为空,则唤醒第一个节点。
-
失败:解锁失败。
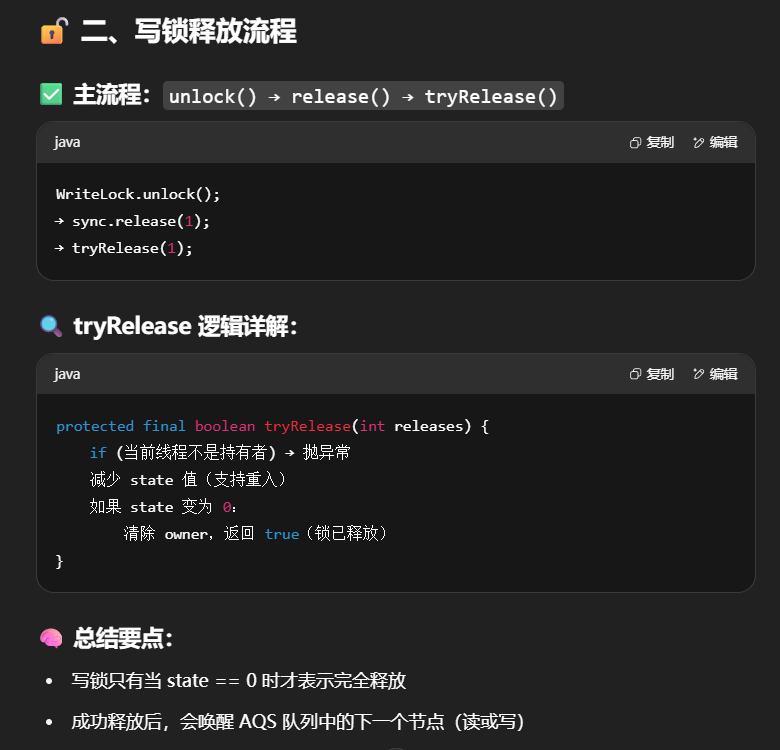
读锁上锁流程
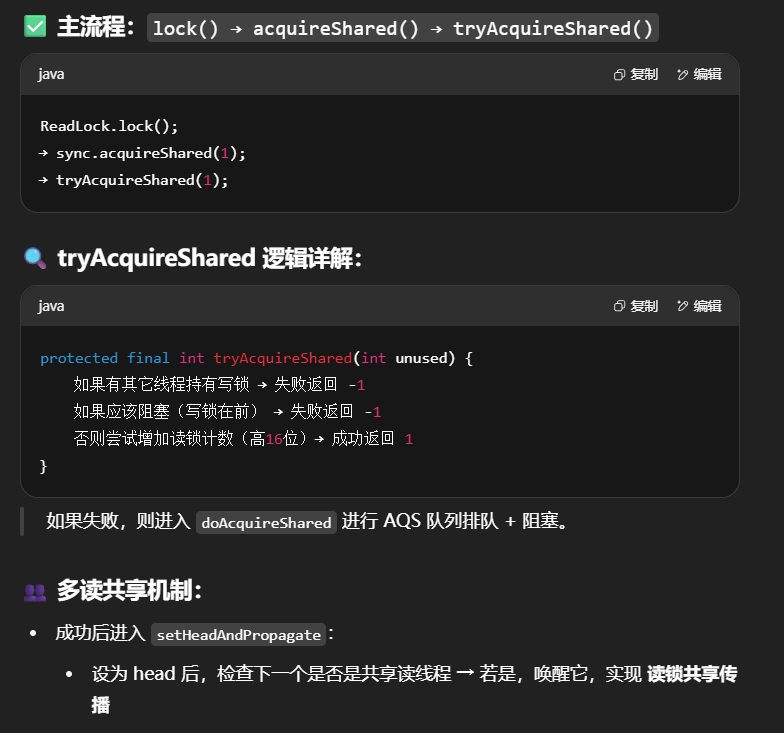
1 | static final class NonfairSync extends Sync { |
总结:
-
locksyn.acquireShare1
2
3
->tryAcquireShare1
2
3
->tryAcquireShare1
2
3
4
5
6
7
8
9
10
11
12
- 如果其他线程持有写锁:则失败,返回-1
- 否则:判断无需等待后,将state加上一个写锁的单位,返回1
- 返回值大于等于0:成功
- 返回值小于0:
- 调用doAcquireShare,类似之前的aquireQueued,将当前线程关联节点,状态设置为SHARE,插入AQS队列尾部。在for循环中判断当前节点的前驱节点是否为头节点
- 是:调用1
2
3
4
5
6
7
8
9
10
11
12
- 如果返回值大于等于0,则获取锁成功,并调用`setHeadAndPropagate`,出队,并不断唤醒AQS队列中的状态为SHARE的节点,直到下一个节点为EXCLUSIVE。记录打断标记,之后退出方法(不返回打断标记)
- 判断是否在失败后阻塞
- 是:阻塞住,并监测打断信号。
- 否则:将前驱节点状态设为-1。(下一次循环就又要阻塞了)
**读锁释放流程**
static final class NonfairSync extends Sync {
// ReadLock 方法, 方便阅读, 放在此处
public void unlock() {
sync.releaseShared(1);
}
// AQS 继承过来的方法, 方便阅读, 放在此处
public final boolean releaseShared(int arg) {
if (tryReleaseShared(arg)) {
doReleaseShared();
return true;
}
return false;
}
// Sync 继承过来的方法, 方便阅读, 放在此处
protected final boolean tryReleaseShared(int unused) {
// ... 省略不重要的代码
for (;;) {
int c = getState();
int nextc = c - SHARED_UNIT;
if (compareAndSetState(c, nextc)) {
// 读锁的计数不会影响其它获取读锁线程, 但会影响其它获取写锁线程
// 计数为 0 才是真正释放
return nextc == 0;
}
}
}
// AQS 继承过来的方法, 方便阅读, 放在此处
private void doReleaseShared() {
// 如果 head.waitStatus == Node.SIGNAL ==> 0 成功, 下一个节点 unpark
// 如果 head.waitStatus == 0 ==> Node.PROPAGATE
for (;;) {
Node h = head;
if (h != null && h != tail) {
int ws = h.waitStatus;
// 如果有其它线程也在释放读锁,那么需要将 waitStatus 先改为 0
// 防止 unparkSuccessor 被多次执行
if (ws == Node.SIGNAL) {
if (!compareAndSetWaitStatus(h, Node.SIGNAL, 0))
continue; // loop to recheck cases
unparkSuccessor(h);
}
// 如果已经是 0 了,改为 -3,用来解决传播性,见后文信号量 bug 分析
else if (ws == 0 &&
!compareAndSetWaitStatus(h, 0, Node.PROPAGATE))
continue; // loop on failed CAS
}
if (h == head) // loop if head changed
break;
}
}
}
1 |
|
long stamp = lock.tryOptimisticRead();
// 读取数据…
if (!lock.validate(stamp)) {
// 戳校验失败,需要升级为读锁
}
1 |
|
stamp = lock.readLock();
// …读取数据…
lock.unlockRead(stamp);
1 |
|
class DataContainerStamped {
private int data;
private final StampedLock lock = new StampedLock();
public int read(int readTime) {
long stamp = lock.tryOptimisticRead(); // 尝试乐观读
sleep(readTime);
if (lock.validate(stamp)) { // 戳校验
return data; // 校验通过,直接返回
}
// 校验失败,升级为读锁
stamp = lock.readLock();
try {
sleep(readTime);
return data;
} finally {
lock.unlockRead(stamp);
}
}
public void write(int newData) {
long stamp = lock.writeLock(); // 加写锁
try {
sleep(2);
this.data = newData;
} finally {
lock.unlockWrite(stamp); // 解写锁
}
}
}
1 |
|
// t1 执行 read(1),t2 稍后执行 read(0)
1 |
|
// t1 执行 read(1),中途 t2 执行 write(100)
1 |
|
Semaphore semaphore = new Semaphore(3);
1 |
|
for (int i = 0; i < 10; i++) {
new Thread(() -> {
try {
semaphore.acquire(); // 获取许可
} catch (InterruptedException e) {
e.printStackTrace();
}
try {
log.debug(“running…”);
sleep(1);
log.debug(“end…”);
} finally {
semaphore.release(); // 释放许可
}
}).start();
}
1 |
|
Semaphore(int permits)
Semaphore(int permits, boolean fair)
1 |
|
@Slf4j(topic = “c.Pool”)
class Pool {
// 1. 连接池大小
private final int poolSize;
// 2. 连接对象数组
private Connection[] connections;
// 3. 连接状态数组 0 表示空闲, 1 表示繁忙
private AtomicIntegerArray states;
private Semaphore semaphore;
// 4. 构造方法初始化
public Pool(int poolSize) {
this.poolSize = poolSize;
// 让许可数与资源数一致
this.semaphore = new Semaphore(poolSize);
this.connections = new Connection[poolSize];
this.states = new AtomicIntegerArray(new int[poolSize]);
for (int i = 0; i < poolSize; i++) {
connections[i] = new MockConnection(“连接” + (i+1));
}
}
// 5. 借连接
public Connection borrow() {// t1, t2, t3
// 获取许可
try {
semaphore.acquire(); // 没有许可的线程,在此等待
} catch (InterruptedException e) {
e.printStackTrace();
}
for (int i = 0; i < poolSize; i++) {
// 获取空闲连接
if(states.get(i) == 0) {
if (states.compareAndSet(i, 0, 1)) {
log.debug(“borrow {}”, connections[i]);
return connections[i];
}
}
}
// 不会执行到这里
return null;
}
// 6. 归还连接
public void free(Connection conn) {
for (int i = 0; i < poolSize; i++) {
if (connections[i] == conn) {
states.set(i, 0);
log.debug(“free {}”, conn);
semaphore.release();
break;
}
}
}
}
1 |
|
public static void main(String[] args) throws InterruptedException {
CountDownLatch latch = new CountDownLatch(3);
new Thread(() -> {
log.debug(“begin…”);
sleep(1);
latch.countDown();
log.debug(“end…{}”, latch.getCount());
}).start();
new Thread(() -> {
log.debug(“begin…”);
sleep(2);
latch.countDown();
log.debug(“end…{}”, latch.getCount());
}).start();
new Thread(() -> {
log.debug(“begin…”);
sleep(1.5);
latch.countDown();
log.debug(“end…{}”, latch.getCount());
}).start();
log.debug(“waiting…”);
latch.await();
log.debug(“wait end…”);
}
1 |
|
AtomicInteger num = new AtomicInteger(0);
ExecutorService service = Executors.newFixedThreadPool(10, ® -> {
return new Thread(r, “t” + num.getAndIncrement());
});
CountDownLatch latch = new CountDownLatch(10);
String[] all = new String[10];
Random r = new Random();
for (int j = 0; j < 10; j++) {
int x = j;
service.submit(() -> {
for (int i = 0; i <= 100; i++) {
try {
//随机休眠,模拟网络延迟
Thread.sleep(r.nextInt(100));
} catch (InterruptedException e) {
}
all[x] = Thread.currentThread().getName() + “(” + (i + “%”) + “)”;
//\r可以让当前输出覆盖上一次的输出。
System.out.print(“\r” + Arrays.toString(all));
}
latch.countDown();
});
}
latch.await();
System.out.println(“\n游戏开始…”);
service.shutdown();
1 |
|
[t0(52%), t1(47%), t2(51%), t3(40%), t4(49%), t5(44%), t6(49%), t7(52%), t8(46%), t9(46%)]
1 |
|
[t0(100%), t1(100%), t2(100%), t3(100%), t4(100%), t5(100%), t6(100%), t7(100%), t8(100%),
t9(100%)]
游戏开始…
1 |
|
@RestController
public class TestCountDownlatchController {
@GetMapping(“/order/{id}”)
public Map<String, Object> order(@PathVariable int id) {
HashMap<String, Object> map = new HashMap<>();
map.put(“id”, id);
map.put(“total”, “2300.00”);
sleep(2000);
return map;
}
@GetMapping(“/product/{id}”)
public Map<String, Object> product(@PathVariable int id) {
HashMap<String, Object> map = new HashMap<>();
if (id == 1) {
map.put(“name”, “小爱音箱”);
map.put(“price”, 300);
} else if (id == 2) {
map.put(“name”, “小米手机”);
map.put(“price”, 2000);
}
map.put(“id”, id);
sleep(1000);
return map;
}
@GetMapping(“/logistics/{id}”)
public Map<String, Object> logistics(@PathVariable int id) {
HashMap<String, Object> map = new HashMap<>();
map.put(“id”, id);
map.put(“name”, “中通快递”);
sleep(2500);
return map;
}
private void sleep(int millis) {
try {
Thread.sleep(millis);
} catch (InterruptedException e) {
e.printStackTrace();
}
}
}
1 |
|
RestTemplate restTemplate = new RestTemplate();
log.debug(“begin”);
ExecutorService service = Executors.newCachedThreadPool();
CountDownLatch latch = new CountDownLatch(4);
Future<Map<String,Object>> f1 = service.submit(() -> {
Map<String, Object> r =
restTemplate.getForObject(“http://localhost:8080/order/{1}”, Map.class, 1);
return r;
});
Future<Map<String, Object>> f2 = service.submit(() -> {
Map<String, Object> r =
restTemplate.getForObject(“http://localhost:8080/product/{1}”, Map.class, 1);
return r;
});
Future<Map<String, Object>> f3 = service.submit(() -> {
Map<String, Object> r =
restTemplate.getForObject(“http://localhost:8080/product/{1}”, Map.class, 2);
return r;
});
Future<Map<String, Object>> f4 = service.submit(() -> {
Map<String, Object> r =
restTemplate.getForObject(“http://localhost:8080/logistics/{1}”, Map.class, 1);
return r;
});
System.out.println(f1.get());
System.out.println(f2.get());
System.out.println(f3.get());
System.out.println(f4.get());
log.debug(“执行完毕”);
service.shutdown();
1 |
|
19:51:39.711 c.TestCountDownLatch [main] - begin
{total=2300.00, id=1}
{price=300, name=小爱音箱, id=1}
{price=2000, name=小米手机, id=2}
{name=中通快递, id=1}
19:51:42.407 c.TestCountDownLatch [main] - 执行完毕
1 |
|
private static void test1() {
ExecutorService service = Executors.newFixedThreadPool(5);
for (int i = 0; i < 3; i++) {
CountDownLatch latch = new CountDownLatch(2);
service.submit(() -> {
log.debug(“task1 start…”);
sleep(1);
latch.countDown();
});
service.submit(() -> {
log.debug(“task2 start…”);
sleep(2);
latch.countDown();
});
try {
latch.await();
} catch (InterruptedException e) {
e.printStackTrace();
}
log.debug(“task1 task2 finish…”);
}
service.shutdown();
}
1 |
|
CyclicBarrier barrier = new CyclicBarrier(2);
1 |
|
CyclicBarrier cb = new CyclicBarrier(2); // 个数为2时才会继续执行
new Thread(()->{
System.out.println(“线程1开始…”+new Date());
try {
cb.await(); // 当个数不足时,等待
} catch (InterruptedException | BrokenBarrierException e) {
e.printStackTrace();
}
System.out.println(“线程1继续向下运行…”+new Date());
}).start();
new Thread(()->{
System.out.println(“线程2开始…”+new Date());
try { Thread.sleep(2000); } catch (InterruptedException e) { }
try {
cb.await(); // 2 秒后,线程个数够2,继续运行
} catch (InterruptedException | BrokenBarrierException e) {
e.printStackTrace();
}
System.out.println(“线程2继续向下运行…”+new Date());
}).start();
1 |
|
Exception in thread “main” java.util.ConcurrentModificationException
1 |
|
public class Test {
public static void main(String[] args){
//在main方法中实现两个接口
}
//开启26个线程,每个线程调用get方法获取map,从对应的文件读取单词并存储到list中,最后调用accept方法进行统计。
public static <V> void calculate(Supplier<Map<String,V>> supplier, BiConsumer<Map<String,V>, List<String>> consumer) {
Map<String, V> map = supplier.get();
CountDownLatch count = new CountDownLatch(26);
for (int i = 1; i < 27; i++) {
int k = i;
new Thread(()->{
ArrayList<String> list = new ArrayList<>();
read(list,k);
consumer.accept(map,list);
count.countDown();
}).start();
}
try {
count.await();
} catch (InterruptedException e) {
e.printStackTrace();
}
System.out.println(map.toString());
}
//读单词方法的实现
public static void read(List<String> list,int i){
try{
String element;
BufferedReader reader = new BufferedReader(new FileReader(i + ".txt"));
while((element = reader.readLine()) != null){
list.add(element);
}
}catch (IOException e){
}
}
//生成测试数据
public void construct(){
String str = "abcdefghijklmnopqrstuvwxyz";
ArrayList<String> list = new ArrayList<>();
for (int i = 0; i < str.length(); i++) {
for (int j = 0; j < 200; j++) {
list.add(String.valueOf(str.charAt(i)));
}
}
Collections.shuffle(list);
for (int i = 0; i < 26; i++) {
try (PrintWriter out = new PrintWriter(new FileWriter(i + 1 + ".txt"))) {
String collect = list.subList(i * 200, (i + 1) * 200).stream().collect(Collectors.joining("\n"));
out.println(collect);
} catch (IOException e) {
e.printStackTrace();
}
}
}
}
1 |
|
demo(
// 创建 map 集合
// 创建 ConcurrentHashMap 对不对?
() -> new ConcurrentHashMap<String, Integer>(),
// 进行计数
(map, words) -> {
for (String word : words) {
Integer counter = map.get(word);
int newValue = counter == null ? 1 : counter + 1;
map.put(word, newValue);
}
}
);
1 |
|
{a=186, b=192, c=187, d=184, e=185, f=185, g=176, h=185, i=193, j=189, k=187, l=157, m=189, n=181, o=180, p=178, q=185, r=188, s=181, t=183, u=177, v=186, w=188, x=178, y=189, z=186}
47
1 |
|
demo(
() -> new ConcurrentHashMap<String, LongAdder>(),
(map, words) -> {
for (String word : words) {
// 注意不能使用 putIfAbsent,此方法返回的是上一次的 value,首次调用返回 null
map.computeIfAbsent(word, (key) -> new LongAdder()).increment();
}
}
);
1 |
|
demo(
() -> new ConcurrentHashMap<String, Integer>(),
(map, words) -> {
for (String word : words) {
// 函数式编程,无需原子变量
map.merge(word, 1, Integer::sum);
}
}
);
1 |
|
public static void main(String[] args) {
// 测试 java 7 中哪些数字的 hash 结果相等
System.out.println(“长度为16时,桶下标为1的key”);
for (int i = 0; i < 64; i++) {
if (hash(i) % 16 == 1) {
System.out.println(i);
}
}
System.out.println(“长度为32时,桶下标为1的key”);
for (int i = 0; i < 64; i++) {
if (hash(i) % 32 == 1) {
System.out.println(i);
}
}
// 1, 35, 16, 50 当大小为16时,它们在一个桶内
final HashMap<Integer, Integer> map = new HashMap<Integer, Integer>();
// 放 12 个元素
map.put(2, null);
map.put(3, null);
map.put(4, null);
map.put(5, null);
map.put(6, null);
map.put(7, null);
map.put(8, null);
map.put(9, null);
map.put(10, null);
map.put(16, null);
map.put(35, null);
map.put(1, null);
System.out.println(“扩容前大小[main]:”+map.size());
new Thread() {
@Override
public void run() {
// 放第 13 个元素, 发生扩容
map.put(50, null);
System.out.println(“扩容后大小[Thread-0]:”+map.size());
}
}.start();
new Thread() {
@Override
public void run() {
// 放第 13 个元素, 发生扩容
map.put(50, null);
System.out.println(“扩容后大小[Thread-1]:”+map.size());
}
}.start();
}
final static int hash(Object k) {
int h = 0;
if (0 != h && k instanceof String) {
return sun.misc.Hashing.stringHash32((String) k);
}
h ^= k.hashCode();
h ^= (h >>> 20) ^ (h >>> 12);
return h ^ (h >>> 7) ^ (h >>> 4);
}
1 |
|
int newCapacity = newTable.length;
1 |
|
newTable.length==32 &&
(
Thread.currentThread().getName().equals(“Thread-0”)||
Thread.currentThread().getName().equals(“Thread-1”)
)
1 |
|
长度为16时,桶下标为1的key
1
16
35
50
长度为32时,桶下标为1的key
1
35
扩容前大小[main]:12
1 |
|
Entry<K,V> next = e.next; // 593
if (rehash) // 594
// …
1 |
|
e (1)->(35)->(16)->null
next (35)->(16)->null
1 |
|
newTable[1] (35)->(1)->null
扩容后大小:13
1 |
|
e (1)->null
next (35)->(1)->null
1 |
|
newTable[1] (1)->null
e (35)->(1)->null
next (1)->null
1 |
|
newTable[1] (35)->(1)->null
e (1)->null
next null
1 |
|
e.next = newTable[1];
// 这时 e (1,35)
// 而 newTable[1] (35,1)->(1,35) 因为是同一个对象
newTable[1] = e;
// 再尝试将 e 作为链表头, 死链已成
e = next;
// 虽然 next 是 null, 会进入下一个链表的复制, 但死链已经形成了
1 |
|
// 将 table 迁移至 newTable
void transfer(Entry[] newTable, boolean rehash) {
int newCapacity = newTable.length;
for (Entry<K,V> e : table) {
while(null != e) {
Entry<K,V> next = e.next;
// 1 处
if (rehash) {
e.hash = null == e.key ? 0 : hash(e.key);
}
int i = indexFor(e.hash, newCapacity);
// 2 处
// 将新元素加入 newTable[i], 原 newTable[i] 作为新元素的 next
e.next = newTable[i];
newTable[i] = e;
e = next;
}
}
}
1 |
|
原始链表,格式:[下标] (key,next)
[1] (1,35)->(35,16)->(16,null)
线程 a 执行到 1 处 ,此时局部变量 e 为 (1,35),而局部变量 next 为 (35,16) 线程 a 挂起
线程 b 开始执行
第一次循环
[1] (1,null)
第二次循环
[1] (35,1)->(1,null)
第三次循环
[1] (35,1)->(1,null)
[17] (16,null)
切换回线程 a,此时局部变量 e 和 next 被恢复,引用没变但内容变了:e 的内容被改为 (1,null),而 next 的内
容被改为 (35,1) 并链向 (1,null)
第一次循环
[1] (1,null)
第二次循环,注意这时 e 是 (35,1) 并链向 (1,null) 所以 next 又是 (1,null)
[1] (35,1)->(1,null)
第三次循环,e 是 (1,null),而 next 是 null,但 e 被放入链表头,这样 e.next 变成了 35 (2 处)
[1] (1,35)->(35,1)->(1,35)
已经是死链了
1 |
|
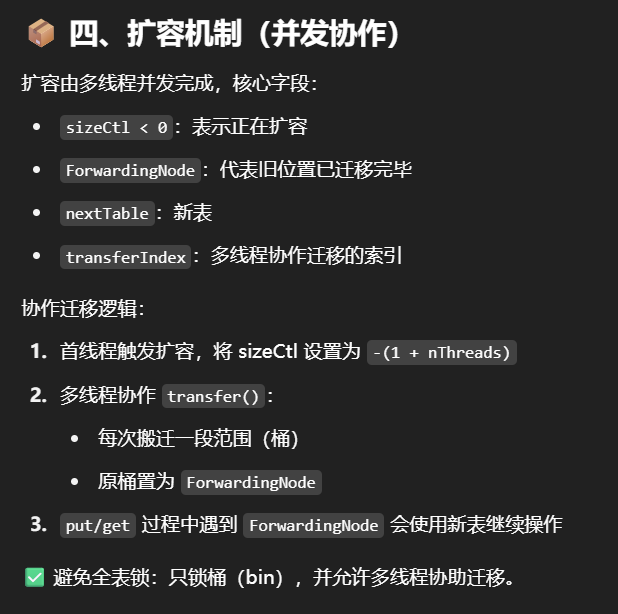
// 默认为 0
// 当初始化时, 为 -1
// 当扩容时, 为 -(1 + 扩容线程数)
// 当初始化或扩容完成后,为 下一次的扩容的阈值大小
private transient volatile int sizeCtl;
// 整个 ConcurrentHashMap 就是一个 Node[]
static class Node<K,V> implements Map.Entry<K,V> {}
// hash 表
transient volatile Node<K,V>[] table;
// 扩容时的 新 hash 表
private transient volatile Node<K,V>[] nextTable;
// 扩容时如果某个 bin 迁移完毕, 用 ForwardingNode 作为旧 table bin 的头结点
static final class ForwardingNode<K,V> extends Node<K,V> {}
// 用在 compute 以及 computeIfAbsent 时, 用来占位, 计算完成后替换为普通 Node
static final class ReservationNode<K,V> extends Node<K,V> {}
// 作为 treebin 的头节点, 存储 root 和 first
static final class TreeBin<K,V> extends Node<K,V> {}
// 作为 treebin 的节点, 存储 parent, left, right
static final class TreeNode<K,V> extends Node<K,V> {}
1 |
|
// 获取 Node[] 中第 i 个 Node
static final <K,V> Node<K,V> tabAt(Node<K,V>[] tab, int i)
// cas 修改 Node[] 中第 i 个 Node 的值, c 为旧值, v 为新值
static final <K,V> boolean casTabAt(Node<K,V>[] tab, int i, Node<K,V> c, Node<K,V> v)
// 直接修改 Node[] 中第 i 个 Node 的值, v 为新值
static final <K,V> void setTabAt(Node<K,V>[] tab, int i, Node<K,V> v)
1 |
|
public ConcurrentHashMap(int initialCapacity, float loadFactor, int concurrencyLevel) {
if (!(loadFactor > 0.0f) || initialCapacity < 0 || concurrencyLevel <= 0)
throw new IllegalArgumentException();
if (initialCapacity < concurrencyLevel) // Use at least as many bins
initialCapacity = concurrencyLevel; // as estimated threads
long size = (long)(1.0 + (long)initialCapacity / loadFactor);
// tableSizeFor 仍然是保证计算的大小是 2^n, 即 16,32,64 …
int cap = (size >= (long)MAXIMUM_CAPACITY) ?
MAXIMUM_CAPACITY : tableSizeFor((int)size);
this.sizeCtl = cap;
}
1 |
|
public V get(Object key) {
Node<K,V>[] tab; Node<K,V> e, p; int n, eh; K ek;
// spread 方法能确保返回结果是正数
int h = spread(key.hashCode());
if ((tab = table) != null && (n = tab.length) > 0 &&
(e = tabAt(tab, (n - 1) & h)) != null) {
// 如果头结点已经是要查找的 key
if ((eh = e.hash) == h) {
if ((ek = e.key) == key || (ek != null && key.equals(ek)))
return e.val;
}
// hash 为负数表示该 bin 在扩容中或是 treebin, 这时调用 find 方法来查找
else if (eh < 0)
return (p = e.find(h, key)) != null ? p.val : null;
// 正常遍历链表, 用 equals 比较
while ((e = e.next) != null) {
if (e.hash == h &&
((ek = e.key) == key || (ek != null && key.equals(ek))))
return e.val;
}
}
return null;
}
1 |
|
public V put(K key, V value) {
return putVal(key, value, false);
}
final V putVal(K key, V value, boolean onlyIfAbsent) {
if (key == null || value == null) throw new NullPointerException();
// 其中 spread 方法会综合高位低位, 具有更好的 hash 性
int hash = spread(key.hashCode());
int binCount = 0;
for (Node<K,V>[] tab = table;;) {
// f 是链表头节点
// fh 是链表头结点的 hash
// i 是链表在 table 中的下标
Node<K,V> f; int n, i, fh;
// 要创建 table
if (tab == null || (n = tab.length) == 0)
// 初始化 table 使用了 cas, 无需 synchronized 创建成功, 进入下一轮循环
tab = initTable();
// 要创建链表头节点
else if ((f = tabAt(tab, i = (n - 1) & hash)) == null) {
// 添加链表头使用了 cas, 无需 synchronized
if (casTabAt(tab, i, null,
new Node<K,V>(hash, key, value, null)))
break;
}
// 帮忙扩容
else if ((fh = f.hash) == MOVED)
// 帮忙之后, 进入下一轮循环
tab = helpTransfer(tab, f);
else {
V oldVal = null;
// 锁住链表头节点
synchronized (f) {
// 再次确认链表头节点没有被移动
if (tabAt(tab, i) == f) {
// 链表
if (fh >= 0) {
binCount = 1;
// 遍历链表
for (Node<K,V> e = f;; ++binCount) {
K ek;
// 找到相同的 key
if (e.hash == hash &&
((ek = e.key) == key ||
(ek != null && key.equals(ek)))) {
oldVal = e.val;
// 更新
if (!onlyIfAbsent)
e.val = value;
break;
}
Node<K,V> pred = e;
// 已经是最后的节点了, 新增 Node, 追加至链表尾
if ((e = e.next) == null) {
pred.next = new Node<K,V>(hash, key,
value, null);
break;
}
}
}
// 红黑树
else if (f instanceof TreeBin) {
Node<K,V> p;
binCount = 2;
// putTreeVal 会看 key 是否已经在树中, 是, 则返回对应的 TreeNode
if ((p = ((TreeBin<K,V>)f).putTreeVal(hash, key,
value)) != null) {
oldVal = p.val;
if (!onlyIfAbsent)
p.val = value;
}
}
}
// 释放链表头节点的锁
}
if (binCount != 0) {
if (binCount >= TREEIFY_THRESHOLD)
// 如果链表长度 >= 树化阈值(8), 进行链表转为红黑树
treeifyBin(tab, i);
if (oldVal != null)
return oldVal;
break;
}
}
}
// 增加 size 计数
addCount(1L, binCount);
return null;
}
private final Node<K,V>[] initTable() {
Node<K,V>[] tab; int sc;
while ((tab = table) == null || tab.length == 0) {
if ((sc = sizeCtl) < 0)
Thread.yield();
// 尝试将 sizeCtl 设置为 -1(表示初始化 table)
else if (U.compareAndSwapInt(this, SIZECTL, sc, -1)) {
// 获得锁, 创建 table, 这时其它线程会在 while() 循环中 yield 直至 table 创建
try {
if ((tab = table) == null || tab.length == 0) {
int n = (sc > 0) ? sc : DEFAULT_CAPACITY;
Node<K,V>[] nt = (Node<K,V>[])new Node[n];
table = tab = nt;
sc = n - (n >>> 2);
}
} finally {
sizeCtl = sc;
}
break;
}
}
return tab;
}
// check 是之前 binCount 的个数
private final void addCount(long x, int check) {
CounterCell[] as; long b, s;
if (
// 已经有了 counterCells, 向 cell 累加
(as = counterCells) != null ||
// 还没有, 向 baseCount 累加
!U.compareAndSwapLong(this, BASECOUNT, b = baseCount, s = b + x)
) {
CounterCell a; long v; int m;
boolean uncontended = true;
if (
// 还没有 counterCells
as == null || (m = as.length - 1) < 0 ||
// 还没有 cell
(a = as[ThreadLocalRandom.getProbe() & m]) == null ||
// cell cas 增加计数失败
!(uncontended = U.compareAndSwapLong(a, CELLVALUE, v = a.value, v + x))
) {
// 创建累加单元数组和cell, 累加重试
fullAddCount(x, uncontended);
return;
}
if (check <= 1)
return;
// 获取元素个数
s = sumCount();
}
if (check >= 0) {
Node<K,V>[] tab, nt; int n, sc;
while (s >= (long)(sc = sizeCtl) && (tab = table) != null &&
(n = tab.length) < MAXIMUM_CAPACITY) {
int rs = resizeStamp(n);
if (sc < 0) {
if ((sc >>> RESIZE_STAMP_SHIFT) != rs || sc == rs + 1 ||
sc == rs + MAX_RESIZERS || (nt = nextTable) == null ||
transferIndex <= 0)
break;
// newtable 已经创建了,帮忙扩容
if (U.compareAndSwapInt(this, SIZECTL, sc, sc + 1))
transfer(tab, nt);
}
// 需要扩容,这时 newtable 未创建
else if (U.compareAndSwapInt(this, SIZECTL, sc,
(rs << RESIZE_STAMP_SHIFT) + 2))
transfer(tab, null);
s = sumCount();
}
}
}
1 |
|
putTreeVal
1
2
3
4
5
6
7
8
9
10
11
12
13
14
15
16
17
18
19
20
21
22
23
24
25
26
27
28
29
30
31
32
33
34
35
查看是否有对应key的数节点
- 如果有且为覆盖模式,将值覆盖,返回旧值
- 如果没有,创建并插入,返回null
- 解锁
- if binCount不为0
- 如果binCount大于树化阈值8
- 树化
- 如果旧值不为null
- 返回旧值
- break
- 增加size计数
- return null
##### size 计算流程
size 计算实际发生在 put,remove 改变集合元素的操作之中
- 没有竞争发生,向 baseCount 累加计数
- 有竞争发生,新建 counterCells,向其中的一个 cell 累加计
- counterCells 初始有两个 cell
- 如果计数竞争比较激烈,会创建新的 cell 来累加计数
public int size() {
long n = sumCount();
return ((n < 0L) ? 0 :
(n > (long)Integer.MAX_VALUE) ? Integer.MAX_VALUE :
(int)n);
}
final long sumCount() {
CounterCell[] as = counterCells; CounterCell a;
// 将 baseCount 计数与所有 cell 计数累加
long sum = baseCount;
if (as != null) {
for (int i = 0; i < as.length; ++i) {
if ((a = as[i]) != null)
sum += a.value;
}
}
return sum;
}
1 |
|
public ConcurrentHashMap(int initialCapacity, float loadFactor, int concurrencyLevel) {
if (!(loadFactor > 0) || initialCapacity < 0 || concurrencyLevel <= 0)
throw new IllegalArgumentException();
if (concurrencyLevel > MAX_SEGMENTS)
concurrencyLevel = MAX_SEGMENTS;
// ssize 必须是 2^n, 即 2, 4, 8, 16 … 表示了 segments 数组的大小
int sshift = 0;
int ssize = 1;
while (ssize < concurrencyLevel) {
++sshift;
ssize <<= 1;
}
// segmentShift 默认是 32 - 4 = 28
this.segmentShift = 32 - sshift;
// segmentMask 默认是 15 即 0000 0000 0000 1111
this.segmentMask = ssize - 1;
if (initialCapacity > MAXIMUM_CAPACITY)
initialCapacity = MAXIMUM_CAPACITY;
int c = initialCapacity / ssize;
if (c * ssize < initialCapacity)
++c;
int cap = MIN_SEGMENT_TABLE_CAPACITY;
while (cap < c)
cap <<= 1;
// 创建 segments and segments[0]
Segment<K,V> s0 =
new Segment<K,V>(loadFactor, (int)(cap * loadFactor),
(HashEntry<K,V>[])new HashEntry[cap]);
Segment<K,V>[] ss = (Segment<K,V>[])new Segment[ssize];
UNSAFE.putOrderedObject(ss, SBASE, s0); // ordered write of segments[0]
this.segments = ss;
}
1 |
|
public V put(K key, V value) {
Segment<K,V> s;
if (value == null)
throw new NullPointerException();
int hash = hash(key);
// 计算出 segment 下标
int j = (hash >>> segmentShift) & segmentMask;
// 获得 segment 对象, 判断是否为 null, 是则创建该 segment
if ((s = (Segment<K,V>)UNSAFE.getObject
(segments, (j << SSHIFT) + SBASE)) == null) {
// 这时不能确定是否真的为 null, 因为其它线程也发现该 segment 为 null,
// 因此在 ensureSegment 里用 cas 方式保证该 segment 安全性
s = ensureSegment(j);
}
// 进入 segment 的put 流程
return s.put(key, hash, value, false);
}
1 |
|
final V put(K key, int hash, V value, boolean onlyIfAbsent) {
// 尝试加锁
HashEntry<K,V> node = tryLock() ? null :
// 如果不成功, 进入 scanAndLockForPut 流程
// 如果是多核 cpu 最多 tryLock 64 次, 进入 lock 流程
// 在尝试期间, 还可以顺便看该节点在链表中有没有, 如果没有顺便创建出来
scanAndLockForPut(key, hash, value);
// 执行到这里 segment 已经被成功加锁, 可以安全执行
V oldValue;
try {
HashEntry<K,V>[] tab = table;
int index = (tab.length - 1) & hash;
HashEntry<K,V> first = entryAt(tab, index);
for (HashEntry<K,V> e = first;;) {
if (e != null) {
// 更新
K k;
if ((k = e.key) == key ||
(e.hash == hash && key.equals(k))) {
oldValue = e.value;
if (!onlyIfAbsent) {
e.value = value;
++modCount;
} break;
}
e = e.next;
}
else {
// 新增
// 1) 之前等待锁时, node 已经被创建, next 指向链表头
if (node != null)
node.setNext(first);
else
// 2) 创建新 node
node = new HashEntry<K,V>(hash, key, value, first);
int c = count + 1;
// 3) 扩容
if (c > threshold && tab.length < MAXIMUM_CAPACITY)
rehash(node);
else
// 将 node 作为链表头
setEntryAt(tab, index, node);
++modCount;
count = c;
oldValue = null;
break;
}
}
} finally {
unlock();
}
return oldValue;
}
1 |
|
private void rehash(HashEntry<K,V> node) {
HashEntry<K,V>[] oldTable = table;
int oldCapacity = oldTable.length;
int newCapacity = oldCapacity << 1;
threshold = (int)(newCapacity * loadFactor);
HashEntry<K,V>[] newTable =
(HashEntry<K,V>[]) new HashEntry[newCapacity];
int sizeMask = newCapacity - 1;
for (int i = 0; i < oldCapacity ; i++) {
HashEntry<K,V> e = oldTable[i];
if (e != null) {
HashEntry<K,V> next = e.next;
int idx = e.hash & sizeMask;
if (next == null) // Single node on list
newTable[idx] = e;
else { // Reuse consecutive sequence at same slot
HashEntry<K,V> lastRun = e;
int lastIdx = idx;
// 过一遍链表, 尽可能把 rehash 后 idx 不变的节点重用
for (HashEntry<K,V> last = next;
last != null;
last = last.next) {
int k = last.hash & sizeMask;
if (k != lastIdx) {
lastIdx = k;
lastRun = last;
}
}
newTable[lastIdx] = lastRun;
// 剩余节点需要新建
for (HashEntry<K,V> p = e; p != lastRun; p = p.next) {
V v = p.value;
int h = p.hash;
int k = h & sizeMask;
HashEntry<K,V> n = newTable[k];
newTable[k] = new HashEntry<K,V>(h, p.key, v, n);
}
}
}
}
// 扩容完成, 才加入新的节点
int nodeIndex = node.hash & sizeMask; // add the new node
node.setNext(newTable[nodeIndex]);
newTable[nodeIndex] = node;
// 替换为新的 HashEntry table
table = newTable;
}
1 |
|
public static void main(String[] args) {
ConcurrentHashMap<Integer, String> map = new ConcurrentHashMap<>();
for (int i = 0; i < 1000; i++) {
int hash = hash(i);
int segmentIndex = (hash >>> 28) & 15;
if (segmentIndex == 4 && hash % 8 == 2) {
System.out.println(i + “\t” + segmentIndex + “\t” + hash % 2 + “\t” + hash % 4 +
“\t” + hash % 8);
}
}
map.put(1, “value”);
map.put(15, “value”); // 2 扩容为 4 15 的 hash%8 与其他不同
map.put(169, “value”);
map.put(197, “value”); // 4 扩容为 8
map.put(341, “value”);
map.put(484, “value”);
map.put(545, “value”); // 8 扩容为 16
map.put(912, “value”);
map.put(941, “value”);
System.out.println(“ok”);
}
private static int hash(Object k) {
int h = 0;
if ((0 != h) && (k instanceof String)) {
return sun.misc.Hashing.stringHash32((String) k);
}
h ^= k.hashCode();
// Spread bits to regularize both segment and index locations,
// using variant of single-word Wang/Jenkins hash.
h += (h << 15) ^ 0xffffcd7d;
h ^= (h >>> 10);
h += (h << 3);
h ^= (h >>> 6);
h += (h << 2) + (h << 14);
int v = h ^ (h >>> 16);
return v;
}
1 |
|
public V get(Object key) {
Segment<K,V> s; // manually integrate access methods to reduce overhead
HashEntry<K,V>[] tab;
int h = hash(key);
// u 为 segment 对象在数组中的偏移量
long u = (((h >>> segmentShift) & segmentMask) << SSHIFT) + SBASE;
// s 即为 segment
if ((s = (Segment<K,V>)UNSAFE.getObjectVolatile(segments, u)) != null &&
(tab = s.table) != null) {
for (HashEntry<K,V> e = (HashEntry<K,V>) UNSAFE.getObjectVolatile
(tab, ((long)(((tab.length - 1) & h)) << TSHIFT) + TBASE);
e != null; e = e.next) {
K k;
if ((k = e.key) == key || (e.hash == h && key.equals(k)))
return e.value;
}
}
return null;
}
1 |
|
public int size() {
// Try a few times to get accurate count. On failure due to
// continuous async changes in table, resort to locking.
final Segment<K,V>[] segments = this.segments;
int size;
boolean overflow; // true if size overflows 32 bits
long sum; // sum of modCounts
long last = 0L; // previous sum
int retries = -1; // first iteration isn’t retry
try {
for (;;) {
if (retries++ == RETRIES_BEFORE_LOCK) {
// 超过重试次数, 需要创建所有 segment 并加锁
for (int j = 0; j < segments.length; ++j)
ensureSegment(j).lock(); // force creation
}
sum = 0L;
size = 0;
overflow = false;
for (int j = 0; j < segments.length; ++j) {
Segment<K,V> seg = segmentAt(segments, j);
if (seg != null) {
sum += seg.modCount;
int c = seg.count;
if (c < 0 || (size += c) < 0)
overflow = true;
}
}
if (sum == last)
break;
last = sum;
}
} finally {
if (retries > RETRIES_BEFORE_LOCK) {
for (int j = 0; j < segments.length; ++j)
segmentAt(segments, j).unlock();
}
}
return overflow ? Integer.MAX_VALUE : size;
}
1 |
|
public class LinkedBlockingQueue
implements BlockingQueue
static class Node
E item;
/**
* 下列三种情况之一
* - 真正的后继节点
* - 自己, 发生在出队时
* - null, 表示是没有后继节点, 是最后了
*/
Node
Node(E x) { item = x; }
}
}
1 |
|
last = last.next = node;
1 |
|
//临时变量h用来指向哨兵
Node
//first用来指向第一个元素
Node
h.next = h; // help GC
//head赋值为first,表示first节点就是下一个哨兵。
head = first;
E x = first.item;
//删除first节点中的数据,表示真正成为了哨兵,第一个元素出队。
first.item = null;
return x;
h = head
1 |
|
first = h.next
1 |
|
h.next = h
1 |
|
head = first
1 |
|
E x = first.item;
first.item = null;
return x;
1 |
|
// 用于 put(阻塞) offer(非阻塞)
private final ReentrantLock putLock = new ReentrantLock();
// 用户 take(阻塞) poll(非阻塞)
private final ReentrantLock takeLock = new ReentrantLock();
1 |
|
public void put(E e) throws InterruptedException {
//LinkedBlockingQueue不支持空元素
if (e == null) throw new NullPointerException();
int c = -1;
Node
final ReentrantLock putLock = this.putLock;
// count 用来维护元素计数
final AtomicInteger count = this.count;
putLock.lockInterruptibly();
try {
// 满了等待
while (count.get() == capacity) {
// 倒过来读就好: 等待 notFull
notFull.await();
}
// 有空位, 入队且计数加一
enqueue(node);
c = count.getAndIncrement();
// 除了自己 put 以外, 队列还有空位, 由自己叫醒其他 put 线程
if (c + 1 < capacity)
notFull.signal();
} finally {
putLock.unlock();
}
// 如果队列中有一个元素, 叫醒 take 线程
if (c == 0)
// 这里调用的是 notEmpty.signal() 而不是 notEmpty.signalAll() 是为了减少竞争
signalNotEmpty();
}
1 |
|
public E take() throws InterruptedException {
E x;
int c = -1;
final AtomicInteger count = this.count;
final ReentrantLock takeLock = this.takeLock;
takeLock.lockInterruptibly();
try {
while (count.get() == 0) {
notEmpty.await();
}
x = dequeue();
c = count.getAndDecrement();
if (c > 1)
notEmpty.signal();
} finally {
takeLock.unlock();
}
// 如果队列中只有一个空位时, 叫醒 put 线程
// 如果有多个线程进行出队, 第一个线程满足 c == capacity, 但后续线程 c < capacity
if (c == capacity)
// 这里调用的是 notFull.signal() 而不是 notFull.signalAll() 是为了减少竞争
signalNotFull()
return x;
}
1 |
|
public boolean add(E e) {
synchronized (lock) {
// 获取旧的数组
Object[] es = getArray();
int len = es.length;
// 拷贝新的数组(这里是比较耗时的操作,但不影响其它读线程)
es = Arrays.copyOf(es, len + 1);
// 在新数组末尾添加元素
es[len] = e;
// 用新数组替换旧数组
setArray(es);
return true;
}
}
1 |
|
public void forEach(Consumer<? super E> action) {
Objects.requireNonNull(action);
for (Object x : getArray()) {
@SuppressWarnings(“unchecked”) E e = (E) x;
action.accept(e);
}
}
1 |
|
CopyOnWriteArrayList
list.add(1);
list.add(2);
list.add(3);
Iterator
new Thread(() -> {
list.remove(0);// 触发复制并替换数组
System.out.println(list);
}).start();
sleep1s();
//此时主线程的iterator依旧指向旧的数组。
while (iter.hasNext()) {
System.out.println(iter.next());// 依旧遍历旧数组
}
结论:
- 读的是旧数据,但**读的行为是安全的**。
- `iter` 拿到的是旧数组的快照。
- 主线程不会报 `ConcurrentModificationException`。
#### 优缺点总结
| 优点 | 说明 |
| -------------------- | -------------------------------------- |
| 读操作无锁,性能高 | 所有读取操作直接读数组 |
| 不会出现并发修改异常 | 不抛 `ConcurrentModificationException` |
| 非阻塞读 | 写不影响读 |
| 简单易用 | 线程安全,不依赖复杂机制 |
| 缺点 | 说明 |
| ------------ | ------------------------ |
| 写操作开销大 | 每次写操作都复制整个数组 |
| 占用内存 | 写频繁时旧数组不容易回收 |
| 一致性弱 | 读取操作读到的不是最新值 |
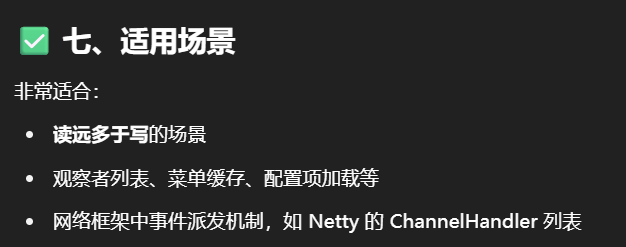
# 下篇完结