1.目标
今天开始我们来学习AIGC中文生图相关功能及技术,在今天的学习内容中主要包含了以下内容:
- Comfyui的认识与安装
- Comfyui的API使用
- Comfyui常用的文生图功能
- Comfyui常用的图生图功能
- Comfyui常用的图片处理功能
- 使用Comfyui开发星图AI软件
总学习目标:
- 通过对AIGC中文生图的技术及知识的学习和掌握,能够应对或满足互联网(自媒体素材)、媒体与广告、娱乐、金融、教育等行业类似业务需求的开发
阶段学习目标:
- 能够熟知StableDIffusion、Comfyui等技术或工具的原理
- 能够使用Comfyui绘制文生图流程
- 能够使用Retrofit封装三方API
- 能够使用Comfyui进行图片精修
- 能够熟练使用Comfyui的API
- 能够熟练使用Ollama的API
- 能够使用API开发出AI绘图工具星图
- 能够理解和应用分布式锁和分布式信号量
- 能够设计和开发复式记账法功能
- 能够理解和运用数据流分析法
- 能够设计和开发双端通信功能
- 能够熟练应用Websocket实现点对点、广播推送
2.Comfyui 入门
1.Comfyui介绍
Comfyui:最强大的、模块化的Stable Diffusion的客户端。https://github.com/comfyanonymous/ComfyUI
主要特点有:
- 通过流程图的方式,来完成Stable Diffusion的出图功能,过程中不需要写代码;
- 完全支持SD1.x、SD2.x、SDXL、SD3.x、Stable Video Diffusion、Stable Audio
- 异步排队系统
- 支持cpu运行、或者在1GB的GPU上运行
- 支持Lora、ControlNet、T2I-Adapter、UnClip等功能
- 支持将工作流保存为json或图片
- 支持windows、linux、mac多平台
2.安装Comfyui
黑马课程中的Comfyui版本过老,我们在Windows中安装别人整合好的Comfyui整合包,直接模型+插件都有
下载整合包 2025年9月秋叶大佬最新Comfyui整合包:ComfyUI-aki-V1.7-史诗级更新 - ComfyUI资源网
环境配置:Comfyui 从0到1环境配置指南(全教程) - ComfyUI资源网
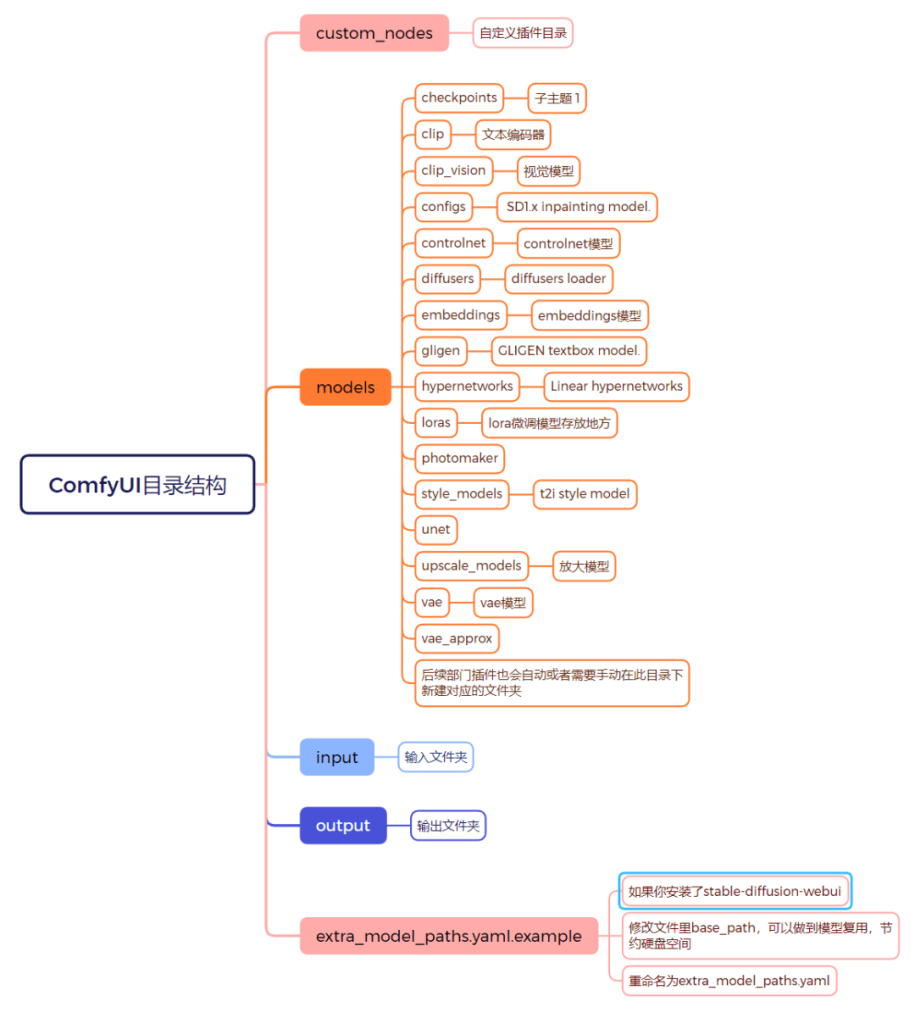
Comfyui目录结构
3.Comfyui入门案例
入门案例我们单独开一篇文章讲解
3.封装Comfyui客户端
为便于在我们程序中通过API来与Comfyui进行通信,我们可以先学习封装相关API,但值得注意的是:这里除封装上一节的API之外,还会封装通过Websocket取监听Comfyui的消息。
1.创建项目
创建一个SpringBoot工程,名称叫star-graph,设置项目JDK为17版本,并按照以下配置进行初始化项目。
设置项目Pom依赖
项目基于SpringBoot3.2版本进行构建,并引入了Redis、Mysql、Hutool、WebSocket等依赖(部分依赖作用后续会讲解)。把一下内容覆盖新建项目的pom.xml内容,然后刷新maven依赖。
1
2
3
4
5
6
7
8
9
10
11
12
13
14
15
16
17
18
19
20
21
22
23
24
25
26
27
28
29
30
31
32
33
34
35
36
37
38
39
40
41
42
43
44
45
46
47
48
49
50
51
52
53
54
55
56
57
58
59
60
61
62
63
64
65
66
67
68
69
70
71
72
73
74
75
76
77
78
79
80
81
82
83
84
85
86
87
88
89
90
91
92
93
94
95
96
97
98
99
100
101
102
103
104
105
106
107
108
109
110
111
112
113
114
115
116
117
118
119
120
121
122
123
124
125
126
127
| <?xml version="1.0" encoding="UTF-8"?>
<project xmlns="http://maven.apache.org/POM/4.0.0"
xmlns:xsi="http://www.w3.org/2001/XMLSchema-instance"
xsi:schemaLocation="http://maven.apache.org/POM/4.0.0 http://maven.apache.org/xsd/maven-4.0.0.xsd">
<modelVersion>4.0.0</modelVersion>
<groupId>cn.itcast</groupId>
<artifactId>star-graph</artifactId>
<version>1.0-SNAPSHOT</version>
<properties>
<maven.compiler.source>17</maven.compiler.source>
<maven.compiler.target>17</maven.compiler.target>
<project.build.sourceEncoding>UTF-8</project.build.sourceEncoding>
<mybatis_plus.version>3.5.7</mybatis_plus.version>
</properties>
<parent>
<groupId>org.springframework.boot</groupId>
<artifactId>spring-boot-starter-parent</artifactId>
<version>3.2.8</version>
</parent>
<dependencies>
<dependency>
<groupId>org.springframework.boot</groupId>
<artifactId>spring-boot-starter-web</artifactId>
</dependency>
<dependency>
<groupId>org.springframework.boot</groupId>
<artifactId>spring-boot-starter-test</artifactId>
</dependency>
<dependency>
<groupId>org.springframework.boot</groupId>
<artifactId>spring-boot-starter-freemarker</artifactId>
</dependency>
<dependency>
<groupId>cn.hutool</groupId>
<artifactId>hutool-all</artifactId>
<version>5.8.28</version>
</dependency>
<dependency>
<groupId>com.alibaba.fastjson2</groupId>
<artifactId>fastjson2</artifactId>
<version>2.0.31</version>
</dependency>
<dependency>
<groupId>org.projectlombok</groupId>
<artifactId>lombok</artifactId>
<scope>annotationProcessor</scope>
</dependency>
<dependency>
<groupId>mysql</groupId>
<artifactId>mysql-connector-java</artifactId>
<version>8.0.33</version>
</dependency>
<dependency>
<groupId>com.baomidou</groupId>
<artifactId>mybatis-plus-boot-starter</artifactId>
<version>${mybatis_plus.version}</version>
</dependency>
<dependency>
<groupId>org.mybatis</groupId>
<artifactId>mybatis-spring</artifactId>
<version>3.0.3</version>
</dependency>
<dependency>
<groupId>org.springframework.boot</groupId>
<artifactId>spring-boot-starter-websocket</artifactId>
</dependency>
<dependency>
<groupId>org.springframework.boot</groupId>
<artifactId>spring-boot-starter-data-redis</artifactId>
</dependency>
<dependency>
<groupId>org.springframework.boot</groupId>
<artifactId>spring-boot-starter-validation</artifactId>
</dependency>
<dependency>
<groupId>com.squareup.retrofit2</groupId>
<artifactId>retrofit</artifactId>
<version>2.11.0</version>
</dependency>
<dependency>
<groupId>com.squareup.retrofit2</groupId>
<artifactId>converter-jackson</artifactId>
<version>2.11.0</version>
</dependency>
<dependency>
<groupId>com.squareup.okhttp3</groupId>
<artifactId>logging-interceptor</artifactId>
<version>4.11.0</version>
</dependency>
<dependency>
<groupId>org.redisson</groupId>
<artifactId>redisson-spring-boot-starter</artifactId>
<version>3.30.0</version>
</dependency>
</dependencies>
<build>
<finalName>star-graph-demo</finalName>
<plugins>
<plugin>
<groupId>org.springframework.boot</groupId>
<artifactId>spring-boot-maven-plugin</artifactId>
</plugin>
</plugins>
</build>
</project>
|
配置项目Yml文件
由于项目依赖了Mysql和Redis,因此还需要再application.yml文件中配置相关的属性信息。
1
2
3
4
5
6
7
8
9
10
11
12
13
14
15
16
17
18
19
20
21
| spring:
datasource:
driver-class-name: com.mysql.cj.jdbc.Driver
url: jdbc:mysql://192.168.100.129:3306/star_graph?useUnicode=true&characterEncoding=utf-8&useSSL=false&serverTimezone=UTC&allowPublicKeyRetrieval=true
username: root
password: 87sdhf298TYUUIz2!
data:
redis:
host: 192.168.100.129
port: 6379
mybatis-plus:
configuration:
log-impl: org.apache.ibatis.logging.stdout.StdOutImpl
global-config:
db-config:
table-prefix: sg_
logging:
level:
root: info
|
创建启动类并启动测试
最后新建一个启动类,并运行该启动类,如果启动过程未出现错误,则项目创建成功。
1
2
3
4
5
6
7
8
9
10
11
12
13
| package cn.itcast.star.graph;
import org.springframework.boot.SpringApplication;
import org.springframework.boot.autoconfigure.SpringBootApplication;
@SpringBootApplication
public class StarGraphApp {
public static void main(String[] args) {
SpringApplication.run(StarGraphApp.class, args);
}
}
|
2.Retrofit客户端
创建好项目之后,接下来我们就要通过程序去访问Comfyui的接口,那么通过之前我们的学习,要在程序中去访问接口,势必要用到Http客户端(完全使用Java代码来实现了Http或者Https协议的三方库),而在Java开源领域有三大Http客户端可供我们选用:
- OkHttp——Square公司——性能最好
- HttpUrlConnection——JDK——性能最差
- HttpClient——Apache
而在企业开发中,开发者不会直接使用这些Http客户端,而是选用这些客户端的封装框架,目前比较好用的封装框架有:
- Retrofit——封装OkHttp
- Huttol——封装HttpUrlConnection
- RestTemplate封装了三个客户端
虽然上述3个框架都大大的封装和简化了Http客户端的使用API,但是在此还是要重点介绍一下Retrofit。
Retrofit介绍
官网:https://square.github.io/retrofit/
Retrofit基于OkHttp开发的、类型安全的Android或Java Http框架。再此我们选用Retrofit框架的重点理由是它基于OkHttp封装,性能好,同时它融入了流行的声明式(PS:只需要定义,不需要实现)开发思想,便于我们开发和学习。
Retrofit入门
在Retrofit中要实现一个Http请求总体来说共有以下2个步骤:
声明API
我们可以先创建一个接口类:cn.itcast.star.graph.comfyui.client.api.ComfyuiApi,并按如下代码进行编写:
1
2
3
4
5
6
7
8
9
10
11
12
13
14
15
16
17
| package cn.itcast.star.graph.comfyui.client.api;
import retrofit2.Call;
import retrofit2.http.GET;
import java.util.HashMap;
public interface ComfyuiApi {
@GET("/system_stats")
Call<HashMap> getSystemStats();
}
|
使用Retrofit来声明API,其实就是声明接口方法,比如上述类中定义了一个方法getSystemStats:
生效API
上面声明类要生效,我们还需要配置生效,可创建一个配置类:cn.itcast.star.graph.comfyui.client.config.ComfyuiConfig
1
2
3
4
5
6
7
8
9
10
11
12
13
14
15
16
17
18
19
20
21
22
23
24
| package cn.itcast.star.graph.comfyui.client.config;
import cn.itcast.star.graph.comfyui.client.api.ComfyuiApi;
import org.springframework.context.annotation.Bean;
import org.springframework.context.annotation.Configuration;
import retrofit2.Retrofit;
import retrofit2.converter.jackson.JacksonConverterFactory;
import java.io.IOException;
@Configuration
public class ComfyuiConfig {
@Bean
public ComfyuiApi comfyuiApi() throws IOException {
Retrofit retrofit = new Retrofit.Builder()
.baseUrl("http://192.168.100.129:8188")
.addConverterFactory(JacksonConverterFactory.create())
.build();
ComfyuiApi comfyuiApi = retrofit.create(ComfyuiApi.class);
return comfyuiApi;
}
}
|
在类中:
- 首先通过Retrofit.Builder构建一个Retrofit客户端
- 通过baseUrl指定请求的服务器地址
- 通过addConverterFactory指定请求数据的转换器
- 最后调用 retrofit.create方法创建ComfyuiApi接口的实现
通过上述代码,在Spring IOC中就是声明好了一个可以远程调用获取Comfyui服务器状态的Bean.
测试API
在测试包下创建类:cn.itcast.star.graph.ComfyuiApiTest
1
2
3
4
5
6
7
8
9
10
11
12
13
14
15
16
17
18
19
| package cn.itcast.star.graph;
import cn.itcast.star.graph.comfyui.client.api.ComfyuiApi;
import org.junit.jupiter.api.Test;
import org.springframework.beans.factory.annotation.Autowired;
import org.springframework.boot.test.context.SpringBootTest;
@SpringBootTest
public class ComfyuiApiTest {
@Autowired
ComfyuiApi comfyuiApi;
@Test
public void test() throws Exception {
System.out.println(comfyuiApi.getSystemStats().execute().body());
}
}
|
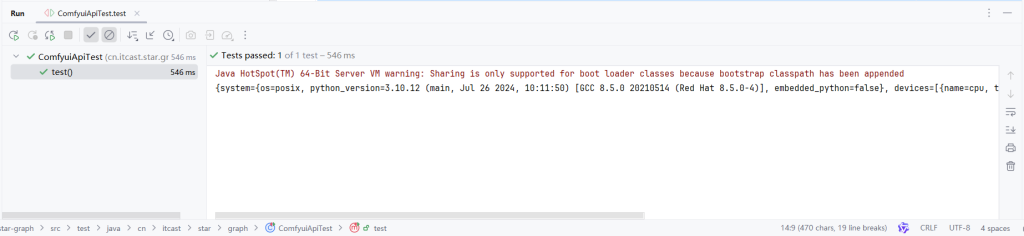
在类中,直接注入ComfyuiApi,并调用getSystemStats(),即可发起请求并打印出结果:
开启日志
Retrofit还提供了打印日志的功能,方便我们进行BUG的排错。Retrofit日志功能默认是关闭的,可以通过以下代码进行开启:
1
2
3
4
5
6
7
8
9
10
11
12
13
14
15
16
17
18
19
| @Bean
public ComfyuiApi comfyuiApi() throws IOException {
HttpLoggingInterceptor loggingInterceptor = new HttpLoggingInterceptor();
loggingInterceptor.setLevel(HttpLoggingInterceptor.Level.BODY);
OkHttpClient okHttpClient = new OkHttpClient.Builder()
.addInterceptor(loggingInterceptor)
.retryOnConnectionFailure(true)
.connectTimeout(30, TimeUnit.SECONDS)
.build();
Retrofit retrofit = new Retrofit.Builder()
.baseUrl("http://192.168.100.129:8188")
.client(okHttpClient)
.addConverterFactory(JacksonConverterFactory.create())
.build();
ComfyuiApi comfyuiApi = retrofit.create(ComfyuiApi.class);
return comfyuiApi;
}
|
我们之前提供过Retrofit框架底层是通过OkHttp实现,Retrofit的日志功能也是交由底层OkHttp实现:
- 由于要重新设置OkHttp,因此代码中自行构建了OkHttpClient
- 给OkHttpClient增加了日志拦截器HttpLoggingInterceptor,并设置拦截器的日志级别为BODY
- NONE:不输出
- BASIC:输出基本摘要
- HEADERS:输出头信息
- BODY:输出body数据
- 最后第14行通过client方法,重新设定Retrofit底层使用的OkHttp客户端
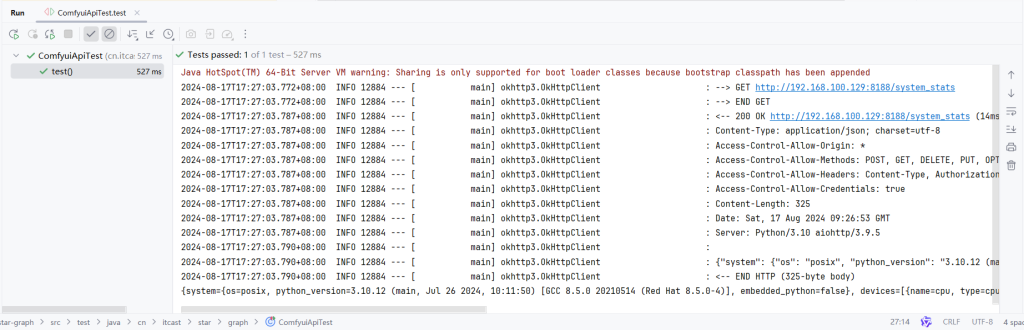
按上述代码进行修改后,重新运行ComfyuiApiTest类,即可在控制台看见相关的日志输出:
3.导入Comfyui封装的代码
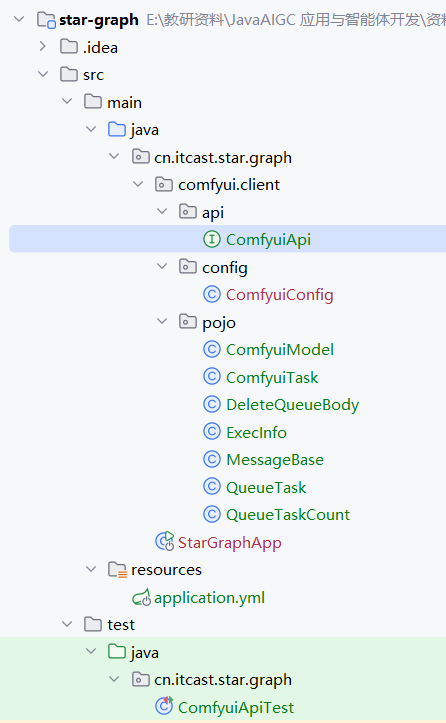
通过Retrofit入门学习,可以看出使用Retrofit来定义一个API接口非常简单;那么对于Comfyui的其它接口,同学们也可以自行定义实现,或者直接导入资料文件下《Comfyui—API封装代码》文件夹下的代码,直接复制到cn.itcast.star.graph.comfyui.client包下,复制后的项目目录结构为:
然后我们打开Comfyui的代码,查看已经定义好的:
1
2
3
4
5
6
7
8
9
10
11
12
13
14
15
16
17
18
19
20
21
22
23
24
25
26
27
28
29
30
31
32
33
34
35
36
37
38
39
40
41
42
43
44
45
46
47
48
49
50
51
52
53
54
55
56
57
58
59
60
61
62
63
64
65
66
67
68
69
70
71
72
73
74
75
76
77
78
79
80
81
82
83
84
85
86
87
88
89
90
91
92
93
94
95
96
97
98
99
100
101
102
103
104
105
106
107
| package cn.itcast.star.graph.comfyui.client.api;
import cn.itcast.star.graph.comfyui.client.pojo.DeleteQueueBody;
import cn.itcast.star.graph.comfyui.client.pojo.QueueTask;
import cn.itcast.star.graph.comfyui.client.pojo.QueueTaskCount;
import okhttp3.MultipartBody;
import okhttp3.RequestBody;
import okhttp3.ResponseBody;
import retrofit2.Call;
import retrofit2.http.*;
import java.util.HashMap;
public interface ComfyuiApi {
@GET("/history")
Call<HashMap> getHistoryTasks(@Query("max_items") int maxItems);
@GET("/view")
Call<ResponseBody> getView(@Query("filename") String filename, @Query("type") String type, @Query("subfolder") String subfolder);
@GET("/system_stats")
Call<HashMap> getSystemStats();
@GET("/object_info/{nodeName}")
Call<HashMap> getNodeInfo(@Path("nodeName") String nodeName);
@GET("/interrupt")
Call<HashMap> interruptTask();
@GET("/queue")
Call<HashMap> getQueueTasks();
@POST("/queue")
Call<HashMap> deleteQueueTasks(@Body DeleteQueueBody body);
@GET("/prompt")
Call<QueueTaskCount> getQueueTaskCount();
@POST("/prompt")
Call<HashMap> addQueueTask(@Body ComfyuiRequestDto body);
@Multipart
@POST("/upload/image")
Call<HashMap> uploadImage(@Part MultipartBody.Part image);
@Multipart
@POST("/upload/mask")
Call<HashMap> uploadMask(@Part MultipartBody.Part image,@Part("type") RequestBody type,@Part("subfolder") RequestBody subfolder,@Part("original_ref") RequestBody originalRef);
@GET("/history/{promptId}")
Call<HashMap> getHistoryTask(@Path("promptId") String promptId);
}
|
在代码中声明了Comfyui的全部API,且声明时还使用到一些新注解,可解释为:
- @Query:用来声明http查询部分的参数,与@RequestParam类似
- @Body:用于声明请求体对象,与@RequestBody类似
- @Multipart:用于说明当前请求以表单形式发起,常常用于带有文件的接口
- 如果是文件字段需要使用 MultipartBody.Part
- 如果是非文件字段需要使用 RequestBody
- @Part:用于说明一个表单字段
- @Path:用于说明请求路径参数,与@PathVariable类似
4.封装Comfyui的事件客户端
Comfyui除了提供API接口之外,还提供了Webcoket服务,通过Webcoket可以接受Comfyui在生图过程中的系列事件,而这些事件常常是业务开发过程中需要用到的,比如图片生产进度事件,应用后端需要监听Comfyui获取进度消息,然后再把消息推送给应用前端,这样应用前端即可同步显示进度。
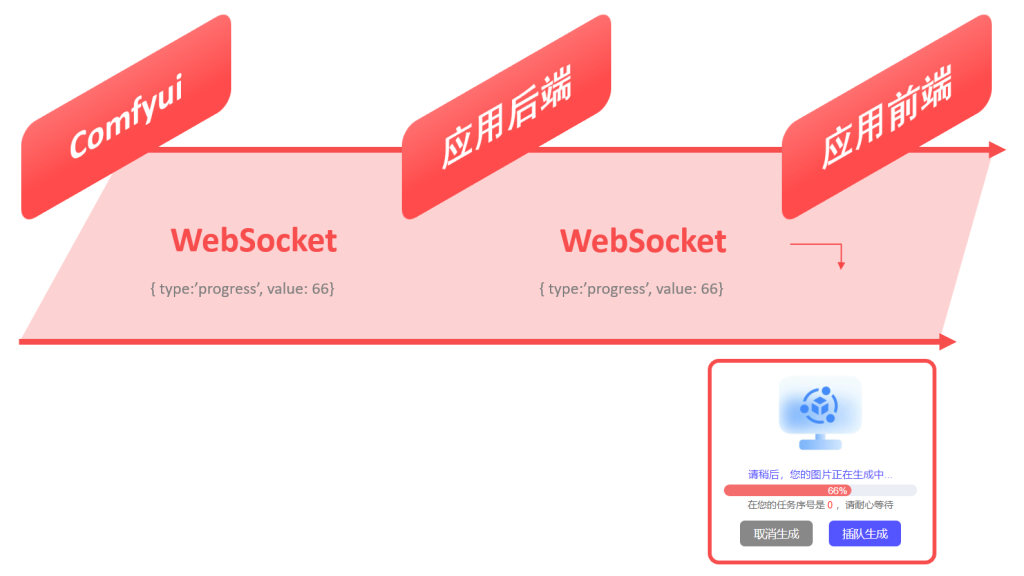
在上图中,应用后端即是WS客户端也是服务端:
- 应用后端是WebSocket的客户端,用于接受Comfyui广播的消息
- 应用后端也是WebSocket的服务端,用于给应用前端推送消息
在这里我们先关注应用后端作为Comfyui客户端的情况,如果监听和接收Comfyui的消息。而要实现这一功能,我们可以参考以下步骤进行实现:
- 继承实现TextWebSocketHandler类,当收到消息时,调用该类。
- 提供一个WebSocketConnectionManager连接管理器,并启动。
1.实现消息处理类
创建类cn.itcast.star.graph.comfyui.client.handler.ComfyuiMessageHandler,并参考以下代码进行实现:
1
2
3
4
5
6
7
8
9
10
11
12
13
14
15
16
17
18
19
| package cn.itcast.star.graph.comfyui.client.handler;
import org.springframework.web.socket.TextMessage;
import org.springframework.web.socket.WebSocketSession;
import org.springframework.web.socket.handler.TextWebSocketHandler;
public class ComfyuiMessageHandler extends TextWebSocketHandler {
@Override
public void afterConnectionEstablished(WebSocketSession session) throws Exception {
System.out.println("=============连接成功");
}
@Override
protected void handleTextMessage(WebSocketSession session, TextMessage message) throws Exception {
System.out.println("=============收到消息:"+message.getPayload());
}
}
|
代码说明:
- TextWebSocketHandler类是Spring提供的一个文本消息处理类,它实现了WebSocketHandler接口
- 当连接成功服务器之后会调用afterConnectionEstablished方法
- 当接收到服务器推送的消息之后,会调用handleTextMessage方法
2.实现连接管理器
连接管理器是一个Bean,我们可以直接在cn.itcast.star.graph.comfyui.client.config.ComfyuiConfig配置类中进行补充:
1
2
3
4
5
6
7
8
9
10
11
12
13
| @Bean
public ComfyuiMessageHandler comfyuiMessageHandler(){
return new ComfyuiMessageHandler();
}
@Bean
public WebSocketConnectionManager webSocketConnectionManager(ComfyuiMessageHandler comfyuiMessageHandler) {
WebSocketClient client = new StandardWebSocketClient();
String url = "ws://192.168.100.129:8188/ws?clientId=star-graph";
WebSocketConnectionManager manager = new WebSocketConnectionManager(client,comfyuiMessageHandler,url);
manager.start();
return manager;
}
|
代码说明:
- 首先把消息处理ComfyuiMessageHandler类注册成Bean
- 接着注册连接管理器Bean
- 由于第10行要用到WebSocketClient、url,因此第8、9行先进行了定义
- 第10行直接通过new构造一个连接管理器
- 第11行通过start方法立即提供连接管理器(即立即去连接Url地址指定的服务器)
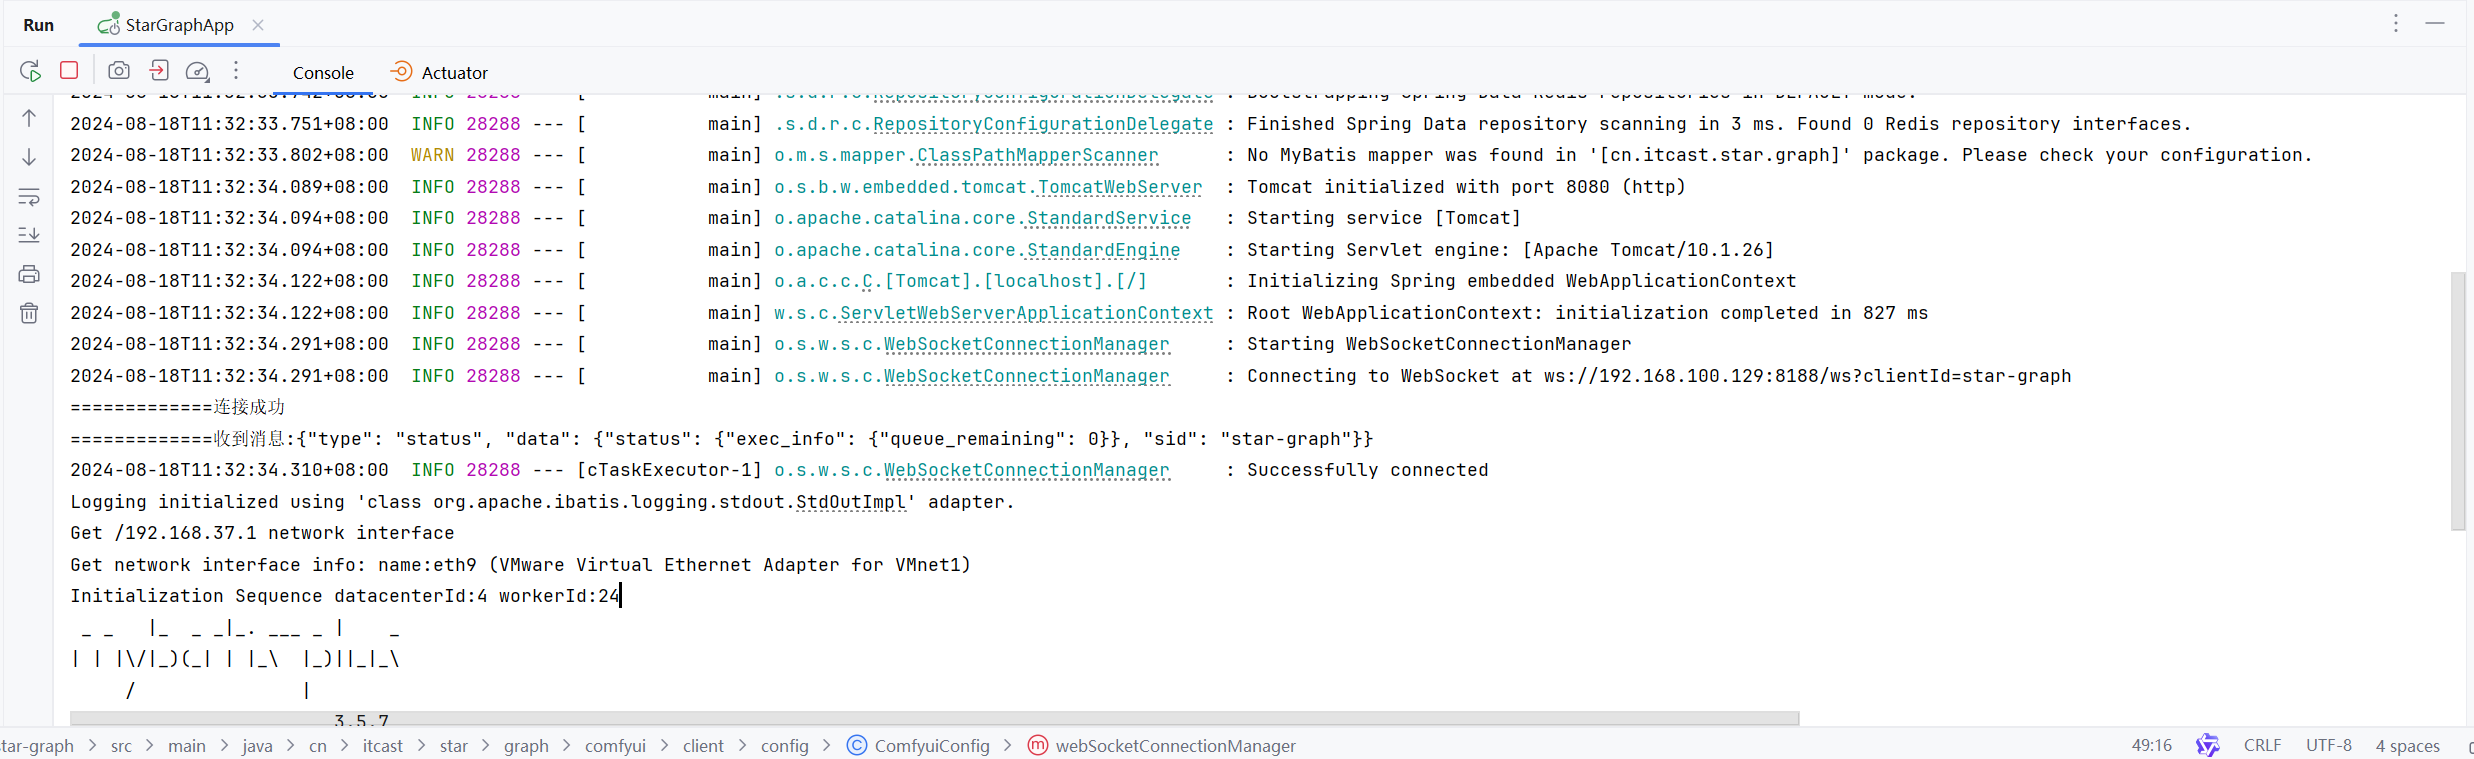
测试事件客户端
上述两步代码实现完整之后,则我们的应该后端就能去监听和接收Comfyui的消息了,我们直接启动服务,然后在控制台能看见打印的如下信息,则成功。
Comfyui推送消息内容及格式
Comfyui通过websocket推送的消息类型及格式如下,再次可以先了解一些,便于后续我们查询和使用。
status:队列状态变更消息
1
| {"type": "status", "data": {"status": {"exec_info": {"queue_remaining": 1}}}}
|
progress:生图处理步骤
1
| {"type": "progress", "data": {"value": 5, "max": 20, "prompt_id": "594ac476-e599-47c1-a99f-bf8a384cfcdb", "node": "4"}}
|
executing:某个节点开始执行
1
| {"type": "executing", "data": {"node": "4"}}
|
executed:生图结果
1
| {"type": "executed", "data": {"node": "9", "output": {"images": [{"filename": "ComfyUI_00239_.png", "subfolder": "", "type": "output"}, {"filename": "ComfyUI_00240_.png", "subfolder": "", "type": "output"}]}, "prompt_id": "c4fba48d-1605-4e94-aabd-a37211204c2f"}}
|
execution_start:任务开始执行事件
1
| xxxxxxxxxx {"type": "execution_start", "data": {"prompt_id": "c25e865d-2307-4482-ac2d-fef2c2993688"}}
|
execution_error:
1
| {"type": "execution_error", "data": {"node_id": "1", "node_type":"","exception_message":"异常信息"}}
|
execution_success:执行成功消息
1
| {"type": "execution_success", "data": {"prompt_id": "594ac476-e599-47c1-a99f-bf8a384cfcdb", "timestamp": 1723966039722}}
|
总结
Comfyui完结