前言
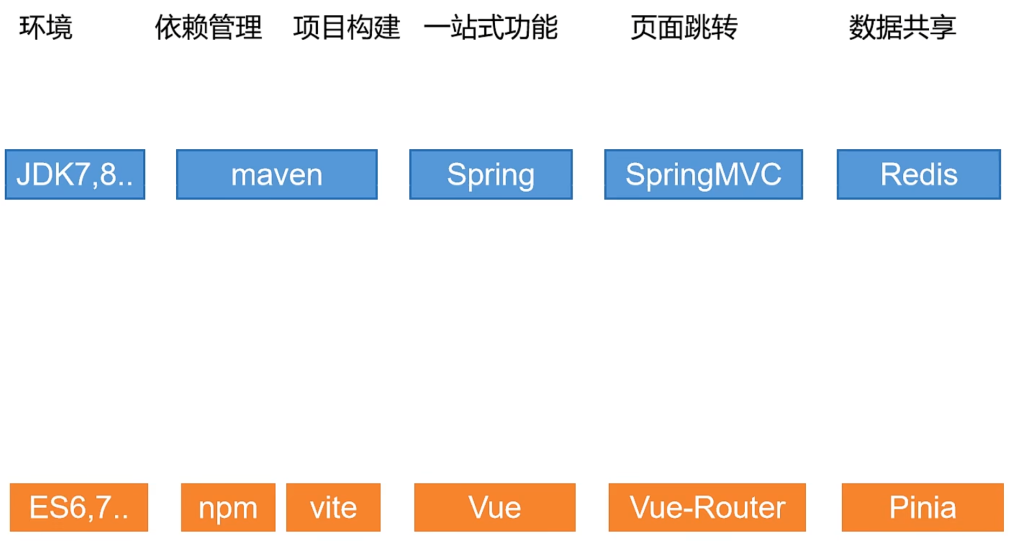
前端工程化与后端工程化的对应关系如图
1.ES6部分
let和const
let 和 const 是在ES6中引入的两个新的变量声明关键字,它们为 JavaScript 的变量声明和作用域管理带来了重要的改进。
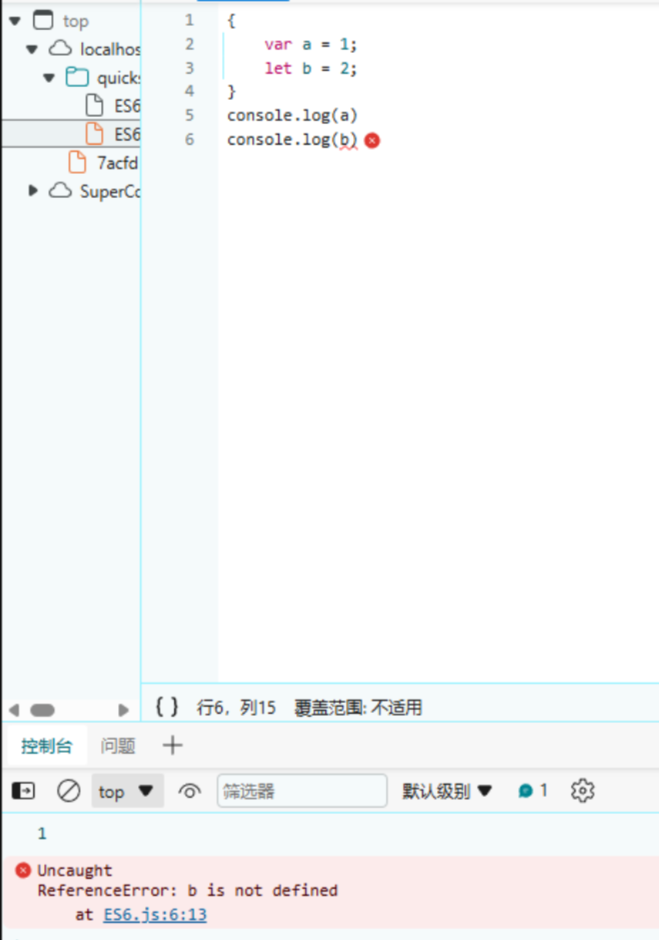
在此之前还有一个关键字可以声明变量,那就是var
可能大家也听说过,能用var的地方都可以使用let进行替代. 至于为什么,是因为使用var会出现以下几个问题:
1.越域
a和b都是在代码块中定义的,但是a越出了代码块,所以在使用时可能会出现一些问题
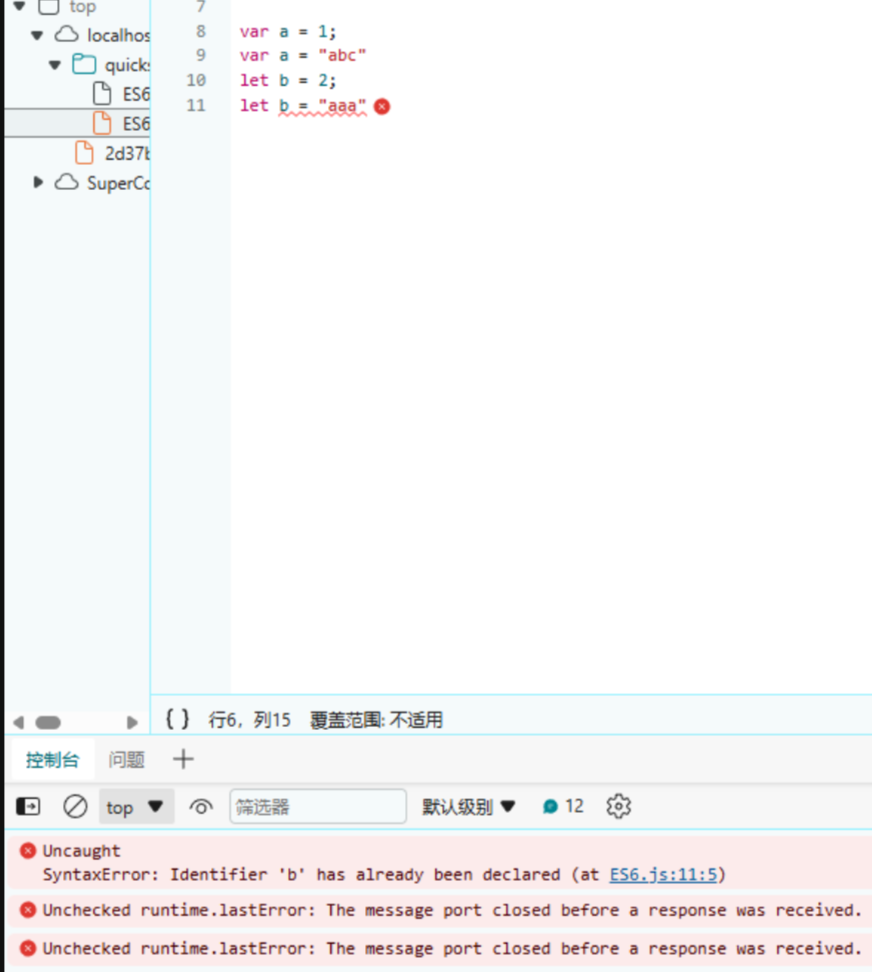
2.重复声明
用var声明变量时,可以对同一个变量重复声明,而使用let不行,只允许声明一次
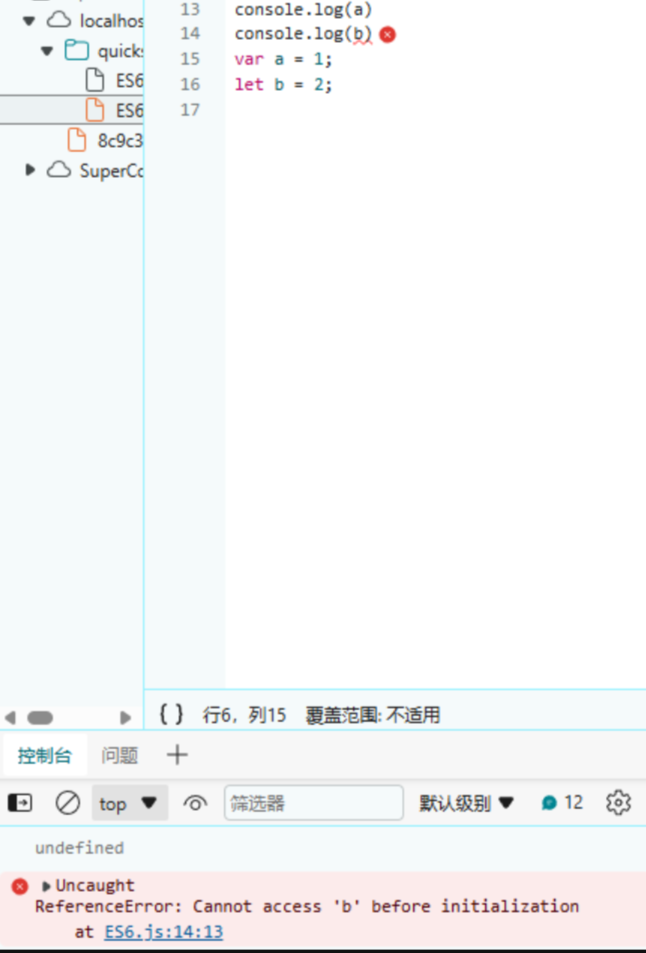
3.变量提升
在Java中是使用变量是要先声明变量的,与let相同.但是使用var声明变量时则可以不先声明就可以使用. 而let则不行
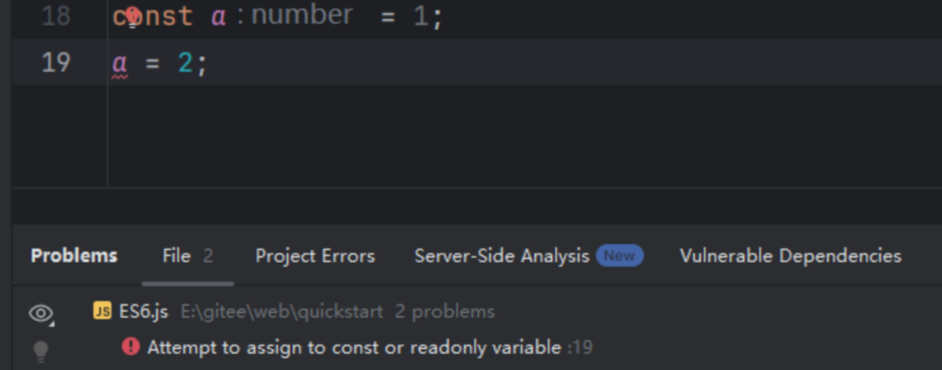
const修饰的变量是不允许修改的,可以看到这里就直接报错了
2.解构
解构允许你将数组或对象的属性直接赋值给不同的变量。
这里的解构分为数组结构和对象结构
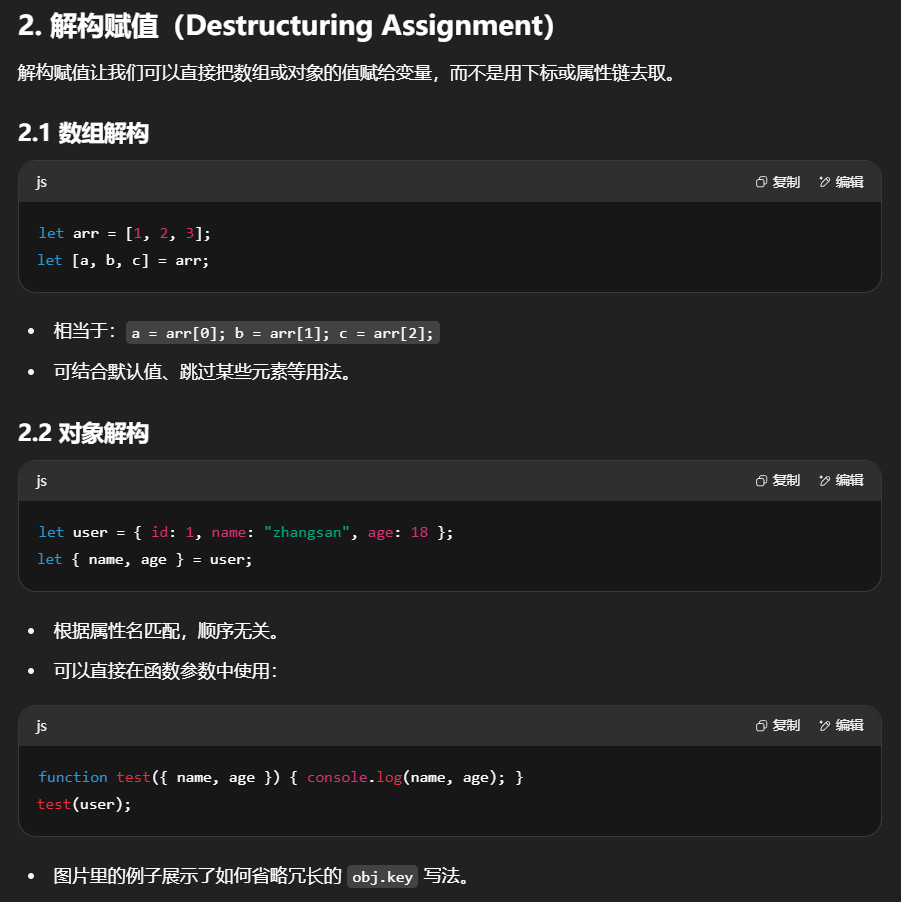
1.数组解构:能够将数组中的元素直接分配给独立的变量。
1
2
3
4
5
6
7
8
9
| let arr = [1, 2, 3];
console.log(arr[0])
console.log(arr[1])
console.log(arr[2])
let [a, b, c] = arr;
console.log(a)
console.log(b)
console.log(c)
|
一般我们在取数组中的元素时,都是按照下标来取. 数组解构是将数组 [1, 2, 3] 的元素分别被解构赋值给变量 a, b, 和 c。
2.对象解构:将对象的属性值直接赋给同名的变量。
1
2
3
4
5
6
7
8
9
10
11
12
13
14
15
16
17
18
19
20
| let user = {
id: 1,
name: zhansgan,
age: 18
}
console.log(user.id)
console.log(user.name)
console.log(user.age)
let {name, age} = user
console.log(name)
console.log(age)
// 还能用在方法上
function test({name, age}) {
console.log(name)
console.log(age)
}
test(user)
|
解构赋值不仅限于简单变量,它也可以用于函数参数,使得函数能更简洁地接收和使用数组或对象类型的参数,提高了代码的清晰度和效率。
3.链判断
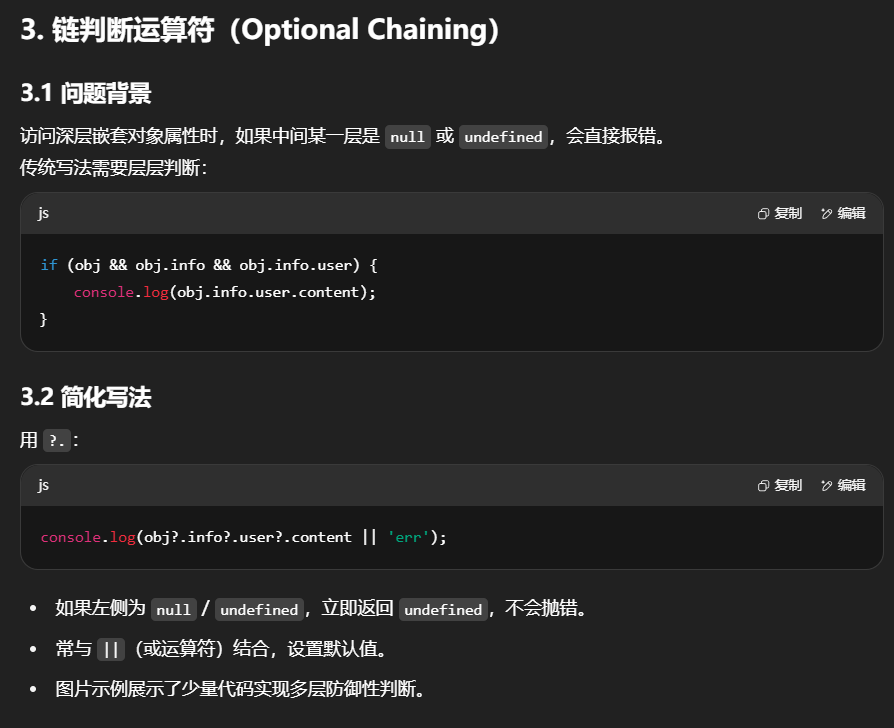
链判断运算符(也称为可选链操作符)是ECMAScript 2020(ES2020)中引入的一个新特性,其符号表示为?.。这个运算符主要用于安全地访问深层嵌套的属性或方法,而无需担心中间某个环节为null或undefined时导致的错误。
在没有链判断运算符的情况下,访问深层属性通常需要先检查每一级是否为null或undefined,以避免抛出错误。例如:
1
2
3
4
5
6
| // 如果想要获取obj.info.user.content
if (obj && obj.info && obj.info.user) {
console.log(obj.info.user.content);
} else {
console.log('err');
}
|
可以看到对每一层进行非空检查,会十分麻烦.
而使用链判断运算符则可以很好的简化
1
| console.log(obj?.info?.user?.content || 'err');
|
上面这一行代码就是对前面四行代码的简化.
?.运算符会在尝试访问属性前检查左侧的操作数是否为null或undefined。如果是,则立即停止评估并返回undefined,而不是继续执行并抛出错误。这在处理可能缺失的属性路径时非常有用,尤其是在处理外部API返回的数据或是可选配置对象时。

4.参数默认值
参数默认值允许你在定义函数时为参数指定一个默认的值。如果函数被调用时没有为该参数提供值或者提供的值是undefined,那么该参数就会使用其默认值。
在JavaScript中,可以直接在函数参数定义时通过= value来指定默认值:
1
2
3
4
5
6
| function hello(name = 'World') {
console.log(`Hello, ${name}!`);
}
hello();
hello('abc');
|
![img]()
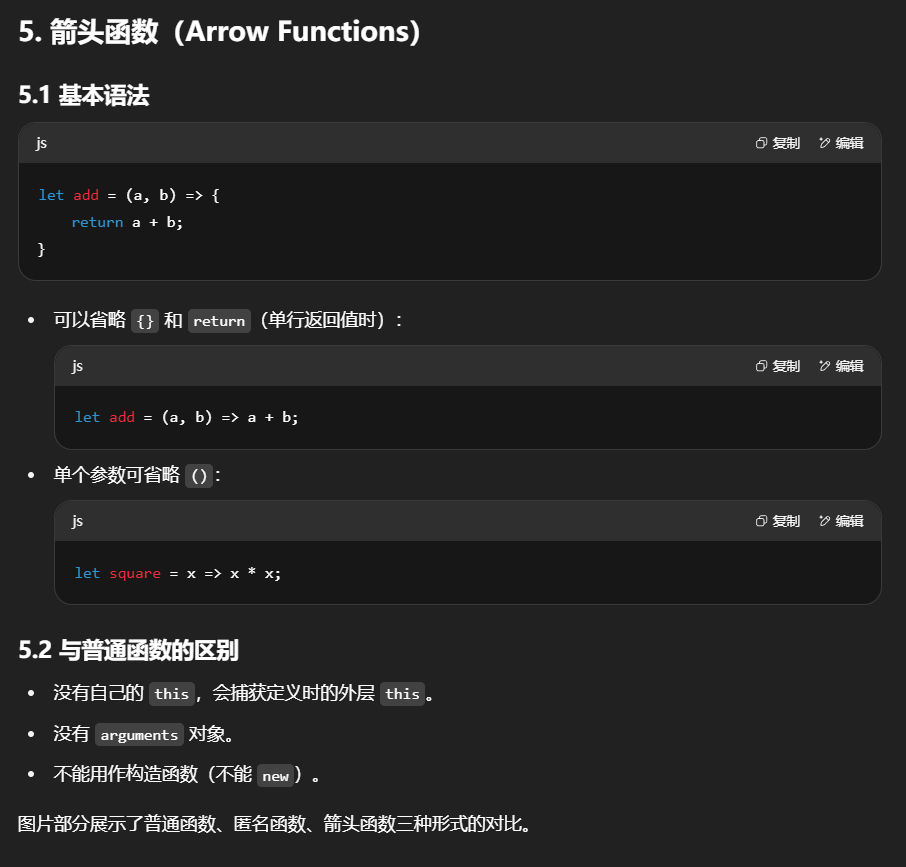
5.箭头函数
箭头函数是一种更简化的函数表达式书写方式,它使用=>符号定义。它类似于Java中的lambda表达式
一般情况下创建方法的两种方式:
1
2
3
4
5
6
7
| function add(a, b) {
console.log(a + b);
}
let add1 = function add(a, b) {
console.log(a + b);
}
|
使用箭头函数创建
1
2
3
| let add2 = (a, b) => {
console.log(a + b);
}
|
简单来说就是把function删除掉,在参数列表后面加 =>
如果函数体内部只有一句话,也可以省略{}
1
| let add2 = (a, b) => console.log(a + b);
|
如果函数只有参数,可以省略()
1
2
| let func1 = num => console.log(num)
func1(1)
|
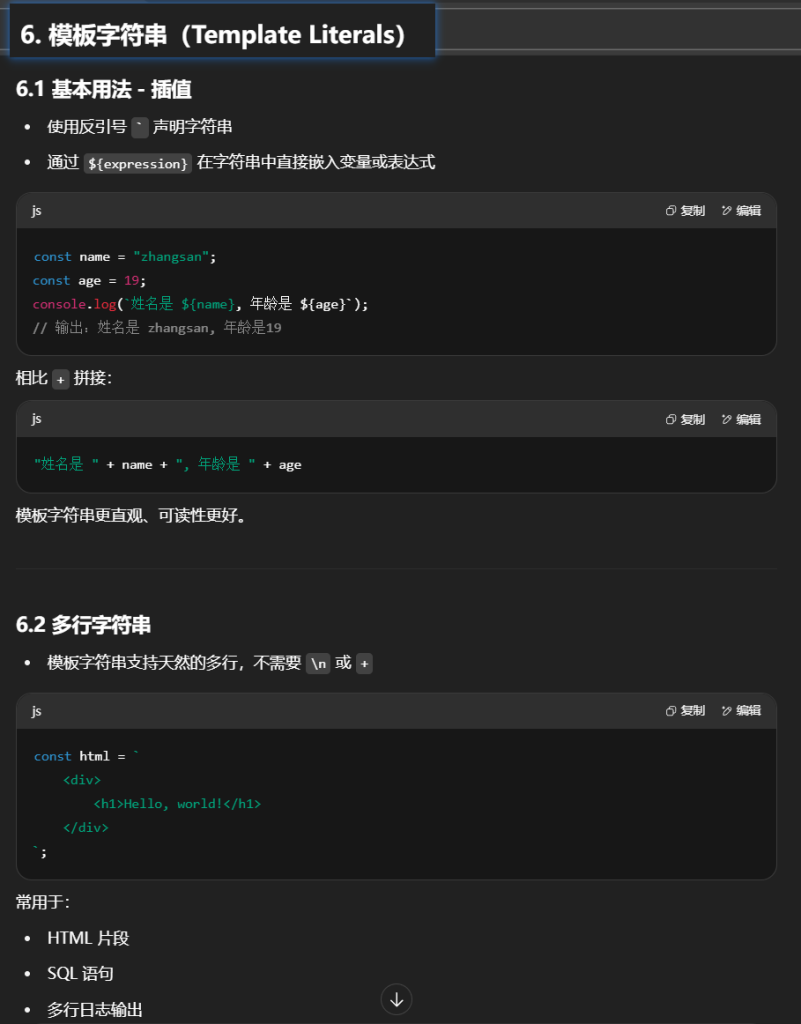
6.模板字符串
ES6引入了模板字符串,这是一种增强型的字符串字面量表示法,使用**反引号`**来界定字符串。
模板字符串最常见的用法就是插值.
插值(Interpolation):通过${expression}语法,可以在字符串中嵌入表达式。表达式将在运行时求值,并将其转换为字符串形式插入到最终的字符串中。这使得字符串拼接变得简单且易读。
1
2
3
4
| const name = "zhangsan"
const age = 19
console.log(`姓名是 ${name}, 年龄是${age}`)
|
除此之外,还有两个不常用的用法.
多行字符串:模板字符串允许你在字符串中直接编写多行文本,无需使用转义字符,这使得编写HTML片段、SQL语句或者任何需要跨越多行的文本变得更加自然。
1
2
3
4
5
| const html = `
<div>
<h1>Hello, world!</h1>
</div>
`;
|
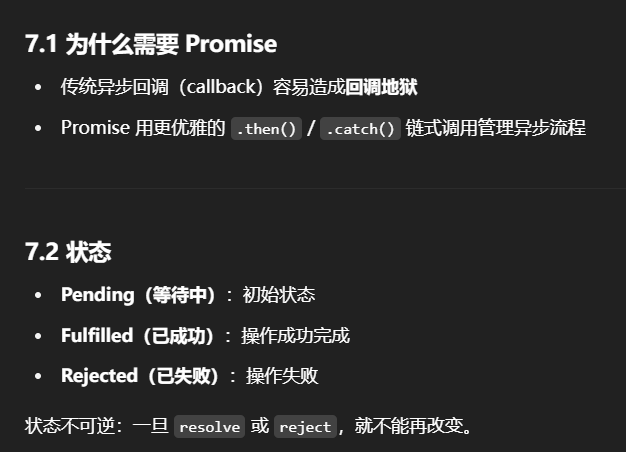
7.Promise
ES6引入了Promise对象,Promise代表异步对象

异步操作: 在实际开发中,我们往往要发送网络请求,如果是同步操作,就会等待网络请求完成.但如果网络请求很慢,就会阻塞后面代码的执行. 而异步操作则不会阻塞,发送网络请求完成后,依旧会执行后面代码,等网络请求成功后再进行处理
Promise 有三种状态:
- Pending(等待中):初始状态,既没有被兑现,也没有被拒绝。
- Fulfilled(已成功):表示操作成功完成,此时Promise变为resolved状态,并携带一个成功的结果值。
- Rejected(已失败):表示操作失败,Promise变为rejected状态,并携带一个失败的原因。
创建Promise
1
2
3
4
5
6
7
8
9
10
| const promise = new Promise((resolve, reject) => {
setTimeout(() => {
if () {
resolve('操作成功后的操作');
} else {
reject('操作失败的原因');
}
}, 2000);
});
|
消费Promise
- then():用于处理成功的场景,可以链式调用。
- catch():用于处理失败的场景。
- finally():无论Promise成功还是失败,都会执行的回调,常用于清理资源。
1
2
3
4
| promise
.then(result => console.log('成功:', result))
.catch(error => console.error('失败:', error))
.finally(() => console.log('无论成功还是失败,都会执行'));
|
8.Async函数
Async/Await是ES2017中引入的一个非常重要的特性,它建立在Promise的基础上,提供了更简洁、更易读的方式来处理异步操作。
- 用于声明异步函数
- 异步函数总是返回 Promise
return 的值会被自动包裹成 Promise.resolve(),抛出的异常会变成 Promise.reject()
async:是一个关键字,用于声明一个异步函数。异步函数总是返回一个Promise。
1
2
3
4
5
6
7
8
9
10
11
12
| async function func() {
let x = 101;
if (x % 2 === 0) {
return x;
} else {
throw new Error("x不是偶数");
}
}
func()
.then(data => console.log("then", data))
.catch(err => console.log("catch", err))
|
因为返回的是Promise对象,因为可以使用对应的then,catch方法.
有一点需要注意,catch方法是处理失败的场景.如果想要让catch进行处理,就需要在业务代码中抛出异常
9.Await关键字
await:只能在async函数内部使用,用来等待Promise的结果,它会使代码暂停执行,直到Promise解析完成(resolve或reject),然后继续执行并返回Promise的结果。
- 只能在 async 函数内部使用
- 会等待 Promise 完成,拿到结果再继续执行
- 让异步代码像同步代码一样写
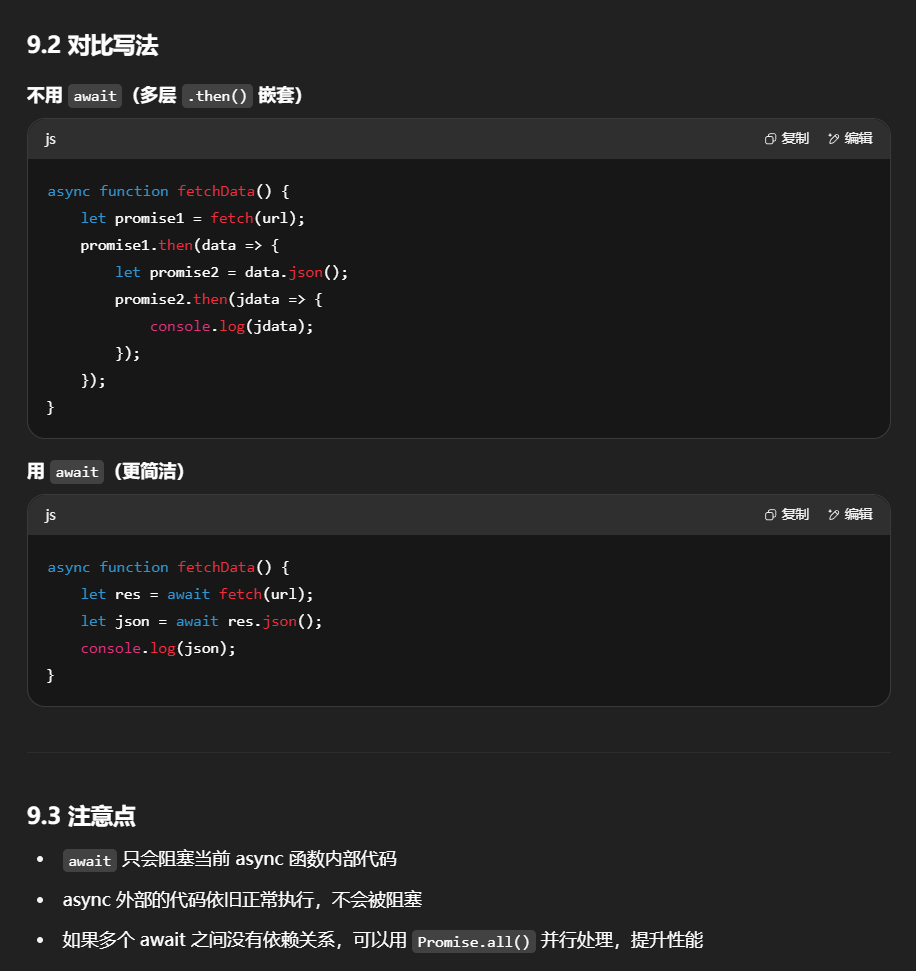
在不使用await关键字时,要获取Promise对象里的数据,要用到.then方法,还要用到箭头函数.如果在.then方法中处理数据又有Promise对象,就需要再使用.then方法,就会非常麻烦且代码可读性不好.
1
2
3
4
5
6
7
8
9
10
| async function fetchData() {
let promise1 = fetch(url)
promise1.then(data => {
let promise2 = data.json()
promise2.then(jdata => {
console.log(jdata)
})
})
}
fetchData()
|
使用await关键字可以简单代码如下:
1
2
3
4
5
6
7
| async function fetchData() {
let promise1 = await fetch(url);
let promise2 = await promise1.json();
console.log(promise2)
}
fetchData();
|

基本用法:最基础的fetch调用非常简单,只需要传入URL作为参数
返回值:fetch返回的是一个Promise,它会根据HTTP响应的状态来解析为一个Response对象。从Response对象中,你可以进一步提取数据,比如使用.json()、.text()等方法。
⭐需要注意:async修饰的方法仍然是异步的,await只是在这个方法内做了暂停等待,等待期间async以外的代码依然继续执行,当await结束后async方法内部的代码继续执行
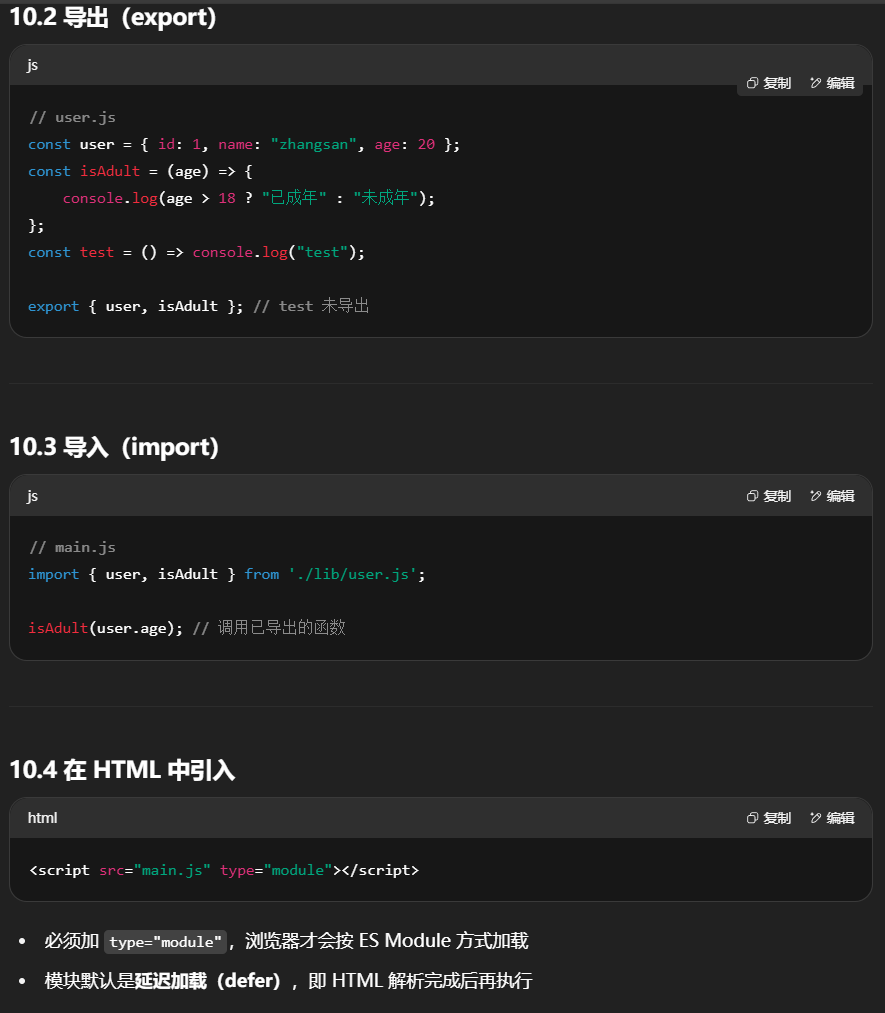
10.模块化
- 将代码按功能拆分为独立模块(类似 Java 的包 / 类)
- 模块之间通过
import / export 共享功能
模块化是软件开发中的一个重要概念,它涉及到将复杂的程序分解为多个相互独立、功能单一的模块。
ES6正式引入了原生的模块系统,它使用import和export关键字来定义和使用模块。
在Java中,我们在开发中,通常会将用到的mapper,service,controller,实体类等创建在对应的包下面.如果我要在controller中使用到实体类对象,就需要import导入对应的实体类.js也是如此
Java中可以使用访问控制修饰符保护对类、变量、方法和构造方法的访问,但是js中没有访问控制修饰符这一概念,但可以使用export关键字来实现.
例如:我在lib目录下创建user.js 用于定义user相关的属性和方法,使用export关键字导出单个或多个函数、对象、类等。
1
2
3
4
5
6
7
8
9
10
11
12
13
14
15
16
| const user = {
id: 1,
name: "zhangsan",
age: 20
}
const isAdult = (age) => {
if (age > 18) {
console.log("已成年")
} else {
console.log("未成年")
}
}
const test = () => console.log("test")
export {user, isAdult}
|
在main.js中进行导入调用
1
2
3
4
5
| import {user, isAdult} from 'lib/user'
isAdult(user.age)
// test(); 这个方法并没有导出,因此也没法导入使用
|
在html页面中导入js时,还需要使用type="module"
1
| <script src="main.js" type="module"></script>
|
通过type=“module”,浏览器能够识别这些语句并正确地解析模块间的依赖关系,按照正确的顺序加载它们。
特点
- 静态分析:
import 必须在模块顶层,不能写在函数里
- 严格模式:模块内默认启用 strict mode
- 单例模式:同一模块在多处导入时,执行一次并缓存结果
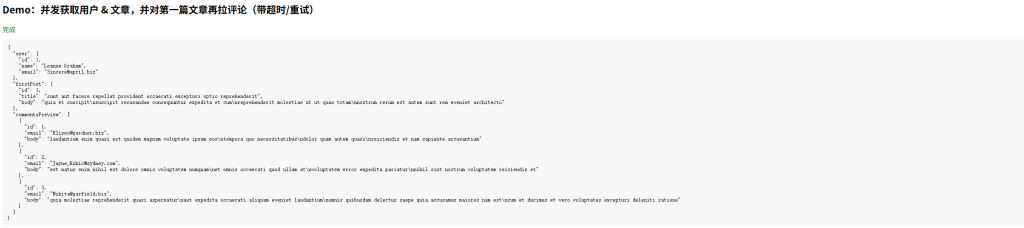
11.Promise + async/await + fetch 实战案例
示例使用公开测试 API(jsonplaceholder.typicode.com)
1
2
3
4
5
6
7
8
9
10
11
12
13
14
15
16
17
18
19
20
21
22
23
24
25
26
27
28
29
30
31
32
33
34
35
36
37
38
39
40
41
42
43
44
45
46
47
48
49
50
51
52
53
54
55
56
57
58
59
60
61
62
63
64
65
66
67
68
69
70
71
72
73
74
75
76
77
78
79
80
81
82
83
84
85
86
87
88
89
90
91
92
93
94
95
96
97
98
99
100
101
102
103
104
105
106
107
108
109
110
111
112
113
114
115
116
117
118
119
120
121
122
123
124
125
126
127
128
129
130
131
132
133
134
135
136
137
138
139
140
141
| <!DOCTYPE html>
<html lang="zh">
<head>
<meta charset="UTF-8" />
<title>Promise + async/await + fetch 实战</title>
<style>
body { font-family: sans-serif; }
pre { background:#f7f7f7; padding:12px; border-radius:8px; }
.loading { color:#666; }
.error { color:#b00020; }
.ok { color:#0a7d28; }
</style>
</head>
<body>
<h2>Demo:并发获取用户 & 文章,并对第一篇文章再拉评论(带超时/重试)</h2>
<div id="status" class="loading">加载中…</div>
<pre id="out"></pre>
<script>
function fetchWithTimeout(url, opts = {}, timeoutMs = 8000) {
const controller = new AbortController();
const id = setTimeout(() => controller.abort(), timeoutMs);
const finalOpts = { ...opts, signal: controller.signal };
return fetch(url, finalOpts).finally(() => clearTimeout(id));
}
async function fetchJSON(url, opts = {}, timeoutMs = 8000) {
const res = await fetchWithTimeout(url, opts, timeoutMs);
if (!res.ok) {
let msg = `HTTP ${res.status} ${res.statusText}`;
try {
const text = await res.text();
if (text) msg += ` | ${text.slice(0, 200)}`;
} catch {}
const err = new Error(msg);
err.status = res.status;
throw err;
}
return res.json();
}
async function withRetry(fn, { retries = 2, delayMs = 300, factor = 2, shouldRetry } = {}) {
let attempt = 0;
let lastErr;
while (attempt <= retries) {
try {
return await fn();
} catch (err) {
lastErr = err;
const retryable = typeof shouldRetry === 'function'
? shouldRetry(err, attempt)
: (err.name === 'AbortError' || (err.status && err.status >= 500));
if (!retryable || attempt === retries) break;
await new Promise(r => setTimeout(r, delayMs * Math.pow(factor, attempt)));
attempt++;
}
}
throw lastErr;
}
async function loadUserAndPosts(userId = 1) {
const statusEl = document.getElementById('status');
const outEl = document.getElementById('out');
statusEl.textContent = '加载中(并发获取用户与文章)…';
statusEl.className = 'loading';
try {
const [user, posts] = await Promise.all([
withRetry(() => fetchJSON(`https://jsonplaceholder.typicode.com/users/${userId}`)),
withRetry(() => fetchJSON(`https://jsonplaceholder.typicode.com/posts?userId=${userId}`))
]);
if (!Array.isArray(posts) || posts.length === 0) {
outEl.textContent = `用户:${user.name}\n未找到文章。`;
statusEl.textContent = '完成(无文章)';
statusEl.className = 'ok';
return;
}
const firstPost = posts[0];
statusEl.textContent = '已拿到用户与文章,正在拉取第一篇文章的评论…';
const comments = await withRetry(
() => fetchJSON(`https://jsonplaceholder.typicode.com/comments?postId=${firstPost.id}`, {}, 5000),
{
retries: 2,
delayMs: 300,
factor: 2,
shouldRetry: (err, attempt) => err.name === 'AbortError' || (err.status && err.status >= 500)
}
);
const result = {
user: { id: user.id, name: user.name, email: user.email },
firstPost: {
id: firstPost.id,
title: firstPost.title,
body: firstPost.body
},
commentsPreview: comments.slice(0, 3).map(c => ({ id: c.id, email: c.email, body: c.body }))
};
outEl.textContent = JSON.stringify(result, null, 2);
statusEl.textContent = '完成';
statusEl.className = 'ok';
} catch (err) {
document.getElementById('out').textContent = (err && err.message) ? err.message : String(err);
const statusEl = document.getElementById('status');
statusEl.textContent = '失败';
statusEl.className = 'error';
} finally {
}
}
loadUserAndPosts(1);
</script>
</body>
</html>
|
- 并发:
Promise.all 同时拉用户与文章,减少总时延
- 依赖链:拿到第一篇文章后再去请求它的评论
- 超时与取消:
AbortController + 定时器实现 fetch 超时
- 重试:对可恢复错误(超时、5xx)做指数退避重试
- 错误处理:统一包装
fetchJSON,res.ok 校验 + 人类可读错误
- finally:做收尾清理(比如关闭 loading)
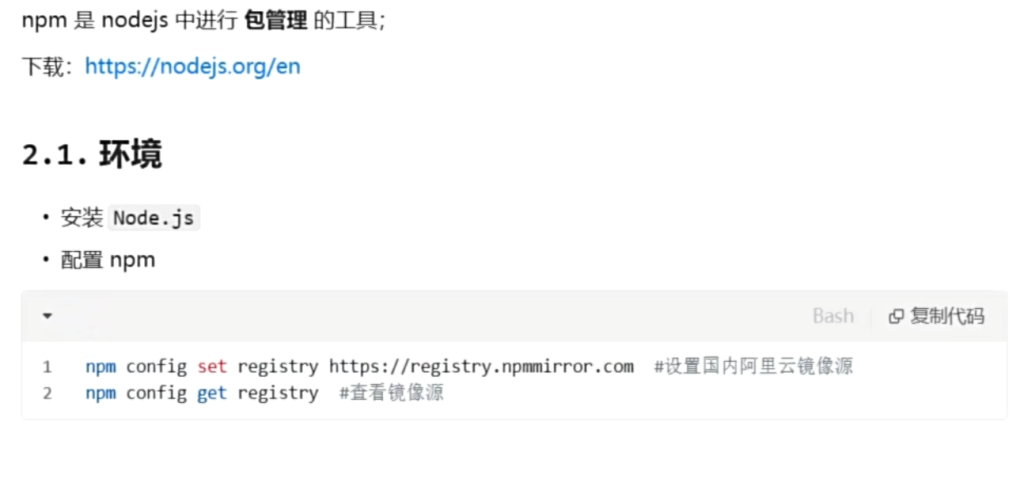
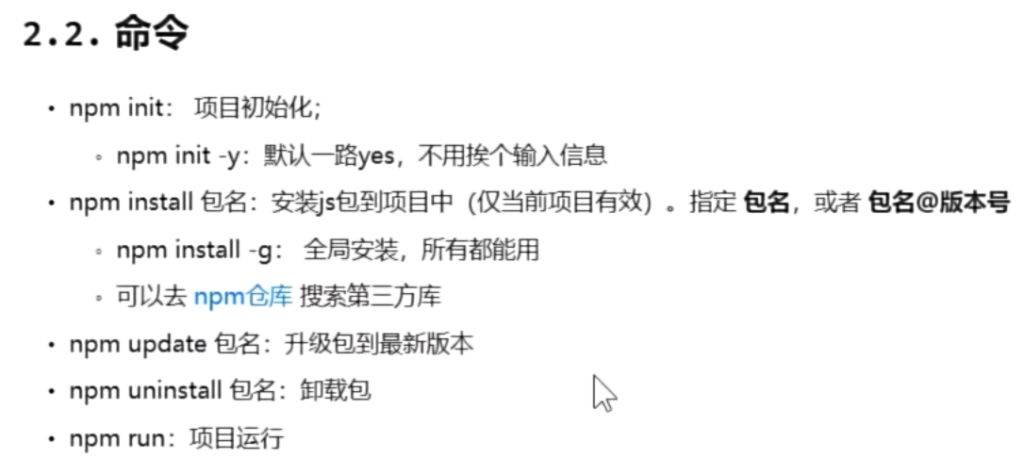
2.npm部分
3.Vite构建工具
创建项⽬
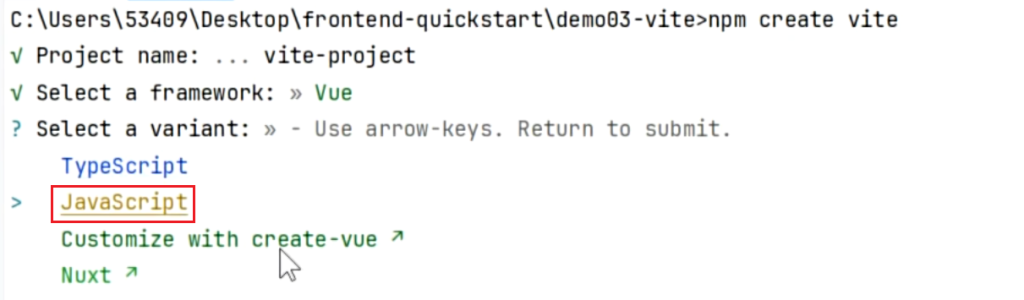
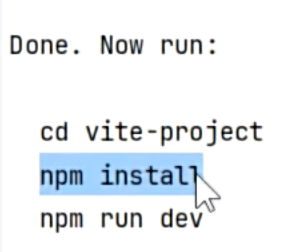
安装依赖
1
2
3
| npm install
npm install axios
npm install -g xxx
|
项⽬启动
项⽬打包
项⽬部署
- 前后分离⽅式:需要把 dist ⽂件夹内容部署到如 nginx 之类的服务器上。
- 前后不分离⽅式:把 dist ⽂件夹内容复制到 SpringBoot 项⽬resources下⾯
4.Vue
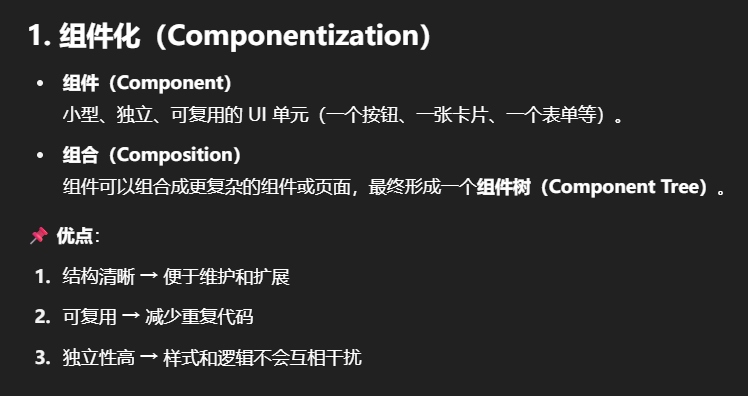
1.组件化
组件系统是一个抽象的概念;
- 组件:小型、独立、可复用的单元
- 组合:通过组件之间的组合、包含关系构建出一个完整应用
几乎任意类型的应用界面都可以抽象为一个组件数

2.SFC
Vue 的单⽂件组件 (即 *.vue ⽂件,英⽂ Single-File Component,简称 SFC) 是⼀种特殊的⽂件格式,
使我们能够将⼀个 Vue 组件的模板、逻辑与样式封装在单个⽂件中.
1
2
3
4
5
6
7
8
9
| <script setup>
</script>
<template>
//编写⻚⾯模板
</template>
<style scoped>
//编写样式scoped 表示只作用于当前组件
</style>
|
scoped 会在生成的 HTML 标签上加唯一属性标识,确保样式不会影响其他组件。
3.Vue⼯程
1.创建&运⾏
1
2
| npm create vite
npm run dev
|
2.运⾏原理
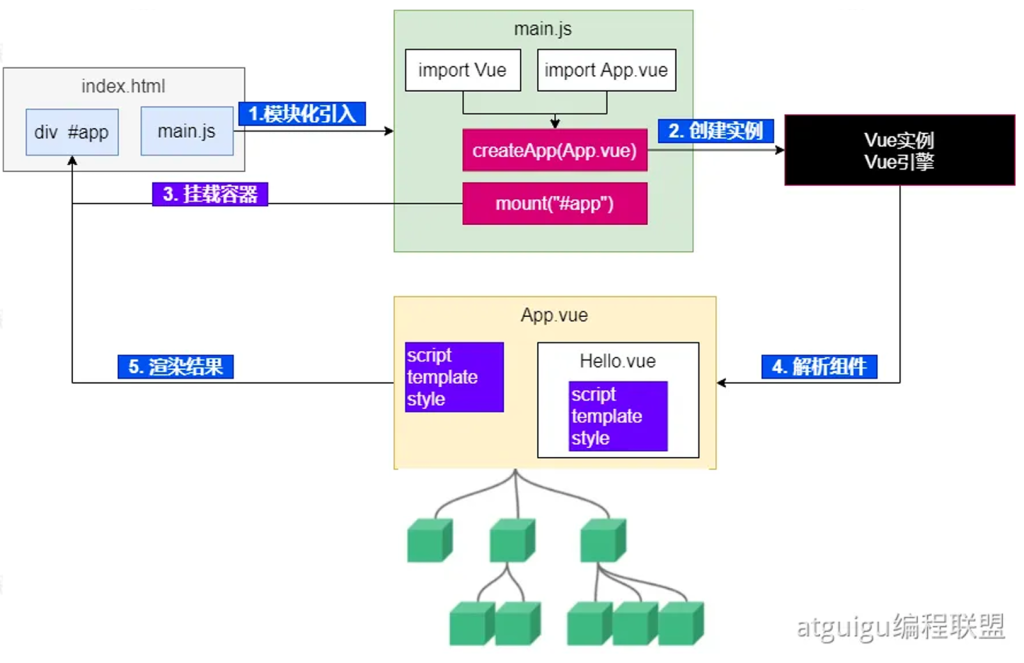
详解
场景参与者
- index.html:只有一个挂载占位
div#app,以及用 <script type="module" src="main.js"> 引入入口脚本。
- main.js:模块化导入
Vue 与根组件 App.vue,创建并挂载应用。
- App.vue / Hello.vue:单文件组件(SFC),写模板、逻辑、样式。
这些要点和 SFC/工程化创建在笔记里有对应小节与图示。
1)模块化引入(main.js)
- 入口
main.js 使用 ESM(原生模块)import:
1
2
3
4
| import { createApp } from 'vue'
import App from './App.vue'
createApp(App).mount('#app')
|
- 这一步把 Vue 运行时 和 根组件 都加载到内存,为后续创建实例做准备。(图中“import Vue / import App.vue”)
2)创建实例(Vue 实例 / Vue 引擎)
createApp(App) 会生成一个 应用实例(包含全局配置、插件、指令等的上下文容器)。- 这里还没有操作 DOM,只是把“要渲染谁(App 组件)”和“用什么规则渲染(Vue 引擎)”绑定好了。
(图右侧“Vue 实例 / Vue 引擎”)
3)挂载容器(mount)
mount('#app') 找到 index.html 里的 根容器,Vue 开始接管这块 DOM。- 挂载时:
- 把
App 的 模板(template)编译成 渲染函数(dev 环境由构建工具/Vue 编译器处理)。
- 执行渲染函数得到 虚拟 DOM(VNode)树。
- 把 VNode patch 成真实 DOM,插入到
#app。
(图中“挂载容器”箭头连回 index.html 的 #app)
4)解析组件(组件树)
- 根组件 App.vue 内又会引用子组件(如
Hello.vue),于是形成 组件树:
App → Hello → …(更深层的子组件)。
- 每个
.vue 文件(SFC)都包含:
1
2
3
| <script setup></script>
<template>/* 视图 */</template>
<style scoped></style>
|
在解析阶段:
<template> 被编译成渲染函数;ref()/reactive() 建立 响应式依赖追踪;- 指令(
v-if / v-for / v-bind / v-on)被转成具体的渲染与更新指令;
- 递归生成整棵 VNode 组件树。
(图中 App.vue 包含 Hello.vue,并向下生长为一棵树)
5)渲染结果(进入真实 DOM)
小提示:#app 原本占位的静态内容会被 Vue 接管替换,这是正常行为。
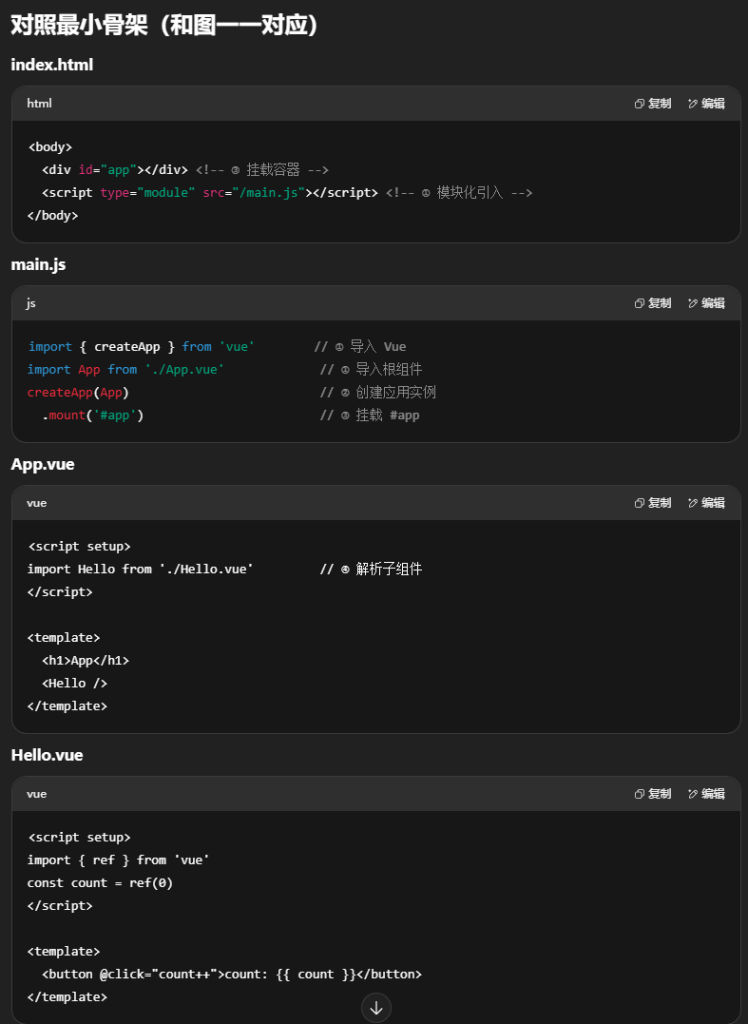
一句话串起来
main.js 模块化引入 → createApp(App) 生成 Vue 应用实例 → mount('#app') 接管 #app → 编译并解析 App.vue(再递归解析 Hello.vue 等组件)→ 生成 虚拟 DOM → patch 到真实 DOM → 之后数据变更由 响应式系统 + diff 做最小化更新。以上流程和你笔记中的“运行原理”示意图、SFC 结构与工程化步骤相互印证。
3.基础使⽤
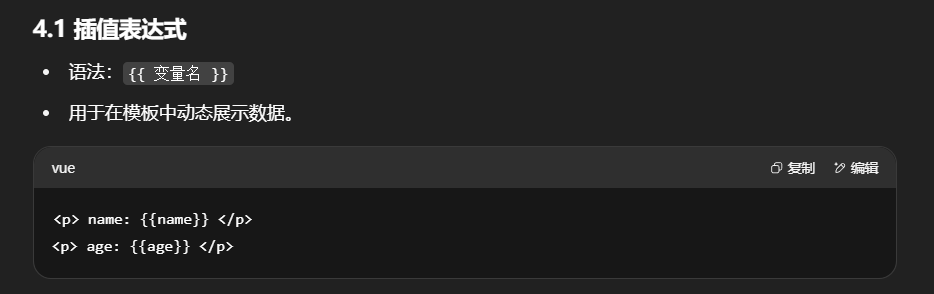
插值
1
2
3
4
5
6
7
8
9
10
11
12
13
14
15
16
17
18
19
20
| <script setup>
let name = "张三"
let age = 18
let car = {
brand: "奔驰",
price: 777
}
</script>
<template>
<p> name: {{name}} </p>
<p> age: {{age}} </p>
<div style="border: 3px solid red">
<p>品牌:{{car.brand}}</p>
<p>价格:{{car.price}}</p>
</div>
</template>
<style scoped>
</style>
|
指令(!)

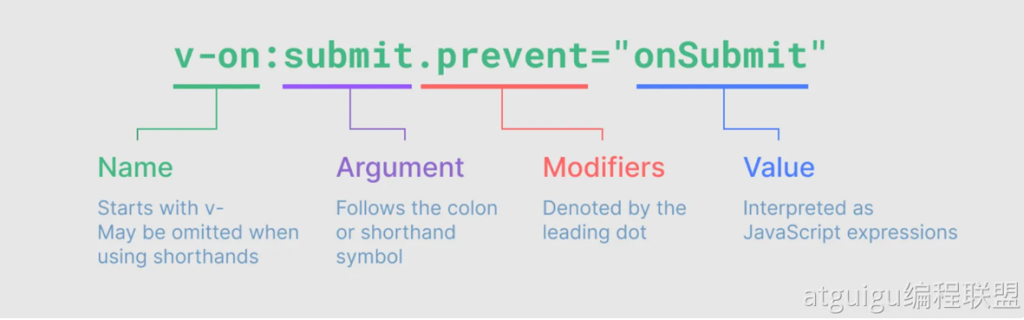
事件绑定:v-on
使⽤v-on指令,可以为元素绑定事件。可以简写为@
1
2
3
4
5
6
7
| <button v-on:click="buy">购买</button>
<button @click="buy">购买</button>
<script setup>
function buy() {
alert("购买成功");
}
</script>
|
条件判断:v-if
- 按条件渲染 DOM 节点。
v-if 为 真删除/假创建,v-show 为 切换 display。
循环:v-for
遍历数组、对象。
1
| <li v-for="item in list" :key="item.id">{{ item.name }}</li>
|
属性绑定v-bind / :
使⽤v-bind:属性='xx’语法,可以为标签的某个属性绑定值;
可以简写为 :属性=‘xx’
1
2
3
4
5
6
7
8
9
10
| <script setup>
let url = "http://www.baidu.com"
</script>
<template>
<a v-bind:href="url">go</a>
<a :href="url">go</a>
</template>
<style scoped>
</style>
|
注意:此时如果我们想修改变量的值,属性值并不会跟着修改。可以测试下。因为还没有响应式特性
响应式 - ref()
数据的动态变化需要反馈到⻚⾯;
Vue通过ref()和reactive()包装数据,将会⽣成⼀个数据的代理对象。vue内部的基于依赖追踪
的响应式系统 就会追踪感知数据变化,并触发⻚⾯的重新渲染。
1.使⽤⽅式
使⽤步骤:
- 使⽤ ref() 包装原始类型、对象类型数据,⽣成 代理对象
- 任何⽅法、js代码中,使⽤代理对象.value的形式读取和修改值
- ⻚⾯组件中,直接使⽤代理对象
注意:推荐使⽤ const(常量) 声明代理对象。代表代理对象不可变,但是内部值变化会被追踪。
1
2
3
4
5
6
7
8
9
10
| <script setup>
import { ref } from 'vue'
const count = ref(0)
function increment() {
count.value++
}
</script>
<template>
<button @click="increment">{{ count }}</button>
</template>
|
2.深层响应性
ref 包裹对象时,对象内部属性依旧是响应式的。
1
2
3
4
| import { ref } from 'vue'
const obj = ref({ nested: { count: 0 }, arr: [] })
obj.value.nested.count++
obj.value.arr.push('baz')
|
响应式 - reactive()
使⽤步骤:
- 使⽤ reactive() 包装对象类型数据,⽣成 代理对象
- 任何⽅法、js代码中,使⽤代理对象.属性 的形式读取和修改值
- ⻚⾯组件中,直接使⽤代理对象.属性
1
2
3
4
5
6
7
| <script setup>
import { reactive } from 'vue'
const state = reactive({ count: 0 })
</script>
<template>
<button @click="state.count++">{{ state.count }}</button>
</template>
|
基本类型⽤ ref(),对象类型⽤ reactive(),ref要⽤.value,reactive直接. 。⻚⾯取值永不变。
也可以 ref ⼀把梭,⼤不了 天天 .value
📌 区别:
- 基本类型 →
ref
- 对象类型 →
reactive
ref 需要 .value,reactive 不需要。
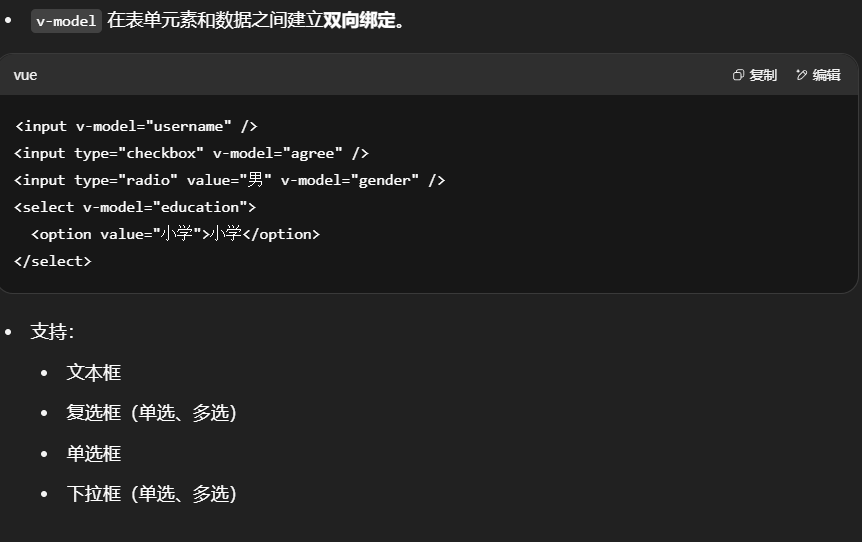
表单绑定v-model
v-model 在表单元素和数据之间建立双向绑定。
复制如下模板到组件,编写你的代码,实现表单数据绑定。
1
2
3
4
5
6
7
8
9
10
11
12
13
14
15
16
17
18
19
20
21
22
23
24
25
26
27
28
29
30
31
32
33
34
35
36
37
38
39
40
41
42
43
44
45
46
47
48
49
50
51
52
53
54
55
56
57
58
59
60
61
62
| <div style="display: flex;">
<div style="border: 1px solid black;width: 300px">
<form>
<h1>表单绑定</h1>
<p style="background-color: azure"><label>姓名(⽂本框):</label><input/></p>
<p style="background-color: azure"><label>同意协议(checkbox):</label>
<input type="checkbox"/>
</p>
<p style="background-color: azure">
<label>兴趣(多选框):</label><br/>
<label><input type="checkbox" value="⾜球"/>⾜球</label>
<label><input type="checkbox" value="篮球"/>篮球</label>
<label><input type="checkbox" value="⽻⽑球"/>⽻⽑球</label>
<label><input type="checkbox" value="乒乓球"/>乒乓球</label>
</p>
<p style="background-color: azure">
<label>性别(单选框):</label>
<label><input type="radio" name="sex" value="男">男</label>
<label><input type="radio" name="sex" value="⼥">⼥</label>
</p>
<p style="background-color: azure">
<label>学历(单选下拉列表):</label>
<select>
<option disabled value="">选择学历</option>
<option>⼩学</option>
<option>初中</option>
<option>⾼中</option>
<option>⼤学</option>
</select>
</p>
<p style="background-color: azure">
<label>课程(多选下拉列表):</label>
<br/>
<select multiple>
<option disabled value="">选择课程</option>
<option>语⽂</option>
<option>数学</option>
<option>英语</option>
<option>道法</option>
</select>
</p>
</form>
</div>
<div style="border: 1px solid blue;width: 200px">
<h1>结果预览</h1>
<p style="background-color: azure"><label>姓名:</label></p>
<p style="background-color: azure"><label>同意协议:</label>
</p>
<p style="background-color: azure">
<label>兴趣:</label>
</p>
<p style="background-color: azure">
<label>性别:</label>
</p>
<p style="background-color: azure">
<label>学历:</label>
</p>
<p style="background-color: azure">
<label>课程:</label>
</p>
</div>
</div>
|
计算属性 - computed
计算属性:根据已有数据计算出新数据
- 用于基于已有数据派生新数据。
- 有缓存,依赖不变时不会重新计算。
1
2
3
4
5
6
7
8
9
10
11
12
13
14
15
16
17
18
19
20
| <script setup>
import {computed, reactive, toRef, toRefs} from "vue";
const totalPrice = computed(()=>{
return price.value * num.value - coupon.value*100
})
</script>
<template>
<div class="car">
<h2>优惠券:{{ car.coupon }} 张</h2>
<h2>数量:{{ car.num }}</h2>
<h2>单价:{{ car.price }}</h2>
<h1>总价:{{totalPrice}}</h1>
<button @click="getCoupon">获取优惠</button>
<button @click="addNum">加量</button>
<button @click="changePrice">加价</button>
</div>
</template>
<style scoped>
</style>
|
4.进阶⽤法
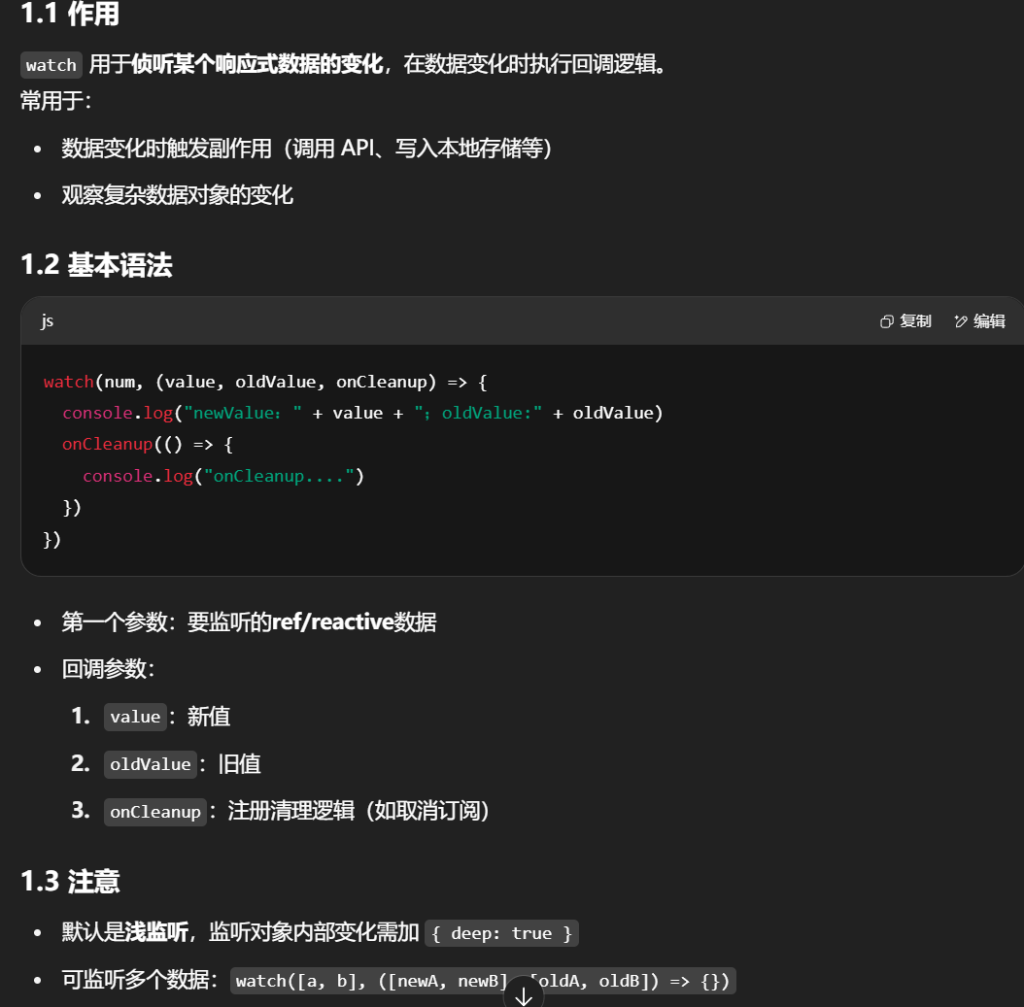
监听 - watch
1
2
3
4
5
6
| watch(num, (value, oldValue, onCleanup) => {
console.log("newValue:" + value + ";oldValue:" + oldValue)
onCleanup(() => {
console.log("onCleanup....")
})
})
|
⽣命周期
每个 Vue 组件实例在创建时都需要经历⼀系列的初始化步骤,⽐如设置好数据侦听,编译模板,挂载实
例到 DOM,以及在数据改变时更新 DOM。在此过程中,它也会运⾏被称为⽣命周期钩⼦的函数,让开
发者有机会在特定阶段运⾏⾃⼰的代码。
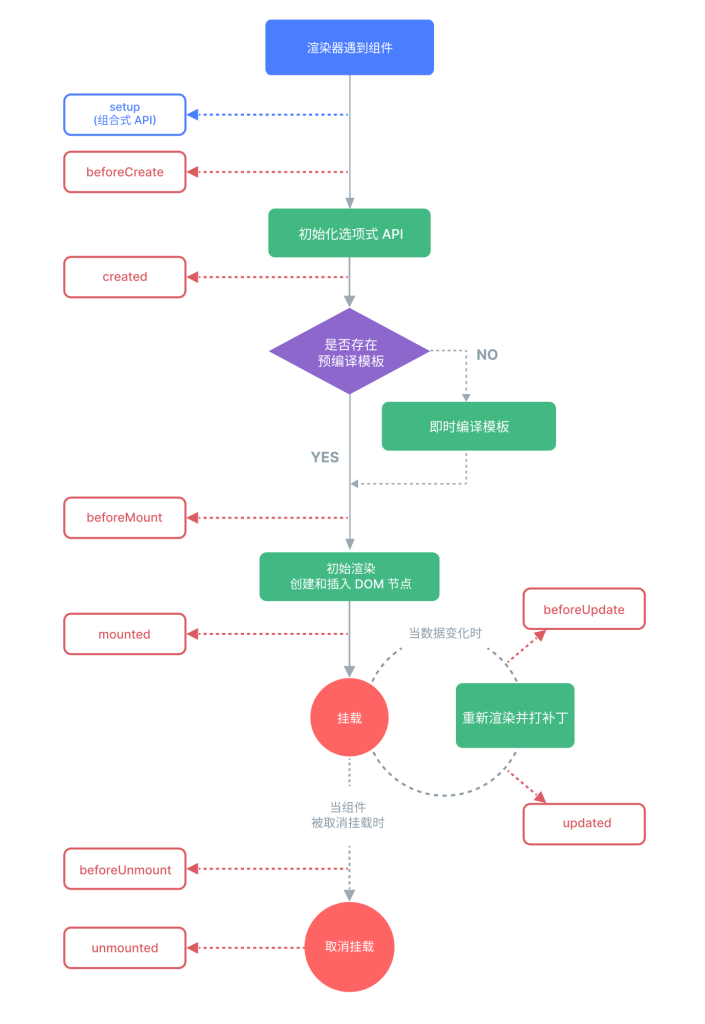
1.生命周期阶段
每个组件实例都会经历:
- 创建(Create):初始化数据、事件监听等
- 挂载(Mount):首次渲染 DOM
- 更新(Update):数据变化后重新渲染
- 卸载(Unmount):组件从 DOM 中移除
2.常用钩子
onMounted:挂载完毕(DOM 可操作)onUpdated:更新完毕onBeforeUnmount:卸载前- 还有对应的
onBeforeMount、onBeforeUpdate
1
2
3
4
5
6
7
8
9
10
11
12
13
14
15
16
17
18
19
20
21
22
23
| <script setup>
import { onBeforeMount, onMounted, onBeforeUpdate, onUpdated, ref } from "vue";
const count = ref(0)
const btn01 = ref()
onBeforeMount(() => {
console.log('挂载之前', count.value, document.getElementById("btn01"))
})
onMounted(() => {
console.log('挂载完毕', count.value, document.getElementById("btn01"))
})
onBeforeUpdate(() => {
console.log('更新之前', count.value, btn01.value.innerHTML)
})
onUpdated(() => {
console.log('更新完毕', count.value, btn01.value.innerHTML)
})
</script>
<template>
<button ref="btn01" @click="count++">{{ count }}</button>
</template>
|
组件传值(父传子/子传父)
1.⽗传⼦ - Props
-
父组件通过 属性绑定 把数据传给子组件
-
数据流是
单向的
:
- 父改子数据:子视图会更新
- 子改父数据:无效(会警告)
1
2
3
4
5
6
7
| //⽗组件给⼦组件传递数据:使⽤属性绑定
<Son :books="data.books" :money="data.money"/>
//⼦组件定义接受⽗组件的属性
let props = defineProps({
money: { type: Number, required: true, default: 200 },
books: Array
});
|
2.⼦传⽗ - Emit
props⽤来⽗传⼦,emit ⽤来⼦传⽗
1
2
3
4
5
6
7
|
let emits = defineEmits(['buy']);
function buy() {
emits('buy', -5);
}
<Son :books="data.books" :money="data.money"@buy="moneyMinis"/>
|
插槽 - Slots
⼦组件可以使⽤插槽接受模板内容。
1.基本使⽤
父组件在使用子组件时,可以向插槽插入模板内容
1
2
3
4
5
6
7
|
<button class="fancy-btn">
<slot></slot>
</button>
<FancyButton>Click me!</FancyButton>
|
2.默认内容
如果父组件没传内容,则显示默认内容
1
2
3
| <button type="submit">
<slot>Submit</slot>
</button>
|
3.具名插槽
可以为插槽命名,父组件按名字填充内容
1
2
3
4
5
6
7
8
9
10
11
|
<div>
<header><slot name="header"></slot></header>
<main><slot></slot></main>
<footer><slot name="footer"></slot></footer>
</div>
<BaseLayout>
<template v-slot:header>头部内容</template>
</BaseLayout>
|
使⽤:v-slot可以简写为#
1
2
3
4
5
| <BaseLayout>
<template v-slot:header>
</template>
</BaseLayout>
|
简写:v-slot:header → #header
5.总结
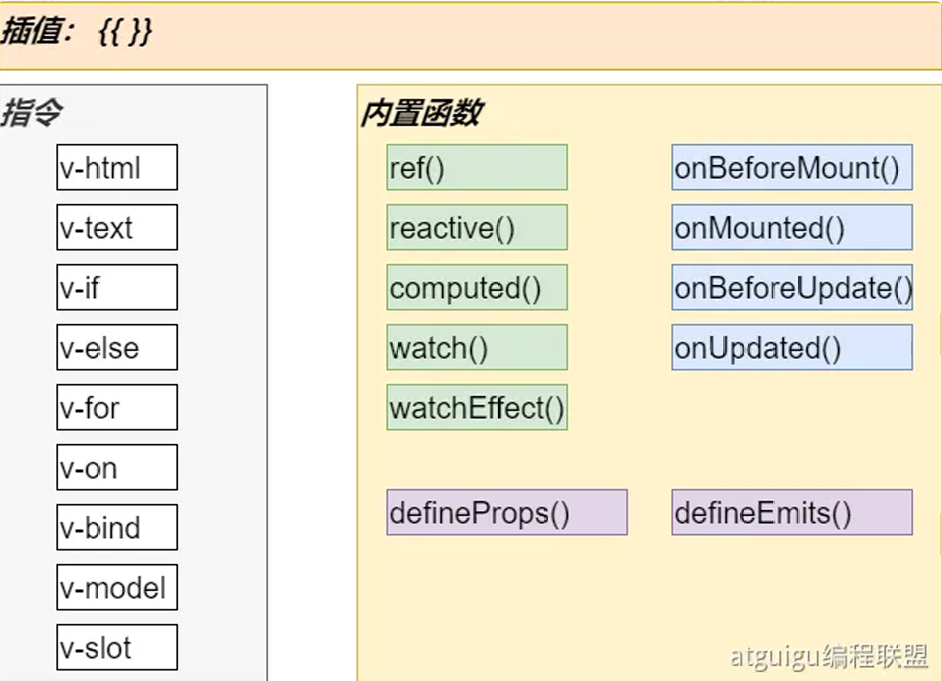
Vue 常用指令表
| 指令 |
作用 |
用法示例 |
说明 / 注意事项 |
v-html |
渲染 HTML 字符串 |
<div v-html="htmlStr"></div> |
会解析成 HTML 标签(有 XSS 风险),用于显示富文本 |
v-text |
渲染纯文本 |
<p v-text="msg"></p> |
等价于 {{ msg }},但无插值语法灵活 |
v-if |
条件渲染(真创建,假移除) |
<div v-if="isShow">显示</div> |
元素完全销毁/重建,有性能开销 |
v-else |
v-if 的 else 分支 |
<div v-if="ok">A</div><div v-else>B</div> |
必须紧跟在 v-if 或 v-else-if 后面 |
v-for |
列表渲染 |
<li v-for="item in list" :key="item.id">{{ item.name }}</li> |
必须有唯一 key,避免渲染异常 |
v-on |
事件绑定 |
<button v-on:click="handle">点我</button> |
简写 @click="handle" |
v-bind |
动态绑定属性 |
<img v-bind:src="imgUrl" /> |
简写 :src="imgUrl" |
v-model |
双向数据绑定 |
<input v-model="username" /> |
适用于表单控件,可修饰 .lazy .number .trim |
v-slot |
插槽定义/使用 |
<template v-slot:header>内容</template> |
简写 #header,用于具名插槽 |
Vue 内置函数与生命周期钩子表
| 分类 |
函数 / API |
作用 |
用法示例 |
说明 / 注意事项 |
| 响应式 |
ref() |
定义基本类型/对象的响应式数据 |
const count = ref(0) |
基本类型用 .value 访问,模板中可直接用 |
|
reactive() |
定义对象/数组的响应式数据 |
const state = reactive({ num: 0 }) |
直接用属性访问,不能替换整个对象 |
|
computed() |
派生数据(带缓存) |
const total = computed(() => price.value * num.value) |
依赖不变时不会重新计算 |
|
watch() |
侦听数据变化 |
watch(count, (n, o) => {...}) |
可深度监听 { deep: true },可监听多个数据 |
|
watchEffect() |
自动收集依赖的响应式副作用 |
watchEffect(() => console.log(count.value)) |
初始化立即执行,依赖变更即执行 |
| 生命周期 |
onBeforeMount() |
挂载前 |
onBeforeMount(() => {...}) |
DOM 未生成,不能操作 |
|
onMounted() |
挂载后 |
onMounted(() => {...}) |
DOM 已生成,可操作 DOM 或发起请求 |
|
onBeforeUpdate() |
更新前 |
onBeforeUpdate(() => {...}) |
旧 DOM 仍在,可清理旧状态 |
|
onUpdated() |
更新后 |
onUpdated(() => {...}) |
DOM 已更新,可重新初始化依赖新 DOM 的内容 |
| 组件通信 |
defineProps() |
声明接收的 props |
const props = defineProps({ title: String }) |
只读,不能直接改 |
|
defineEmits() |
声明可触发的事件 |
const emit = defineEmits(['save']) |
子组件用 emit('save', data) 通知父组件 |
几个简写:
补充:生命周期详解

一、四个大阶段
- 创建(create) → 2) 挂载(mount) → 3) 更新(update) → 4) 卸载(unmount)。
每个阶段各有“前/后”两个时点的钩子(如 onBeforeMount / onMounted 等)。
二、首渲染时的时序(对应图的上半部分)
0)渲染器遇到组件
- Vue 创建组件实例、解析
props / emits,建立响应式作用域(effect scope)。
setup()(或 <script setup> 编译成的 setup)被执行,用来声明响应式数据、注册生命周期钩子等。 组合式 API 的各类 onXxx() 都是在 setup() 里“注册”,到对应阶段再被调用。
选项式 API 里还可见 beforeCreate / created,但在组合式 API 中它们等价于在 setup 顶部写初始化逻辑,实际项目很少再用(更推荐组合式 API)。
1)模板准备:是否“预编译模板”
- 有预编译(Vite/构建器把
.vue 的 <template> 变成渲染函数)→ 直接进入挂载。
- 无预编译(运行时编译)→ 先把模板即时编译成渲染函数(图中菱形与“即时编译模板”分支)。
2)onBeforeMount(挂载前)
- 渲染函数将要首次执行、但真实 DOM 还未生成,
$el/$refs 还不可用。
- 适合:做“渲染前准备”,如日志、轻量计算。
- 避坑:不要操作 DOM。
3)初次渲染 & 挂载
- 执行渲染函数 → 生成 VNode 树 → 与容器
#app patch 为真实 DOM。
onMounted:DOM 已经插入页面;此时 $el/$refs 可用。
适合:读写 DOM、测量尺寸、注册基于 DOM 的第三方库、发起需要 DOM 的异步请求等。
三、数据变更 → 组件更新(对应图中部的回路)
响应式与调度
ref()/reactive() 的依赖在首渲染时被收集;当你修改它们时触发 调度器 queue,把本组件的“更新任务”压到微任务队列中合并执行,避免多次重复渲染(批处理)。
1)onBeforeUpdate(更新前)
- 响应式数据已变化,渲染函数即将重新执行,旧 DOM 仍在页面。
- 适合:基于“变更前 DOM”做收尾(如销毁旧的第三方实例)。
2)重新渲染并打补丁(patch)
- 生成新 VNode,与旧 VNode diff,只最小化修改受影响的 DOM 节点。
3)onUpdated(更新后)
- DOM 已经是最新。
- 适合:依赖新 DOM 状态的操作(如再次初始化第三方库)。
- 避坑:这里做重计算/再改数据容易形成更新-计算-再更新的循环,要谨慎。
四、组件离场(对应图下半部分)
1)onBeforeUnmount(卸载前)
- 组件即将从 DOM 移除。
- 适合:清理副作用——移除全局事件监听、
setInterval/setTimeout、取消网络订阅/Socket、销毁第三方实例等。
2)移除 & onUnmounted(已卸载)
- VNode 和 DOM 都被移除,响应式作用域结束。
- 如果 watcher 是在
setup() 里用 watch/watchEffect 创建的,它们会随作用域自动停止;但计时器、外部事件仍需你手动清理。
五、父子组件的触发顺序(高频考点)
- 挂载:
父 onBeforeMount → 子 onBeforeMount → 子 onMounted → 父 onMounted
- 更新(父数据变更导致父子都重渲):
父 onBeforeUpdate → 子 onBeforeUpdate → 子 onUpdated → 父 onUpdated
- 卸载:
父 onBeforeUnmount → 子 onBeforeUnmount → 子 onUnmounted → 父 onUnmounted
每个钩子“该做/不该做什么”(速查)
| 阶段 |
钩子 |
适合做什么 |
避免做什么 |
| 创建 |
setup() |
声明响应式数据、props/emit、注册生命周期、创建 watch |
直接操作 DOM(DOM 尚未生成) |
| 挂载前 |
onBeforeMount |
轻准备、日志 |
访问 $refs/$el |
| 挂载后 |
onMounted |
读写 DOM、对接第三方库、需要 DOM 的网络/动画 |
重计算导致卡顿 |
| 更新前 |
onBeforeUpdate |
基于旧 DOM 的清理 |
在此疯狂改数据(可能触发额外更新) |
| 更新后 |
onUpdated |
基于新 DOM 的初始化 |
反复改数据造成更新循环 |
| 卸载前 |
onBeforeUnmount |
清理事件/计时器/订阅、销毁实例 |
忘记清理导致内存泄漏 |
| 卸载后 |
onUnmounted |
最终收尾、日志 |
访问 DOM(已移除) |
记忆法:“先外后内,再内后外”——进入时外层先到,出来时内层先撤。
最小代码骨架(对照流程图)
1
2
3
4
5
6
7
8
9
10
11
12
13
14
15
16
17
18
19
20
21
22
23
24
25
| <script setup>
import { ref, onBeforeMount, onMounted, onBeforeUpdate, onUpdated, onBeforeUnmount, onUnmounted } from 'vue'
const n = ref(0)
let timer
onBeforeMount(() => console.log('before mount'))
onMounted(() => {
console.log('mounted: DOM ready')
timer = setInterval(() => n.value++, 1000)
})
onBeforeUpdate(() => console.log('before update, old DOM still here'))
onUpdated(() => console.log('updated, DOM is new'))
onBeforeUnmount(() => {
clearInterval(timer)
console.log('before unmount')
})
onUnmounted(() => console.log('unmounted'))
</script>
<template>
<button @click="n++">count: {{ n }}</button>
</template>
|
一句话总结
- Mounted 后才能动 DOM;
- Updated 后 DOM 已是最新;
- Unmount 前一定要清理副作用;
- 响应式更新是批处理 + diff,只改必要的 DOM。
5.Vue-Router
1.理解路由
前端系统根据⻚⾯路径,跳转到指定组件,展示出指定效果


2.路由⼊⻔
项⽬创建
整合vue-router
- 安装依赖:
npm install vue-router@4 or yarn add vue-router@4
- 在 src 下新建 router 文件夹 并新建
index.js 文件
路由器实例
路由器实例是通过调用 createRouter() 函数创建的:
1
2
3
4
5
6
7
| // src/router/index.js
import { createRouter, createWebHashHistory } from 'vue-router'
const routes = [
{ path: '/', component: () => import('../views/HelloWorld.vue') },
{ path: '/login', component: () => import('../views/Login.vue') }
]
export default createRouter({ history: createWebHashHistory(), routes })
|
挂到应用
main.js 修改为
1
2
3
4
5
|
import { createApp } from 'vue'
import App from './App.vue'
import router from './router'
createApp(App).use(router).mount('#app')
|
页面占位
1
2
3
4
5
6
7
8
|
<template>
<nav>
<router-link to="/">首页</router-link>
<router-link to="/login">登录</router-link>
</nav>
<router-view />
</template>
|
记忆:routes(映射表) → createRouter → app.use(router) → <router-view> 出口。

路由配置
编写⼀个新的组件,测试路由功能;步骤如下:
- 编写router/index.js⽂件
- 配置路由表信息
- 创建路由器并导出
- 在main.js中使⽤路由
- 在⻚⾯使⽤router-link,router-view完成路由功能
动态路由参数(path params)
定义
1
2
| { path: '/o/:orderId', component: () => import('../views/Order.vue') }
{ path: '/p/:productName', component: () => import('../views/Product.vue') }
|
读取
1
2
3
| import { useRoute } from 'vue-router'
const route = useRoute()
console.log(route.params.orderId)
|
复用同一组件时的“参数变化”
- 同一路由记录,仅
:id 改变时 组件不会被销毁重建;要监听参数:
1
2
| import { watch } from 'vue'
watch(() => route.params.orderId, (n, o) => { })
|
或用 onBeforeRouteUpdate(vue-router 提供的组合式钩子)。
用 props 解耦
1
2
3
4
|
{ path:'/o/:orderId', component: Order, props: true }
defineProps<{ orderId: string }>()
|
好处:组件测试更简单,不耦合路由对象。
3.嵌套路由
定义
1
2
3
4
5
6
7
8
9
10
11
| const routes = [
{
path: '/user/:id',
component: () => import('../views/User.vue'),
children: [
{ path: '', component: () => import('../views/UserHome.vue') }, // 默认子路由
{ path: 'profile', component: () => import('../views/UserProfile.vue') },
{ path: 'posts', component: () => import('../views/UserPosts.vue') }
]
}
]
|
视图占位
1
2
3
4
5
6
7
|
<template>
<h2>User</h2>
<router-link :to="`/user/${$route.params.id}/profile`">资料</router-link>
<router-link :to="`/user/${$route.params.id}/posts`">帖子</router-link>
<router-view />
</template>
|
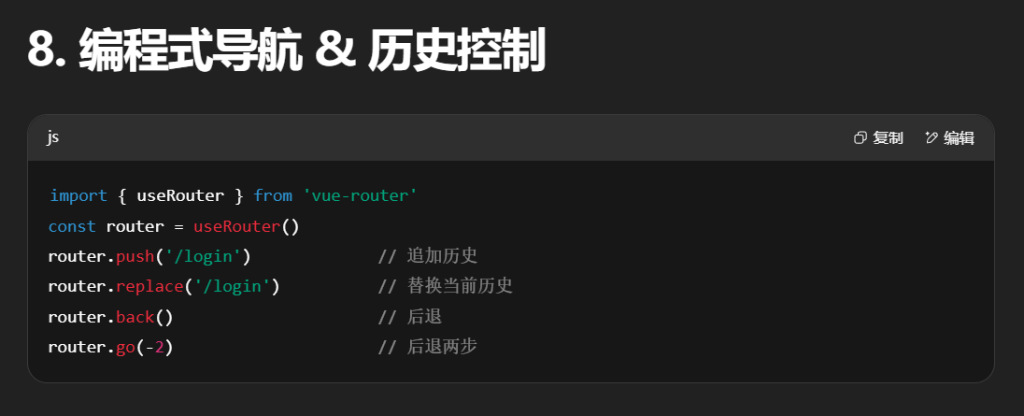
4.编程式
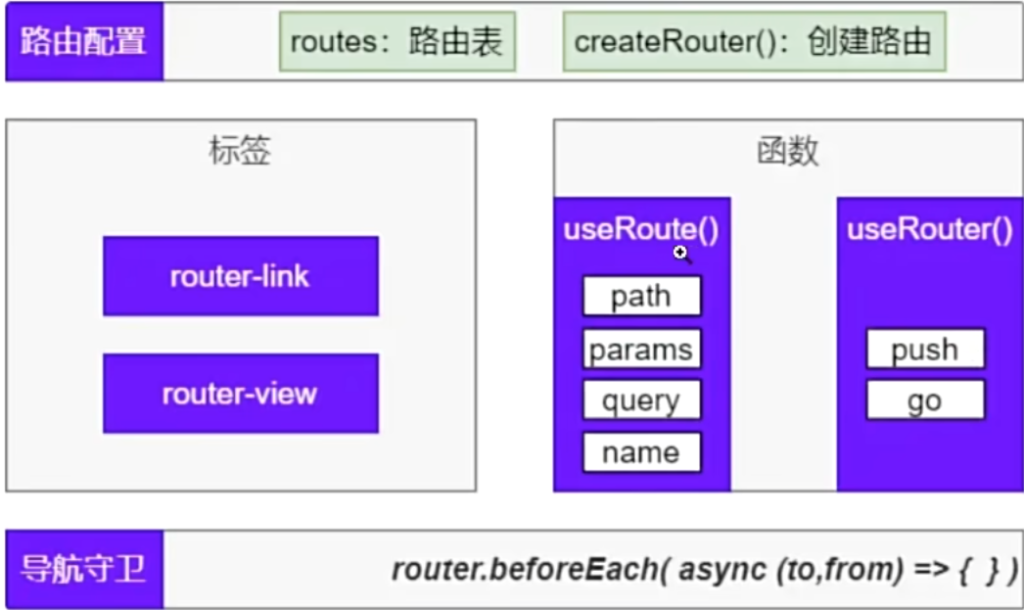
Vue Router 提供了两个组合式 API,方便在组件逻辑中访问路由信息和控制导航。
| API |
作用 |
常见用法 |
注意事项 |
useRoute() |
获取当前路由信息对象 |
const route = useRoute()``console.log(route.query)``console.log(route.params) |
响应式对象,属性变化会触发更新 |
useRouter() |
获取路由器实例(控制跳转) |
router.push('/path')``router.replace('/path')``router.back() |
params 不可和 path 同时用,否则会忽略 params |
常用跳转方式:
1
2
3
4
5
6
7
8
9
10
11
12
13
14
|
router.push('/users/eduardo')
router.push({ path: '/users/eduardo' })
router.push({ name: 'user', params: { username: 'eduardo' } })
router.push({ path: '/register', query: { plan: 'private' } })
router.push({ path: '/about', hash: '#team' })
|
坑:params 不能和 path 同时使用。
useRoute:路由数据
路由传参跳转到指定⻚⾯后,⻚⾯需要取到传递过来的值,可以使⽤useRoute⽅法;
拿到当前⻚路由数据;
可以做
- 获取到当前路径
- 获取到组件名
- 获取到参数
- 获取到查询字符串
1
2
3
4
5
6
| import {useRoute} from 'vue-router'
const route = useRoute()
console.log(route.query)
console.log(route.params)
|
useRouter:路由器
拿到路由器;可以控制跳转、回退等。
1
2
3
4
5
6
7
8
9
10
11
12
13
14
| import {useRoute, useRouter} from "vue-router";
const router = useRouter();
router.push('/users/eduardo')
router.push({ path: '/users/eduardo' })
router.push({ name: 'user', params: { username: 'eduardo' } })
router.push({ path: '/register', query: { plan: 'private' } })
router.push({ path: '/about', hash: '#team' })
router.push({ path: '/user', params: { username } })
|
5.路由传参
params 参数
定义路由
1
| { path: '/news/detail/:id/:title/:content', name: 'xiang', component: Detail }
|
跳转:
1
2
3
4
5
6
7
|
<RouterLink :to="`/news/detail/001/新闻001/内容001`">{{ news.title }}</RouterLink>
<RouterLink :to="{ name: 'xiang', params: { id: news.id, title: news.title, content: news.content } }">
{{ news.title }}
</RouterLink>
|
读取:
1
2
| const route = useRoute()
console.log(route.params.id)
|
⚠ 使用 params 必须配合命名路由(name),且不能和 path 同时出现。
query 参数
跳转:
1
2
3
4
5
6
7
|
<RouterLink to="/news/detail?a=1&b=2&content=欢迎你">跳转</RouterLink>
<RouterLink :to="{ path: '/news/detail', query: { id: news.id, title: news.title, content: news.content } }">
{{ news.title }}
</RouterLink>
|
读取:
1
2
| const route = useRoute()
console.log(route.query.id)
|
6.导航守卫
守卫可以拦截导航、检查权限、记录日志等。
1 全局前置守卫(beforeEach)
1
2
3
4
5
6
7
8
9
10
11
| router.beforeEach(async (to, from) => {
console.log("to", to)
console.log("from", from)
if (to.path === '/hello') {
console.log("禁止访问")
return "/" // 返回路径 → 重定向
}
// 返回 false → 取消导航
// 不返回 / 返回 true → 继续导航
})
|
触发时机:
- 每次路由跳转前执行
- 可异步(支持
async/await)
2 全局后置守卫(afterEach)
1
2
3
| router.afterEach((to, from) => {
console.log(`从 ${from.fullPath} 到 ${to.fullPath} 完成导航`)
})
|
- 没有
next(),不能阻止导航
- 常用于日志、页面埋点
3 路由独享守卫(beforeEnter)
1
2
3
| { path: '/admin', component: Admin, beforeEnter: (to, from) => {
if (!isAdmin()) return '/login'
}}
|
4 组件内守卫(组合式 API)
1
2
3
4
5
6
7
8
9
| import { onBeforeRouteUpdate, onBeforeRouteLeave } from 'vue-router'
onBeforeRouteUpdate((to, from) => {
console.log('参数变化了', to.params.id)
})
onBeforeRouteLeave((to, from) => {
if (!confirm('确定离开吗?')) return false
})
|
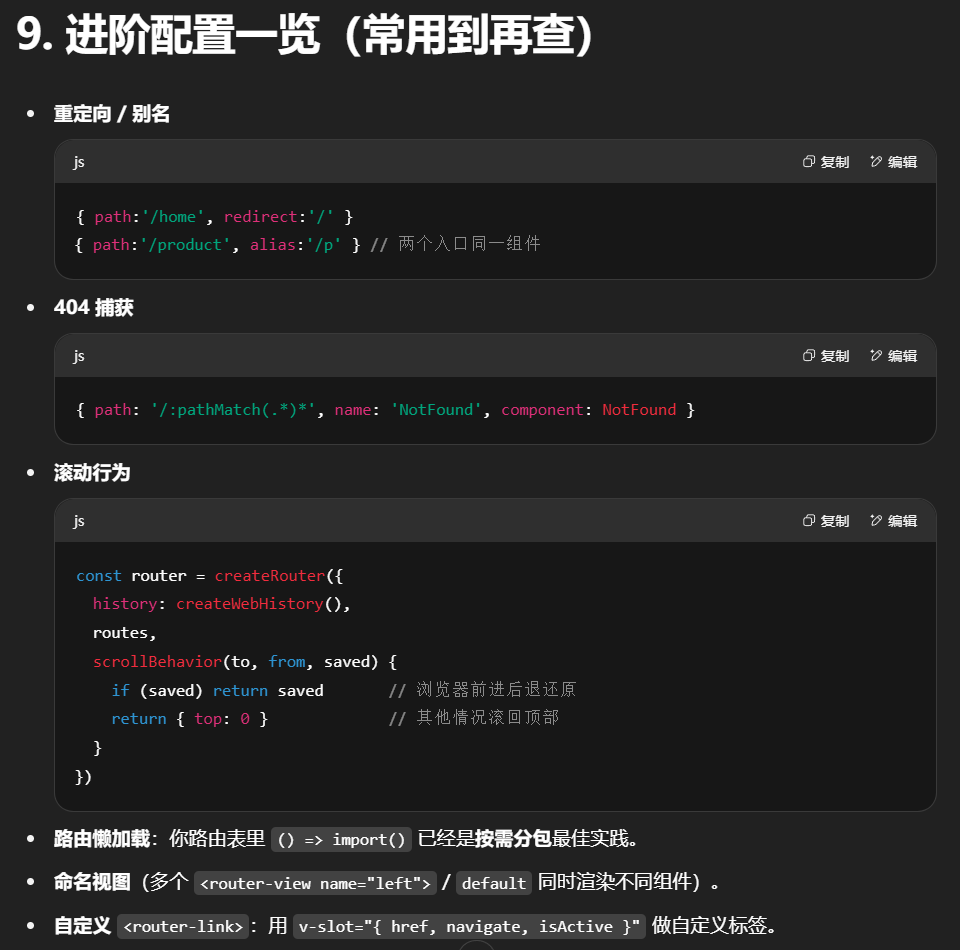
7.总结
补充:
滚动行为
在路由器创建时配置 scrollBehavior:
1
2
3
4
5
6
7
8
9
10
| const router = createRouter({
history: createWebHistory(),
routes,
scrollBehavior(to, from, savedPosition) {
if (savedPosition) {
return savedPosition
}
return { top: 0 }
}
})
|
可返回 { left, top }、el(CSS 选择器)、或平滑滚动 { behavior: 'smooth' }。
命名视图(Named Views)
一个路由可同时渲染多个 <router-view>:
1
2
3
4
5
6
7
8
9
10
11
12
13
| {
path: '/layout',
components: {
default: MainContent,
sidebar: SidebarMenu,
header: HeaderBar
}
}
<template>
<router-view />
<router-view name="sidebar" />
<router-view name="header" />
</template>
|
适用于多区域布局
多级嵌套实践
路由定义:
1
2
3
4
5
6
7
8
9
10
11
12
13
14
15
| const routes = [
{
path: '/user/:id',
component: User,
children: [
{
path: 'profile',
component: UserProfile,
children: [
{ path: 'settings', component: ProfileSettings }
]
}
]
}
]
|
运⾏流程
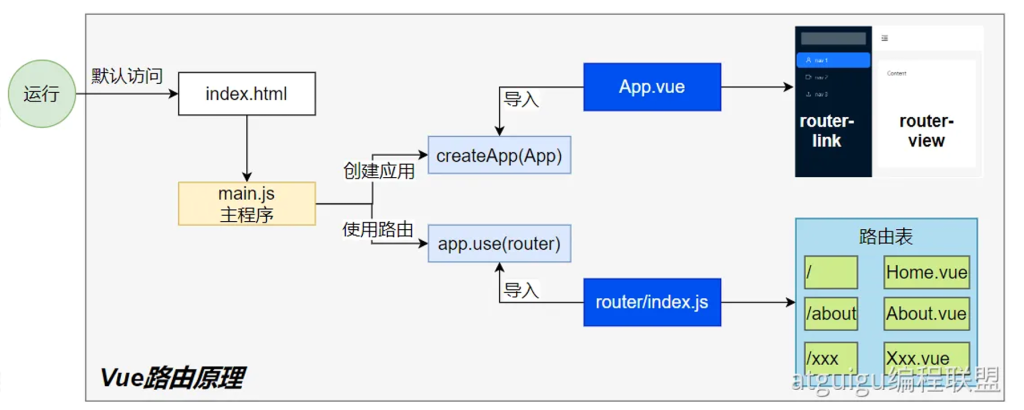
这张图是在讲 Vue Router 从浏览器加载 → 创建应用 → 匹配路由 → 渲染组件 的完整链路。按图中方块从左到右、从上到下,把每一步拆开讲清楚,并补上“导航一次到底发生了什么”。
这张图是在讲 Vue Router 从浏览器加载 → 创建应用 → 匹配路由 → 渲染组件 的完整链路。按图中方块从左到右、从上到下,把每一步拆开讲清楚,并补上“导航一次到底发生了什么”。
1) 浏览器首次打开:index.html
- 浏览器默认请求
index.html,里面只有一个挂载点和入口脚本: <div id="app"></div> <script type="module" src="/src/main.js"></script>
- 此时页面还没有任何业务组件,Vue 也尚未接管 DOM。
2) 入口脚本:main.js(创建应用 & 使用路由)
1
2
3
4
5
6
7
8
|
import { createApp } from 'vue'
import App from './App.vue'
import router from './router'
createApp(App)
.use(router)
.mount('#app')
|
- 这 3 行,恰好对应图里的“createApp(App)”和“app.use(router)”。
3) app.use(router) 实际做了什么?
Vue Router 作为插件被安装时,会完成四件关键事:
-
注册全局组件:<router-link>、<router-view>
-
注入响应式的 currentRoute:提供 useRoute() 可读、useRouter() 可写(跳转)
-
绑定浏览器历史监听
:
- hash 模式监听
hashchange
- history 模式监听
popstate,并通过 pushState/replaceState 改地址栏而不刷新
-
触发一次“初始导航”:用当前 URL 去解析匹配并渲染到 <router-view>(见 §6)
4) 路由表:router/index.js
1
2
3
4
5
6
7
8
9
10
11
12
13
14
15
16
| // router/index.js
import { createRouter, createWebHistory } from 'vue-router'
const routes = [
{ path: '/', component: () => import('../views/Home.vue') },
{ path: '/about', component: () => import('../views/About.vue') },
// 动态段:/user/123
{ path: '/user/:id', component: () => import('../views/User.vue') },
// 兜底 404
{ path: '/:pathMatch(.*)*', name:'NotFound', component: () => import('../views/NotFound.vue') }
]
export default createRouter({
history: createWebHistory(), // 或 createWebHashHistory()
routes
})
|
- 路由表就是“URL → 组件”的映射;动态段
:id 会被解析到 route.params。
- 懒加载
() => import() 会把各页面拆成独立 chunk,首屏更快。
5) 视图占位与导航:App.vue
1
2
3
4
5
6
7
| <template>
<nav>
<router-link to="/">首页</router-link>
<router-link to="/about">关于</router-link>
</nav>
<router-view />
</template>
|
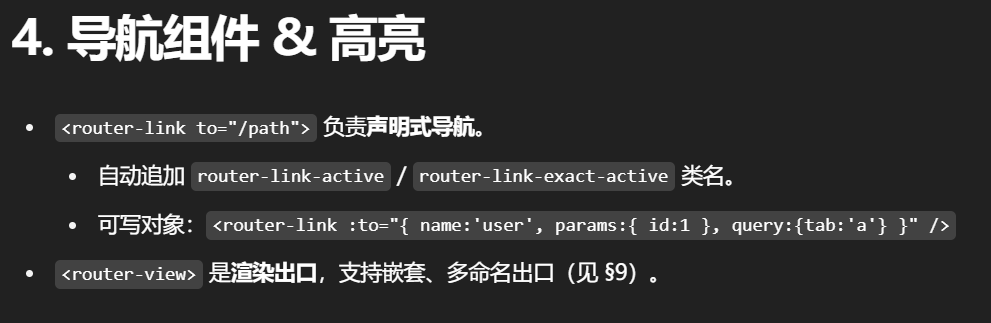
<router-link> 本质是 router.push() 的封装,还会自动加激活类名(router-link-active)。<router-view> 是“占位符”,当前匹配路由对应的组件会被挂载到这里;若有嵌套路由,会在子组件里再放一个 <router-view> 作为“下一层出口”。
6) 首次渲染:URL → 组件
当应用安装路由器并 mount 后,路由器会用当前地址栏的 URL执行一次“导航解析”:
- 解析 URL → 得到
location(path/query/hash 等)
- 匹配路由记录:路由表会被编译成一棵“路由记录树”,动态段会被转成正则;从根到叶找到一条匹配链,如
['/user/:id', 'profile']
- 生成
to / from:第一次 from 是一个“初始路由”(通常为 /)
- 运行导航守卫(若配置,见下)
- 确认导航:更新
history 与 currentRoute(它是响应式对象)
- 渲染:把匹配链上的组件依次塞进每层
<router-view>,形成最终页面
这一切不刷新页面:只是修改地址栏 + 组件挂载/卸载 + DOM diff。
7) 二次及之后的导航(点击 <router-link> 或 router.push)
- 改变 URL(
pushState/replaceState 或 hash),不会整页刷新。
- 重复 §6 的流程:解析 → 匹配 → 守卫 → 确认 → 更新 → 渲染。
- 如果只是
params 变了但同一记录复用(如 /user/1 → /user/2),组件不会重建,你需要在组件里监听: import { useRoute, onBeforeRouteUpdate } from 'vue-router' const route = useRoute() onBeforeRouteUpdate((to) => { /* 拉取 to.params.id 的新数据 */ }) // 或 watch(() => route.params.id, ...)
8) 守卫(发生在“确认导航”之前/之后)
- 全局前置
router.beforeEach(to, from):做鉴权、白名单、重定向
- 路由独享
beforeEnter:只影响该条记录
- 组件内
onBeforeRouteLeave / onBeforeRouteUpdate:离开/参数变更时机
- 全局后置
router.afterEach:日志/埋点(不能中断导航)
顺序(常见):全局前置 → 路由独享 → 组件离开守卫 → 组件更新/进入守卫 → 全局后置。
9) 嵌套路由与多出口
- 嵌套:父路由渲染父组件,父组件内部的
<router-view> 再渲染子路由组件,一层层向下。
- 命名视图:一个路由可以同时渲染多个出口:
{ path:'/layout', components:{ default: Main, sidebar: Aside, header: Header } } <router-view /> <!-- default --> <router-view name="sidebar"/> <!-- 指定 name --> <router-view name="header"/>
10) 两种路由模式的底层监听
- Hash 模式:地址形如
/#/about;通过监听 hashchange 实现前进后退。无需后端配置。
- History 模式:无
#;通过 pushState/replaceState 改地址、popstate 监听回退。需要后端把未知路径都回退到 index.html(Nginx try_files $uri /index.html)。
- Memory 模式:不改地址栏,多用于 SSR/测试。
11) 滚动还原与动画(简述)
- 在
createRouter 里配置 scrollBehavior(to, from, saved),可实现“前进/后退还原滚动位置、其他场景回到顶部或锚点”: scrollBehavior(to, from, saved) { if (saved) return saved // 浏览器历史产生的位移 if (to.hash) return { el: to.hash, behavior: 'smooth' } return { top: 0 } }
- 结合
<transition> 可以给 <router-view> 切换加动画。
12) 为什么“只是切页面,网络很快”?
- 首屏只加载需要的 chunk,其他页面通过路由懒加载按需拉取;
- 切换时只是组件卸载/挂载 + DOM diff,没有整页刷新、没有重新跑
index.html → main.js 这条冷启动链路;
- 浏览器缓存与 HTTP/2 会进一步减少请求开销。
13) 一个“可直接抄用”的最小骨架(汇总)
1
2
3
4
5
6
7
8
9
| src
├─ main.js
├─ App.vue
└─ router/
└─ index.js
└─ views/
├─ Home.vue
├─ About.vue
└─ User.vue
|
App.vue
1
2
3
4
5
6
7
| <template>
<nav>
<router-link to="/">Home</router-link>
<router-link to="/about">About</router-link>
</nav>
<router-view/>
</template>
|
router/index.js(同 4)
User.vue(演示复用组件时监听 params)
1
2
3
4
5
6
7
8
9
10
| <script setup>
import { useRoute, onBeforeRouteUpdate } from 'vue-router'
const route = useRoute()
function fetchUser(id){ }
fetchUser(route.params.id)
onBeforeRouteUpdate((to) => fetchUser(to.params.id))
</script>
<template><div>User: {{ $route.params.id }}</div></template>
|
一句话总结
路由表定义“URL → 组件”;app.use(router) 安装后接管历史与注册 <router-link>/<router-view>;每次 URL 改变都走“解析 → 匹配 → 守卫 → 确认 → 渲染”流程;没有整页刷新,只是把匹配的组件填进路由出口并按需更新 DOM。
组件结构:
1
2
3
4
5
6
7
8
9
10
11
12
13
|
<template>
<h1>User {{ $route.params.id }}</h1>
<router-link :to="`${$route.fullPath}/profile`">资料</router-link>
<router-view />
</template>
<template>
<h2>Profile</h2>
<router-link :to="`${$route.fullPath}/settings`">设置</router-link>
<router-view />
</template>
|
6.Axios
1.简介
Axios 是什么(与 fetch 的最小差异)
- 基于 Promise 的网络请求库,浏览器 + Node 通用,默认就带有请求/响应拦截器机制、请求取消、超时等能力。
- 与
fetch 相比:Axios 默认把响应按 responseType 解析好(默认 JSON),错误只要非 2xx 就走 catch,用起来更顺手。
最小使用:
1
2
3
| import axios from "axios"
axios.get('/user')
.then(res => console.log(resp.data))
|
2.请求GET / POST(含参数与请求体)
get请求
直写查询串
1
2
3
4
5
6
7
8
9
10
11
12
13
|
axios.get('/user?ID=12345')
.then(function (response) {
console.log(response);
})
.catch(function (error) {
console.log(error);
})
.finally(function () {
});
|
// 用 params(推荐,可配合序列化器)
1
2
3
4
5
6
7
8
9
10
11
12
13
14
15
|
axios.get('/user', {
params: {
ID: 12345
}
})
.then(function (response) {
console.log(response);
})
.catch(function (error) {
console.log(error);
})
.finally(function () {
});
|
两种写法等价;当有数组、嵌套对象时,搭配 paramsSerializer 更稳
post请求
Axios 默认以 JSON 提交请求体:
1
2
3
4
5
6
7
8
9
10
| axios.post('/user', {
firstName: 'Fred',
lastName: 'Flintstone'
})
.then(function (response) {
console.log(response);
})
.catch(function (error) {
console.log(error);
});
|
其他常见格式:
1
2
3
4
5
6
7
8
9
10
11
|
import qs from 'qs'
axios.post('/login', qs.stringify({ username:'a', password:'b' }))
const fd = new FormData()
fd.append('file', fileInput.files[0])
fd.append('desc', 'avatar')
axios.post('/upload', fd, {
onUploadProgress: e => console.log('上传进度:', Math.round(e.progress * 100) + '%')
})
|
3.响应
响应的数据结构如下:
Axios 的响应对象:{ data, status, statusText, headers, config, request }。
最常用的是 response.data
1
2
3
4
5
6
7
8
9
10
11
12
13
14
15
16
17
18
19
| {
// `data` 由服务器提供的响应
data: {},
// `status` 来⾃服务器响应的HTTP 状态码
status: 200,
// `statusText` 来⾃服务器响应的HTTP 状态信息
statusText: 'OK',
// `headers` 是服务器响应头
// 所有的header 名称都是⼩写,⽽且可以使⽤⽅括号语法访问
// 例如: `response.headers['content-type']`
headers: {},
// `config` 是`axios` 请求的配置信息
config: {},
// `request` 是⽣成此响应的请求
// 在node.js中它是最后⼀个ClientRequest实例(in redirects),
// 在浏览器中则是 XMLHttpRequest 实例
request: {}
}
|
4.配置
1
2
3
4
5
6
7
8
9
10
11
12
13
14
15
16
17
18
19
20
21
22
23
24
25
26
27
28
29
30
31
32
33
34
35
36
37
38
39
40
41
42
43
44
45
46
47
48
49
50
51
52
53
54
55
56
57
58
59
60
61
62
63
64
65
66
67
68
69
70
71
72
73
74
75
76
77
78
79
80
81
82
83
84
85
86
87
88
89
90
91
92
93
94
95
96
97
98
99
100
101
102
103
104
105
106
107
108
109
110
111
112
113
114
115
116
117
118
119
120
121
122
123
124
125
126
127
128
|
const instance = axios.create({
baseURL: 'https://some-domain.com/api/', // 基础请求地址
timeout: 1000, // 请求超时时间(毫秒)
headers: { 'X-Custom-Header': 'foobar' } // 自定义请求头
});
{
url: '/user',
method: 'get',
baseURL: 'https://some-domain.com/api/',
transformRequest: [function (data, headers) {
return data;
}],
transformResponse: [function (data) {
return data;
}],
headers: { 'X-Requested-With': 'XMLHttpRequest' },
params: {
ID: 12345
},
paramsSerializer: function (params) {
return Qs.stringify(params, { arrayFormat: 'brackets' });
},
data: {
firstName: 'Fred'
},
data: 'Country=Brasil&City=Belo Horizonte',
timeout: 1000,
withCredentials: false,
adapter: function (config) {
},
auth: {
username: 'janedoe',
password: 's00pers3cret'
},
responseType: 'json',
responseEncoding: 'utf8',
xsrfCookieName: 'XSRF-TOKEN',
xsrfHeaderName: 'X-XSRF-TOKEN',
onUploadProgress: function (progressEvent) {
},
onDownloadProgress: function (progressEvent) {
},
maxContentLength: 2000,
maxBodyLength: 2000,
validateStatus: function (status) {
return status >= 200 && status < 300;
},
maxRedirects: 5,
socketPath: null,
httpAgent: new http.Agent({ keepAlive: true }),
httpsAgent: new https.Agent({ keepAlive: true }),
proxy: {
protocol: 'https',
host: '127.0.0.1',
port: 9000,
auth: {
username: 'mikemike',
password: 'rapunz3l'
}
},
cancelToken: new CancelToken(function (cancel) {
}),
decompress: true
}
|

5.拦截器(统一加 Token / 统一处理错误与数据)
1.请求拦截器:自动带上 token / 语言等
1
2
3
4
5
6
7
8
| http.interceptors.request.use(
config => {
const token = localStorage.getItem('token')
if (token) config.headers.Authorization = `Bearer ${token}`
return config
},
error => Promise.reject(error)
)
|
2 响应拦截器:解包数据、兜底错误
1
2
3
4
5
6
7
8
9
10
11
12
13
14
15
16
17
| http.interceptors.response.use(
res => {
return res.data
},
err => {
const status = err?.response?.status
const msg = err?.response?.data?.message || err.message
console.error('HTTP Error:', status, msg)
if (status === 401) {
}
return Promise.reject(err)
}
)
|
6.超时、取消、重试(稳定性关键)以及错误处理
1 超时
1
| http.get('/slow', { timeout: 5000 })
|
2 取消请求(建议用 AbortController)
Axios v1 推荐 signal,老的 CancelToken 已不再鼓励使用(笔记里仍有示例,放在最后对照)。
1
2
3
| const controller = new AbortController()
http.get('/search', { signal: controller.signal })
setTimeout(() => controller.abort(), 300)
|
(对照:传统 cancelToken 也能用)
1
2
3
4
| const CancelToken = axios.CancelToken
const source = CancelToken.source()
http.get('/search', { cancelToken: source.token })
source.cancel('用户取消')
|
3 简单重试(指数退避)
1
2
3
4
5
6
7
8
9
10
11
12
13
14
15
16
| async function withRetry(fn, { retries = 2, delay = 300, factor = 2 } = {}) {
let attempt = 0, lastErr
while (attempt <= retries) {
try { return await fn() } catch (e) {
lastErr = e
const retriable = e.code === 'ERR_CANCELED' || (e.response && e.response.status >= 500)
if (!retriable || attempt === retries) break
await new Promise(r => setTimeout(r, delay * (factor ** attempt)))
attempt++
}
}
throw lastErr
}
withRetry(() => http.get('/unstable')).then(console.log).catch(console.error)
|
错误处理:三类错误怎么判
1
2
3
4
5
6
7
8
9
10
11
| http.get('/api')
.then(data => { })
.catch(err => {
if (err.response) {
} else if (err.request) {
} else {
}
})
|
(response/request/message 的结构,笔记“响应”一节有说明)
8.“服务层”封装(推荐项目结构)
1 通用请求助手(范型 + 统一方法)
1
2
3
4
5
6
7
8
9
10
11
12
13
14
15
|
import { http } from './http'
export function get<T>(url: string, params?: any) {
return http.get<T>(url, { params })
}
export function post<T>(url: string, data?: any) {
return http.post<T>(url, data)
}
export function put<T>(url: string, data?: any) {
return http.put<T>(url, data)
}
export function del<T>(url: string, data?: any) {
return http.delete<T>(url, { data })
}
|
2 具体业务模块
1
2
3
4
5
| // api/user.ts
import { get, post } from './request'
export const fetchUser = (id: string) => get<User>('/user', { id })
export const login = (body: { username: string; password: string }) => post<LoginResp>('/login', body)
|
9.与 Vue 结合(两种主流方式)
1 直接导入实例(最简单)
1
2
3
|
import { fetchUser } from '@/api/user'
const user = await fetchUser('1001')
|
2 作为插件注入(可在模板里用)
1
2
3
4
5
6
7
8
9
10
11
12
13
14
15
|
import { http } from '@/api/http'
export default {
install(app) {
app.config.globalProperties.$http = http
app.provide('http', http)
}
}
import axiosPlugin from './plugins/axios'
createApp(App).use(router).use(axiosPlugin).mount('#app')
const http = inject('http')
|
10. 安全与跨域:withCredentials / XSRF
- 跨域携带 cookie:
withCredentials: true(服务端需允许并设置 Access-Control-Allow-Credentials:true)。
- XSRF 防护:后端把 token 写在 Cookie(如
XSRF-TOKEN),Axios 自动从 Cookie 读出并注入请求头 X-XSRF-TOKEN(可在配置中自定义字段名)。
7.Pinia
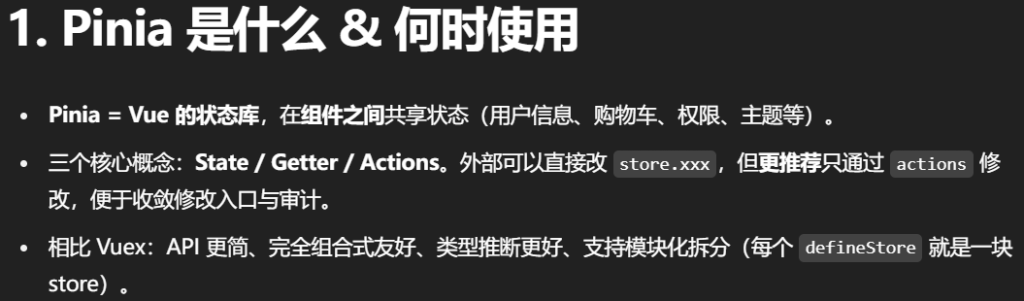
1.核⼼
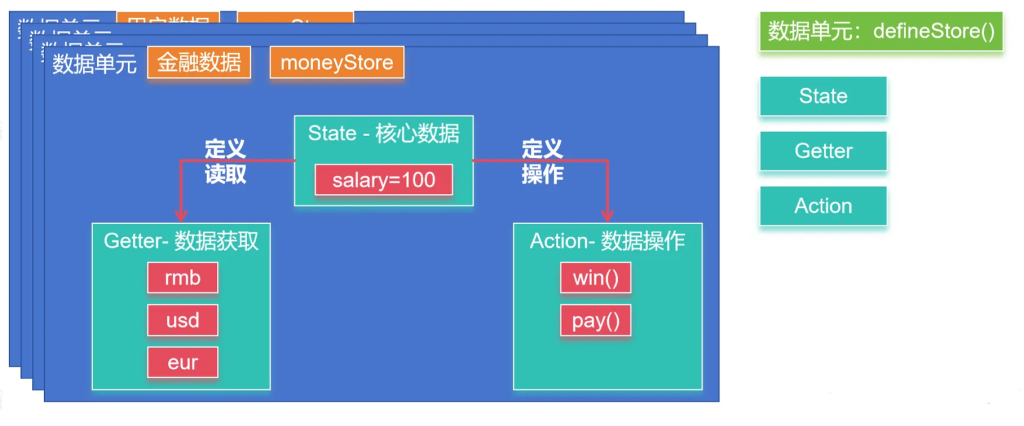
Pinia 是 Vue 的存储库,它允许您跨组件/⻚⾯共享状态。
Pinia 三个核⼼概念:
- State:表示 Pinia Store 内部保存的数据(data)
- Getter:可以认为是 Store ⾥⾯数据的计算属性(computed)
- Actions:是暴露修改数据的⼏种⽅式。
虽然外部也可以直接读写Pinia Store 中保存的data,但是我们建议使⽤Actions暴露的⽅法操作数据更
加安全。
2.整合
main.js
1
2
3
4
5
6
7
8
|
import { createApp } from 'vue'
import { createPinia } from 'pinia'
import App from './App.vue'
const app = createApp(App)
app.use(createPinia())
app.mount('#app')
|
3.案例
stores/money.js编写内容;
Options 写法(更像 Vue Options API)
1
2
3
4
5
6
7
8
9
10
11
12
13
14
| // stores/money.js
import { defineStore } from 'pinia'
export const useMoneyStore = defineStore('money', {
state: () => ({ money: 100 }), // State
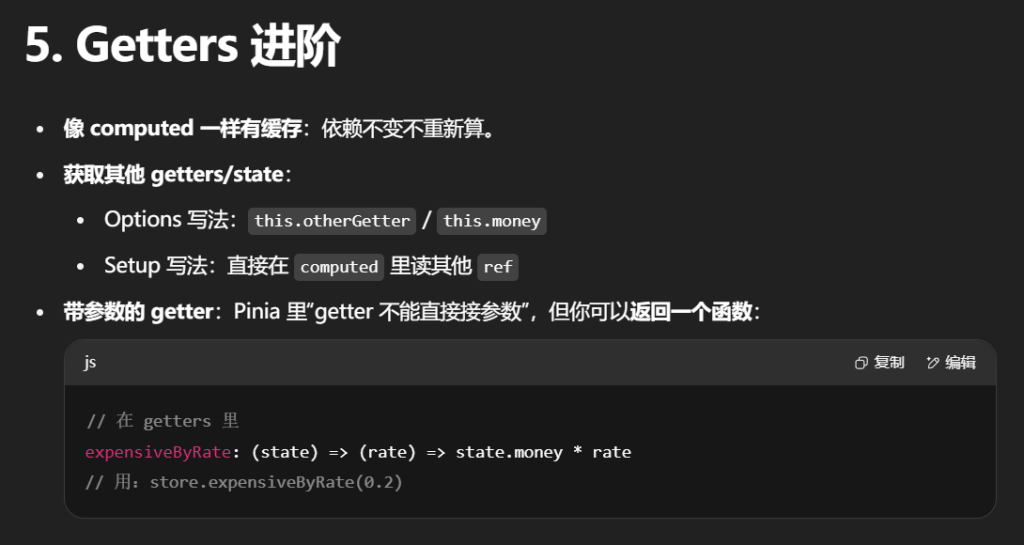
getters: { // Getters(有缓存)
rmb: (state) => state.money,
usd: (state) => state.money * 0.14,
eur: (state) => state.money * 0.13,
},
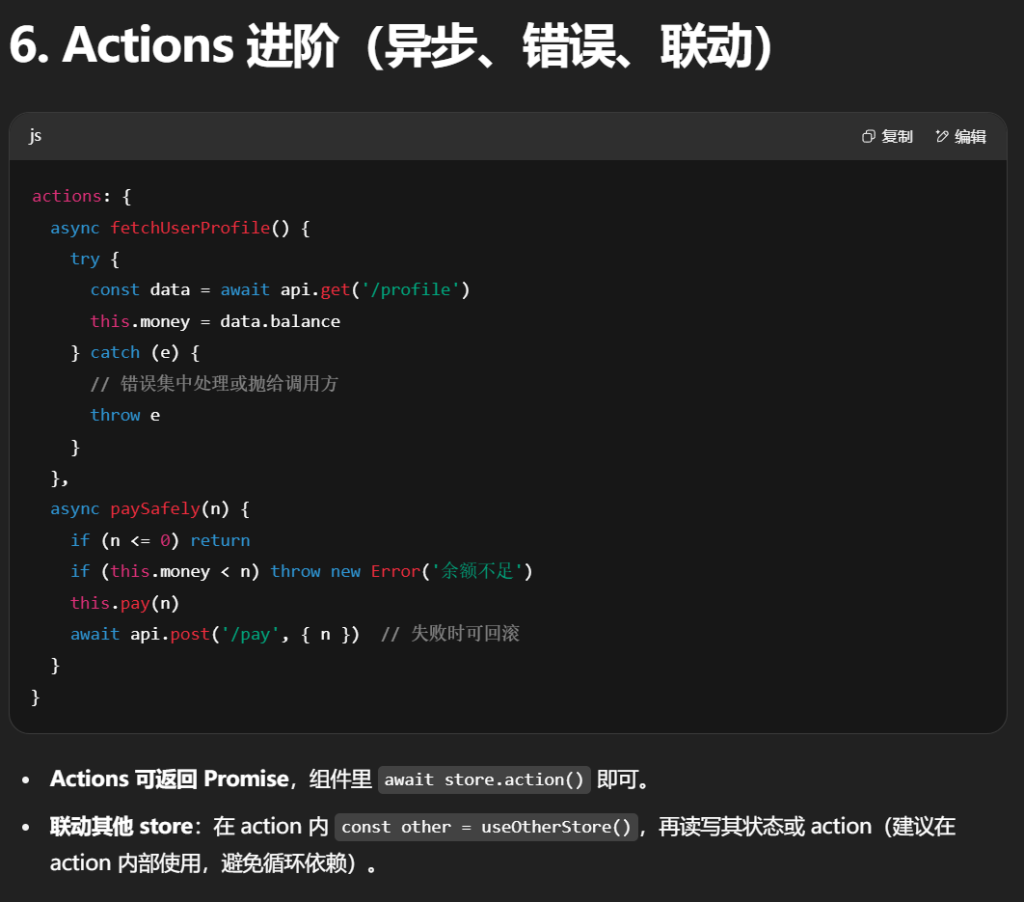
actions: { // Actions(同步/异步都可)
win(arg) { this.money += arg },
pay(arg) { this.money -= arg }
}
})
|
this 指向 store 实例(可读写 state、调其他 actions)。- Getters 自动缓存,依赖不变不会重复计算。
App.vue
1
2
3
4
5
6
7
8
9
10
11
12
13
14
15
16
17
18
19
20
21
22
23
24
25
26
27
| <script setup>
import Wallet from "./components/Wallet.vue";
import Game from "./components/Game.vue";
</script>
<template>
<Wallet></Wallet>
<Game/>
</template>
<style scoped>
.logo {
height: 6em;
padding: 1.5em;
will-change: filter;
transition: filter 300ms;
}
.logo:hover {
filter: drop-shadow(0 0 2em #646cffaa);
}
.logo.vue:hover {
filter: drop-shadow(0 0 2em #42b883aa);
}
</style>
|
Game.vue
1
2
3
4
5
6
7
8
| <script setup>
import { useMoneyStore } from '@/stores/money'
const { win, pay } = useMoneyStore()
</script>
<template>
<button @click="win(100)">刮刮乐</button>
<button @click="pay(5)">买棒棒糖</button>
</template>
|
Wallet.vue
1
2
3
4
5
6
7
8
9
10
11
12
13
| <script setup>
import { storeToRefs } from 'pinia'
import { useMoneyStore } from '@/stores/money'
const { money, rmb, usd, eur } = storeToRefs(useMoneyStore())
</script>
<template>
<div>
<h2>¥:{{ money }}</h2>
<h2>¥:{{ rmb }}</h2>
<h2>$:{{ usd }}</h2>
<h2>€:{{ eur }}</h2>
</div>
</template>
|
Setup 写法(完全组合式)
1
2
3
4
5
6
7
8
9
10
11
12
13
| // stores/money.js
import { defineStore } from 'pinia'
import { ref, computed } from 'vue'
export const useMoneyStore = defineStore('money', () => {
const money = ref(100) // state
const rmb = computed(() => money.value) // getters
const usd = computed(() => money.value * 0.14)
const eur = computed(() => money.value * 0.13)
const win = (n) => { money.value += n } // actions
const pay = (n) => { money.value -= n }
return { money, rmb, usd, eur, win, pay } // 必须 return 暴露
})
|
- 完全是 Vue 组合式 API 的写法(
ref/computed/function)。
- 不用
this,直接用闭包变量。
- 你的笔记也给出了 Setup 版本。
选择建议
- 用 Setup 写法:组合式项目、TS 友好、可自由组合其他
ref/computed/副作用。
- 用 Options 写法:从 Vuex 迁移、或团队更熟悉 Options 思维。
4.在组件中使用(正确的响应式解构姿势)
1
2
3
4
5
6
7
8
9
10
11
12
13
14
15
16
17
| <script setup>
import { storeToRefs } from 'pinia'
import { useMoneyStore } from '@/stores/money'
const moneyStore = useMoneyStore()
const { money, rmb, usd, eur } = storeToRefs(moneyStore)
const { win, pay } = moneyStore
</script>
<template>
<h2>¥ {{ money }}</h2>
<h2>$ {{ usd }}</h2>
<button @click="win(100)">刮刮乐</button>
<button @click="pay(5)">买棒棒糖</button>
</template>
|
- 不要直接用 ES 解构
const { money } = moneyStore,那样会丢响应式;应使用 storeToRefs(store)。
- 你的
Wallet.vue / Game.vue 用法与此一致(未解构时直接用 moneyStore.xxx 也 OK)。
5.Store 的实例 API(很实用)
1
2
3
4
5
6
7
8
9
10
11
12
13
14
15
16
17
18
19
20
21
22
23
| const store = useMoneyStore()
store.$patch({ money: store.money + 100 })
store.$patch((state) => { state.money += 100 })
store.$reset?.()
const stop = store.$subscribe((mutation, state) => {
localStorage.setItem('money', JSON.stringify(state))
}, { detached: true })
store.$onAction(({ name, args, after, onError }) => {
const start = Date.now()
after(() => console.log(`[${name}] 耗时`, Date.now() - start, 'ms'))
onError
((e) => console.error(`[${name}] 失败`, e))
})
|
8.脚手架
1
2
3
| npm create vite
npm create vue@latest
vue-cli
|
9.登录鉴权实战把 Pinia + Axios + Vue Router 串起来:
- 账号密码登录 → 保存
accessToken/refreshToken(持久化)
- Axios 请求自动带 token,401 自动刷新,失败回登录
- 受保护路由(
meta.requiresAuth)+ 全局守卫
- 退出登录全清理
- 提供可运行的 本地假接口(前端内置 mock),开箱即用
目录结构
1
2
3
4
5
6
7
8
9
10
11
12
13
14
15
16
17
| src/
main.ts
App.vue
router/
index.ts
api/
http.ts
auth.ts
mock.ts
stores/
auth.ts
views/
Login.vue
Dashboard.vue
Profile.vue
components/
NavBar.vue
|
如用 JS,把后缀 .ts 改成 .js 即可。
1) Axios 实例与拦截器(api/http.ts)
1
2
3
4
5
6
7
8
9
10
11
12
13
14
15
16
17
18
19
20
21
22
23
24
25
26
27
28
29
30
31
32
33
34
35
36
37
38
39
40
41
42
43
44
45
46
47
48
49
50
51
52
53
54
55
56
57
58
59
60
61
62
63
64
65
66
67
68
69
70
71
72
73
74
|
import axios, { AxiosError, AxiosRequestConfig } from 'axios'
import { useAuthStore } from '@/stores/auth'
import router from '@/router'
export const http = axios.create({
baseURL: '/api',
timeout: 10000,
headers: { 'X-Requested-With': 'XMLHttpRequest' }
})
let isRefreshing = false
let pendingQueue: Array<(token: string | null) => void> = []
function flushQueue(token: string | null) {
pendingQueue.forEach(cb => cb(token))
pendingQueue = []
}
http.interceptors.request.use((config) => {
const auth = useAuthStore()
const token = auth.accessToken
if (token) config.headers.Authorization = `Bearer ${token}`
return config
})
http.interceptors.response.use(
(res) => res.data,
async (error: AxiosError) => {
const auth = useAuthStore()
const status = error.response?.status
const original = error.config as AxiosRequestConfig & { _retry?: boolean }
if (status === 401 && !original._retry) {
if (!auth.refreshToken) {
auth.logout()
return router.replace({ name: 'login', query: { redirect: location.pathname } })
}
if (isRefreshing) {
return new Promise((resolve, reject) => {
pendingQueue.push((t) => {
if (!t) return reject(error)
original.headers = { ...(original.headers || {}), Authorization: `Bearer ${t}` }
original._retry = true
resolve(http(original))
})
})
}
try {
isRefreshing = true
const newToken = await auth.refresh()
flushQueue(newToken)
original.headers = { ...(original.headers || {}), Authorization: `Bearer ${newToken}` }
original._retry = true
return http(original)
} catch (e) {
flushQueue(null)
auth.logout()
return router.replace({ name: 'login', query: { redirect: location.pathname } })
} finally {
isRefreshing = false
}
}
return Promise.reject(error)
}
)
|
2) 认证 API(api/auth.ts)与本地假接口(api/mock.ts)
为了“即插即用”,这里给了前端自带 mock。以后接后端时只需把 mockLogin/mockRefresh/getProfile 换成真实接口。
1
2
3
4
5
6
7
8
9
10
11
12
13
14
15
16
17
18
19
20
21
22
23
24
25
26
27
28
29
30
31
32
33
34
35
36
37
38
39
40
41
42
43
44
45
46
47
48
49
50
51
52
|
type User = { id: string; name: string; role: 'user' | 'admin' }
let FAKE_DB_USER: User = { id: 'u1001', name: 'Alice', role: 'user' }
let ACCESS = 'access_initial'
let REFRESH = 'refresh_initial'
let ACCESS_EXPIRES_AT = Date.now() + 60_000
export async function mockLogin(username: string, password: string) {
await sleep(400)
if (username !== 'alice' || password !== '123456') {
throw { response: { status: 401, data: { message: '用户名或密码错误' } } }
}
ACCESS = 'access_' + Math.random().toString(36).slice(2)
REFRESH = 'refresh_' + Math.random().toString(36).slice(2)
ACCESS_EXPIRES_AT = Date.now() + 60_000
return { accessToken: ACCESS, refreshToken: REFRESH, user: FAKE_DB_USER }
}
export async function mockRefresh(refreshToken: string) {
await sleep(300)
if (refreshToken !== REFRESH) {
throw { response: { status: 401, data: { message: '刷新令牌失效' } } }
}
ACCESS = 'access_' + Math.random().toString(36).slice(2)
ACCESS_EXPIRES_AT = Date.now() + 60_000
return { accessToken: ACCESS }
}
export async function mockGetProfile(accessToken: string) {
await sleep(200)
if (accessToken !== ACCESS || Date.now() > ACCESS_EXPIRES_AT) {
throw { response: { status: 401, data: { message: 'AccessToken 过期' } } }
}
return FAKE_DB_USER
}
function sleep(ms: number) { return new Promise(r => setTimeout(r, ms)) }
import { http } from './http'
import { mockLogin, mockRefresh, mockGetProfile } from './mock'
export const login = (data:{username:string;password:string}) => mockLogin(data.username, data.password)
export const refreshToken = (rt:string) => mockRefresh(rt)
export const getProfile = (at?:string) => mockGetProfile(at || '')
|
3) Pinia 认证仓库(stores/auth.ts)
1
2
3
4
5
6
7
8
9
10
11
12
13
14
15
16
17
18
19
20
21
22
23
24
25
26
27
28
29
30
31
32
33
34
35
36
37
38
39
40
41
42
43
44
45
46
47
48
49
50
51
|
import { defineStore } from 'pinia'
import { login, refreshToken, getProfile } from '@/api/auth'
type User = { id: string; name: string; role: 'user' | 'admin' }
export const useAuthStore = defineStore('auth', {
state: () => ({
accessToken: localStorage.getItem('accessToken') as string | null,
refreshToken: localStorage.getItem('refreshToken') as string | null,
user: (localStorage.getItem('user') ? JSON.parse(localStorage.getItem('user')!) : null) as User | null
}),
getters: {
isAuthed: (s) => !!s.accessToken && !!s.user
},
actions: {
async login(username: string, password: string) {
const res = await login({ username, password })
this.accessToken = res.accessToken
this.refreshToken = res.refreshToken
this.user = res.user
this._persist()
},
async refresh(): Promise<string> {
if (!this.refreshToken) throw new Error('no refresh token')
const res = await refreshToken(this.refreshToken)
this.accessToken = res.accessToken
this._persist()
return res.accessToken
},
async fetchProfile() {
if (!this.accessToken) throw new Error('no access token')
this.user = await getProfile(this.accessToken)
this._persist()
},
logout() {
this.accessToken = null
this.refreshToken = null
this.user = null
localStorage.removeItem('accessToken')
localStorage.removeItem('refreshToken')
localStorage.removeItem('user')
},
_persist() {
if (this.accessToken) localStorage.setItem('accessToken', this.accessToken)
if (this.refreshToken) localStorage.setItem('refreshToken', this.refreshToken)
if (this.user) localStorage.setItem('user', JSON.stringify(this.user))
}
}
})
|
4) 路由与守卫(router/index.ts)
1
2
3
4
5
6
7
8
9
10
11
12
13
14
15
16
17
18
19
20
21
22
23
24
25
26
27
28
29
30
31
32
33
34
35
36
37
38
39
40
| // src/router/index.ts
import { createRouter, createWebHistory, RouteRecordRaw } from 'vue-router'
import { useAuthStore } from '@/stores/auth'
const routes: RouteRecordRaw[] = [
{ path: '/', redirect: '/dashboard' },
{ path: '/login', name: 'login', component: () => import('@/views/Login.vue') },
// 受保护路由
{
path: '/dashboard',
name: 'dashboard',
component: () => import('@/views/Dashboard.vue'),
meta: { requiresAuth: true }
},
{
path: '/profile',
name: 'profile',
component: () => import('@/views/Profile.vue'),
meta: { requiresAuth: true }
},
{ path: '/:pathMatch(.*)*', name: '404', component: { template: '<h2>404</h2>' } }
]
const router = createRouter({
history: createWebHistory(),
routes,
scrollBehavior() { return { top: 0 } }
})
// 全局前置:鉴权 & 还原重定向
router.beforeEach(async (to) => {
const auth = useAuthStore()
if (to.meta.requiresAuth && !auth.isAuthed) {
// 未登录:跳转登录,并带上 redirect
return { name: 'login', query: { redirect: to.fullPath } }
}
})
export default router
|
5) 入口与 App(main.ts, App.vue)
1
2
3
4
5
6
7
8
9
10
11
12
13
14
15
16
|
import { createApp } from 'vue'
import { createPinia } from 'pinia'
import App from './App.vue'
import router from './router'
createApp(App).use(createPinia()).use(router).mount('#app')
<!-- src/App.vue -->
<script setup lang="ts">
import NavBar from '@/components/NavBar.vue'
</script>
<template>
<NavBar />
<router-view />
</template>
|
6) 登录页 / 仪表盘 / 资料页 / 导航栏
1
2
3
4
5
6
7
8
9
10
11
12
13
14
15
16
17
18
19
20
21
22
23
24
25
26
27
28
29
30
31
32
33
34
35
36
37
38
39
40
41
42
43
44
45
46
47
48
49
50
51
52
53
54
55
56
57
58
59
60
61
62
63
64
65
66
67
68
69
70
71
72
73
74
75
76
77
78
79
80
81
82
83
84
85
86
87
88
89
|
<script setup lang="ts">
import { ref } from 'vue'
import { useRouter, useRoute } from 'vue-router'
import { useAuthStore } from '@/stores/auth'
const username = ref('alice')
const password = ref('123456')
const loading = ref(false)
const err = ref<string | null>(null)
const router = useRouter()
const route = useRoute()
const auth = useAuthStore()
async function onSubmit() {
loading.value = true
err.value = null
try {
await auth.login(username.value, password.value)
await auth.fetchProfile()
const redirect = (route.query.redirect as string) || '/dashboard'
router.replace(redirect)
} catch (e: any) {
err.value = e?.response?.data?.message || e.message || '登录失败'
} finally {
loading.value = false
}
}
</script>
<template>
<h2>登录</h2>
<form @submit.prevent="onSubmit">
<input v-model="username" placeholder="用户名 alice" />
<input v-model="password" type="password" placeholder="密码 123456" />
<button :disabled="loading">{{ loading ? '登录中...' : '登录' }}</button>
</form>
<p v-if="err" style="color:#b00020">{{ err }}</p>
</template>
<script setup lang="ts">
import { useAuthStore } from '@/stores/auth'
const auth = useAuthStore()
</script>
<template>
<h2>Dashboard</h2>
<p>欢迎,{{ auth.user?.name }}(角色:{{ auth.user?.role }})</p>
<p>当前 accessToken: <code>{{ auth.accessToken }}</code></p>
</template>
<script setup lang="ts">
import { useAuthStore } from '@/stores/auth'
const auth = useAuthStore()
</script>
<template>
<h2>个人资料</h2>
<ul v-if="auth.user">
<li>ID:{{ auth.user.id }}</li>
<li>姓名:{{ auth.user.name }}</li>
<li>角色:{{ auth.user.role }}</li>
</ul>
</template>
<script setup lang="ts">
import { useRouter } from 'vue-router'
import { useAuthStore } from '@/stores/auth'
const auth = useAuthStore()
const router = useRouter()
function logout(){
auth.logout()
router.replace({ name: 'login' })
}
</script>
<template>
<nav style="display:flex; gap:12px; align-items:center; padding:8px 0;">
<router-link to="/dashboard">Dashboard</router-link>
<router-link to="/profile">Profile</router-link>
<span style="flex:1"></span>
<template v-if="auth.isAuthed">
<span>Hi, {{ auth.user?.name }}</span>
<button @click="logout">退出</button>
</template>
<router-link v-else to="/login">登录</router-link>
</nav>
</template>
|
7) 运行要点
- 本地即可运行(使用
mock.ts),无需后端。登录账号:alice / 123456。
- 生产接后端时:
- 把
api/auth.ts 中 mockLogin/mockRefresh/mockGetProfile 换为真实 http.post/get;
- 配置
Vite 代理避免 CORS(vite.config.ts): export default { server: { proxy: { '/api': { target: 'http://localhost:8080', changeOrigin: true } } } }
- 如果你的后端返回结构为
{ code, data, message },在 http.interceptors.response 里把返回值改为 res.data.data,并在非 code===0 时 Promise.reject() 统一抛错即可。
8) 鉴权流程(文字版时序)
-
访问受保护路由 → 全局守卫检测
:
- 否 → 去
/login?redirect=原地址
- 是 → 放行
-
登录提交 → 成功后持久化 accessToken/refreshToken/user,拉一次资料 → 重定向到 redirect
-
之后所有请求:Axios 请求拦截器自动带 Authorization
-
若响应 401:
- 若有
refreshToken → 串行刷新,队列挂起其它 401 请求 → 刷新成功:重试原请求;刷新失败:清空并去登录
-
退出:清掉 token 与用户信息,跳回登录页
10.Ant Design Vue
官⽹:https://www.antdv.com/
使⽤npm create vue@latest创建出项⽬脚⼿架,然后整合ant design vue
1.整合
安装依赖
1
| npm i --save ant-design-vue@4.x
|
全局注册: 编写main.js
建议把 ConfigProvider 一并用上,后面主题/中文/暗黑都靠它切换。
1
2
3
4
5
6
7
8
9
10
11
12
13
14
15
| // main.ts
import { createApp, h } from 'vue'
import App from './App.vue'
import router from './router'
import Antd, { ConfigProvider, theme } from 'ant-design-vue'
import 'ant-design-vue/dist/reset.css'
const app = createApp({
render: () =>
h(ConfigProvider, {
theme: { algorithm: theme.defaultAlgorithm } // or theme.darkAlgorithm
}, { default: () => h(App) })
})
app.use(router).use(Antd).mount('#app')
|
也可把 ConfigProvider 写在 App.vue 外层模板里,二选一即可。
2. 后台经典布局:路由驱动的菜单
Layout:布局容器,其下可嵌套 Header Sider Content Footer 或 Layout 本身,可以放在任何⽗容器
中。
- Header:顶部布局,⾃带默认样式,其下可嵌套任何元素,只能放在 Layout 中。
- Sider:侧边栏,⾃带默认样式及基本功能,其下可嵌套任何元素,只能放在 Layout 中。
- Content:内容部分,⾃带默认样式,其下可嵌套任何元素,只能放在 Layout 中。
- Footer:底部布局,⾃带默认样式,其下可嵌套任何元素,只能放在 Layout 中。
⼀个典型的后台管理系统布局
相比在 watch(selectedKeys) 里手动 push,更推荐直接让菜单读路由并保持联动:
- 选中态:
selectedKeys 绑定 当前路由 path
- 点击:从菜单项
key 跳转;
- 嵌套路由:用
openKeys 控制父级展开;
- 响应式:
breakpoint="lg" 与 collapsedWidth 让 Sider 在窄屏收起。
App.vue
1
2
3
4
5
6
7
8
9
10
11
12
13
14
15
16
17
18
19
20
21
22
23
24
25
26
27
28
29
30
31
32
33
34
35
36
37
38
39
40
41
42
43
44
45
46
47
48
49
50
51
52
53
54
55
56
57
58
59
60
61
62
63
64
|
<script setup lang="ts">
import { ref, computed, h } from 'vue'
import { useRoute, useRouter } from 'vue-router'
import { UserOutlined, VideoCameraOutlined, UploadOutlined, MenuUnfoldOutlined, MenuFoldOutlined } from '@ant-design/icons-vue'
const route = useRoute()
const router = useRouter()
const collapsed = ref(false)
const menuItems = [
{ key: '/user', icon: () => h(UserOutlined), label: '用户' },
{ key: '/order', icon: () => h(VideoCameraOutlined), label: '订单' },
{ key: '/logistics', icon: () => h(UploadOutlined), label: '物流' }
]
const selectedKeys = computed(() => [route.matched.at(-1)?.path ?? route.path])
const openKeys = computed(() => route.matched.map(m => m.path).slice(0, -1))
function onMenuClick({ key }: { key: string }) { router.push(key) }
</script>
<template>
<a-layout style="min-height: 100vh">
<a-layout-sider
:collapsed="collapsed"
collapsible
:trigger="null"
breakpoint="lg"
:collapsedWidth="64"
>
<div class="logo" />
<a-menu
theme="dark"
mode="inline"
:items="menuItems"
:selectedKeys="selectedKeys"
:openKeys="openKeys"
@click="onMenuClick"
/>
</a-layout-sider>
<a-layout>
<a-layout-header style="background:#fff; padding:0 16px">
<menu-unfold-outlined v-if="collapsed" class="trigger" @click="collapsed=false" />
<menu-fold-outlined v-else class="trigger" @click="collapsed=true" />
</a-layout-header>
<a-layout-content style="margin:24px 16px;padding:24px;background:#fff">
<router-view/>
</a-layout-content>
<a-layout-footer style="text-align:center">Ant Design Vue Admin</a-layout-footer>
</a-layout>
</a-layout>
</template>
<style scoped>
.trigger{ font-size:18px; line-height:64px; cursor:pointer }
.logo{ height:32px; margin:16px; background:rgba(255,255,255,0.3); border-radius:4px }
</style>
|
3.典型业务页模板(表格 + 查询表单 + 新建/编辑弹窗)
放到 src/views/User.vue,即可得到“搜索+分页+增改”的骨架。
1
2
3
4
5
6
7
8
9
10
11
12
13
14
15
16
17
18
19
20
21
22
23
24
25
26
27
28
29
30
31
32
33
34
35
36
37
38
39
40
41
42
43
44
45
46
47
48
49
50
51
52
53
54
55
56
57
58
59
60
61
62
63
64
65
66
67
68
69
70
71
72
73
74
75
76
77
78
79
80
81
82
83
84
85
86
87
88
|
<script setup lang="ts">
import { ref, reactive, onMounted } from 'vue'
import { message, Modal } from 'ant-design-vue'
type User = { id:number; name:string; age:number }
const loading = ref(false)
const dataSource = ref<User[]>([])
const pagination = reactive({ current:1, pageSize:10, total:0, showTotal:(t:number)=>`共 ${t} 条` })
const query = reactive({ name:'', age: undefined as number | undefined })
async function fetchList(){
loading.value = true
await new Promise(r=>setTimeout(r,400))
const all = Array.from({length:57}, (_,i)=>({ id:i+1, name:`User${i+1}`, age: 18+(i%20) }))
const filtered = all.filter(u => (!query.name || u.name.includes(query.name)) && (!query.age || u.age===query.age))
pagination.total = filtered.length
const start = (pagination.current-1)*pagination.pageSize
dataSource.value = filtered.slice(start, start+pagination.pageSize)
loading.value = false
}
function handleTableChange(p:any){ Object.assign(pagination, p); fetchList() }
const modalVisible = ref(false)
const form = reactive<Partial<User>>({ id:0, name:'', age:18 })
const rules = { name:[{required:true,message:'请输入姓名'}], age:[{type:'number',required:true,message:'请输入年龄'}] }
function openCreate(){ Object.assign(form,{id:0,name:'',age:18}); modalVisible.value=true }
function openEdit(r:User){ Object.assign(form,r); modalVisible.value=true }
async function submit(){
await new Promise(r=>setTimeout(r,300))
message.success('保存成功'); modalVisible.value=false; fetchList()
}
function remove(r:User){
Modal.confirm({ title:`确认删除 ${r.name}?`, onOk: async()=>{ await new Promise(r=>setTimeout(r,300)); message.success('删除成功'); fetchList() } })
}
onMounted(fetchList)
</script>
<template>
<a-form layout="inline" :model="query" @submit.prevent>
<a-form-item label="姓名">
<a-input v-model:value="query.name" placeholder="支持模糊" allow-clear />
</a-form-item>
<a-form-item label="年龄">
<a-input-number v-model:value="query.age" :min="1" style="width:120px" />
</a-form-item>
<a-form-item>
<a-space>
<a-button type="primary" @click="()=>{pagination.current=1;fetchList()}">查询</a-button>
<a-button @click="()=>{Object.assign(query,{name:'',age:undefined});pagination.current=1;fetchList()}">重置</a-button>
<a-button type="dashed" @click="openCreate">新建用户</a-button>
</a-space>
</a-form-item>
</a-form>
<a-table
row-key="id"
:loading="loading"
:data-source="dataSource"
:pagination="pagination"
@change="handleTableChange"
style="margin-top:16px"
>
<a-table-column title="ID" dataIndex="id" />
<a-table-column title="姓名" dataIndex="name" />
<a-table-column title="年龄" dataIndex="age" />
<a-table-column title="操作" :customRender="({record}) =>
h('div', null, [
h('a', { onClick:()=>openEdit(record) }, '编辑'),
h('span', { style:'margin:0 8px' }, '|'),
h('a', { onClick:()=>remove(record) }, '删除')
])
" />
</a-table>
<a-modal v-model:open="modalVisible" title="用户" @ok="submit">
<a-form :model="form" :rules="rules" label-col="{span:5}" wrapper-col="{span:19}">
<a-form-item label="姓名" name="name"><a-input v-model:value="form.name" /></a-form-item>
<a-form-item label="年龄" name="age"><a-input-number v-model:value="form.age" :min="1" style="width:100%"/></a-form-item>
</a-form>
</a-modal>
</template>
|
这套写法把 Form + Table + Modal + Message 的最常见组合走通了,后续接入真实接口时,把 fetchList / submit / remove 换成 Axios 调用即可。
4.主题与暗黑模式
token 可微调主色、圆角、字号等设计变量;darkAlgorithm 一键暗黑。
1
2
3
4
5
6
7
8
9
10
11
12
13
14
|
<script setup>
import { ref } from 'vue'
import { ConfigProvider, theme } from 'ant-design-vue'
const dark = ref(false)
const themeCfg = computed(()=>({ algorithm: dark.value ? theme.darkAlgorithm : theme.defaultAlgorithm,
token: { colorPrimary: '#1677ff', borderRadius: 8 } }))
</script>
<template>
<ConfigProvider :theme="themeCfg">
<a-switch v-model:checked="dark" checked-children="Dark" un-checked-children="Light" />
<router-view/>
</ConfigProvider>
</template>
|
5. Icons 与按需加载(性能友好)
- 只引入用到的图标(你在笔记中已演示引入五个图标)。
- 规模较大时可用 unplugin 自动按需:
pnpm i -D unplugin-vue-components unplugin-auto-import
1
2
3
4
|
import Components from 'unplugin-vue-components/vite'
import { AntDesignVueResolver } from 'unplugin-vue-components/resolvers'
export default { plugins: [Components({ resolvers: [AntDesignVueResolver({ resolveIcons: true })] })] }
|
这样模板里直接写 <UserOutlined/> <a-button/> 即可自动注册。
7. 路由与文件
router-index.js
1
2
3
4
5
6
7
8
9
10
| // router/index.ts
import { createRouter, createWebHistory } from 'vue-router'
export default createRouter({
history: createWebHistory(),
routes: [
{ path: '/user', name:'User', component: () => import('@/views/User.vue') },
{ path: '/order', name:'Order', component: () => import('@/views/Order.vue') },
{ path: '/:pathMatch(.*)*', name:'404', component: { template:'<h2>404</h2>' } }
]
})
|
前端工程化速通完结