JDBC
1.JDBC的概念
1.1JDBC的概念
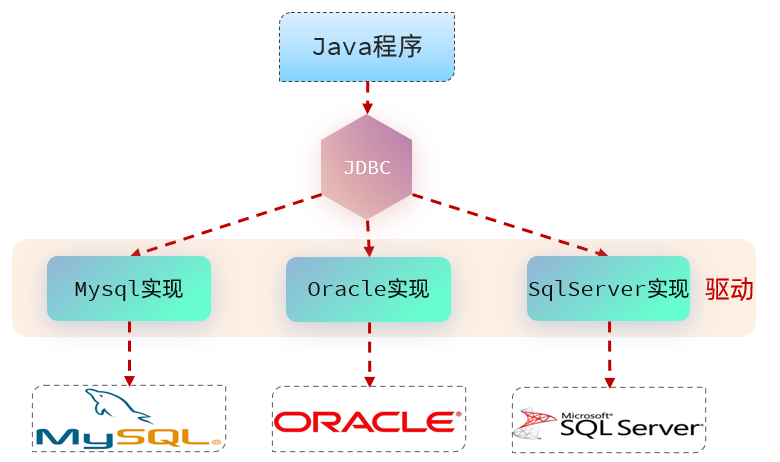
- JDBC:Java Database Connectivity,意为Java数据库连接。
- JDBC是Java提供的一组独立于任何数据库管理系统的API。
- Java提供接口规范,由各个数据库厂商提供接口的实现,厂商提供的实现类封装成jar文件,也就是我们俗称的数据库驱动jar包。
- 学习JDBC,充分体现了面向接口编程的好处,程序员只关心标准和规范,而无需关注实现过程。
1.2JDBC的核心组成
- 接口规范:
- 为了项目代码的可移植性,可维护性,SUN公司从最初就制定了Java程序连接各种数据库的统一接口规范。这样的话,不管是连接哪一种DBMS软件,Java代码可以保持一致性。
- 接口存储在java.sql和javax.sql包下。
- 实现规范:
- 因为各个数据库厂商的DBMS软件各有不同,那么各自的内部如何通过SQL实现增、删、改、查等操作管理数据,只有这个数据库厂商自己更清楚,因此把接口规范的实现交给各个数据库厂商自己实现。
- 厂商将实现内容和过程封装成jar文件,我们程序员只需要将jar文件引入到项目中集成即可,就可以开发调用实现过程操作数据库了。
2.JDBC快速入门
2.1准备工作
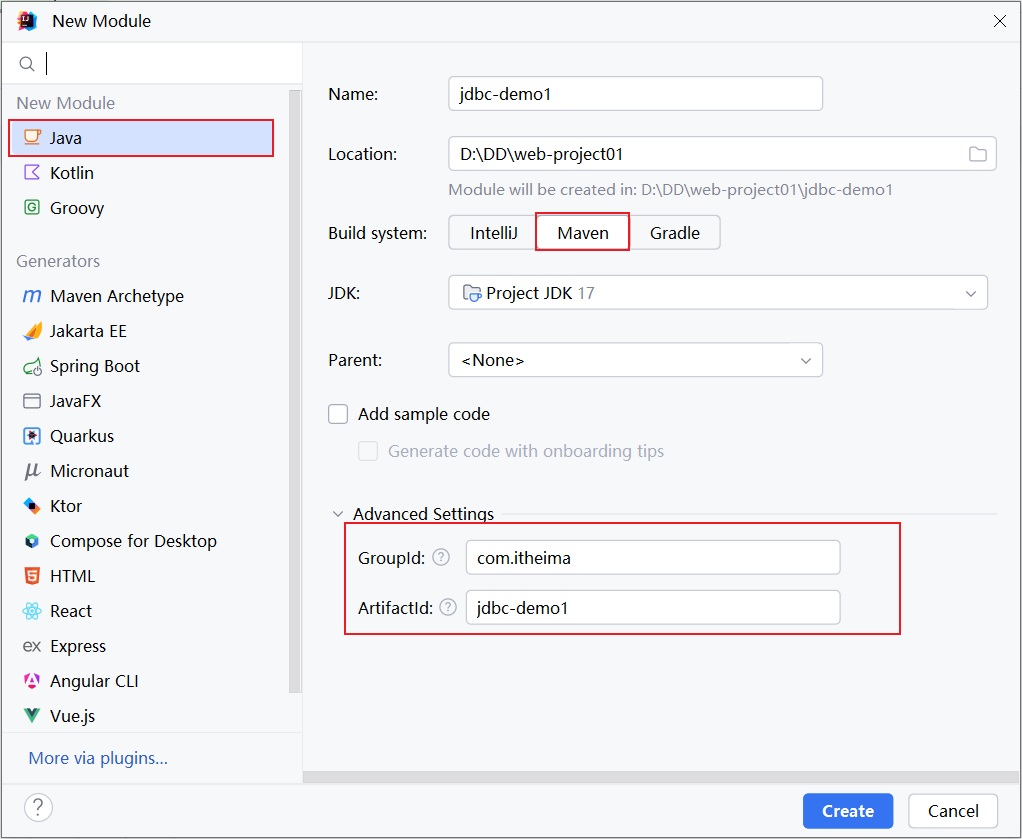
1). 创建一个maven项目
2). 创建一个数据库 web,并在该数据库中创建user表
1 | create table user( |
2.2代码实现
具体的代码为:
1). 在 pom.xml 文件中引入依赖
1 | <dependencies> |
2). 在 src/main/test/java 目录下编写测试类,定义测试方法
1 | public class JDBCTest { |
2.3步骤总结
- 1.注册驱动【依赖的驱动类,进行安装】/注册pom
- 2.获取连接【Connection建立连接】
- 3.创建发送SQL语句对象【Connection创建发送SQL语句的Statement】
- 4.发送SQL语句,并获取返回结果【Statement 发送sql语句到数据库并且取得返回结果】
- 5.结果集解析【结果集解析,将查询结果解析出来】
- 6.资源关闭【释放ResultSet、Statement 、Connection】
3.核心API理解
3.1 注册驱动(我们这里用导入pom.xml依赖替代了这一步)
- Class.forName(“com.mysql.cj.jdbc.Driver”);
- 在 Java 中,当使用 JDBC(Java Database Connectivity)连接数据库时,需要加载数据库特定的驱动程序,以便与数据库进行通信。加载驱动程序的目的是为了注册驱动程序,使得 JDBC API 能够识别并与特定的数据库进行交互。
- 从JDK6开始,不再需要显式地调用
Class.forName()来加载 JDBC 驱动程序,只要在类路径中集成了对应的jar文件,会自动在初始化时注册驱动程序。
3.2 Connection
- Connection接口是JDBC API的重要接口,用于建立与数据库的通信通道。换而言之,Connection对象不为空,则代表一次数据库连接。
- 在建立连接时,需要指定数据库URL、用户名、密码参数。
- URL:jdbc:mysql://localhost:3306/atguigu
- jdbc:mysql://IP地址:端口号/数据库名称?参数键值对1&参数键值对2
- URL:jdbc:mysql://localhost:3306/atguigu
Connection接口还负责管理事务,Connection接口提供了commit和rollback方法,用于提交事务和回滚事务。- 可以创建
Statement对象,用于执行 SQL 语句并与数据库进行交互。 - 在使用JDBC技术时,必须要先获取Connection对象,在使用完毕后,要释放资源,避免资源占用浪费及泄漏。
3.3 Statement
-
Statement接口用于执行 SQL 语句并与数据库进行交互。它是 JDBC API 中的一个重要接口。通过Statement对象,可以向数据库发送 SQL 语句并获取执行结果。 -
结果可以是一个或多个结果。
- 增删改:受影响行数单个结果。
- 查询:单行单列、多行多列、单行多列等结果。
-
但是
1
Statement
接口在执行SQL语句时,会产生
1
SQL注入攻击问题
:
- 当使用
Statement执行动态构建的 SQL 查询时,往往需要将查询条件与 SQL 语句拼接在一起,直接将参数和SQL语句一并生成,让SQL的查询条件始终为true得到结果。
- 当使用
3.4 PreparedStatement
-
PreparedStatementStatement1
2
3
是预编译1
2
3
接口的子接口,用于执行@Test public void querySingleRowAndColumn() throws SQLException { //1.注册驱动1
2
3
4
5
6
7
8
9
10
11
12
13
14
15
16
17
18
19
的 SQL 查询,作用如下:
- 预编译SQL语句:在创建PreparedStatement时,就会预编译SQL语句,也就是SQL语句已经固定。
- 防止SQL注入:`PreparedStatement` 支持参数化查询,将数据作为参数传递到SQL语句中,采用?占位符的方式,将传入的参数用一对单引号包裹起来'',无论传递什么都作为值。有效防止传入关键字或值导致SQL注入问题。
- 性能提升:PreparedStatement是预编译SQL语句,同一SQL语句多次执行的情况下,可以复用,不必每次重新编译和解析。
- 后续的学习我们都是基于PreparedStatement进行实现,更安全、效率更高!
### 3.5 ResultSet
- `ResultSet`是 JDBC API 中的一个接口,用于表示从数据库中`执行查询语句所返回的结果集`。它提供了一种用于遍历和访问查询结果的方式。
- 遍历结果:ResultSet可以使用 `next()` 方法将游标移动到结果集的下一行,逐行遍历数据库查询的结果,返回值为boolean类型,true代表有下一行结果,false则代表没有。
- 获取单列结果:可以通过getXxx的方法获取单列的数据,该方法为重载方法,支持索引和列名进行获取。
## 4.基于PreparedStatement实现CRUD
### 4.1 查询单行单列
// Class.forName(“com.mysql.cj.jdbc.Driver”);
    //2.获取数据库连接
    Connection connection = DriverManager.getConnection("jdbc:mysql://localhost:3306/atguigu", "root","atguigu");

    //3.创建PreparedStatement对象,并预编译SQL语句
    PreparedStatement preparedStatement = connection.prepareStatement("select count(*) as count from t_emp");

    //4.执行SQL语句,获取结果
    ResultSet resultSet = preparedStatement.executeQuery();

    //5.处理结果
    while (resultSet.next()){
        int count = resultSet.getInt("count");
        System.out.println("count = " + count);
    }

    //6.释放资源(先开后关原则)
    resultSet.close();
    preparedStatement.close();
    connection.close();

}
1 |
|
@Test
public void querySingleRow() throws SQLException {
    //1.注册驱动
// Class.forName(“com.mysql.cj.jdbc.Driver”);
    //2.获取数据库连接
    Connection connection = DriverManager.getConnection("jdbc:mysql://localhost:3306/atguigu","root","atguigu");

    //3.创建PreparedStatement对象,并预编译SQL语句,使用?占位符
    PreparedStatement preparedStatement = connection.prepareStatement("select emp_id,emp_name,emp_salary,emp_age from t_emp where emp_id = ?");

    //4.为占位符赋值,索引从1开始,执行SQL语句,获取结果
    preparedStatement.setInt(1,1);
    ResultSet resultSet = preparedStatement.executeQuery();

    //5.处理结果
    while (resultSet.next()){
        int empId = resultSet.getInt("emp_id");
        String empName = resultSet.getString("emp_name");
        String empSalary = resultSet.getString("emp_salary");
        int empAge = resultSet.getInt("emp_age");
        System.out.println(empId+"\t"+empName+"\t"+empSalary+"\t"+empAge);
    }

    //6.释放资源(先开后关原则)
    resultSet.close();
    preparedStatement.close();
    connection.close();

}
1 |
|
@Test
public void queryMoreRow() throws SQLException {
    //1.注册驱动
// Class.forName(“com.mysql.cj.jdbc.Driver”);
    //2.获取数据库连接
    Connection connection = DriverManager.getConnection("jdbc:mysql://localhost:3306/atguigu","root","atguigu");

    //3.创建Statement对象
    PreparedStatement preparedStatement = connection.prepareStatement("select emp_id,emp_name,emp_salary,emp_age from t_emp");

    //4.编写SQL语句并执行,获取结果
    ResultSet resultSet = preparedStatement.executeQuery();


    //5.处理结果
    while (resultSet.next()){
        int empId = resultSet.getInt("emp_id");
        String empName = resultSet.getString("emp_name");
        String empSalary = resultSet.getString("emp_salary");
        int empAge = resultSet.getInt("emp_age");
        System.out.println(empId+"\t"+empName+"\t"+empSalary+"\t"+empAge);
    }

    //6.释放资源(先开后关原则)
    resultSet.close();
    preparedStatement.close();
    connection.close();

}
1 |
|
@Test
public void insert() throws SQLException {
    //1.注册驱动
// Class.forName(“com.mysql.cj.jdbc.Driver”);
    //2.获取数据库连接
    Connection connection = DriverManager.getConnection("jdbc:mysql://localhost:3306/atguigu","root", "atguigu");

    //3.创建Statement对象
    PreparedStatement preparedStatement = connection.prepareStatement("insert into t_emp (emp_name,emp_salary,emp_age)values  (?, ?,?)");

    //4.为占位符赋值,索引从1开始,编写SQL语句并执行,获取结果
    preparedStatement.setString(1,"rose");
    preparedStatement.setDouble(2,666.66);
    preparedStatement.setDouble(3,28);
    int result = preparedStatement.executeUpdate();

    //5.处理结果
    if(result>0){
        System.out.println("添加成功");
    }else{
        System.out.println("添加失败");
    }

    //6.释放资源(先开后关原则)
    preparedStatement.close();
    connection.close();

}
1 |
|
@Test
public void update() throws SQLException {
    //1.注册驱动
// Class.forName(“com.mysql.cj.jdbc.Driver”);
    //2.获取数据库连接
    Connection connection = DriverManager.getConnection("jdbc:mysql://localhost:3306/atguigu", "root", "atguigu");

    //3.创建Statement对象
    PreparedStatement preparedStatement = connection.prepareStatement("update t_emp set emp_salary = ? where emp_id = ?");

    //4.为占位符赋值,索引从1开始,编写SQL语句并执行,获取结果
    preparedStatement.setDouble(1,888.88);
    preparedStatement.setDouble(2,8);
    int result = preparedStatement.executeUpdate();

    //5.处理结果
    if(result>0){
        System.out.println("修改成功");
    }else{
        System.out.println("修改失败");
    }

    //6.释放资源(先开后关原则)
    preparedStatement.close();
    connection.close();

}
1 |
|
@Test
public void delete() throws SQLException {
    //1.注册驱动
// Class.forName(“com.mysql.cj.jdbc.Driver”);
    //2.获取数据库连接
    Connection connection = DriverManager.getConnection("jdbc:mysql://localhost:3306/atguigu", "root", "atguigu");

    //3.创建Statement对象
    PreparedStatement preparedStatement = connection.prepareStatement("delete from t_emp where emp_id = ?");

    //4.为占位符赋值,索引从1开始,编写SQL语句并执行,获取结果
    preparedStatement.setInt(1,8);
    int result = preparedStatement.executeUpdate();

    //5.处理结果
    if(result>0){
        System.out.println("删除成功");
    }else{
        System.out.println("删除失败");
    }

    //6.释放资源(先开后关原则)
    preparedStatement.close();
    connection.close();

}
1 |
|
package com.atguigu.pojo;
//类名和数据库名对应,但是表名一般缩写,类名要全写!
public class Employee {
private Integer empId;//emp_id = empId 数据库中列名用下划线分隔,属性名用驼峰!
private String empName;//emp_name = empName
private Double empSalary;//emp_salary = empSalary
private Integer empAge;//emp_age = empAge
//省略get、set、无参、有参、toString方法。
}
1 |
|
@Test
public void querySingleRow() throws SQLException {
    //1.注册驱动
// Class.forName(“com.mysql.cj.jdbc.Driver”);
    //2.获取数据库连接
    Connection connection = DriverManager.getConnection("jdbc:mysql://localhost:3306/atguigu", "root","atguigu");

    //3.创建PreparedStatement对象,并预编译SQL语句,使用?占位符
    PreparedStatement preparedStatement = connection.prepareStatement("select emp_id,emp_name,emp_salary,emp_age from t_emp where emp_id = ?");

    //4.为占位符赋值,索引从1开始,执行SQL语句,获取结果
    preparedStatement.setInt(1, 1);
    ResultSet resultSet = preparedStatement.executeQuery();
      //预先创建实体类变量
    Employee employee = null;
    //5.处理结果
    while (resultSet.next()) {
        int empId = resultSet.getInt("emp_id");
        String empName = resultSet.getString("emp_name");
        Double empSalary = Double.valueOf(resultSet.getString("emp_salary"));
        int empAge = resultSet.getInt("emp_age");
        //当结果集中有数据,再进行对象的创建
        employee = new Employee(empId,empName,empSalary,empAge);
    }

    System.out.println("employee = " + employee);

    //6.释放资源(先开后关原则)
    resultSet.close();
    preparedStatement.close();
    connection.close();

}
1 |
|
@Test
public void testReturnPK() throws SQLException {
//1.注册驱动
// Class.forName(“com.mysql.cj.jdbc.Driver”);
   //2.获取数据库连接
   Connection connection = DriverManager.getConnection("jdbc:mysql://localhost:3306/atguigu", "root", "atguigu");

   //3.创建preparedStatement对象,传入需要主键回显参数Statement.RETURN_GENERATED_KEYS
   PreparedStatement preparedStatement = connection.prepareStatement("insert into t_emp (emp_name, emp_salary, emp_age)values (?, ?,?)",Statement.RETURN_GENERATED_KEYS);

   //4.编写SQL语句并执行,获取结果
   Employee employee = new Employee(null,"rose",666.66,28);
   preparedStatement.setString(1,employee.getEmpName());
   preparedStatement.setDouble(2,employee.getEmpSalary());
   preparedStatement.setDouble(3,employee.getEmpAge());
   int result = preparedStatement.executeUpdate();

   //5.处理结果
   if(result>0){
       System.out.println("添加成功");
  }else{
       System.out.println("添加失败");
  }

   //6.获取生成的主键列值,返回的是resultSet,在结果集中获取主键列值
   ResultSet resultSet = preparedStatement.getGeneratedKeys();
   if (resultSet.next()){
       int empId = resultSet.getInt(1);
       employee.setEmpId(empId);
  }

  System.out.println(employee.toString());

   //7.释放资源(先开后关原则)
   resultSet.close();
   preparedStatement.close();
   connection.close();
}
1 |
|
@Test
public void testBatch() throws Exception {
//1.注册驱动
// Class.forName(“com.mysql.cj.jdbc.Driver”);
//2.获取连接
Connection connection = DriverManager.getConnection(“jdbc:mysql:///atguigu?rewriteBatchedStatements=true”, “root”, “atguigu”);
//3.编写SQL语句
/*
注意:1、必须在连接数据库的URL后面追加?rewriteBatchedStatements=true,允许批量操作
2、新增SQL必须用values。且语句最后不要追加;结束
3、调用addBatch()方法,将SQL语句进行批量添加操作
4、统一执行批量操作,调用executeBatch()
*/
String sql = “insert into t_emp (emp_name,emp_salary,emp_age) values (?,?,?)”;
//4.创建预编译的PreparedStatement,传入SQL语句
PreparedStatement preparedStatement = connection.prepareStatement(sql);
//获取当前行代码执行的时间。毫秒值
long start = System.currentTimeMillis();
for(int i = 0;i<10000;i++){
//5.为占位符赋值
preparedStatement.setString(1, “marry”+i);
preparedStatement.setDouble(2, 100.0+i);
preparedStatement.setInt(3, 20+i);
preparedStatement.addBatch();
}
//执行批量操作
preparedStatement.executeBatch();
long end = System.currentTimeMillis();
System.out.println(“消耗时间:”+(end - start));
preparedStatement.close();
connection.close();
}
1 |
|
@Test
public void testHardCodeDruid() throws SQLException {
/*
硬编码:将连接池的配置信息和Java代码耦合在一起。
1、创建DruidDataSource连接池对象。
2、设置连接池的配置信息【必须 | 非必须】
3、通过连接池获取连接对象
4、回收连接【不是释放连接,而是将连接归还给连接池,给其他线程进行复用】
*/
   //1.创建DruidDataSource连接池对象。
   DruidDataSource druidDataSource = new DruidDataSource();

   //2.设置连接池的配置信息【必须 | 非必须】
   //2.1 必须设置的配置
   druidDataSource.setDriverClassName("com.mysql.cj.jdbc.Driver");
   druidDataSource.setUrl("jdbc:mysql:///atguigu");
   druidDataSource.setUsername("root");
   druidDataSource.setPassword("atguigu");

   //2.2 非必须设置的配置
   druidDataSource.setInitialSize(10);
   druidDataSource.setMaxActive(20);

   //3.通过连接池获取连接对象
   Connection connection = druidDataSource.getConnection();
   System.out.println(connection);

   //基于connection进行CRUD

   //4.回收连接
   connection.close();
}
1 |
|
druid连接池需要的配置参数,key固定命名
driverClassName=com.mysql.cj.jdbc.Driver
url=jdbc:mysql:///atguigu
username=root
password=atguigu
initialSize=10
maxActive=20
1 |
|
@Test
public void testResourcesDruid() throws Exception {
//1.创建Properties集合,用于存储外部配置文件的key和value值。
Properties properties = new Properties();
   //2.读取外部配置文件,获取输入流,加载到Properties集合里。
   InputStream inputStream = DruidTest.class.getClassLoader().getResourceAsStream("db.properties");
   properties.load(inputStream);

   //3.基于Properties集合构建DruidDataSource连接池
   DataSource dataSource = DruidDataSourceFactory.createDataSource(properties);

   //4.通过连接池获取连接对象
   Connection connection = dataSource.getConnection();
   System.out.println(connection);

   //5.开发CRUD

   //6.回收连接
   connection.close();
}
1 |
|
@Test
public void testHardCodeHikari() throws SQLException {
/*
硬编码:将连接池的配置信息和Java代码耦合在一起。
1、创建HikariDataSource连接池对象
2、设置连接池的配置信息【必须 | 非必须】
3、通过连接池获取连接对象
4、回收连接
*/
//1.创建HikariDataSource连接池对象
HikariDataSource hikariDataSource = new HikariDataSource();
//2.设置连接池的配置信息【必须 | 非必须】
//2.1必须设置的配置
hikariDataSource.setDriverClassName(“com.mysql.cj.jdbc.Driver”);
hikariDataSource.setJdbcUrl(“jdbc:mysql:///atguigu”);
hikariDataSource.setUsername(“root”);
hikariDataSource.setPassword(“atguigu”);
//2.2 非必须设置的配置
hikariDataSource.setMinimumIdle(10);
hikariDataSource.setMaximumPoolSize(20);
//3.通过连接池获取连接对象
Connection connection = hikariDataSource.getConnection();
System.out.println(connection);
//回收连接
connection.close();
}
1 |
|
driverClassName=com.mysql.cj.jdbc.Driver
jdbcUrl=jdbc:mysql:///atguigu
username=root
password=atguigu
minimumIdle=10
maximumPoolSize=20
1 |
|
@Test
public void testResourcesHikari()throws Exception{
//1.创建Properties集合,用于存储外部配置文件的key和value值。
Properties properties = new Properties();
   //2.读取外部配置文件,获取输入流,加载到Properties集合里。
   InputStream inputStream = HikariTest.class.getClassLoader().getResourceAsStream("db.properties");
   properties.load(inputStream);

   // 3.创建Hikari连接池配置对象,将Properties集合传进去
   HikariConfig hikariConfig = new HikariConfig(properties);

   // 4. 基于Hikari配置对象,构建连接池
   HikariDataSource hikariDataSource = new HikariDataSource(hikariConfig);

   // 5. 获取连接
   Connection connection = hikariDataSource.getConnection();
   System.out.println("connection = " + connection);

   //6.回收连接
   connection.close();
}
}