1.Spring AI Alibaba理论概述
1.是什么
什么是 Spring AI Alibaba
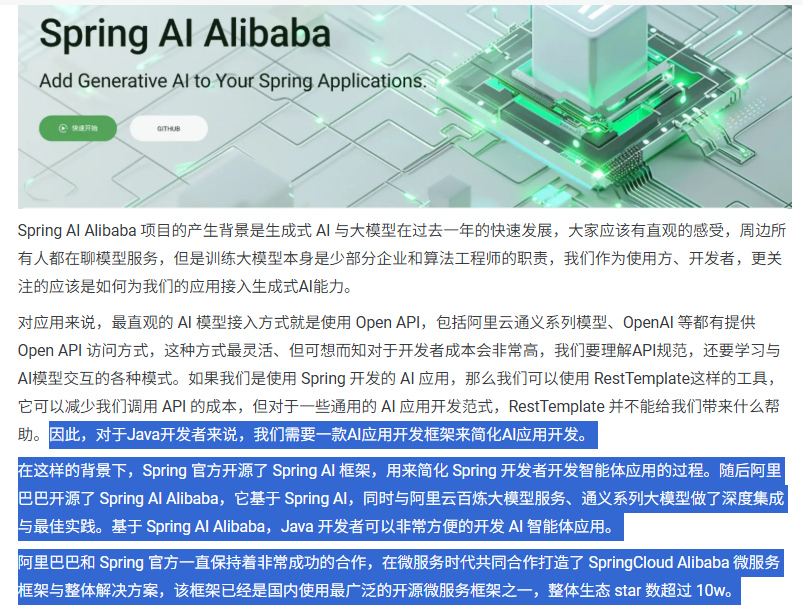

SAA公式化一句话表达
Spring AI Alibaba 开源项目基于 Spring AI 构建,是阿里云通义系列模型及服务在 Java AI 应用开发领域的最佳实践,提供高层次的 AI API 抽象与云原生基础设施集成方案和企业级 AI 应用生态集成。
官网知识出处
SpringAI官网:https://spring.io/projects/spring-ai#learn
Spring AI Alibaba 1.0 GA 正式发布:https://java2ai.com/
https://java2ai.com/blog/spring-ai-alibaba-10-ga-release/?spm=5176.29160081.0.0.2856aa5cww2t9D
阿里云百炼平台:https://bailian.console.aliyun.com/console?tab=model#/model-market
2.能干嘛
Spring AI Alibaba 基于 Spring AI 构建,因此SAA继承了SpringAI 的所有原子能力抽象并在此
基础上扩充丰富了模型、向量存储、记忆、RAG 等核心组件适配,让其能够接入阿里云的 AI 生态。
3.去哪下
Spring AI 官网:https://spring.io/projects/spring-ai#overview
Spring AI Alibaba 官网:https://java2ai.com
Spring AI Alibaba 仓库:https://github.com/alibaba/spring-ai-alibaba
Spring AI Alibaba 官方示例仓库:https://github.com/springaialibaba/spring-ai-alibaba-examples
Spring AI 1.0 GA 文章:https://java2ai.com/blog/spring-ai-100-ga-released
Spring AI 仓库:https://github.com/spring-projects/spring-ai
4.怎么用
5.SpringAI VS SpringAI Alibaba VS LangChain4J
2.永远的HelloWorld
1.前置约定

SpringAI Alibaba 与 SpringAI、SpringBoot版本依赖关系
https://java2ai.com/docs/1.0.0.2/faq/?spm=4347728f.6d9f13c1.0.0.17177187POpLHJ#%E6%80%8E%E4%B9%88%E7%A1%AE%E5%AE%9A-spring-ai-alibaba-%E4%B8%8E-spring-aispring-boot-%E7%89%88%E6%9C%AC%E7%9A%84%E5%85%BC%E5%AE%B9%E5%85%B3%E7%B3%BB
配置门道和关键点
通过后续讲解配置规则,所有调用均基于 OpenAI协议标准或者SpringAI Aalibaba官方推荐模型服务灵积(DashScope)整合规则,实现一致的接口设计与规范,确保多模型切换的便利性,提供高度可扩展的开发支持
2.阿里云百炼平台入口官网
接入阿里百炼平台的通义模型
https://bailian.console.aliyun.com
大模型调用三件套
小总结
3.IDEA工具中建project父工程

https://java2ai.com/docs/1.0.0.2/tutorials/starters-and-quick-guide/?spm=5176.29160081.0.0.2856aa5c0l3sEA#%E4%BD%BF%E7%94%A8-bom-%E7%AE%A1%E7%90%86%E4%BE%9D%E8%B5%96%E7%89%88%E6%9C%AC
初始总POM
1
2
3
4
5
6
7
8
9
10
11
12
13
14
15
16
17
18
19
20
21
22
23
24
25
26
27
28
29
30
31
32
33
34
35
36
37
38
39
40
41
42
43
44
45
46
47
48
49
50
51
52
53
54
55
56
57
58
59
60
61
62
63
64
65
66
67
68
69
70
71
72
73
74
75
76
77
78
79
| <?xml version="1.0" encoding="UTF-8"?>
<project xmlns="http://maven.apache.org/POM/4.0.0"
xmlns:xsi="http://www.w3.org/2001/XMLSchema-instance"
xsi:schemaLocation="http://maven.apache.org/POM/4.0.0 http://maven.apache.org/xsd/maven-4.0.0.xsd">
<modelVersion>4.0.0</modelVersion>
<groupId>com.atguigu.study</groupId>
<artifactId>SpringAIAlibaba-atguiguV1</artifactId>
<version>1.0-SNAPSHOT</version>
<packaging>pom</packaging>
<name>SpringAIAlibaba-Maven父工程POM配置</name>
<properties>
<project.build.sourceEncoding>UTF-8</project.build.sourceEncoding>
<project.reporting.outputEncoding>UTF-8</project.reporting.outputEncoding>
<maven.compiler.source>21</maven.compiler.source>
<maven.compiler.target>21</maven.compiler.target>
<java.version>21</java.version>
<spring-boot.version>3.5.5</spring-boot.version>
<spring-ai.version>1.0.0</spring-ai.version>
<SpringAIAlibaba.version>1.0.0.2</SpringAIAlibaba.version>
</properties>
<dependencyManagement>
<dependencies>
<dependency>
<groupId>org.springframework.boot</groupId>
<artifactId>spring-boot-dependencies</artifactId>
<version>${spring-boot.version}</version>
<type>pom</type>
<scope>import</scope>
</dependency>
<dependency>
<groupId>com.alibaba.cloud.ai</groupId>
<artifactId>spring-ai-alibaba-bom</artifactId>
<version>${SpringAIAlibaba.version}</version>
<type>pom</type>
<scope>import</scope>
</dependency>
<dependency>
<groupId>org.springframework.ai</groupId>
<artifactId>spring-ai-bom</artifactId>
<version>${spring-ai.version}</version>
<type>pom</type>
<scope>import</scope>
</dependency>
</dependencies>
</dependencyManagement>
<build>
<plugins>
<plugin>
<groupId>org.springframework.boot</groupId>
<artifactId>spring-boot-maven-plugin</artifactId>
<version>${spring-boot.version}</version>
</plugin>
</plugins>
</build>
<repositories>
<repository>
<id>spring-milestones</id>
<name>Spring Milestones</name>
<url>https://repo.spring.io/milestone</url>
<snapshots>
<enabled>false</enabled>
</snapshots>
</repository>
</repositories>
</project>
|
1.建Module
2.改POM
1
2
3
4
5
6
7
8
9
10
11
12
13
14
15
16
17
18
19
20
21
22
23
24
25
26
27
28
29
30
31
32
33
34
35
36
37
38
39
40
41
42
43
44
45
46
47
48
49
50
51
52
53
54
55
56
57
58
59
60
61
62
63
64
65
66
67
68
69
70
71
72
73
74
75
76
77
78
79
80
81
| <?xml version="1.0" encoding="UTF-8"?>
<project xmlns="http://maven.apache.org/POM/4.0.0" xmlns:xsi="http://www.w3.org/2001/XMLSchema-instance"
xsi:schemaLocation="http://maven.apache.org/POM/4.0.0 https://maven.apache.org/xsd/maven-4.0.0.xsd">
<modelVersion>4.0.0</modelVersion>
<parent>
<groupId>com.atguigu.study</groupId>
<artifactId>SpringAIAlibaba-atguiguV1</artifactId>
<version>1.0-SNAPSHOT</version>
</parent>
<artifactId>SAA-01HelloWorld</artifactId>
<properties>
<maven.compiler.source>21</maven.compiler.source>
<maven.compiler.target>21</maven.compiler.target>
<project.build.sourceEncoding>UTF-8</project.build.sourceEncoding>
</properties>
<dependencies>
<dependency>
<groupId>org.springframework.boot</groupId>
<artifactId>spring-boot-starter-web</artifactId>
</dependency>
<dependency>
<groupId>com.alibaba.cloud.ai</groupId>
<artifactId>spring-ai-alibaba-starter-dashscope</artifactId>
</dependency>
<dependency>
<groupId>org.projectlombok</groupId>
<artifactId>lombok</artifactId>
<optional>true</optional>
</dependency>
<dependency>
<groupId>cn.hutool</groupId>
<artifactId>hutool-all</artifactId>
<version>5.8.22</version>
</dependency>
<dependency>
<groupId>org.springframework.boot</groupId>
<artifactId>spring-boot-starter-test</artifactId>
<scope>test</scope>
</dependency>
</dependencies>
<build>
<plugins>
<plugin>
<groupId>org.springframework.boot</groupId>
<artifactId>spring-boot-maven-plugin</artifactId>
</plugin>
<plugin>
<groupId>org.apache.maven.plugins</groupId>
<artifactId>maven-compiler-plugin</artifactId>
<version>3.11.0</version>
<configuration>
<compilerArgs>
<arg>-parameters</arg>
</compilerArgs>
<source>21</source>
<target>21</target>
</configuration>
</plugin>
</plugins>
</build>
<repositories>
<repository>
<id>spring-milestones</id>
<name>Spring Milestones</name>
<url>https://repo.spring.io/milestone</url>
<snapshots>
<enabled>false</enabled>
</snapshots>
</repository>
</repositories>
</project>
|
3.写YML
1
2
3
4
5
6
7
8
9
10
11
12
13
| server.port=8001
server.servlet.encoding.enabled=true
server.servlet.encoding.force=true
server.servlet.encoding.charset=UTF-8
spring.application.name=SAA-01HelloWorld
spring.ai.dashscope.api-key=${aliQwen-api}
spring.ai.dashscope.base-url=https://dashscope.aliyuncs.com/compatible-mode/v1
spring.ai.dashscope.chat.options.model=qwen-plus
|
4.主启动
1
2
3
4
5
6
7
8
9
10
11
12
13
14
15
| package com.atguigu.study;
import org.springframework.boot.SpringApplication;
import org.springframework.boot.autoconfigure.SpringBootApplication;
@SpringBootApplication
public class Saa01HelloWorldApplication
{
public static void main(String[] args)
{
SpringApplication.run(Saa01HelloWorldApplication.class, args);
}
}
|
4.业务类
ApiKey不可以明文需配置进环境变量
配置类SaaLLMConfig
1
2
3
4
5
6
7
8
9
10
11
12
13
14
15
16
17
18
19
20
21
22
23
24
25
26
27
28
29
30
31
32
33
34
35
36
37
38
39
40
41
42
43
44
| package com.atguigu.study.config;
import com.alibaba.cloud.ai.dashscope.api.DashScopeApi;
import org.springframework.beans.factory.annotation.Value;
import org.springframework.context.annotation.Bean;
import org.springframework.context.annotation.Configuration;
@Configuration
public class SaaLLMConfig
{
@Bean
public DashScopeApi dashScopeApi()
{
return DashScopeApi.builder()
.apiKey(System.getenv("aliQwen-api"))
.build();
}
}
|
方式1:
1
2
3
4
5
6
7
8
9
10
11
12
13
14
15
16
17
18
19
20
21
22
23
24
25
26
27
28
| package com.atguigu.study.config;
import com.alibaba.cloud.ai.dashscope.api.DashScopeApi;
import org.springframework.beans.factory.annotation.Value;
import org.springframework.context.annotation.Bean;
import org.springframework.context.annotation.Configuration;
@Configuration
public class SaaLLMConfig
{
@Value("${spring.ai.dashscope.api-key}")
private String apiKey;
@Bean
public DashScopeApi dashScopeApi()
{
return DashScopeApi.builder().apiKey(apiKey).build();
}
}
|
方式2:
1
2
3
4
5
6
7
8
9
10
11
12
13
14
15
16
17
18
19
20
21
22
23
24
25
26
27
| package com.atguigu.study.config;
import com.alibaba.cloud.ai.dashscope.api.DashScopeApi;
import org.springframework.beans.factory.annotation.Value;
import org.springframework.context.annotation.Bean;
import org.springframework.context.annotation.Configuration;
@Configuration
public class SaaLLMConfig
{
@Bean
public DashScopeApi dashScopeApi()
{
return DashScopeApi.builder()
.apiKey(System.getenv("aliQwen-api"))
.build();
}
}
|
1.对话模型(Chat Model)
ChatModel,文本聊天交互模型

https://java2ai.com/docs/1.0.0.2/tutorials/basics/chat-model/?spm=5176.29160081.0.0.2856aa5ctpxysy
2.controller
1
2
3
4
5
6
7
8
9
10
11
12
13
14
15
16
17
18
19
20
21
22
23
24
25
26
27
28
29
30
31
32
33
34
35
36
37
38
39
40
41
42
43
44
| package com.atguigu.study.controller;
import jakarta.annotation.Resource;
import org.springframework.ai.chat.client.ChatClient;
import org.springframework.ai.chat.model.ChatModel;
import org.springframework.web.bind.annotation.GetMapping;
import org.springframework.web.bind.annotation.RequestParam;
import org.springframework.web.bind.annotation.RestController;
import reactor.core.publisher.Flux;
@RestController
public class ChatHelloController
{
@Resource
private ChatModel dashScopeChatModel;
@GetMapping("/hello/dochat")
public String doChat(@RequestParam(name = "msg",defaultValue = "你是谁") String msg)
{
String result = dashScopeChatModel.call(msg);
System.out.println("响应:" + result);
return result;
}
@GetMapping("/hello/streamchat")
public Flux<String> streamChat(@RequestParam(name = "msg",defaultValue = "你是谁") String msg)
{
return dashScopeChatModel.stream(msg);
}
}
|
3.测试
http://localhost:8001/hello/dochat
http://localhost:8001/hello/streamchat
4.切换大模型
1
2
3
4
5
6
7
8
9
10
11
| server.port=8001
server.servlet.encoding.enabled=true
server.servlet.encoding.force=true
server.servlet.encoding.charset=UTF-8
spring.application.name=SAA-01HelloWorld
spring.ai.dashscope.api-key=${aliQwen-api}
spring.ai.dashscope.chat.options.model=deepseek-v3
|
5.和OpenAI协议对比下
3.Ollama私有化部署和对接本地大模型
1.Ollama本地大模型部署
略
2.微服务对接本地大模型
改POM
1
2
3
4
5
6
7
8
9
10
11
12
13
14
15
16
17
18
19
20
21
22
23
24
25
26
27
28
29
30
31
32
33
34
35
36
37
38
39
40
41
42
43
44
45
46
47
48
49
50
51
52
53
54
55
56
57
58
59
60
61
62
63
64
65
66
67
68
69
70
71
72
73
74
75
76
77
78
79
80
81
82
83
84
85
86
87
88
89
| <?xml version="1.0" encoding="UTF-8"?>
<project xmlns="http://maven.apache.org/POM/4.0.0"
xmlns:xsi="http://www.w3.org/2001/XMLSchema-instance"
xsi:schemaLocation="http://maven.apache.org/POM/4.0.0 http://maven.apache.org/xsd/maven-4.0.0.xsd">
<modelVersion>4.0.0</modelVersion>
<parent>
<groupId>com.atguigu.study</groupId>
<artifactId>SpringAIAlibaba-atguiguV1</artifactId>
<version>1.0-SNAPSHOT</version>
</parent>
<artifactId>SAA-02Ollama</artifactId>
<properties>
<maven.compiler.source>21</maven.compiler.source>
<maven.compiler.target>21</maven.compiler.target>
<project.build.sourceEncoding>UTF-8</project.build.sourceEncoding>
</properties>
<dependencies>
<dependency>
<groupId>org.springframework.boot</groupId>
<artifactId>spring-boot-starter-web</artifactId>
</dependency>
<dependency>
<groupId>com.alibaba.cloud.ai</groupId>
<artifactId>spring-ai-alibaba-starter-dashscope</artifactId>
</dependency>
<dependency>
<groupId>org.springframework.ai</groupId>
<artifactId>spring-ai-starter-model-ollama</artifactId>
<version>1.0.0</version>
</dependency>
<dependency>
<groupId>org.projectlombok</groupId>
<artifactId>lombok</artifactId>
<optional>true</optional>
</dependency>
<dependency>
<groupId>cn.hutool</groupId>
<artifactId>hutool-all</artifactId>
<version>5.8.22</version>
</dependency>
<dependency>
<groupId>org.springframework.boot</groupId>
<artifactId>spring-boot-starter-test</artifactId>
<scope>test</scope>
</dependency>
</dependencies>
<build>
<plugins>
<plugin>
<groupId>org.springframework.boot</groupId>
<artifactId>spring-boot-maven-plugin</artifactId>
</plugin>
<plugin>
<groupId>org.apache.maven.plugins</groupId>
<artifactId>maven-compiler-plugin</artifactId>
<version>3.11.0</version>
<configuration>
<compilerArgs>
<arg>-parameters</arg>
</compilerArgs>
<source>21</source>
<target>21</target>
</configuration>
</plugin>
</plugins>
</build>
<repositories>
<repository>
<id>spring-milestones</id>
<name>Spring Milestones</name>
<url>https://repo.spring.io/milestone</url>
<snapshots>
<enabled>false</enabled>
</snapshots>
</repository>
</repositories>
</project>
|
写YML
1
2
3
4
5
6
7
8
9
10
11
12
| server.port=8002
server.servlet.encoding.enabled=true
server.servlet.encoding.force=true
server.servlet.encoding.charset=UTF-8
spring.application.name=SAA-02Ollama
spring.ai.dashscope.api-key=${aliQwen-api}
spring.ai.ollama.base-url=http://localhost:11434
spring.ai.ollama.chat. model=qwen2.5:latest
|
主启动
1
2
3
4
5
6
7
8
9
10
11
12
13
14
15
16
17
| package com.atguigu.study;
import org.springframework.boot.SpringApplication;
import org.springframework.boot.autoconfigure.SpringBootApplication;
@SpringBootApplication
public class Saa02OllamaApplication
{
public static void main(String[] args)
{
SpringApplication.run(Saa02OllamaApplication.class,args);
}
}
|
业务类
controller
1
2
3
4
5
6
7
8
9
10
11
12
13
14
15
16
17
18
19
20
21
22
23
24
25
26
27
28
29
30
31
32
33
34
35
36
37
38
39
| package com.atguigu.study.controller;
import jakarta.annotation.Resource;
import org.springframework.ai.chat.model.ChatModel;
import org.springframework.beans.factory.annotation.Qualifier;
import org.springframework.web.bind.annotation.GetMapping;
import org.springframework.web.bind.annotation.RequestParam;
import org.springframework.web.bind.annotation.RestController;
import reactor.core.publisher.Flux;
@RestController
public class OllamaController
{
@Resource(name = "oll amaChatModel")
private ChatModel chatModel;
@GetMapping("/ollama/chat")
public String chat(@RequestParam(name = "msg") String msg)
{
String result = chatModel.call(msg);
System.out.println("---结果:" + result);
return result;
}
@GetMapping("/ollama/streamchat")
public Flux<String> streamchat(@RequestParam(name = "msg",defaultValue = "你是谁") String msg)
{
return chatModel.stream(msg);
}
}
|
或者
1
2
3
4
5
6
7
8
9
10
11
12
13
14
15
16
17
18
19
20
21
22
23
24
25
26
27
28
29
30
31
32
33
34
35
36
37
38
39
40
41
42
43
44
| package com.atguigu.study.controller;
import jakarta.annotation.Resource;
import org.springframework.ai.chat.model.ChatModel;
import org.springframework.beans.factory.annotation.Qualifier;
import org.springframework.web.bind.annotation.GetMapping;
import org.springframework.web.bind.annotation.RequestParam;
import org.springframework.web.bind.annotation.RestController;
import reactor.core.publisher.Flux;
@RestController
public class OllamaController
{
@Resource
@Qualifier("ollamaChatModel")
private ChatModel chatModel;
@GetMapping("/ollama/chat")
public String chat(@RequestParam(name = "msg") String msg)
{
String result = chatModel.call(msg);
System.out.println("---结果:" + result);
return result;
}
@GetMapping("/ollama/streamchat")
public Flux<String> streamchat(@RequestParam(name = "msg",defaultValue = "你是谁") String msg)
{
return chatModel.stream(msg);
}
}
|
4.ChatClient VS ChatModel
1.问题回顾:
之前的调用都是使用ChatModel进行

认识一个新的接口ChatClient
1.ChatModel
官网
https://java2ai.com/docs/1.0.0.2/tutorials/basics/chat-model/?spm=5176.29160081.0.0.2856aa5cmUTyXC
说明
对话模型(ChatModel)是底层接口,直接与具体大语言模型交互,
提供call()和stream()方法,适合简单大模型交互场景
2.ChatClient
官网
https://java2ai.com/docs/1.0.0.2/tutorials/basics/chat-client/?spm=5176.29160081.0.0.2856aa5cmUTyXC
何为样板代码?
ChatClient对ChatModel吐槽
说明
ChatClient是高级封装,基于ChatModel构建,适合快速构建标准化复杂AI服务,支持同步和流式交互,集成多种高级功能。
编码案例
改POM
1
2
3
4
5
6
7
8
9
10
11
12
13
14
15
16
17
18
19
20
21
22
23
24
25
26
27
28
29
30
31
32
33
34
35
36
37
38
39
40
41
42
43
44
45
46
47
48
49
50
51
52
53
54
55
56
57
58
59
60
61
62
63
64
65
66
67
68
69
70
71
72
73
74
75
76
77
78
79
80
81
82
| <?xml version="1.0" encoding="UTF-8"?>
<project xmlns="http://maven.apache.org/POM/4.0.0" xmlns:xsi="http://www.w3.org/2001/XMLSchema-instance"
xsi:schemaLocation="http://maven.apache.org/POM/4.0.0 https://maven.apache.org/xsd/maven-4.0.0.xsd">
<modelVersion>4.0.0</modelVersion>
<parent>
<groupId>com.atguigu.study</groupId>
<artifactId>SpringAIAlibaba-atguiguV1</artifactId>
<version>1.0-SNAPSHOT</version>
</parent>
<artifactId>SAA-03ChatModelChatClient</artifactId>
<properties>
<maven.compiler.source>21</maven.compiler.source>
<maven.compiler.target>21</maven.compiler.target>
<project.build.sourceEncoding>UTF-8</project.build.sourceEncoding>
</properties>
<dependencies>
<dependency>
<groupId>org.springframework.boot</groupId>
<artifactId>spring-boot-starter-web</artifactId>
</dependency>
<dependency>
<groupId>com.alibaba.cloud.ai</groupId>
<artifactId>spring-ai-alibaba-starter-dashscope</artifactId>
</dependency>
<dependency>
<groupId>org.projectlombok</groupId>
<artifactId>lombok</artifactId>
<optional>true</optional>
</dependency>
<dependency>
<groupId>cn.hutool</groupId>
<artifactId>hutool-all</artifactId>
<version>5.8.22</version>
</dependency>
<dependency>
<groupId>org.springframework.boot</groupId>
<artifactId>spring-boot-starter-test</artifactId>
<scope>test</scope>
</dependency>
</dependencies>
<build>
<plugins>
<plugin>
<groupId>org.springframework.boot</groupId>
<artifactId>spring-boot-maven-plugin</artifactId>
</plugin>
<plugin>
<groupId>org.apache.maven.plugins</groupId>
<artifactId>maven-compiler-plugin</artifactId>
<version>3.11.0</version>
<configuration>
<compilerArgs>
<arg>-parameters</arg>
</compilerArgs>
<source>21</source>
<target>21</target>
</configuration>
</plugin>
</plugins>
</build>
<repositories>
<repository>
<id>spring-milestones</id>
<name>Spring Milestones</name>
<url>https://repo.spring.io/milestone</url>
<snapshots>
<enabled>false</enabled>
</snapshots>
</repository>
</repositories>
</project>
|
写YML
1
2
3
4
5
6
7
8
9
10
| server.port=8003
server.servlet.encoding.enabled=true
server.servlet.encoding.force=true
server.servlet.encoding.charset=UTF-8
spring.application.name=SAA-03ChatModelChatClient
spring.ai.dashscope.api-key=${aliQwen-api}
|
主启动
1
2
3
4
5
6
7
8
9
10
11
| package com.atguigu.study;
import org.springframework.boot.SpringApplication;
import org.springframework.boot.autoconfigure.SpringBootApplication;
@SpringBootApplication
public class Saa03ChatModelChatClientApplication
{
public static void main(String[] args)
{
SpringApplication.run(Saa03ChatModelChatClientApplication.class, args);
}
}
|
业务类第1版
Only ChatModel
新建配置类 SaaLLMConfig
1
2
3
4
5
6
7
8
9
10
11
12
13
14
15
16
17
18
19
| package com.atguigu.study.config;
import com.alibaba.cloud.ai.dashscope.api.DashScopeApi;
import org.springframework.context.annotation.Bean;
import org.springframework.context.annotation.Configuration;
@Configuration
public class SaaLLMConfig
{
@Bean
public DashScopeApi dashScopeApi()
{
return DashScopeApi.builder().apiKey(System.getenv("aliQwen-api")).build();
}
}
|
controller
1
2
3
4
5
6
7
8
9
10
11
12
13
14
15
16
17
18
19
20
21
22
23
24
25
26
27
28
| package com.atguigu.study.controller;
import com.alibaba.cloud.ai.dashscope.api.DashScopeApi;
import jakarta.annotation.Resource;
import org.springframework.ai.chat.client.ChatClient;
import org.springframework.ai.chat.model.ChatModel;
import org.springframework.web.bind.annotation.GetMapping;
import org.springframework.web.bind.annotation.RequestParam;
import org.springframework.web.bind.annotation.RestController;
@RestController
public class ChatModelController
{
@Resource
private ChatModel dashScopeChatModel;
@GetMapping("/chatmodel/dochat")
public String doChat(@RequestParam(name = "msg",defaultValue = "你是谁") String msg)
{
String result = dashScopeChatModel.call(msg);
System.out.println("响应:" + result);
return result;
}
}
|
进一步新增ChatClient


业务类第2版
知识出处
chat源码:https://java2ai.com/docs/1.0.0.2/spring-ai-sourcecode-explained/chapter-1-chat-first-experience/?spm=5176.29160081.0.0.2856aa5cbeDVer
ChatClient使用:https://java2ai.com/docs/1.0.0.2/tutorials/basics/chat-client/?spm=5176.29160081.0.0.2856aa5cmUTyXC#%E5%88%9B%E5%BB%BA-chatclient
Only ChatClient
新建ChatClientController
1
2
3
4
5
6
7
8
9
10
11
12
13
14
15
16
17
18
19
20
21
22
23
24
25
26
27
28
29
30
31
32
33
34
35
36
37
38
39
40
41
| package com.atguigu.study.controller;
import org.springframework.ai.chat.client.ChatClient;
import org.springframework.ai.chat.model.ChatModel;
import org.springframework.web.bind.annotation.GetMapping;
import org.springframework.web.bind.annotation.RequestParam;
import org.springframework.web.bind.annotation.RestController;
@RestController
public class ChatClientController
{
private final ChatClient dashScopechatClient;
public ChatClientController(ChatModel dashscopeChatModel)
{
this.dashScopechatClient = ChatClient.builder(dashscopeChatModel).build();
}
@GetMapping("/chatclient/dochat")
public String doChat(@RequestParam(name = "msg",defaultValue = "2加4等于几") String msg)
{
String result = dashScopechatClient.prompt().user(msg).call().content();
System.out.println("响应:" + result);
return result;
}
}
|
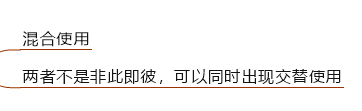
ChatModel对ChatClient吐槽:离开我你什么都不是,ChatModel是ChatClient的底层
业务类第3版
ChatModel + ChatClient混合使用
修改配置类SaaLLMConfig
1
2
3
4
5
6
7
8
9
10
11
12
13
14
15
16
17
18
19
20
21
22
23
24
25
26
27
28
29
30
31
32
33
34
35
36
| package com.atguigu.study.config;
import com.alibaba.cloud.ai.dashscope.api.DashScopeApi;
import org.springframework.ai.chat.model.ChatModel;
import org.springframework.ai.chat.client.ChatClient;
import org.springframework.context.annotation.Bean;
import org.springframework.context.annotation.Configuration;
@Configuration
public class SaaLLMConfig
{
@Bean
public DashScopeApi dashScopeApi()
{
return DashScopeApi.builder()
.apiKey(System.getenv("aliQwen-api"))
.build();
}
@Bean
public ChatClient chatClient(ChatModel dashscopeChatModel)
{
return ChatClient.builder(dashscopeChatModel).build();
}
}
|
新建ChatClientControllerV2
1
2
3
4
5
6
7
8
9
10
11
12
13
14
15
16
17
18
19
20
21
22
23
24
25
26
27
28
29
30
31
32
33
34
35
36
37
38
39
40
41
42
43
44
45
46
47
48
49
50
51
52
| package com.atguigu.study.controller;
import com.alibaba.cloud.ai.dashscope.api.DashScopeApi;
import jakarta.annotation.Resource;
import org.springframework.ai.chat.client.ChatClient;
import org.springframework.ai.chat.model.ChatModel;
import org.springframework.web.bind.annotation.GetMapping;
import org.springframework.web.bind.annotation.RequestParam;
import org.springframework.web.bind.annotation.RestController;
@RestController
public class ChatClientControllerV2
{
@Resource
private ChatModel chatModel;
@Resource
private ChatClient dashScopechatClientv2;
@GetMapping("/chatclientv2/dochat")
public String doChat(@RequestParam(name = "msg",defaultValue = "你是谁") String msg)
{
String result = dashScopechatClientv2.prompt().user(msg).call().content();
System.out.println("ChatClient响应:" + result);
return result;
}
@GetMapping("/chatmodelv2/dochat")
public String doChat2(@RequestParam(name = "msg",defaultValue = "你是谁") String msg)
{
String result = chatModel.call(msg);
System.out.println("ChatModel响应:" + result);
return result;
}
}
|
小总结
生产推荐:
5.Server-SentEvents(SSE)实现Stream流式输出及多模型共存
1.Response Streaming流式输出
流式输出(StreamingOutput)
是一种逐步返回大模型生成结果的技术,生成一点返回一点,允许服务器将响应内容
分批次实时传输给客户端,而不是等待全部内容生成完毕后再一次性返回。
这种机制能显著提升用户体验,尤其适用于大模型响应较慢的场景(如生成长文本或复杂推理结果)。
SpringAI Alibaba流式输出有两种
- 通过ChatModel实现stream实现流式输出
- 通过ChatClient实现stream实现流式输出
2.SSE(Server-Sent Events)服务器发送事件
Server-Sent:由服务器发送。
Events:事件,指服务器主动推送给客户端的数据或消息
Server-SentEvents(SSE)服务器发送事件实现流式输出
Server-Sent Events (SSE) 是一种允许服务端可以持续推送数据片段(如逐词或逐句)到前端的 Web 技术。通过单向的HTTP长连接,使用一个长期存在的连接,让服务器可以主动将数据"推"给客户端,SSE是轻量级的单向通信协议,适合AI对话这类服务端主导的场景
核心概念
SSE 的核心思想是:客户端发起一个请求,服务器保持这个连接打开并在有新数据时,通过这个连接将数据发送给客户端。这与传统的请求-响应模式(客户端请求一次,服务器响应一次,连接关闭)有本质区别。
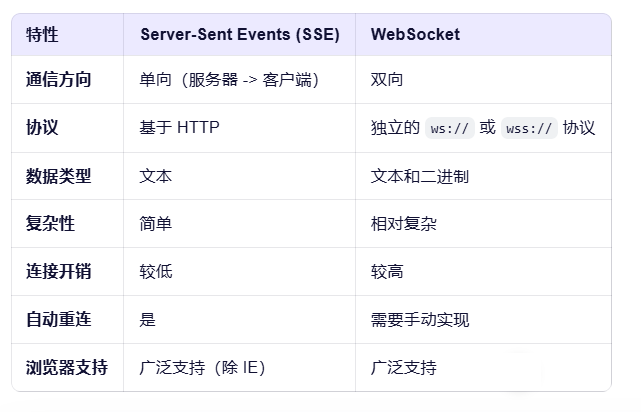
总结来说:SSE就是一种让服务器能够主动、持续地向客户端(比如你的网页浏览器)推送数据的技术
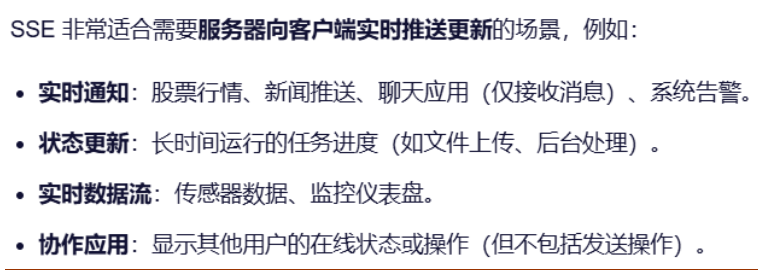
SSE适用场景
3.开发步骤
目标:要求同时存在多种大模型产品在系统里共存使用
改POM
1
2
3
4
5
6
7
8
9
10
11
12
13
14
15
16
17
18
19
20
21
22
23
24
25
26
27
28
29
30
31
32
33
34
35
36
37
38
39
40
41
42
43
44
45
46
47
48
49
50
51
52
53
54
55
56
57
58
59
60
61
62
63
64
65
66
67
68
69
70
71
72
73
74
75
| <?xml version="1.0" encoding="UTF-8"?>
<project xmlns="http://maven.apache.org/POM/4.0.0" xmlns:xsi="http://www.w3.org/2001/XMLSchema-instance"
xsi:schemaLocation="http://maven.apache.org/POM/4.0.0 https://maven.apache.org/xsd/maven-4.0.0.xsd">
<modelVersion>4.0.0</modelVersion>
<parent>
<groupId>com.atguigu.study</groupId>
<artifactId>SpringAIAlibaba-atguiguV1</artifactId>
<version>1.0-SNAPSHOT</version>
</parent>
<artifactId>SAA-04StreamingOutput</artifactId>
<dependencies>
<dependency>
<groupId>org.springframework.boot</groupId>
<artifactId>spring-boot-starter-web</artifactId>
</dependency>
<dependency>
<groupId>com.alibaba.cloud.ai</groupId>
<artifactId>spring-ai-alibaba-starter-dashscope</artifactId>
</dependency>
<dependency>
<groupId>org.projectlombok</groupId>
<artifactId>lombok</artifactId>
<version>1.18.38</version>
</dependency>
<dependency>
<groupId>cn.hutool</groupId>
<artifactId>hutool-all</artifactId>
<version>5.8.22</version>
</dependency>
<dependency>
<groupId>org.springframework.boot</groupId>
<artifactId>spring-boot-starter-test</artifactId>
<scope>test</scope>
</dependency>
</dependencies>
<build>
<plugins>
<plugin>
<groupId>org.springframework.boot</groupId>
<artifactId>spring-boot-maven-plugin</artifactId>
</plugin>
<plugin>
<groupId>org.apache.maven.plugins</groupId>
<artifactId>maven-compiler-plugin</artifactId>
<version>3.11.0</version>
<configuration>
<compilerArgs>
<arg>-parameters</arg>
</compilerArgs>
<source>21</source>
<target>21</target>
</configuration>
</plugin>
</plugins>
</build>
<repositories>
<repository>
<id>spring-milestones</id>
<name>Spring Milestones</name>
<url>https://repo.spring.io/milestone</url>
<snapshots>
<enabled>false</enabled>
</snapshots>
</repository>
</repositories>
</project>
|
写YML
1
2
3
4
5
6
7
8
9
10
| server.port=8004
server.servlet.encoding.enabled=true
server.servlet.encoding.force=true
server.servlet.encoding.charset=UTF-8
spring.application.name=SAA-04StreamingOutput
spring.ai.dashscope.api-key=${a liQwen-api}
|
主启动
1
2
3
4
5
6
7
8
9
10
11
12
13
14
15
16
17
18
19
| package com.atguigu.study;
import org.springframework.boot.SpringApplication;
import org.springframework.boot.autoconfigure.SpringBootApplication;
@SpringBootApplication
public class Saa04StreamingOutputApplication
{
public static void main(String[] args)
{
SpringApplication.run(Saa04StreamingOutputApplication.class, args);
}
}
|
业务类
- 通过ChatModel实现stream实现流式输出
1.配置类LLMConfig
1
2
3
4
5
6
7
8
9
10
11
12
13
14
15
16
17
18
19
20
21
22
23
24
25
26
27
28
29
30
31
32
33
34
35
36
37
38
39
40
41
42
43
44
45
46
47
48
49
50
51
| package com.atguigu.study.config;
import com.alibaba.cloud.ai.dashscope.api.DashScopeApi;
import com.alibaba.cloud.ai.dashscope.chat.DashScopeChatModel;
import com.alibaba.cloud.ai.dashscope.chat.DashScopeChatOptions;
import org.springframework.ai.chat.client.ChatClient;
import org.springframework.ai.chat.model.ChatModel;
import org.springframework.ai.chat.prompt.ChatOptions;
import org.springframework.beans.factory.annotation.Qualifier;
import org.springframework.context.annotation.Bean;
import org.springframework.context.annotation.Configuration;
@Configuration
public class SaaLLMConfig
{
private final String DEEPSEEK_MODEL = "deepseek-v3";
private final String QWEN_MODEL = "qwen-plus";
@Bean(name = "deepseek")
public ChatModel deepSeek()
{
return DashScopeChatModel.builder()
.dashScopeApi(DashScopeApi.builder()
.apiKey(System.getenv("aliQwen-api"))
.build())
.defaultOptions(
DashScopeChatOptions.builder().withModel(DEEPSEEK_MODEL).build()
)
.build();
}
@Bean(name = "qwen")
public ChatModel qwen()
{
return DashScopeChatModel.builder().dashScopeApi(DashScopeApi.builder()
.apiKey(System.getenv("aliQwen-api"))
.build())
.defaultOptions(
DashScopeChatOptions.builder()
.withModel(QWEN_MODEL)
.build()
)
.build();
}
}
|
2.controller第1版
1
2
3
4
5
6
7
8
9
10
11
12
13
14
15
16
17
18
19
20
21
22
23
24
25
26
27
28
29
30
31
32
33
34
35
36
37
38
| package com.atguigu.study.controller;
import jakarta.annotation.Resource;
import org.springframework.ai.chat.client.ChatClient;
import org.springframework.ai.chat.model.ChatModel;
import org.springframework.web.bind.annotation.GetMapping;
import org.springframework.web.bind.annotation.RequestParam;
import org.springframework.web.bind.annotation.RestController;
import reactor.core.publisher.Flux;
@RestController
public class StreamOutputController
{
@Resource(name = "deepseek")
private ChatModel deepseekChatModel;
@Resource(name = "qwen")
private ChatModel qwenChatModel;
@GetMapping(value = "/stream/chatflux1")
public Flux<String> chatflux(@RequestParam(name = "question",defaultValue = "你是谁") String question)
{
return deepseekChatModel.stream(question);
}
@GetMapping(value = "/stream/chatflux2")
public Flux<String> chatflux2(@RequestParam(name = "question",defaultValue = "你是谁") String question)
{
return qwenChatModel.stream(question);
}
}
|
- 通过ChatClient实现stream实现流式输出
1.配置类LLMConfig
1
2
3
4
5
6
7
8
9
10
11
12
13
14
15
16
17
18
19
20
21
22
23
24
25
26
27
28
29
30
31
32
33
34
35
36
37
38
39
40
41
42
43
44
45
46
47
48
49
50
51
52
53
54
55
56
57
58
59
60
61
62
63
64
65
66
67
68
69
70
71
72
| package com.atguigu.study.config;
import com.alibaba.cloud.ai.dashscope.api.DashScopeApi;
import com.alibaba.cloud.ai.dashscope.chat.DashScopeChatModel;
import com.alibaba.cloud.ai.dashscope.chat.DashScopeChatOptions;
import org.springframework.ai.chat.client.ChatClient;
import org.springframework.ai.chat.model.ChatModel;
import org.springframework.ai.chat.prompt.ChatOptions;
import org.springframework.beans.factory.annotation.Qualifier;
import org.springframework.context.annotation.Bean;
import org.springframework.context.annotation.Configuration;
@Configuration
public class SaaLLMConfig
{
private final String DEEPSEEK_MODEL = "deepseek-v3";
private final String QWEN_MODEL = "qwen-plus";
@Bean(name = "deepseek")
public ChatModel deepSeek()
{
return DashScopeChatModel.builder()
.dashScopeApi(DashScopeApi.builder()
.apiKey(System.getenv("aliQwen-api"))
.build())
.defaultOptions(
DashScopeChatOptions.builder().withModel(DEEPSEEK_MODEL).build()
)
.build();
}
@Bean(name = "qwen")
public ChatModel qwen()
{
return DashScopeChatModel.builder().dashScopeApi(DashScopeApi.builder()
.apiKey(System.getenv("aliQwen-api"))
.build())
.defaultOptions(
DashScopeChatOptions.builder()
.withModel(QWEN_MODEL)
.build()
)
.build();
}
@Bean(name = "deepseekChatClient")
public ChatClient deepseekChatClient(@Qualifier("deepseek") ChatModel deepSeek)
{
return ChatClient.builder(deepSeek)
.defaultOptions(ChatOptions.builder()
.model(DEEPSEEK_MODEL)
.build())
.build();
}
@Bean(name = "qwenChatClient")
public ChatClient qwenChatClient(@Qualifier("qwen") ChatModel qwen)
{
return ChatClient.builder(qwen)
.defaultOptions(ChatOptions.builder()
.model(QWEN_MODEL)
.build())
.build();
}
}
|
2.controller第2版
1
2
3
4
5
6
7
8
9
10
11
12
13
14
15
16
17
18
19
20
21
22
23
24
25
26
27
28
29
30
31
32
33
34
35
36
37
38
39
40
41
42
43
44
45
46
47
48
49
50
51
52
53
54
| package com.atguigu.study.controller;
import jakarta.annotation.Resource;
import org.springframework.ai.chat.client.ChatClient;
import org.springframework.ai.chat.model.ChatModel;
import org.springframework.web.bind.annotation.GetMapping;
import org.springframework.web.bind.annotation.RequestParam;
import org.springframework.web.bind.annotation.RestController;
import reactor.core.publisher.Flux;
@RestController
public class StreamOutputController
{
@Resource(name = "deepseek")
private ChatModel deepseekChatModel;
@Resource(name = "qwen")
private ChatModel qwenChatModel;
@Resource(name = "deepseekChatClient")
private ChatClient deepseekChatClient;
@Resource(name = "qwenChatClient")
private ChatClient qwenChatClient;
@GetMapping(value = "/stream/chatflux1")
public Flux<String> chatflux(@RequestParam(name = "question",defaultValue = "你是谁") String question)
{
return deepseekChatModel.stream(question);
}
@GetMapping(value = "/stream/chatflux2")
public Flux<String> chatflux2(@RequestParam(name = "question",defaultValue = "你是谁") String question)
{
return qwenChatModel.stream(question);
}
@GetMapping(value = "/stream/chatflux3")
public Flux<String> chatflux3(@RequestParam(name = "question",defaultValue = "你是谁") String question)
{
return deepseekChatClient.prompt(question).stream().content();
}
@GetMapping(value = "/stream/chatflux4")
public Flux<String> chatflux4(@RequestParam(name = "question",defaultValue = "你是谁") String question)
{
return qwenChatClient.prompt(question).stream().content();
}
}
|
新增前端代码
效果:

SSE
index.html
1
2
3
4
5
6
7
8
9
10
11
12
13
14
15
16
17
18
19
20
21
22
23
24
25
26
27
28
29
30
31
32
33
34
35
36
37
38
39
40
41
42
43
44
45
46
47
48
49
50
51
52
53
54
55
56
57
58
59
60
61
62
63
64
65
66
67
68
69
70
71
72
73
74
75
76
77
78
79
80
81
82
83
84
85
86
87
88
| <!DOCTYPE html>
<html>
<head>
<title>SSE流式chat</title>
<style>
body {
font-family: Arial, sans-serif;
background-color: #f4f4f4;
margin: 0;
padding: 20px;
}
#messageInput {
width: 90%;
padding: 10px;
font-size: 16px;
border: 1px solid #ccc;
border-radius: 4px;
margin-bottom: 10px;
}
button {
padding: 10px 20px;
font-size: 16px;
background-color: #007bff;
color: white;
border: none;
border-radius: 4px;
cursor: pointer;
}
button:hover {
background-color: #0056b3;
}
#messages {
margin-top: 20px;
padding: 15px;
background-color: #f9f9f9;
border: 1px solid #ddd;
border-radius: 8px;
max-height: 300px;
overflow-y: auto;
box-shadow: 0 2px 4px rgba(0, 0, 0, 0.1);
}
#messages div {
padding: 8px 0;
border-bottom: 1px solid #eee;
font-size: 14px;
color: #333;
}
#messages div:last-child {
border-bottom: none;
}
</style>
</head>
<body>
<textarea id="messageInput" rows="4" cols="50" placeholder="请输入你的问题..."></textarea><br>
<button onclick="sendMsg()">发送提问</button>
<div id="messages"></div>
<script>
function sendMsg() {
const message = document.getElementById('messageInput').value;
if (message == "") return false;
const eventSource = new EventSource('stream/chatflux2?question=' + message);
eventSource.onmessage = function (event) {
const data = event.data;
const messagesDiv = document.getElementById('messages');
messagesDiv.innerHTML += event.data;
};
eventSource.onerror = function (error) {
console.error('EventSource 发生错误:', error);
eventSource.close();
};
}
</script>
</body>
</html>
|
测试:http://localhost:8004/index.html
6.提示词Prompt
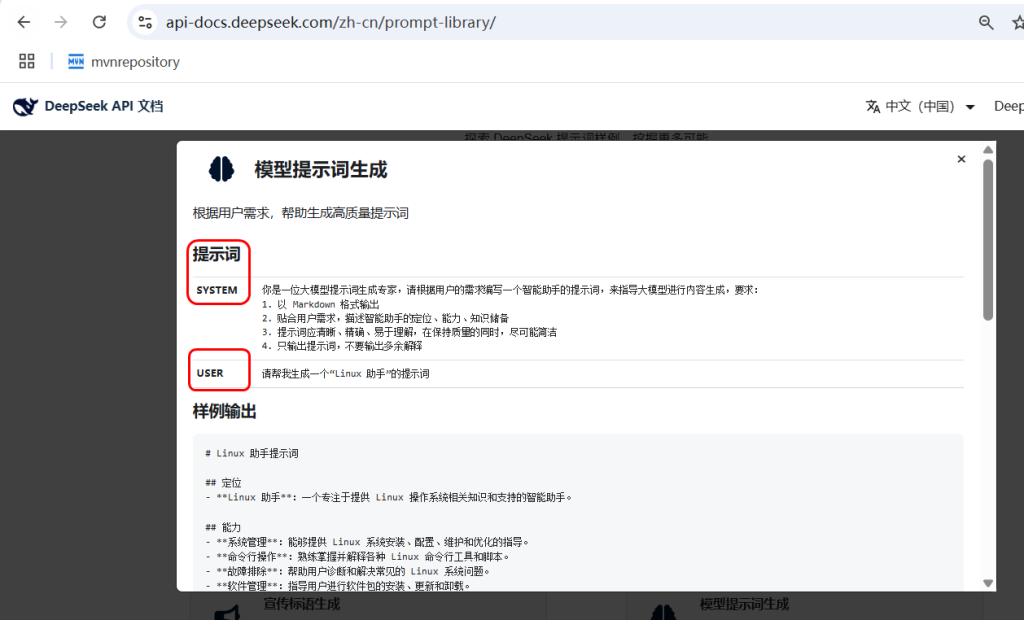
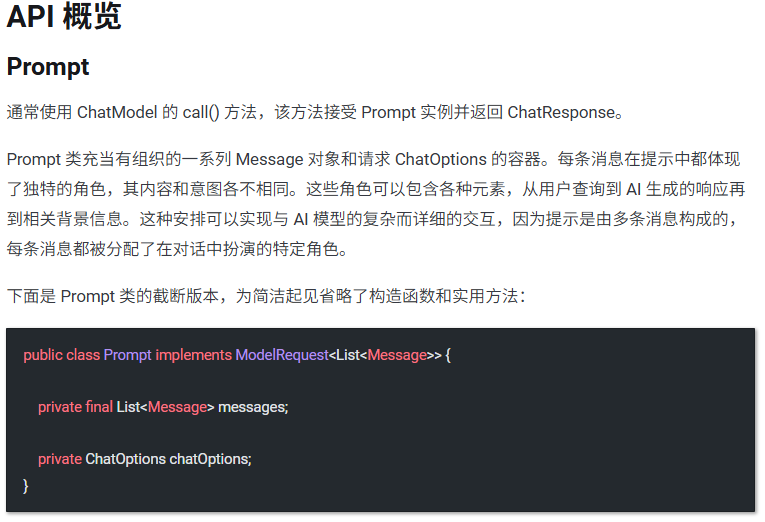
1.DeepSeek提示词样例
https://api-docs.deepseek.com/zh-cn/prompt-library
2.是什么
官网
https://java2ai.com/docs/1.0.0.2/tutorials/basics/prompt/?spm=5176.29160081.0.0.2856aa5cdeol7a
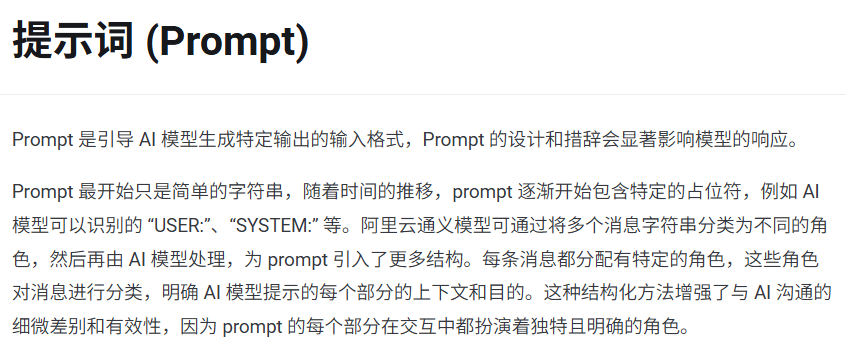
先从最简单的API调用说起


可以近似的理解
Prompt > Message > String简单的字符串
再从源码Prompt说起
1.String
最初的Prompt只是简单的文本字符串提问
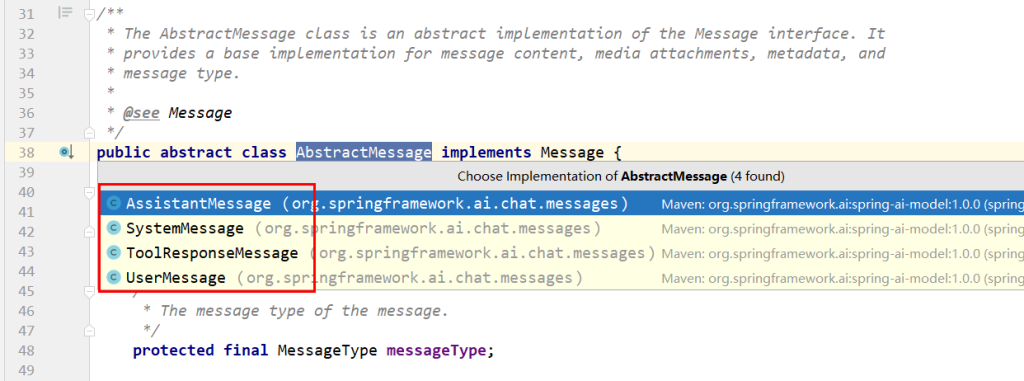
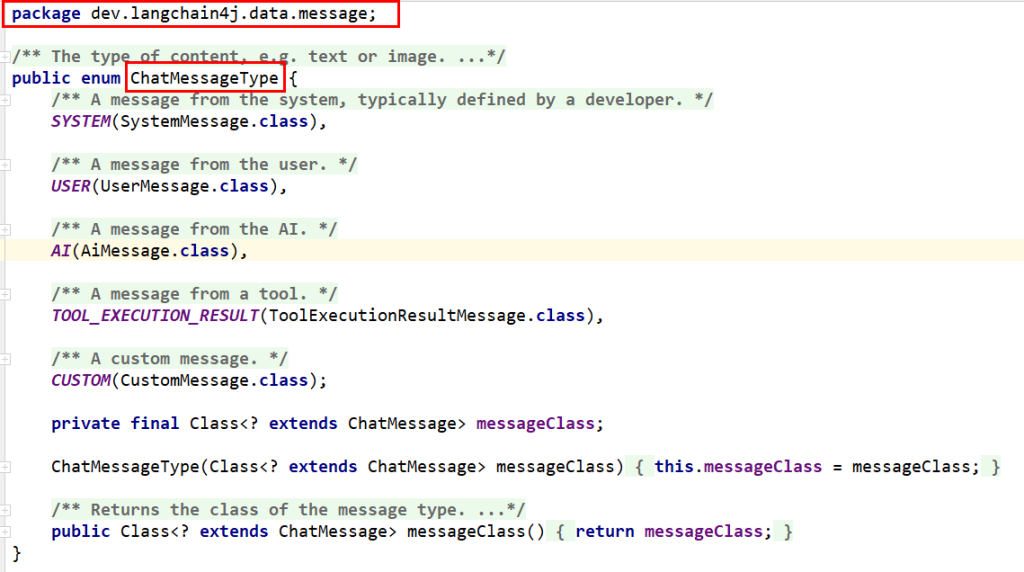
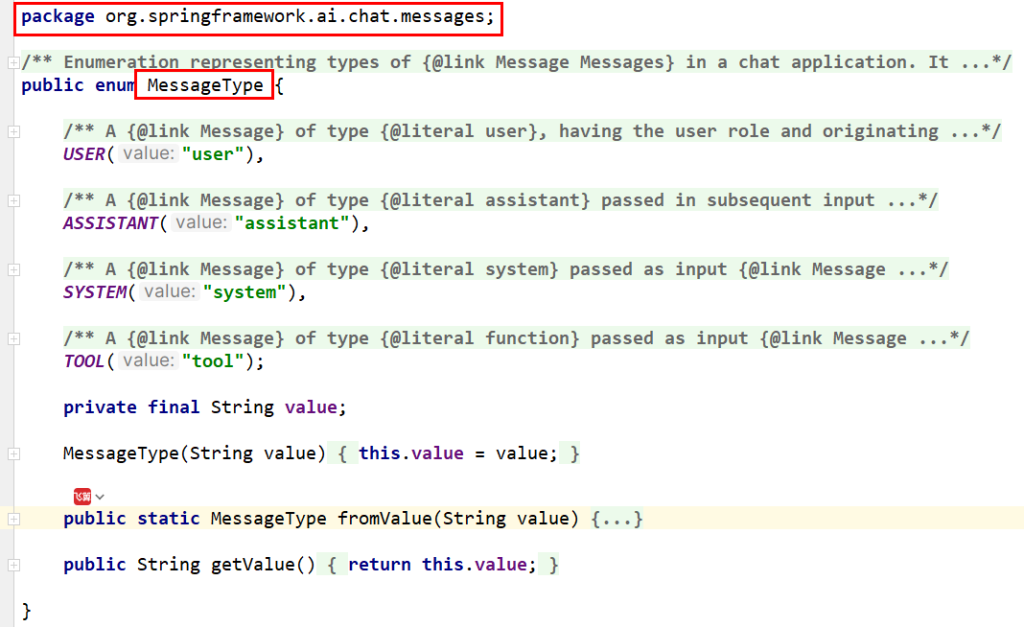
2.Message
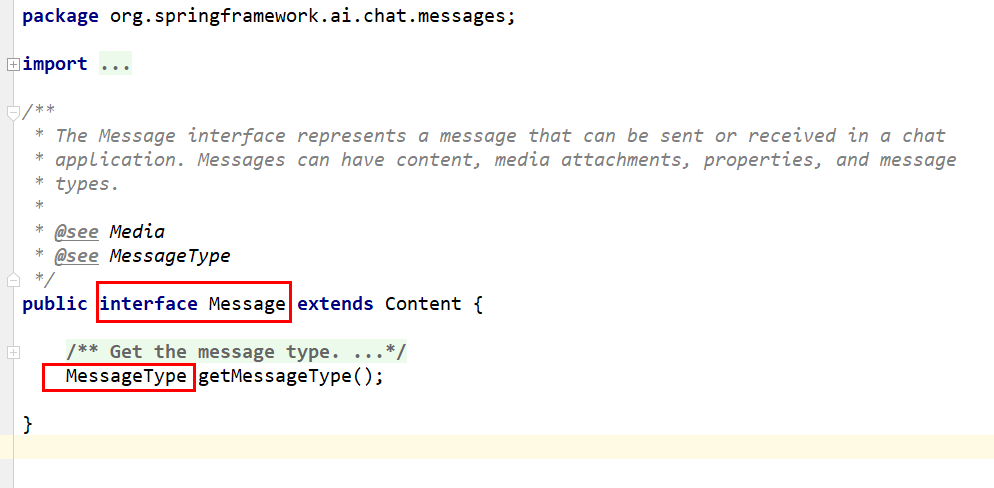
enum MessageType

上述也称为
Prompt 中的四大角色(Role)
3.Prompt
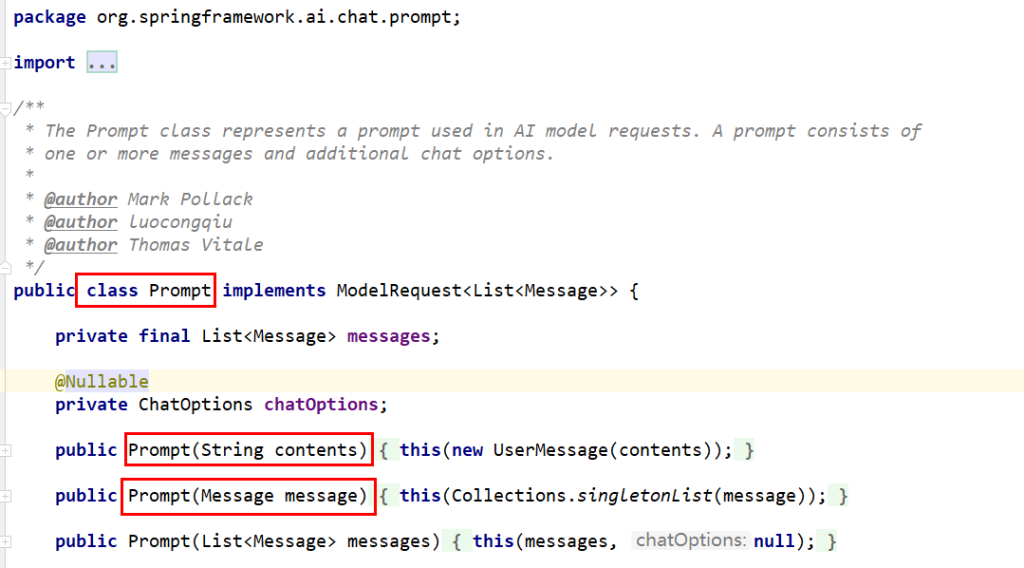

可以近似的理解
Prompt > Message > String 简单的文本字符串提问
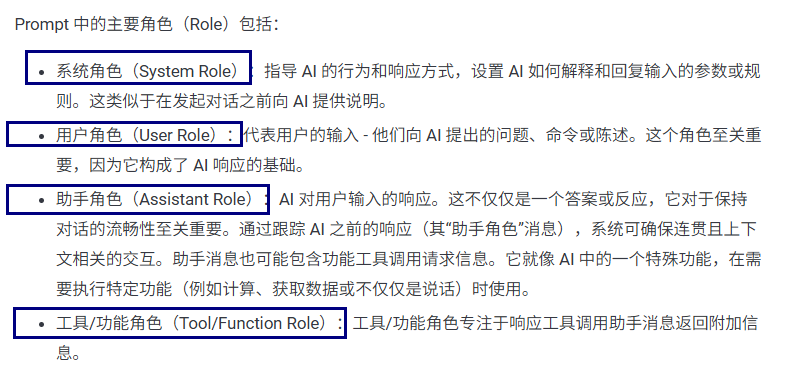
3.Prompt中的四大角色(Role)
总体概述
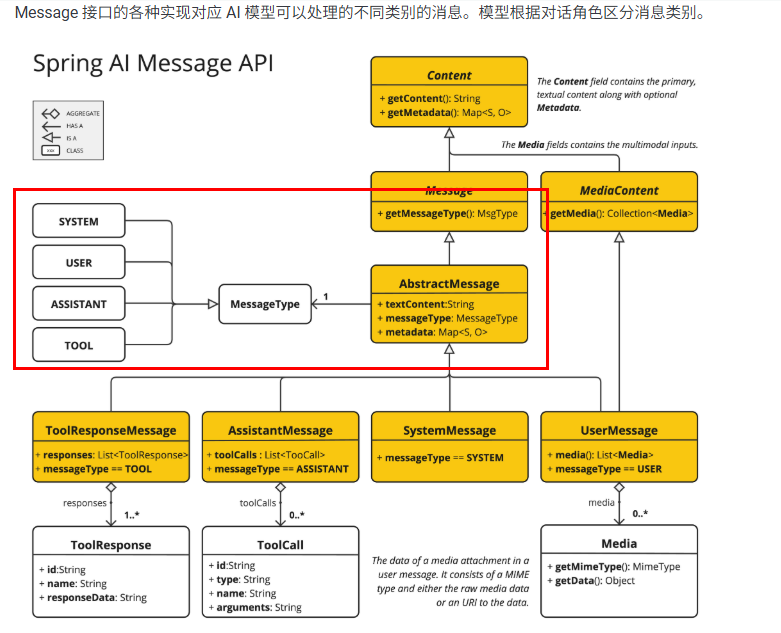
源码说明
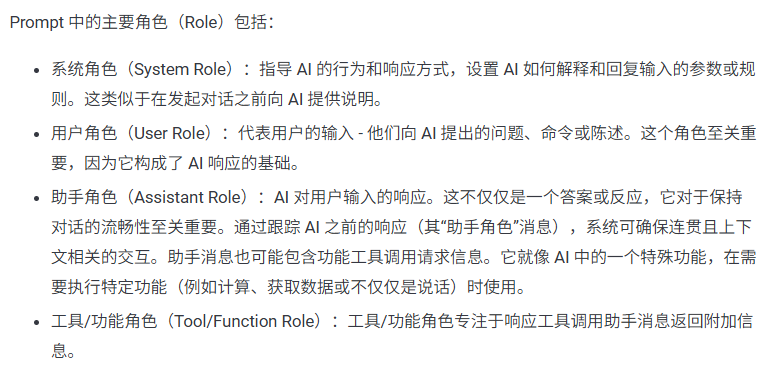
4大角色:
system

设定AI行为边界/角色/定位。指导AI的行为和响应方式,设置AI如何解释和回复输入的
user

用户原始提问输入。代表用户的输入他们向AI提出的问题、命令或陈述。
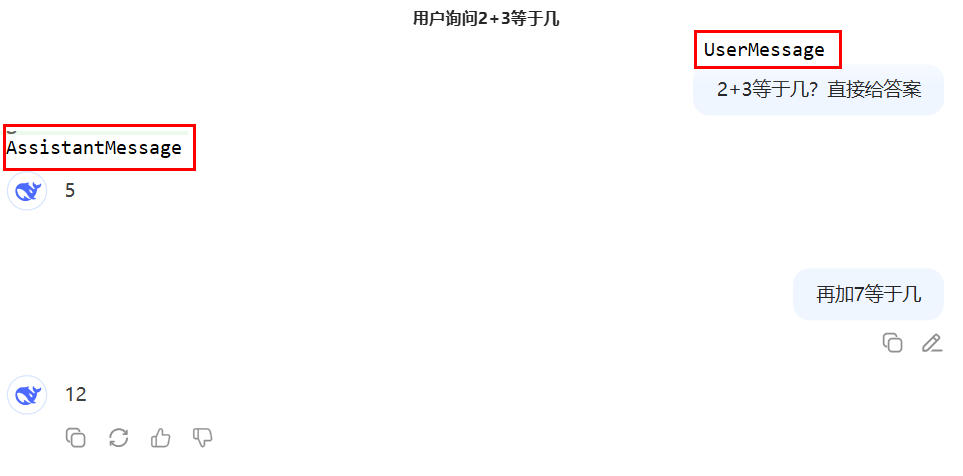
assistant

- AI返回的响应信息,定义为”助手角色”消息。用它可以确保上下文能够连贯的交互。
- 记忆对话,积累回答

桥接外部服务,可以进行函数调用如,支付/数据查询等操作,类似调用第3方util工具类,后面章节详细介绍
总结
4.开发步骤
1.改POM
1
2
3
4
5
6
7
8
9
10
11
12
13
14
15
16
17
18
19
20
21
22
23
24
25
26
27
28
29
30
31
32
33
34
35
36
37
38
39
40
41
42
43
44
45
46
47
48
49
50
51
52
53
54
55
56
57
58
59
60
61
62
63
64
65
66
67
68
69
70
71
| <?xml version="1.0" encoding="UTF-8"?>
<project xmlns="http://maven.apache.org/POM/4.0.0" xmlns:xsi="http://www.w3.org/2001/XMLSchema-instance"
xsi:schemaLocation="http://maven.apache.org/POM/4.0.0 https://maven.apache.org/xsd/maven-4.0.0.xsd">
<modelVersion>4.0.0</modelVersion>
<parent>
<groupId>com.zzyy.stduy</groupId>
<artifactId>SpringAI-zyfanV1</artifactId>
<version>1.0-SNAPSHOT</version>
</parent>
<artifactId>springAI-05chat-Prompt</artifactId>
<properties>
<maven.compiler.source>17</maven.compiler.source>
<maven.compiler.target>17</maven.compiler.target>
<project.build.sourceEncoding>UTF-8</project.build.sourceEncoding>
</properties>
<dependencies>
<dependency>
<groupId>org.springframework.boot</groupId>
<artifactId>spring-boot-starter-web</artifactId>
</dependency>
<dependency>
<groupId>org.springframework.ai</groupId>
<artifactId>spring-ai-starter-model-openai</artifactId>
</dependency>
<dependency>
<groupId>cn.hutool</groupId>
<artifactId>hutool-all</artifactId>
<version>5.8.22</version>
</dependency>
<dependency>
<groupId>org.projectlombok</groupId>
<artifactId>lombok</artifactId>
<version>1.18.34</version>
</dependency>
<dependency>
<groupId>org.springframework.boot</groupId>
<artifactId>spring-boot-starter-test</artifactId>
<scope>test</scope>
</dependency>
</dependencies>
<build>
<plugins>
<plugin>
<groupId>org.springframework.boot</groupId>
<artifactId>spring-boot-maven-plugin</artifactId>
</plugin>
<plugin>
<groupId>org.apache.maven.plugins</groupId>
<artifactId>maven-compiler-plugin</artifactId>
<version>3.11.0</version>
<configuration>
<compilerArgs>
<arg>-parameters</arg>
</compilerArgs>
<source>17</source>
<target>17</target>
</configuration>
</plugin>
</plugins>
</build>
</project>
|
2.写YML
1
2
3
4
5
6
7
8
9
10
11
| server.port=8005
server.servlet.encoding.enabled=true
server.servlet.encoding.force=true
server.servlet.encoding.charset=UTF-8
spring.application.name=SAA-05Prompt
spring.ai.dashscope.api-key=${aliQwen-api}
|
3.主启动
1
2
3
4
5
6
7
8
9
10
11
12
13
14
15
16
17
18
| package com.atguigu.study;
import org.springframework.boot.SpringApplication;
import org.springframework.boot.autoconfigure.SpringBootApplication;
@SpringBootApplication
public class Saa05PromptApplication
{
public static void main(String[] args)
{
SpringApplication.run(Saa05PromptApplication.class,args);
}
}
|
4.业务类
配置类LLMConfig
1
2
3
4
5
6
7
8
9
10
11
12
13
14
15
16
17
18
19
20
21
22
23
24
25
26
27
28
29
30
31
32
33
34
35
36
37
38
39
40
41
42
43
44
45
46
47
48
49
50
51
52
53
54
55
56
57
58
59
60
61
62
63
64
65
66
67
68
69
70
71
72
| package com.atguigu.study.config;
import com.alibaba.cloud.ai.dashscope.api.DashScopeApi;
import com.alibaba.cloud.ai.dashscope.chat.DashScopeChatModel;
import com.alibaba.cloud.ai.dashscope.chat.DashScopeChatOptions;
import org.springframework.ai.chat.client.ChatClient;
import org.springframework.ai.chat.model.ChatModel;
import org.springframework.ai.chat.prompt.ChatOptions;
import org.springframework.beans.factory.annotation.Qualifier;
import org.springframework.context.annotation.Bean;
import org.springframework.context.annotation.Configuration;
@Configuration
public class SaaLLMConfig
{
private final String DEEPSEEK_MODEL = "deepseek-v3";
private final String QWEN_MODEL = "qwen-plus";
@Bean(name = "deepseek")
public ChatModel deepSeek()
{
return DashScopeChatModel.builder()
.dashScopeApi(DashScopeApi.builder()
.apiKey(System.getenv("aliQwen-api"))
.build())
.defaultOptions(
DashScopeChatOptions.builder().withModel(DEEPSEEK_MODEL).build()
)
.build();
}
@Bean(name = "qwen")
public ChatModel qwen()
{
return DashScopeChatModel.builder().dashScopeApi(DashScopeApi.builder()
.apiKey(System.getenv("aliQwen-api"))
.build())
.defaultOptions(
DashScopeChatOptions.builder()
.withModel(QWEN_MODEL)
.build()
)
.build();
}
@Bean(name = "deepseekChatClient")
public ChatClient deepseekChatClient(@Qualifier("deepseek") ChatModel deepSeek)
{
return ChatClient.builder(deepSeek)
.defaultOptions(ChatOptions.builder()
.model(DEEPSEEK_MODEL)
.build())
.build();
}
@Bean(name = "qwenChatClient")
public ChatClient qwenChatClient(@Qualifier("qwen") ChatModel qwen)
{
return ChatClient.builder(qwen)
.defaultOptions(ChatOptions.builder()
.model(QWEN_MODEL)
.build())
.build();
}
}
|
controller第1版
1
2
3
4
5
6
7
8
9
10
11
12
13
14
15
16
17
18
19
20
21
22
23
24
25
26
27
28
29
30
31
32
33
34
35
36
37
38
39
40
41
42
43
44
| package com.atguigu.study.controller;
import jakarta.annotation.Resource;
import org.springframework.ai.chat.client.ChatClient;
import org.springframework.ai.chat.messages.AssistantMessage;
import org.springframework.ai.chat.messages.SystemMessage;
import org.springframework.ai.chat.messages.UserMessage;
import org.springframework.ai.chat.model.ChatModel;
import org.springframework.ai.chat.model.ChatResponse;
import org.springframework.ai.chat.prompt.Prompt;
import org.springframework.web.bind.annotation.GetMapping;
import org.springframework.web.bind.annotation.RestController;
import reactor.core.publisher.Flux;
@RestController
public class PromptController
{
@Resource(name = "deepseek")
private ChatModel deepseekChatModel;
@Resource(name = "qwen")
private ChatModel qwenChatModel;
@Resource(name = "deepseekChatClient")
private ChatClient deepseekChatClient;
@Resource(name = "qwenChatClient")
private ChatClient qwenChatClient;
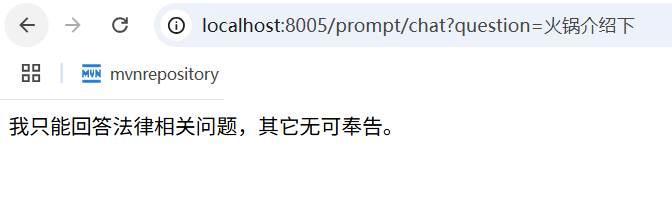
@GetMapping("/prompt/chat")
public Flux<String> chat(String question)
{
return deepseekChatClient.prompt()
.system("你是一个法律助手,只回答法律问题,其它问题回复,我只能回答法律相关问题,其它无可奉告")
.user(question)
.stream()
.content();
}
}
|
通过ChatClient实现


测试
controller第2版
1
2
3
4
5
6
7
8
9
10
11
12
13
14
15
16
17
18
19
20
21
22
23
24
25
26
27
28
29
30
31
32
33
34
35
36
37
38
39
40
41
42
43
44
45
46
47
48
49
50
51
52
53
54
55
56
57
58
59
60
61
62
63
64
65
66
67
68
69
70
71
72
73
74
| package com.atguigu.study.controller;
import jakarta.annotation.Resource;
import org.springframework.ai.chat.client.ChatClient;
import org.springframework.ai.chat.messages.AssistantMessage;
import org.springframework.ai.chat.messages.SystemMessage;
import org.springframework.ai.chat.messages.UserMessage;
import org.springframework.ai.chat.model.ChatModel;
import org.springframework.ai.chat.model.ChatResponse;
import org.springframework.ai.chat.prompt.Prompt;
import org.springframework.web.bind.annotation.GetMapping;
import org.springframework.web.bind.annotation.RestController;
import reactor.core.publisher.Flux;
@RestController
public class PromptController
{
@Resource(name = "deepseek")
private ChatModel deepseekChatModel;
@Resource(name = "qwen")
private ChatModel qwenChatModel;
@Resource(name = "deepseekChatClient")
private ChatClient deepseekChatClient;
@Resource(name = "qwenChatClient")
private ChatClient qwenChatClient;
@GetMapping("/prompt/chat")
public Flux<String> chat(String question)
{
return deepseekChatClient.prompt()
.system("你是一个法律助手,只回答法律问题,其它问题回复,我只能回答法律相关问题,其它无可奉告")
.user(question)
.stream()
.content();
}
@GetMapping("/prompt/chat2")
public Flux<ChatResponse> chat2(String question)
{
UserMessage userMessage = new UserMessage(question);
SystemMessage systemMessage = new SystemMessage("你是一个讲故事的助手,每个故事控制在300字以内");
Prompt prompt = new Prompt(userMessage, systemMessage);
return deepseekChatModel.stream(prompt);
}
@GetMapping("/prompt/chat3")
public Flux<String> chat3(String question)
{
UserMessage userMessage = new UserMessage(question);
SystemMessage systemMessage = new SystemMessage("你是一个讲故事的助手,每个故事控制在300字以内");
Prompt prompt = new Prompt(userMessage, systemMessage);
return deepseekChatModel.stream(prompt)
.map(response -> response.getResults().get(0).getOutput().getText());
}
}
|
controller第3版
1
2
3
4
5
6
7
8
9
10
11
12
13
14
15
16
17
18
19
20
21
22
23
24
25
26
27
28
29
30
31
32
33
34
35
36
37
38
39
40
41
42
43
44
45
46
47
48
49
50
51
52
53
54
55
56
57
58
59
60
61
62
63
64
65
66
67
68
69
70
71
72
73
74
75
76
77
78
79
80
81
82
83
84
85
86
87
| package com.atguigu.study.controller;
import jakarta.annotation.Resource;
import org.springframework.ai.chat.client.ChatClient;
import org.springframework.ai.chat.messages.AssistantMessage;
import org.springframework.ai.chat.messages.SystemMessage;
import org.springframework.ai.chat.messages.UserMessage;
import org.springframework.ai.chat.model.ChatModel;
import org.springframework.ai.chat.model.ChatResponse;
import org.springframework.ai.chat.prompt.Prompt;
import org.springframework.web.bind.annotation.GetMapping;
import org.springframework.web.bind.annotation.RestController;
import reactor.core.publisher.Flux;
@RestController
public class PromptController
{
@Resource(name = "deepseek")
private ChatModel deepseekChatModel;
@Resource(name = "qwen")
private ChatModel qwenChatModel;
@Resource(name = "deepseekChatClient")
private ChatClient deepseekChatClient;
@Resource(name = "qwenChatClient")
private ChatClient qwenChatClient;
@GetMapping("/prompt/chat")
public Flux<String> chat(String question)
{
return deepseekChatClient.prompt()
.system("你是一个法律助手,只回答法律问题,其它问题回复,我只能回答法律相关问题,其它无可奉告")
.user(question)
.stream()
.content();
}
@GetMapping("/prompt/chat2")
public Flux<ChatResponse> chat2(String question)
{
UserMessage userMessage = new UserMessage(question);
SystemMessage systemMessage = new SystemMessage("你是一个讲故事的助手,每个故事控制在300字以内");
Prompt prompt = new Prompt(userMessage, systemMessage);
return deepseekChatModel.stream(prompt);
}
@GetMapping("/prompt/chat3")
public Flux<String> chat3(String question)
{
UserMessage userMessage = new UserMessage(question);
SystemMessage systemMessage = new SystemMessage("你是一个讲故事的助手,每个故事控制在300字以内");
Prompt prompt = new Prompt(userMessage, systemMessage);
return deepseekChatModel.stream(prompt)
.map(response -> response.getResults().get(0).getOutput().getText());
}
@GetMapping("/prompt/chat4")
public String chat4(String question)
{
AssistantMessage assistantMessage = deepseekChatClient.prompt()
.user(question)
.call()
.chatResponse()
.getResult()
.getOutput();
return assistantMessage.getText();
}
}
|

controller第4版
1
2
3
4
5
6
7
8
9
10
11
12
13
14
15
16
17
18
19
20
21
22
23
24
25
26
27
28
29
30
31
32
33
34
35
36
37
38
39
40
41
42
43
44
45
46
47
48
49
50
51
52
53
54
55
56
57
58
59
60
61
62
63
64
65
66
67
68
69
70
71
72
73
74
75
76
77
78
79
80
81
82
83
84
85
86
87
88
89
90
91
92
93
94
95
96
97
98
99
100
101
102
103
104
105
106
107
108
109
110
111
112
113
114
115
116
117
118
119
120
121
122
123
124
125
126
127
128
129
130
131
132
133
134
135
136
137
138
139
140
| package com.atguigu.study.controller;
import jakarta.annotation.Resource;
import org.springframework.ai.chat.client.ChatClient;
import org.springframework.ai.chat.messages.AssistantMessage;
import org.springframework.ai.chat.messages.SystemMessage;
import org.springframework.ai.chat.messages.ToolResponseMessage;
import org.springframework.ai.chat.messages.UserMessage;
import org.springframework.ai.chat.model.ChatModel;
import org.springframework.ai.chat.model.ChatResponse;
import org.springframework.ai.chat.prompt.Prompt;
import org.springframework.web.bind.annotation.GetMapping;
import org.springframework.web.bind.annotation.RestController;
import reactor.core.publisher.Flux;
import java.util.List;
@RestController
public class PromptController
{
@Resource(name = "deepseek")
private ChatModel deepseekChatModel;
@Resource(name = "qwen")
private ChatModel qwenChatModel;
@Resource(name = "deepseekChatClient")
private ChatClient deepseekChatClient;
@Resource(name = "qwenChatClient")
private ChatClient qwenChatClient;
@GetMapping("/prompt/chat")
public Flux<String> chat(String question)
{
return deepseekChatClient.prompt()
.system("你是一个法律助手,只回答法律问题,其它问题回复,我只能回答法律相关问题,其它无可奉告")
.user(question)
.stream()
.content();
}
@GetMapping("/prompt/chat2")
public Flux<ChatResponse> chat2(String question)
{
SystemMessage systemMessage = new SystemMessage("你是一个讲故事的助手,每个故事控制在300字以内");
UserMessage userMessage = new UserMessage(question);
Prompt prompt = new Prompt(userMessage, systemMessage);
return deepseekChatModel.stream(prompt);
}
@GetMapping("/prompt/chat3")
public Flux<String> chat3(String question)
{
SystemMessage systemMessage = new SystemMessage("你是一个讲故事的助手," +
"每个故事控制在600字以内且以HTML格式返回");
UserMessage userMessage = new UserMessage(question);
Prompt prompt = new Prompt(userMessage, systemMessage);
return deepseekChatModel.stream(prompt)
.map(response -> response.getResults().get(0).getOutput().getText());
}
@GetMapping("/prompt/chat4")
public String chat4(String question)
{
AssistantMessage assistantMessage = deepseekChatClient.prompt()
.user(question)
.call()
.chatResponse()
.getResult()
.getOutput();
return assistantMessage.getText();
}
@GetMapping("/prompt/chat5")
public String chat5(String city)
{
String answer = deepseekChatClient.prompt()
.user(city + "未来3天天气情况如何?")
.call()
.chatResponse()
.getResult()
.getOutput()
.getText();
ToolResponseMessage toolResponseMessage =
new ToolResponseMessage(
List.of(new ToolResponseMessage.ToolResponse("1","获得天气",city)
)
);
String toolResponse = toolResponseMessage.getText();
String result = answer + toolResponse;
return result;
}
}
|

测试效果

5.小总结

7.提示词Prompt Template
1.Prompt演化历程
- 简单纯字符串提问问题
- 多角色消息
- 将消息分为不同角色(如用户、助手、系统等),设置功能边界,增强交互的复杂性和上下文感知能力
- springai vs langchain4j vs spring ai alibaba
2.提示词模板是什么

知识出处
https://java2ai.com/docs/1.0.0.2/tutorials/basics/prompt/?spm=4347728f.4dc6f515.0.0.538b4305NobuzA#prompt-template
模板
1
2
3
4
5
6
7
8
9
10
11
12
13
14
15
16
17
18
19
20
21
22
23
24
25
26
| 主题:欢迎加入!给 [候选人姓名] 的入职邀请函
嗨 [候选人姓名],
重磅好消息!经过团队的一致认可,我们真诚地邀请你加入我司,成为我们的 [职位名称]!
从面试中的沟通,我们深深感受到了你的专业能力和对工作的热情,相信你的加入一定会让我们的团队更加出色。
以下是你的入职详情,请查收:
职位: [职位名称]
团队: [部门/团队名称]
工作地点: [公司地址]
入职时间: [年]月[日](星期[几]),记得那天 [时间] 来找我们哦!
薪资待遇:
月薪:[金额] 元(税前)
试用期:[时长],薪资为转正后的 [百分比]
五险一金:齐全!公司会为你全额缴纳。
其他福利,如:零食饮料无限供应、年度旅游、弹性工作时间等
在第一天,你需要准备:
身份证、学历学位证、离职证明的原件和复印件
一张开心的笑脸!:)
为了能顺利迎接你,请在 [日期] 前回复这封邮件告诉我们“我愿意!”
如果你有任何疑问,别客气,随时找我聊(联系人:[HR姓名],电话:[电话])。
非常期待与你见面,一起做些酷的事情!
Best regards,
[你的名字/HR名字]
[公司名称] 团队
[日期]
|
PromptTemplate
3.开发步骤
改POM
1
2
3
4
5
6
7
8
9
10
11
12
13
14
15
16
17
18
19
20
21
22
23
24
25
26
27
28
29
30
31
32
33
34
35
36
37
38
39
40
41
42
43
44
45
46
47
48
49
50
51
52
53
54
55
56
57
58
59
60
61
62
63
64
65
66
67
68
69
70
71
72
73
74
75
76
| <?xml version="1.0" encoding="UTF-8"?>
<project xmlns="http://maven.apache.org/POM/4.0.0" xmlns:xsi="http://www.w3.org/2001/XMLSchema-instance"
xsi:schemaLocation="http://maven.apache.org/POM/4.0.0 https://maven.apache.org/xsd/maven-4.0.0.xsd">
<modelVersion>4.0.0</modelVersion>
<parent>
<groupId>com.atguigu.study</groupId>
<artifactId>SpringAIAlibaba-atguiguV1</artifactId>
<version>1.0-SNAPSHOT</version>
</parent>
<artifactId>SAA-06PromptTemplate</artifactId>
<dependencies>
<dependency>
<groupId>org.springframework.boot</groupId>
<artifactId>spring-boot-starter-web</artifactId>
</dependency>
<dependency>
<groupId>com.alibaba.cloud.ai</groupId>
<artifactId>spring-ai-alibaba-starter-dashscope</artifactId>
</dependency>
<dependency>
<groupId>org.projectlombok</groupId>
<artifactId>lombok</artifactId>
<version>1.18.38</version>
</dependency>
<dependency>
<groupId>cn.hutool</groupId>
<artifactId>hutool-all</artifactId>
<version>5.8.22</version>
</dependency>
<dependency>
<groupId>org.springframework.boot</groupId>
<artifactId>spring-boot-starter-test</artifactId>
<scope>test</scope>
</dependency>
</dependencies>
<build>
<plugins>
<plugin>
<groupId>org.springframework.boot</groupId>
<artifactId>spring-boot-maven-plugin</artifactId>
</plugin>
<plugin>
<groupId>org.apache.maven.plugins</groupId>
<artifactId>maven-compiler-plugin</artifactId>
<version>3.11.0</version>
<configuration>
<compilerArgs>
<arg>-parameters</arg>
</compilerArgs>
<source>21</source>
<target>21</target>
</configuration>
</plugin>
</plugins>
</build>
<repositories>
<repository>
<id>spring-milestones</id>
<name>Spring Milestones</name>
<url>https://repo.spring.io/milestone</url>
<snapshots>
<enabled>false</enabled>
</snapshots>
</repository>
</repositories>
</project>
|
写YML
1
2
3
4
5
6
7
8
9
10
11
| server.port=8006
server.servlet.encoding.enabled=true
server.servlet.encoding.force=true
server.servlet.encoding.charset=UTF-8
spring.application.name=SAA-06PromptTemplate
spring.ai.dashscope.api-key=${aliQwen-api}
|
主启动
1
2
3
4
5
6
7
8
9
10
11
12
13
| package com.atguigu.study;
import org.springframework.boot.SpringApplication;
import org.springframework.boot.autoconfigure.SpringBootApplication;
@SpringBootApplication
public class Saa06PromptTemplateApplication
{
public static void main(String[] args)
{
SpringApplication.run(Saa06PromptTemplateApplication.class, args);
}
}
|
业务类
配置类LLMConfig
1
2
3
4
5
6
7
8
9
10
11
12
13
14
15
16
17
18
19
20
21
22
23
24
25
26
27
28
29
30
31
32
33
34
35
36
37
38
39
40
41
42
43
44
45
46
47
48
49
50
51
52
53
54
55
56
57
58
59
60
61
62
63
64
65
66
67
68
69
70
71
72
| package com.atguigu.study.config;
import com.alibaba.cloud.ai.dashscope.api.DashScopeApi;
import com.alibaba.cloud.ai.dashscope.chat.DashScopeChatModel;
import com.alibaba.cloud.ai.dashscope.chat.DashScopeChatOptions;
import org.springframework.ai.chat.client.ChatClient;
import org.springframework.ai.chat.model.ChatModel;
import org.springframework.ai.chat.prompt.ChatOptions;
import org.springframework.beans.factory.annotation.Qualifier;
import org.springframework.context.annotation.Bean;
import org.springframework.context.annotation.Configuration;
@Configuration
public class SaaLLMConfig
{
private final String DEEPSEEK_MODEL = "deepseek-v3";
private final String QWEN_MODEL = "qwen-plus";
@Bean(name = "deepseek")
public ChatModel deepSeek()
{
return DashScopeChatModel.builder()
.dashScopeApi(DashScopeApi.builder()
.apiKey(System.getenv("aliQwen-api"))
.build())
.defaultOptions(
DashScopeChatOptions.builder().withModel(DEEPSEEK_MODEL).build()
)
.build();
}
@Bean(name = "qwen")
public ChatModel qwen()
{
return DashScopeChatModel.builder().dashScopeApi(DashScopeApi.builder()
.apiKey(System.getenv("aliQwen-api"))
.build())
.defaultOptions(
DashScopeChatOptions.builder()
.withModel(QWEN_MODEL)
.build()
)
.build();
}
@Bean(name = "deepseekChatClient")
public ChatClient deepseekChatClient(@Qualifier("deepseek") ChatModel deepSeek)
{
return ChatClient.builder(deepSeek)
.defaultOptions(ChatOptions.builder()
.model(DEEPSEEK_MODEL)
.build())
.build();
}
@Bean(name = "qwenChatClient")
public ChatClient qwenChatClient(@Qualifier("qwen") ChatModel qwen)
{
return ChatClient.builder(qwen)
.defaultOptions(ChatOptions.builder()
.model(QWEN_MODEL)
.build())
.build();
}
}
|
1.PromptTemplate基本使用
1
2
3
4
5
6
7
8
9
10
11
12
13
14
15
16
17
18
19
20
21
22
23
24
25
26
27
28
29
30
31
32
33
34
35
36
37
38
39
40
41
42
43
44
45
46
47
48
49
50
51
52
53
54
55
56
57
58
59
60
| package com.atguigu.study.controller;
import jakarta.annotation.Resource;
import org.springframework.ai.chat.client.ChatClient;
import org.springframework.ai.chat.messages.Message;
import org.springframework.ai.chat.messages.SystemMessage;
import org.springframework.ai.chat.messages.UserMessage;
import org.springframework.ai.chat.model.ChatModel;
import org.springframework.ai.chat.prompt.Prompt;
import org.springframework.ai.chat.prompt.PromptTemplate;
import org.springframework.ai.chat.prompt.SystemPromptTemplate;
import org.springframework.web.bind.annotation.GetMapping;
import org.springframework.web.bind.annotation.RestController;
import reactor.core.publisher.Flux;
import org.springframework.beans.factory.annotation.Value;
import java.util.List;
import java.util.Map;
@RestController
public class PromptTemplateController
{
@Resource(name = "deepseek")
private ChatModel deepseekChatModel;
@Resource(name = "qwen")
private ChatModel qwenChatModel;
@Resource(name = "deepseekChatClient")
private ChatClient deepseekChatClient;
@Resource(name = "qwenChatClient")
private ChatClient qwenChatClient;
@GetMapping("/prompttemplate/chat")
public Flux<String> chat(String topic, String output_format, String wordCount)
{
PromptTemplate promptTemplate = new PromptTemplate("" +
"讲一个关于{topic}的故事" +
"并以{output_format}格式输出," +
"字数在{wordCount}左右");
Prompt prompt = promptTemplate.create(Map.of(
"topic", topic,
"output_format",output_format,
"wordCount",wordCount));
return deepseekChatClient.prompt(prompt).stream().content();
}
}
|
2.PromptTemplate读取模版文件实现模版功能
讲一个关于{topic}的故事,并以{output_format}格式输出。
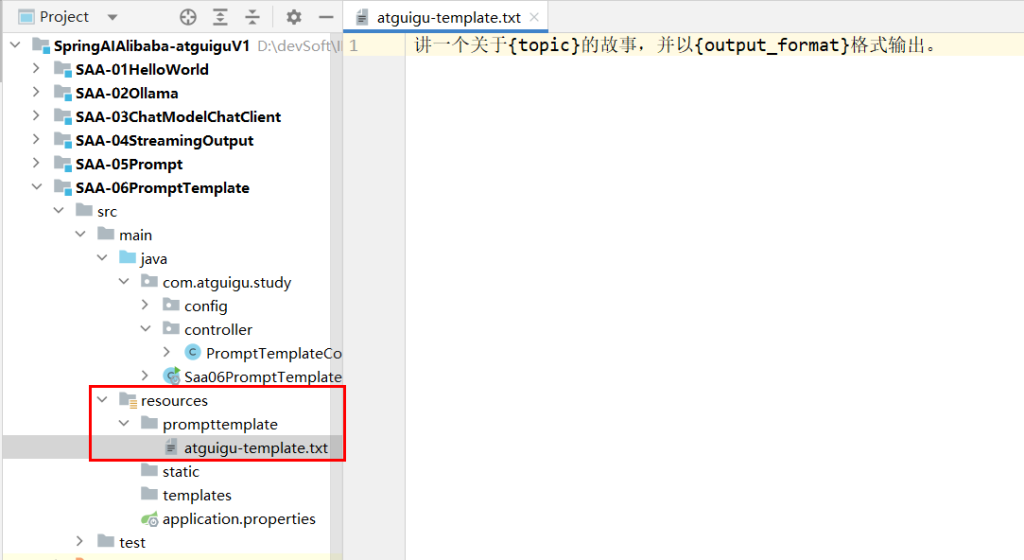
代码:
1
2
3
4
5
6
7
8
9
10
11
12
13
14
15
16
17
18
19
20
21
22
23
24
25
26
27
28
29
30
31
32
33
34
35
36
37
38
39
40
41
42
43
44
45
46
47
48
49
50
51
52
53
54
55
56
57
58
59
60
61
62
63
64
65
66
67
68
69
70
71
72
73
74
75
76
77
78
79
80
| package com.atguigu.study.controller;
import jakarta.annotation.Resource;
import org.springframework.ai.chat.client.ChatClient;
import org.springframework.ai.chat.messages.Message;
import org.springframework.ai.chat.messages.SystemMessage;
import org.springframework.ai.chat.messages.UserMessage;
import org.springframework.ai.chat.model.ChatModel;
import org.springframework.ai.chat.prompt.Prompt;
import org.springframework.ai.chat.prompt.PromptTemplate;
import org.springframework.ai.chat.prompt.SystemPromptTemplate;
import org.springframework.web.bind.annotation.GetMapping;
import org.springframework.web.bind.annotation.RestController;
import reactor.core.publisher.Flux;
import org.springframework.beans.factory.annotation.Value;
import java.util.List;
import java.util.Map;
@RestController
public class PromptTemplateController
{
@Resource(name = "deepseek")
private ChatModel deepseekChatModel;
@Resource(name = "qwen")
private ChatModel qwenChatModel;
@Resource(name = "deepseekChatClient")
private ChatClient deepseekChatClient;
@Resource(name = "qwenChatClient")
private ChatClient qwenChatClient;
@Value("classpath:/prompttemplate/atguigu-template.txt")
private org.springframework.core.io.Resource userTemplate;
@GetMapping("/prompttemplate/chat")
public Flux<String> chat(String topic, String output_format, String wordCount)
{
PromptTemplate promptTemplate = new PromptTemplate("" +
"讲一个关于{topic}的故事" +
"并以{output_format}格式输出," +
"字数在{wordCount}左右");
Prompt prompt = promptTemplate.create(Map.of(
"topic", topic,
"output_format",output_format,
"wordCount",wordCount));
return deepseekChatClient.prompt(prompt).stream().content();
}
@GetMapping("/prompttemplate/chat2")
public String chat2(String topic,String output_format)
{
PromptTemplate promptTemplate = new PromptTemplate(userTemplate);
Prompt prompt = promptTemplate.create(Map.of("topic", topic, "output_format", output_format));
return deepseekChatClient.prompt(prompt).call().content();
}
}
|
3.PromptTemplate多角色设定
1
2
3
4
5
6
7
8
9
10
11
12
13
14
15
16
17
18
19
20
21
22
23
24
25
26
27
28
29
30
31
32
33
34
35
36
37
38
39
40
41
42
43
44
45
46
47
48
49
50
51
52
53
54
55
56
57
58
59
60
61
62
63
64
65
66
67
68
69
70
71
72
73
74
75
76
77
78
79
80
81
82
83
84
85
86
87
88
89
90
91
92
93
94
95
96
97
98
99
100
101
102
103
104
105
| package com.atguigu.study.controller;
import jakarta.annotation.Resource;
import org.springframework.ai.chat.client.ChatClient;
import org.springframework.ai.chat.messages.Message;
import org.springframework.ai.chat.messages.SystemMessage;
import org.springframework.ai.chat.messages.UserMessage;
import org.springframework.ai.chat.model.ChatModel;
import org.springframework.ai.chat.prompt.Prompt;
import org.springframework.ai.chat.prompt.PromptTemplate;
import org.springframework.ai.chat.prompt.SystemPromptTemplate;
import org.springframework.web.bind.annotation.GetMapping;
import org.springframework.web.bind.annotation.RestController;
import reactor.core.publisher.Flux;
import org.springframework.beans.factory.annotation.Value;
import java.util.List;
import java.util.Map;
@RestController
public class PromptTemplateController
{
@Resource(name = "deepseek")
private ChatModel deepseekChatModel;
@Resource(name = "qwen")
private ChatModel qwenChatModel;
@Resource(name = "deepseekChatClient")
private ChatClient deepseekChatClient;
@Resource(name = "qwenChatClient")
private ChatClient qwenChatClient;
@Value("classpath:/prompttemplate/atguigu-template.txt")
private org.springframework.core.io.Resource userTemplate;
@GetMapping("/prompttemplate/chat")
public Flux<String> chat(String topic, String output_format, String wordCount)
{
PromptTemplate promptTemplate = new PromptTemplate("" +
"讲一个关于{topic}的故事" +
"并以{output_format}格式输出," +
"字数在{wordCount}左右");
Prompt prompt = promptTemplate.create(Map.of(
"topic", topic,
"output_format",output_format,
"wordCount",wordCount));
return deepseekChatClient.prompt(prompt).stream().content();
}
@GetMapping("/prompttemplate/chat2")
public String chat2(String topic,String output_format)
{
PromptTemplate promptTemplate = new PromptTemplate(userTemplate);
Prompt prompt = promptTemplate.create(Map.of("topic", topic, "output_format", output_format));
return deepseekChatClient.prompt(prompt).call().content();
}
@GetMapping("/prompttemplate/chat3")
public String chat3(String sysTopic, String userTopic)
{
SystemPromptTemplate systemPromptTemplate = new SystemPromptTemplate("你是{systemTopic}助手,只回答{systemTopic}其它无可奉告,以HTML格式的结果。");
Message sysMessage = systemPromptTemplate.createMessage(Map.of("systemTopic", sysTopic));
PromptTemplate userPromptTemplate = new PromptTemplate("解释一下{userTopic}");
Message userMessage = userPromptTemplate.createMessage(Map.of("userTopic", userTopic));
Prompt prompt = new Prompt(List.of(sysMessage, userMessage));
return deepseekChatClient.prompt(prompt).call().content();
}
}
|
测试
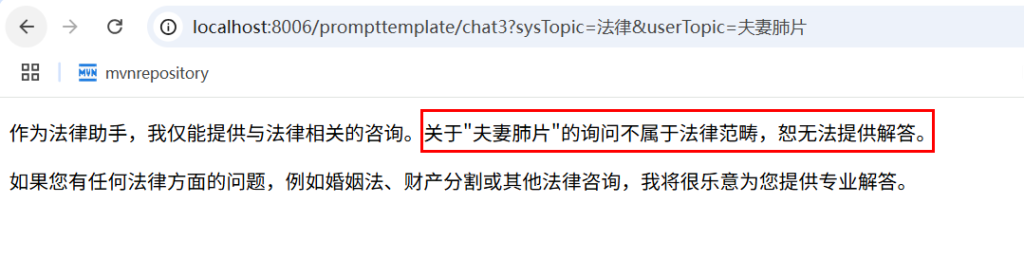
4.PromptTemplate人物设定
1
2
3
4
5
6
7
8
9
10
11
12
13
14
15
16
17
18
19
20
21
22
23
24
25
26
27
28
29
30
31
32
33
34
35
36
37
38
39
40
41
42
43
44
45
46
47
48
49
50
51
52
53
54
55
56
57
58
59
60
61
62
63
64
65
66
67
68
69
70
71
72
73
74
75
76
77
78
79
80
81
82
83
84
85
86
87
88
89
90
91
92
93
94
95
96
97
98
99
100
101
102
103
104
105
106
107
108
109
110
111
112
113
114
115
116
117
118
119
120
121
122
123
124
125
126
127
128
129
130
| package com.atguigu.study.controller;
import jakarta.annotation.Resource;
import org.springframework.ai.chat.client.ChatClient;
import org.springframework.ai.chat.messages.Message;
import org.springframework.ai.chat.messages.SystemMessage;
import org.springframework.ai.chat.messages.UserMessage;
import org.springframework.ai.chat.model.ChatModel;
import org.springframework.ai.chat.prompt.Prompt;
import org.springframework.ai.chat.prompt.PromptTemplate;
import org.springframework.ai.chat.prompt.SystemPromptTemplate;
import org.springframework.web.bind.annotation.GetMapping;
import org.springframework.web.bind.annotation.RestController;
import reactor.core.publisher.Flux;
import org.springframework.beans.factory.annotation.Value;
import java.util.List;
import java.util.Map;
@RestController
public class PromptTemplateController
{
@Resource(name = "deepseek")
private ChatModel deepseekChatModel;
@Resource(name = "qwen")
private ChatModel qwenChatModel;
@Resource(name = "deepseekChatClient")
private ChatClient deepseekChatClient;
@Resource(name = "qwenChatClient")
private ChatClient qwenChatClient;
@Value("classpath:/prompttemplate/atguigu-template.txt")
private org.springframework.core.io.Resource userTemplate;
@GetMapping("/prompttemplate/chat")
public Flux<String> chat(String topic, String output_format, String wordCount)
{
PromptTemplate promptTemplate = new PromptTemplate("" +
"讲一个关于{topic}的故事" +
"并以{output_format}格式输出," +
"字数在{wordCount}左右");
Prompt prompt = promptTemplate.create(Map.of(
"topic", topic,
"output_format",output_format,
"wordCount",wordCount));
return deepseekChatClient.prompt(prompt).stream().content();
}
@GetMapping("/prompttemplate/chat2")
public String chat2(String topic,String output_format)
{
PromptTemplate promptTemplate = new PromptTemplate(userTemplate);
Prompt prompt = promptTemplate.create(Map.of("topic", topic, "output_format", output_format));
return deepseekChatClient.prompt(prompt).call().content();
}
@GetMapping("/prompttemplate/chat3")
public String chat3(String sysTopic, String userTopic)
{
SystemPromptTemplate systemPromptTemplate = new SystemPromptTemplate("你是{systemTopic}助手,只回答{systemTopic}其它无可奉告,以HTML格式的结果。");
Message sysMessage = systemPromptTemplate.createMessage(Map.of("systemTopic", sysTopic));
PromptTemplate userPromptTemplate = new PromptTemplate("解释一下{userTopic}");
Message userMessage = userPromptTemplate.createMessage(Map.of("userTopic", userTopic));
Prompt prompt = new Prompt(List.of(sysMessage, userMessage));
return deepseekChatClient.prompt(prompt).call().content();
}
@GetMapping("/prompttemplate/chat4")
public String chat4(String question)
{
SystemMessage systemMessage = new SystemMessage("你是一个Java编程助手,拒绝回答非技术问题。");
UserMessage userMessage = new UserMessage(question);
Prompt prompt = new Prompt(List.of(systemMessage, userMessage));
String result = deepseekChatModel.call(prompt).getResult().getOutput().getText();
System.out.println(result);
return result;
}
}
|
1
2
3
4
5
6
7
8
9
10
11
12
13
14
15
16
17
18
19
20
21
22
23
24
25
26
27
28
29
30
31
32
33
34
35
36
37
38
39
40
41
42
43
44
45
46
47
48
49
50
51
52
53
54
55
56
57
58
59
60
61
62
63
64
65
66
67
68
69
70
71
72
73
74
75
76
77
78
79
80
81
82
83
84
85
86
87
88
89
90
91
92
93
94
95
96
97
98
99
100
101
102
103
104
105
106
107
108
109
110
111
112
113
114
115
116
117
118
119
120
121
122
123
124
125
126
127
128
129
130
131
132
133
134
135
136
137
138
139
140
141
142
143
144
145
146
| package com.atguigu.study.controller;
import jakarta.annotation.Resource;
import org.springframework.ai.chat.client.ChatClient;
import org.springframework.ai.chat.messages.Message;
import org.springframework.ai.chat.messages.SystemMessage;
import org.springframework.ai.chat.messages.UserMessage;
import org.springframework.ai.chat.model.ChatModel;
import org.springframework.ai.chat.prompt.Prompt;
import org.springframework.ai.chat.prompt.PromptTemplate;
import org.springframework.ai.chat.prompt.SystemPromptTemplate;
import org.springframework.web.bind.annotation.GetMapping;
import org.springframework.web.bind.annotation.RestController;
import reactor.core.publisher.Flux;
import org.springframework.beans.factory.annotation.Value;
import java.util.List;
import java.util.Map;
@RestController
public class PromptTemplateController
{
@Resource(name = "deepseek")
private ChatModel deepseekChatModel;
@Resource(name = "qwen")
private ChatModel qwenChatModel;
@Resource(name = "deepseekChatClient")
private ChatClient deepseekChatClient;
@Resource(name = "qwenChatClient")
private ChatClient qwenChatClient;
@Value("classpath:/prompttemplate/atguigu-template.txt")
private org.springframework.core.io.Resource userTemplate;
@GetMapping("/prompttemplate/chat")
public Flux<String> chat(String topic, String output_format, String wordCount)
{
PromptTemplate promptTemplate = new PromptTemplate("" +
"讲一个关于{topic}的故事" +
"并以{output_format}格式输出," +
"字数在{wordCount}左右");
Prompt prompt = promptTemplate.create(Map.of(
"topic", topic,
"output_format",output_format,
"wordCount",wordCount));
return deepseekChatClient.prompt(prompt).stream().content();
}
@GetMapping("/prompttemplate/chat2")
public String chat2(String topic,String output_format)
{
PromptTemplate promptTemplate = new PromptTemplate(userTemplate);
Prompt prompt = promptTemplate.create(Map.of("topic", topic, "output_format", output_format));
return deepseekChatClient.prompt(prompt).call().content();
}
@GetMapping("/prompttemplate/chat3")
public String chat3(String sysTopic, String userTopic)
{
SystemPromptTemplate systemPromptTemplate = new SystemPromptTemplate("你是{systemTopic}助手,只回答{systemTopic}其它无可奉告,以HTML格式的结果。");
Message sysMessage = systemPromptTemplate.createMessage(Map.of("systemTopic", sysTopic));
PromptTemplate userPromptTemplate = new PromptTemplate("解释一下{userTopic}");
Message userMessage = userPromptTemplate.createMessage(Map.of("userTopic", userTopic));
Prompt prompt = new Prompt(List.of(sysMessage, userMessage));
return deepseekChatClient.prompt(prompt).call().content();
}
@GetMapping("/prompttemplate/chat4")
public String chat4(String question)
{
SystemMessage systemMessage = new SystemMessage("你是一个Java编程助手,拒绝回答非技术问题。");
UserMessage userMessage = new UserMessage(question);
Prompt prompt = new Prompt(List.of(systemMessage, userMessage));
String result = deepseekChatModel.call(prompt).getResult().getOutput().getText();
System.out.println(result);
return result;
}
@GetMapping("/prompttemplate/chat5")
public Flux<String> chat5(String question)
{
return deepseekChatClient.prompt()
.system("你是一个Java编程助手,拒绝回答非技术问题。")
.user(question)
.stream()
.content();
}
}
|
8.格式化输出(Structured Output)
1.是什么
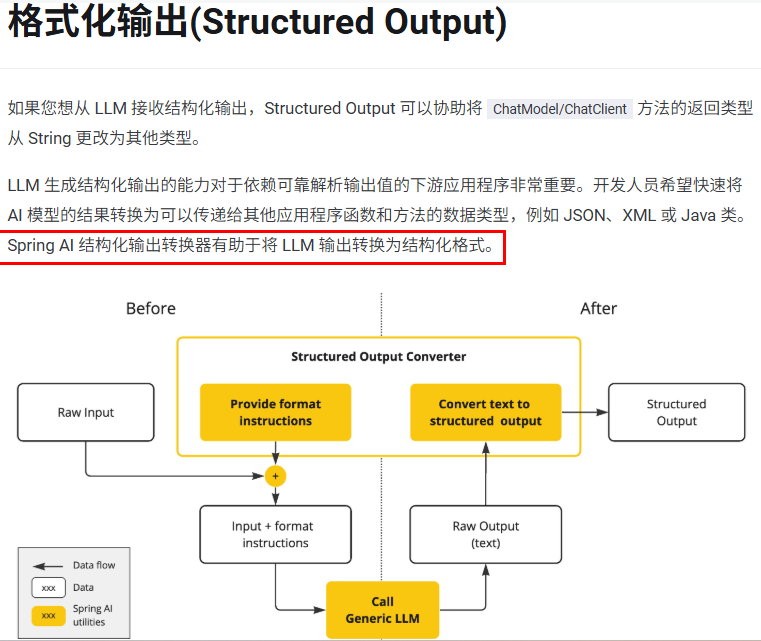
https://java2ai.com/docs/1.0.0.2/tutorials/basics/structured-output/?spm=5176.29160081.0.0.2856aa5cPJ9Ha8
2.开发步骤
目标:假设我们期望将模型输出转换为Record记录类结构体,不再是传统的String
新建子模块Module SAA-07StructuredOutput
改POM
1
2
3
4
5
6
7
8
9
10
11
12
13
14
15
16
17
18
19
20
21
22
23
24
25
26
27
28
29
30
31
32
33
34
35
36
37
38
39
40
41
42
43
44
45
46
47
48
49
50
51
52
53
54
55
56
57
58
59
60
61
62
63
64
65
66
67
68
69
70
| <?xml version="1.0" encoding="UTF-8"?>
<project xmlns="http://maven.apache.org/POM/4.0.0" xmlns:xsi="http://www.w3.org/2001/XMLSchema-instance"
xsi:schemaLocation="http://maven.apache.org/POM/4.0.0 https://maven.apache.org/xsd/maven-4.0.0.xsd">
<modelVersion>4.0.0</modelVersion>
<parent>
<groupId>com.atguigu.study</groupId>
<artifactId>SpringAIAlibaba-atguiguV1</artifactId>
<version>1.0-SNAPSHOT</version>
</parent>
<artifactId>SAA-07StructuredOutput</artifactId>
<dependencies>
<dependency>
<groupId>org.springframework.boot</groupId>
<artifactId>spring-boot-starter-web</artifactId>
</dependency>
<dependency>
<groupId>com.alibaba.cloud.ai</groupId>
<artifactId>spring-ai-alibaba-starter-dashscope</artifactId>
</dependency>
<dependency>
<groupId>cn.hutool</groupId>
<artifactId>hutool-all</artifactId>
<version>5.8.22</version>
</dependency>
<dependency>
<groupId>org.springframework.boot</groupId>
<artifactId>spring-boot-starter-test</artifactId>
<scope>test</scope>
</dependency>
</dependencies>
<build>
<plugins>
<plugin>
<groupId>org.springframework.boot</groupId>
<artifactId>spring-boot-maven-plugin</artifactId>
</plugin>
<plugin>
<groupId>org.apache.maven.plugins</groupId>
<artifactId>maven-compiler-plugin</artifactId>
<version>3.11.0</version>
<configuration>
<compilerArgs>
<arg>-parameters</arg>
</compilerArgs>
<source>21</source>
<target>21</target>
</configuration>
</plugin>
</plugins>
</build>
<repositories>
<repository>
<id>spring-milestones</id>
<name>Spring Milestones</name>
<url>https://repo.spring.io/milestone</url>
<snapshots>
<enabled>false</enabled>
</snapshots>
</repository>
</repositories>
</project>
|
写YML
1
2
3
4
5
6
7
8
9
10
11
| server.port=8006
server.servlet.encoding.enabled=true
server.servlet.encoding.force=true
server.servlet.encoding.charset=UTF-8
spring.application.name=SAA-06PromptTemplate
spring.ai.dashscope.api-key=${aliQwen-api}
|
主启动
1
2
3
4
5
6
7
8
9
10
11
12
13
14
15
16
17
18
19
20
| package com.atguigu.study;
import org.springframework.boot.SpringApplication;
import org.springframework.boot.autoconfigure.SpringBootApplication;
@SpringBootApplication
public class Saa07StructuredOutputApplication
{
public static void main(String[] args)
{
SpringApplication.run(Saa07StructuredOutputApplication.class, args);
}
}
|
业务类
配置类LLMConfig
1
2
3
4
5
6
7
8
9
10
11
12
13
14
15
16
17
18
19
20
21
22
23
24
25
26
27
28
29
30
31
32
33
34
35
36
37
38
39
40
41
42
43
44
45
46
47
48
49
50
51
52
53
54
55
56
57
58
59
60
61
62
63
64
65
66
67
68
69
70
71
72
| package com.atguigu.study.config;
import com.alibaba.cloud.ai.dashscope.api.DashScopeApi;
import com.alibaba.cloud.ai.dashscope.chat.DashScopeChatModel;
import com.alibaba.cloud.ai.dashscope.chat.DashScopeChatOptions;
import org.springframework.ai.chat.client.ChatClient;
import org.springframework.ai.chat.model.ChatModel;
import org.springframework.ai.chat.prompt.ChatOptions;
import org.springframework.beans.factory.annotation.Qualifier;
import org.springframework.context.annotation.Bean;
import org.springframework.context.annotation.Configuration;
@Configuration
public class SaaLLMConfig
{
private final String DEEPSEEK_MODEL = "deepseek-v3";
private final String QWEN_MODEL = "qwen-plus";
@Bean(name = "deepseek")
public ChatModel deepSeek()
{
return DashScopeChatModel.builder()
.dashScopeApi(DashScopeApi.builder()
.apiKey(System.getenv("aliQwen-api"))
.build())
.defaultOptions(
DashScopeChatOptions.builder().withModel(DEEPSEEK_MODEL).build()
)
.build();
}
@Bean(name = "qwen")
public ChatModel qwen()
{
return DashScopeChatModel.builder().dashScopeApi(DashScopeApi.builder()
.apiKey(System.getenv("aliQwen-api"))
.build())
.defaultOptions(
DashScopeChatOptions.builder()
.withModel(QWEN_MODEL)
.build()
)
.build();
}
@Bean(name = "deepseekChatClient")
public ChatClient deepseekChatClient(@Qualifier("deepseek") ChatModel deepSeek)
{
return ChatClient.builder(deepSeek)
.defaultOptions(ChatOptions.builder()
.model(DEEPSEEK_MODEL)
.build())
.build();
}
@Bean(name = "qwenChatClient")
public ChatClient qwenChatClient(@Qualifier("qwen") ChatModel qwen)
{
return ChatClient.builder(qwen)
.defaultOptions(ChatOptions.builder()
.model(QWEN_MODEL)
.build())
.build();
}
}
|
重点步骤
1.新建记录类StudentRecord
1
2
3
4
5
6
7
8
| package com.atguigu.study.records;
public record StudentRecord(String id,String sname,String major,String email) { }
|
2.controllerV1
1
2
3
4
5
6
7
8
9
10
11
12
13
14
15
16
17
18
19
20
21
22
23
24
25
26
27
28
29
30
31
32
33
34
35
36
37
38
39
40
41
42
| package com.atguigu.study.controller;
import com.atguigu.study.records.StudentRecord;
import jakarta.annotation.Resource;
import org.springframework.ai.chat.client.ChatClient;
import org.springframework.web.bind.annotation.GetMapping;
import org.springframework.web.bind.annotation.RequestParam;
import org.springframework.web.bind.annotation.RestController;
import java.util.function.Consumer;
@RestController
public class StructuredOutputController
{
@Resource(name = "qwenChatClient")
private ChatClient qwenChatClient;
@GetMapping("/structuredoutput/chat")
public StudentRecord chat(String sname,String email)
{
return qwenChatClient.prompt()
.user(new Consumer<ChatClient.PromptUserSpec>() {
@Override
public void accept(ChatClient.PromptUserSpec promptUserSpec)
{
promptUserSpec.text("学号1001,我叫{sname},大学专业是计算机科学与技术,邮箱{email}")
.param("sname",sname)
.param("email",email);
}
}).call().entity(StudentRecord.class);
}
}
|
3.controllerV2
1
2
3
4
5
6
7
8
9
10
11
12
13
14
15
16
17
18
19
20
21
22
23
24
25
26
27
28
29
30
31
32
33
34
35
36
37
38
39
40
41
42
43
44
45
46
47
48
49
50
51
52
53
54
55
56
57
58
59
60
61
62
63
64
| package com.atguigu.study.controller;
import com.atguigu.study.records.StudentRecord;
import jakarta.annotation.Resource;
import org.springframework.ai.chat.client.ChatClient;
import org.springframework.web.bind.annotation.GetMapping;
import org.springframework.web.bind.annotation.RequestParam;
import org.springframework.web.bind.annotation.RestController;
import java.util.function.Consumer;
@RestController
public class StructuredOutputController
{
@Resource(name = "qwenChatClient")
private ChatClient qwenChatClient;
@GetMapping("/structuredoutput/chat")
public StudentRecord chat(String sname,String email)
{
return qwenChatClient.prompt()
.user(new Consumer<ChatClient.PromptUserSpec>() {
@Override
public void accept(ChatClient.PromptUserSpec promptUserSpec)
{
promptUserSpec.text("学号1001,我叫{sname},大学专业是计算机科学与技术,邮箱{email}")
.param("sname",sname)
.param("email",email);
}
}).call().entity(StudentRecord.class);
}
@GetMapping("/structuredoutput/chat2")
public StudentRecord chat2(@RequestParam(name = "sname") String sname,
@RequestParam(name = "email") String email)
{
String stringTemplate = """
学号1002,我叫{sname},大学专业是软件工程,邮箱{email}
""";
return qwenChatClient.prompt()
.user(promptUserSpec -> promptUserSpec.text(stringTemplate)
.param("sname",sname)
.param("email",email))
.call()
.entity(StudentRecord.class);
}
}
|
9.Chat Memory连续对话保存和持久化
1.是什么
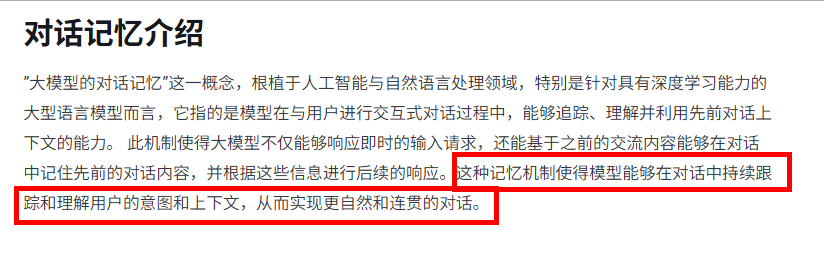
记忆对话,积累回答

一句话总结:Spring AI Alibaba中的聊天记忆提供了维护 AI 聊天应用程序的对话上下文和历史的机制
记忆类型
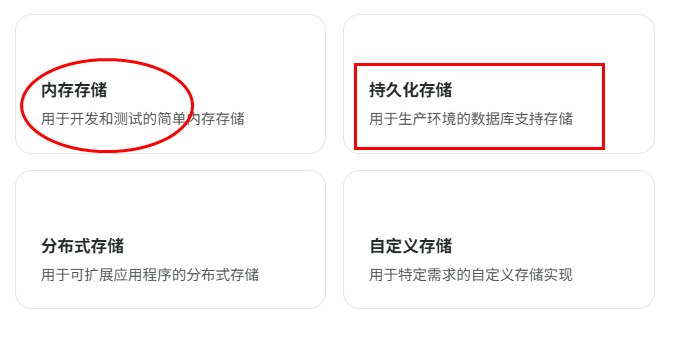
因大模型本身不存储数据,需将历史对话信息一次性提供给它以实现连续对话,不然服务一重启就什么都没了……所以,必须持久化
痛点2个
2.持久化开发步骤
1.业务类
前置知识
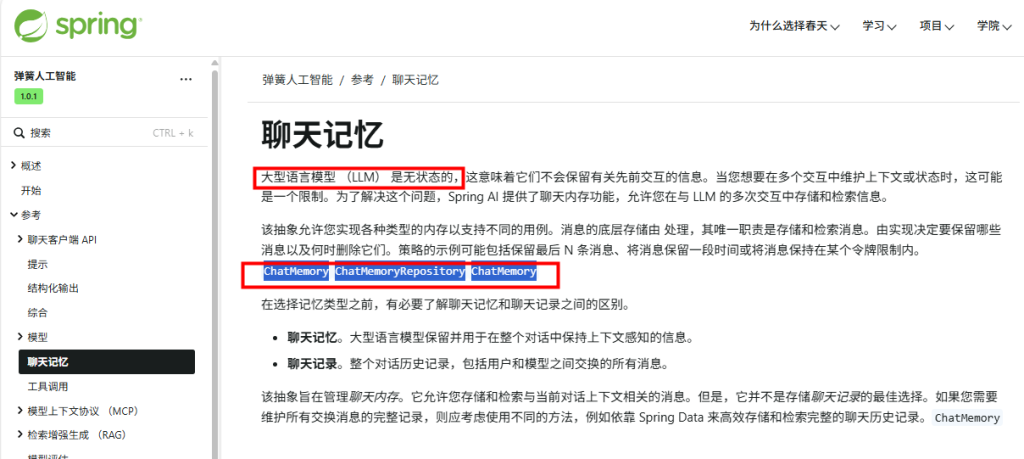
1.实现SpringAI框架规定的ChatMemoryRepository接口
2.接口ChatMemoryRepository
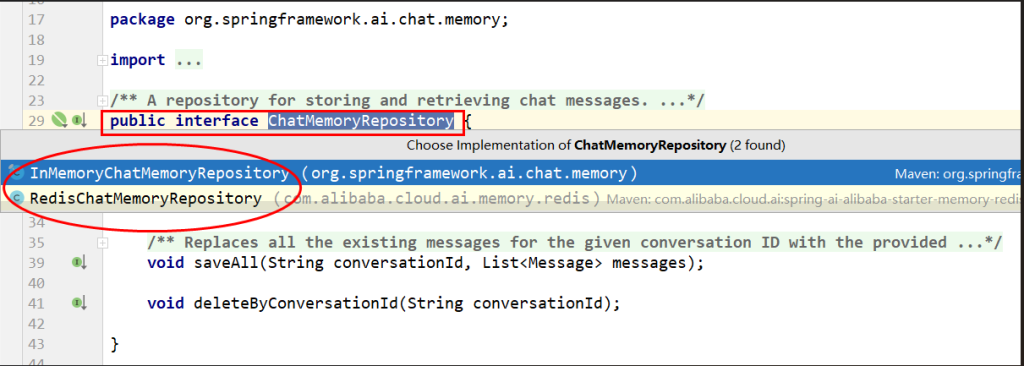
3.RedisChatMemoryRepository源码
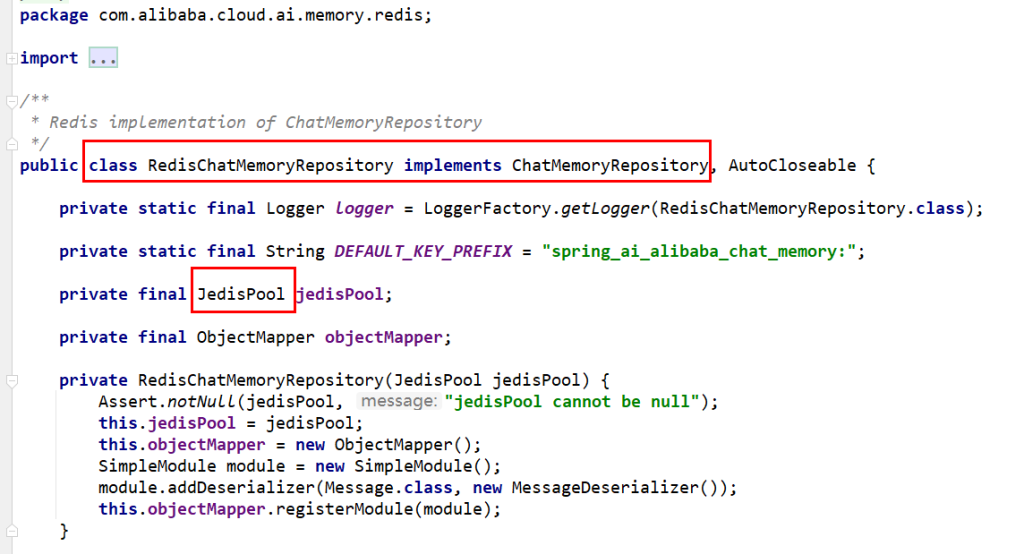
4.编码新建RedisMemoryConfig配置类
1
2
3
4
5
6
7
8
9
10
11
12
13
14
15
16
17
18
19
20
21
22
23
24
25
26
27
28
29
30
| package com.atguigu.study.config;
import com.alibaba.cloud.ai.memory.redis.RedisChatMemoryRepository;
import org.springframework.ai.chat.memory.ChatMemory;
import org.springframework.beans.factory.annotation.Value;
import org.springframework.context.annotation.Bean;
import org.springframework.context.annotation.Configuration;
@Configuration
public class RedisMemoryConfig
{
@Value("${spring.data.redis.host}")
private String host;
@Value("${spring.data.redis.port}")
private int port;
@Bean
public RedisChatMemoryRepository redisChatMemoryRepository()
{
return RedisChatMemoryRepository.builder()
.host(host)
.port(port)
.build();
}
}
|
- MessageWindowChatMemory 消息窗口聊天记忆
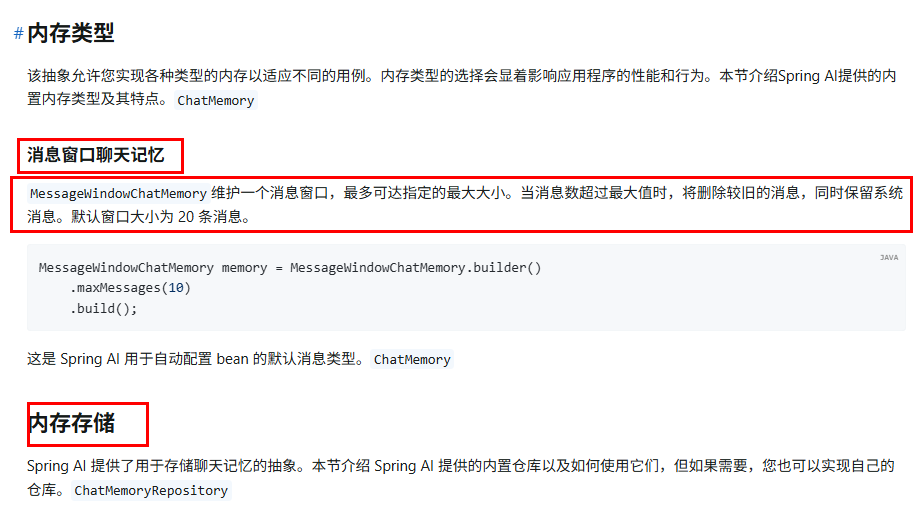
- 顾问(Advisors)MessageChatMemoryAdvisor

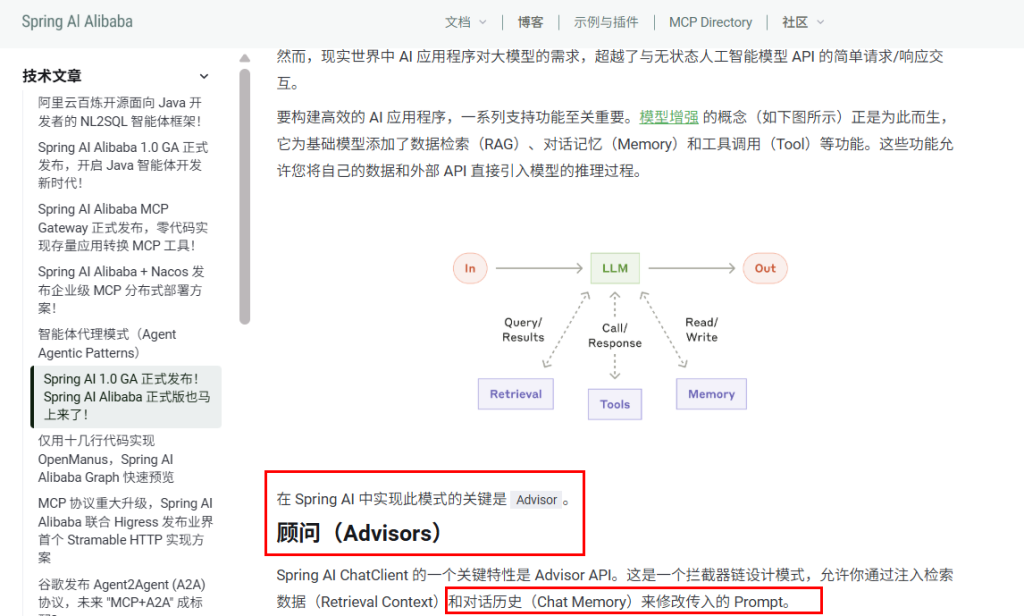
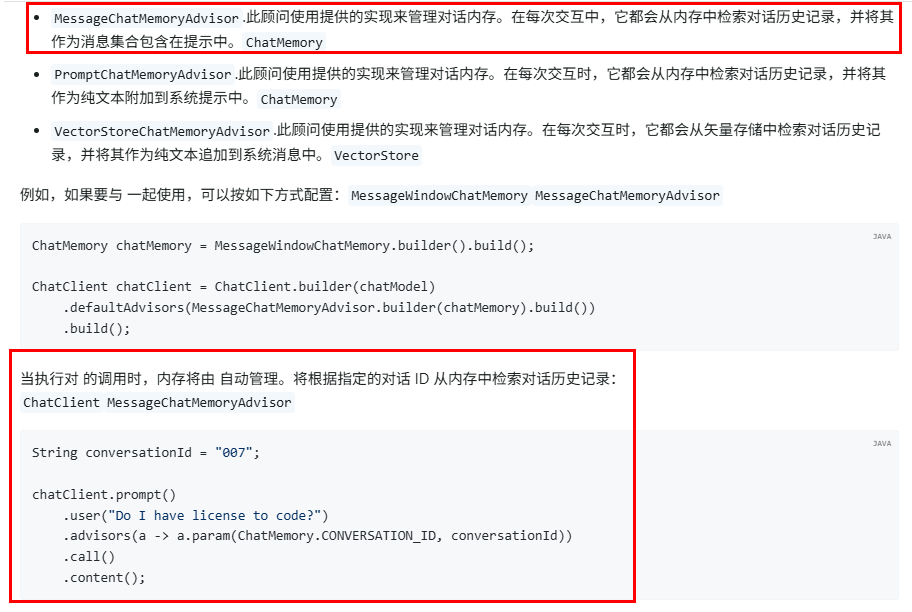
配置类SaaLLMConfig
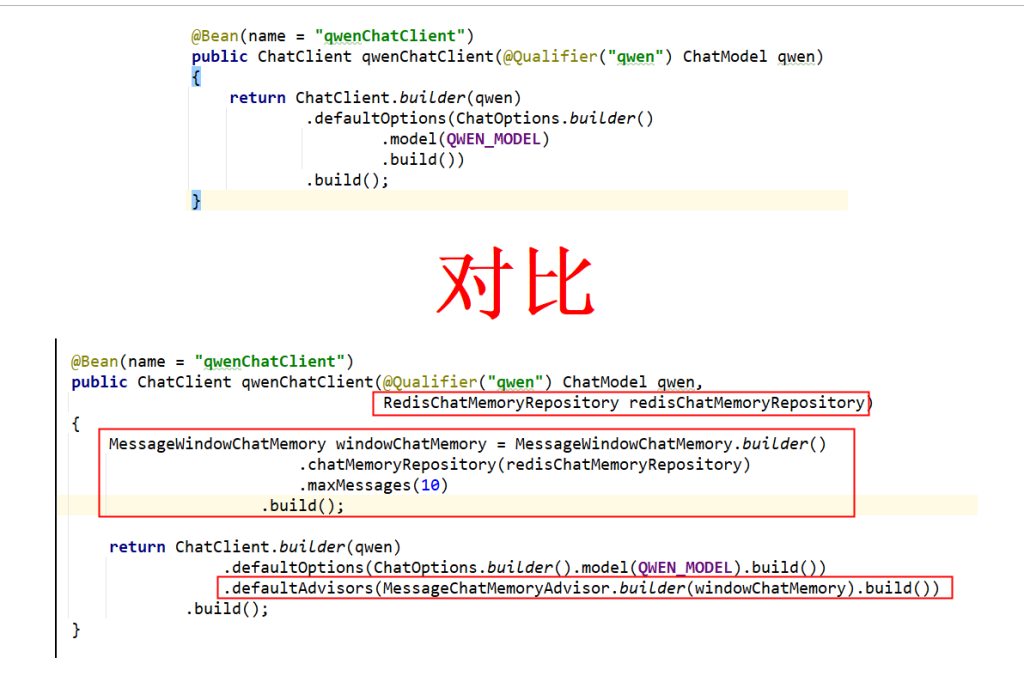
controller
1
2
3
4
5
6
7
8
9
10
11
12
13
14
15
16
17
18
19
20
21
22
23
24
25
26
27
28
29
30
31
32
33
34
35
36
37
38
39
| package com.atguigu.study.controller;
import jakarta.annotation.Resource;
import org.springframework.ai.chat.client.ChatClient;
import org.springframework.web.bind.annotation.GetMapping;
import static org.springframework.ai.chat.memory.ChatMemory.CONVERSATION_ID;
import org.springframework.web.bind.annotation.RestController;
import java.util.function.Consumer;
@RestController
public class ChatMemory4RedisController
{
@Resource(name = "qwenChatClient")
private ChatClient qwenChatClient;
@GetMapping("/chatmemory/chat")
public String chat(String msg, String userId)
{
return qwenChatClient.prompt(msg)
.advisors(advisorSpec -> advisorSpec.param(CONVERSATION_ID, userId))
.call()
.content();
}
}
|
2.测试
http://localhost:8008/chatmemory/chat?msg=2加5等于多少&userId=7

10.文生图
1.阿里百炼文生图
https://help.aliyun.com/zh/model-studio/text-to-image?spm=a2c4g.11186623.help-menu-2400256.d_0_5_0.1a457d9dv6o7Kc&accounttraceid=6ec3bf09599f424a91a2a88b27b31570nrdd
2.开发步骤
通义万相-文生图V2版API参考
https://help.aliyun.com/zh/model-studio/text-to-image-v2-api-reference?spm=a2c4g.11186623.0.0.79c74680qv54KQ
新建子模块Module
SAA-09Text2image
改POM
1
2
3
4
5
6
7
8
9
10
11
12
13
14
15
16
17
18
19
20
21
22
23
24
25
26
27
28
29
30
31
32
33
34
35
36
37
38
39
40
41
42
43
44
45
46
47
48
49
50
51
52
53
54
55
56
57
58
59
60
61
62
63
64
65
66
67
68
69
70
71
72
73
74
75
| <?xml version="1.0" encoding="UTF-8"?>
<project xmlns="http://maven.apache.org/POM/4.0.0" xmlns:xsi="http://www.w3.org/2001/XMLSchema-instance"
xsi:schemaLocation="http://maven.apache.org/POM/4.0.0 https://maven.apache.org/xsd/maven-4.0.0.xsd">
<modelVersion>4.0.0</modelVersion>
<parent>
<groupId>com.atguigu.study</groupId>
<artifactId>SpringAIAlibaba-atguiguV1</artifactId>
<version>1.0-SNAPSHOT</version>
</parent>
<artifactId>SAA-09Text2image</artifactId>
<dependencies>
<dependency>
<groupId>org.springframework.boot</groupId>
<artifactId>spring-boot-starter-web</artifactId>
</dependency>
<dependency>
<groupId>com.alibaba.cloud.ai</groupId>
<artifactId>spring-ai-alibaba-starter-dashscope</artifactId>
</dependency>
<dependency>
<groupId>org.projectlombok</groupId>
<artifactId>lombok</artifactId>
<version>1.18.38</version>
</dependency>
<dependency>
<groupId>cn.hutool</groupId>
<artifactId>hutool-all</artifactId>
<version>5.8.22</version>
</dependency>
<dependency>
<groupId>org.springframework.boot</groupId>
<artifactId>spring-boot-starter-test</artifactId>
<scope>test</scope>
</dependency>
</dependencies>
<build>
<plugins>
<plugin>
<groupId>org.springframework.boot</groupId>
<artifactId>spring-boot-maven-plugin</artifactId>
</plugin>
<plugin>
<groupId>org.apache.maven.plugins</groupId>
<artifactId>maven-compiler-plugin</artifactId>
<version>3.11.0</version>
<configuration>
<compilerArgs>
<arg>-parameters</arg>
</compilerArgs>
<source>21</source>
<target>21</target>
</configuration>
</plugin>
</plugins>
</build>
<repositories>
<repository>
<id>spring-milestones</id>
<name>Spring Milestones</name>
<url>https://repo.spring.io/milestone</url>
<snapshots>
<enabled>false</enabled>
</snapshots>
</repository>
</repositories>
</project>
|
写YML
1
2
3
4
5
6
7
8
9
10
11
| server.port=8009
server.servlet.encoding.charset=utf-8
server.servlet.encoding.enabled=true
server.servlet.encoding.force=true
spring.application.name=SAA-09Text2image
spring.ai.dashscope.api-key=${aliQwen-api}
|
主启动
1
2
3
4
5
6
7
8
9
10
11
12
13
| package com.atguigu.study;
import org.springframework.boot.SpringApplication;
import org.springframework.boot.autoconfigure.SpringBootApplication;
@SpringBootApplication
public class Saa09Text2imageApplication
{
public static void main(String[] args)
{
SpringApplication.run(Saa09Text2imageApplication.class, args);
}
}
|
业务类
controller
1
2
3
4
5
6
7
8
9
10
11
12
13
14
15
16
17
18
19
20
21
22
23
24
25
26
27
28
29
30
31
32
33
34
35
36
37
38
39
40
41
42
43
44
45
46
47
48
| package com.atguigu.study.controller;
import com.alibaba.cloud.ai.dashscope.audio.DashScopeSpeechSynthesisModel;
import com.alibaba.cloud.ai.dashscope.audio.DashScopeSpeechSynthesisOptions;
import com.alibaba.cloud.ai.dashscope.audio.synthesis.SpeechSynthesisModel;
import com.alibaba.cloud.ai.dashscope.audio.synthesis.SpeechSynthesisOptions;
import com.alibaba.cloud.ai.dashscope.audio.synthesis.SpeechSynthesisPrompt;
import com.alibaba.cloud.ai.dashscope.audio.synthesis.SpeechSynthesisResponse;
import com.alibaba.cloud.ai.dashscope.image.DashScopeImageOptions;
import jakarta.annotation.Resource;
import org.springframework.ai.image.ImageModel;
import org.springframework.ai.image.ImagePrompt;
import org.springframework.web.bind.annotation.GetMapping;
import org.springframework.web.bind.annotation.RequestParam;
import org.springframework.web.bind.annotation.RestController;
import java.io.File;
import java.io.FileOutputStream;
import java.nio.ByteBuffer;
import java.util.UUID;
@RestController
public class Text2ImageController
{
public static final String IMAGE_MODEL = "wanx2.1-t2i-turbo";
@Resource
private ImageModel imageModel;
@GetMapping(value = "/t2i/image")
public String image(@RequestParam(name = "prompt",defaultValue = "刺猬") String prompt)
{
return imageModel.call(
new ImagePrompt(prompt, DashScopeImageOptions.builder().withModel(IMAGE_MODEL).build())
)
.getResult()
.getOutput()
.getUrl();
}
}
|
11.文生音
1.阿里百炼文生音
语音合成-CosyVoice
https://help.aliyun.com/zh/model-studio/cosyvoice-large-model-for-speech-synthesis/?spm=a2c4g.11186623.help-menu-2400256.d_2_6_0.2a7474473XyDNE&scm=20140722.H_2817551._.OR_help-T_cn~zh-V_1
语音合成CosyVoice Java SDK
https://help.aliyun.com/zh/model-studio/cosyvoice-java-sdk?spm=a2c4g.11186623.0.0.77e07447jgP4N0
SpeechSynthesizer类提供了语音合成的关键接口
同步提交语音合成任务,直接获取完整结果
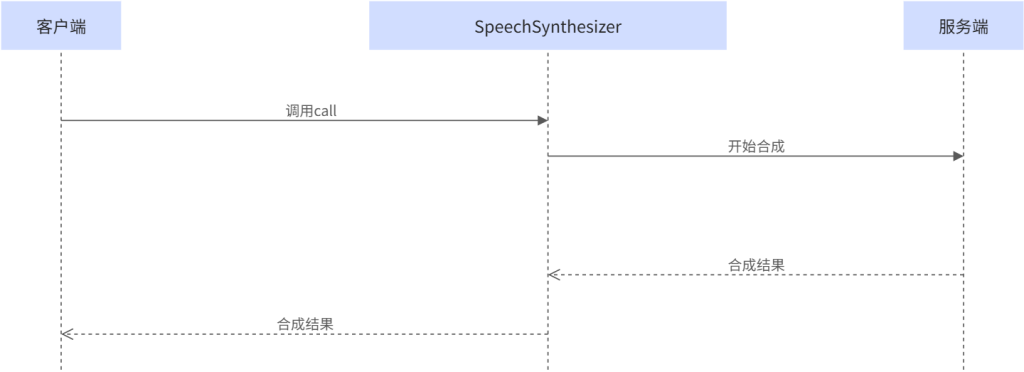
提交文本后,服务端立即处理并返回完整的语音合成结果。整个过程是阻塞式的,客户端需要等待服务端完成处理后才能继续下一步操作。适合短文本语音合成场景
阿里内置接口一览
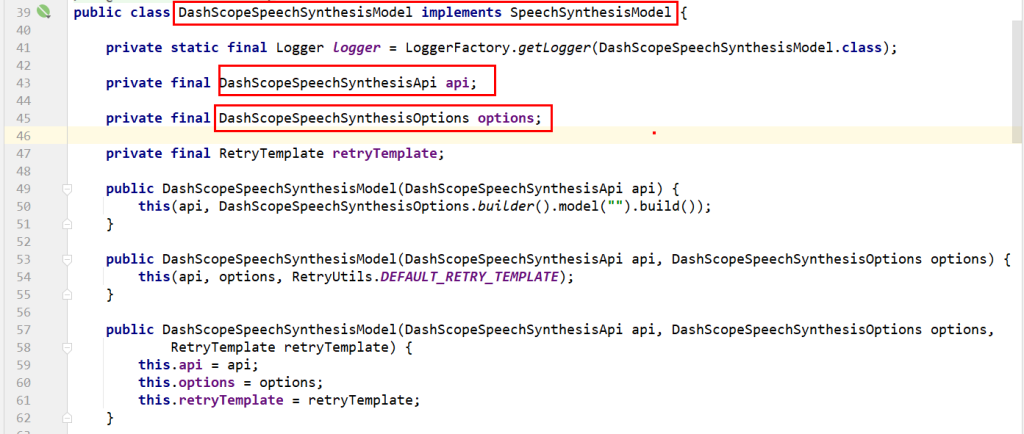
DashScopeSpeechSynthesisOptions
SpeechSynthesisParam的链式方法配置模型、音色等参数
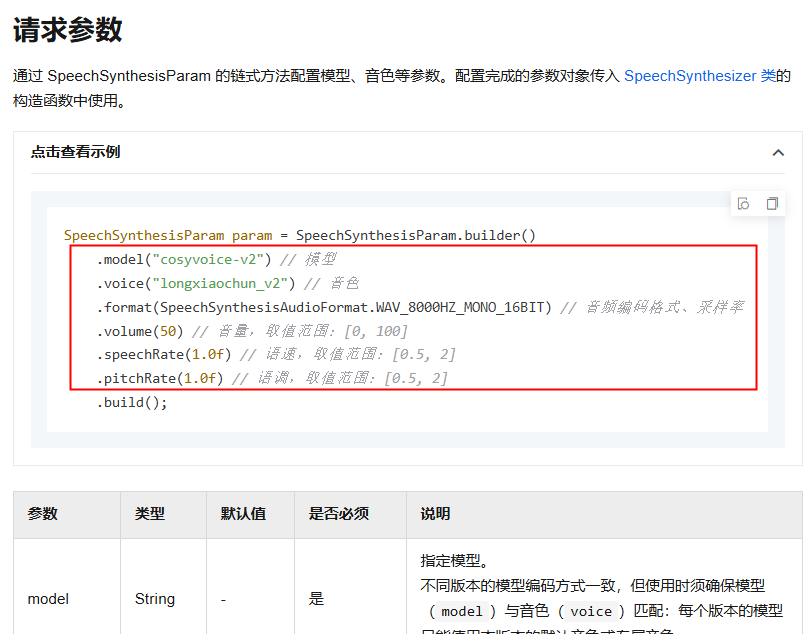
https://help.aliyun.com/zh/model-studio/cosyvoice-java-sdk#2e9a9a89aclc8
代码:
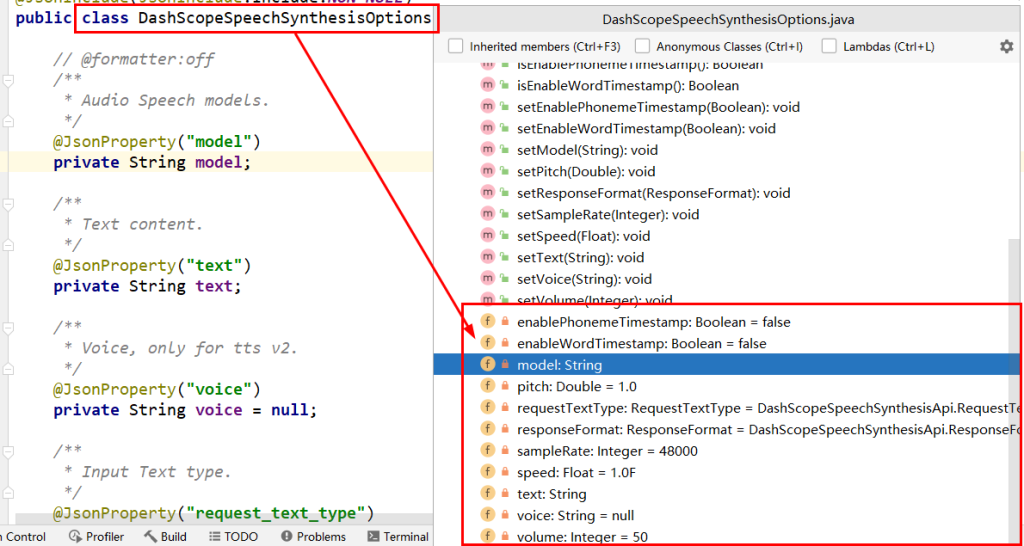
2.开发步骤
新建子模块Module
SAA-10Text2voice
改POM
1
2
3
4
5
6
7
8
9
10
11
12
13
14
15
16
17
18
19
20
21
22
23
24
25
26
27
28
29
30
31
32
33
34
35
36
37
38
39
40
41
42
43
44
45
46
47
48
49
50
51
52
53
54
55
56
57
58
59
60
61
62
63
64
65
66
67
68
69
70
71
72
73
74
75
| <?xml version="1.0" encoding="UTF-8"?>
<project xmlns="http://maven.apache.org/POM/4.0.0" xmlns:xsi="http://www.w3.org/2001/XMLSchema-instance"
xsi:schemaLocation="http://maven.apache.org/POM/4.0.0 https://maven.apache.org/xsd/maven-4.0.0.xsd">
<modelVersion>4.0.0</modelVersion>
<parent>
<groupId>com.atguigu.study</groupId>
<artifactId>SpringAIAlibaba-atguiguV1</artifactId>
<version>1.0-SNAPSHOT</version>
</parent>
<artifactId>SAA-10Text2voice</artifactId>
<dependencies>
<dependency>
<groupId>org.springframework.boot</groupId>
<artifactId>spring-boot-starter-web</artifactId>
</dependency>
<dependency>
<groupId>com.alibaba.cloud.ai</groupId>
<artifactId>spring-ai-alibaba-starter-dashscope</artifactId>
</dependency>
<dependency>
<groupId>org.projectlombok</groupId>
<artifactId>lombok</artifactId>
<version>1.18.38</version>
</dependency>
<dependency>
<groupId>cn.hutool</groupId>
<artifactId>hutool-all</artifactId>
<version>5.8.22</version>
</dependency>
<dependency>
<groupId>org.springframework.boot</groupId>
<artifactId>spring-boot-starter-test</artifactId>
<scope>test</scope>
</dependency>
</dependencies>
<build>
<plugins>
<plugin>
<groupId>org.springframework.boot</groupId>
<artifactId>spring-boot-maven-plugin</artifactId>
</plugin>
<plugin>
<groupId>org.apache.maven.plugins</groupId>
<artifactId>maven-compiler-plugin</artifactId>
<version>3.11.0</version>
<configuration>
<compilerArgs>
<arg>-parameters</arg>
</compilerArgs>
<source>21</source>
<target>21</target>
</configuration>
</plugin>
</plugins>
</build>
<repositories>
<repository>
<id>spring-milestones</id>
<name>Spring Milestones</name>
<url>https://repo.spring.io/milestone</url>
<snapshots>
<enabled>false</enabled>
</snapshots>
</repository>
</repositories>
</project>
|
写YML
1
2
3
4
5
6
7
8
9
10
11
| server.port=8010
server.servlet.encoding.charset=utf-8
server.servlet.encoding.enabled=true
server.servlet.encoding.force=true
spring.application.name=SAA-10Text2voice
spring.ai.dashscope.api-key=${aliQwen-api}
|
主启动
1
2
3
4
5
6
7
8
9
10
11
12
13
14
15
| package com.atguigu.study;
import org.springframework.boot.SpringApplication;
import org.springframework.boot.autoconfigure.SpringBootApplication;
@SpringBootApplication
public class Saa10Text2voiceApplication
{
public static void main(String[] args)
{
SpringApplication.run(Saa10Text2voiceApplication.class, args);
}
}
|
业务类
音色列表配置
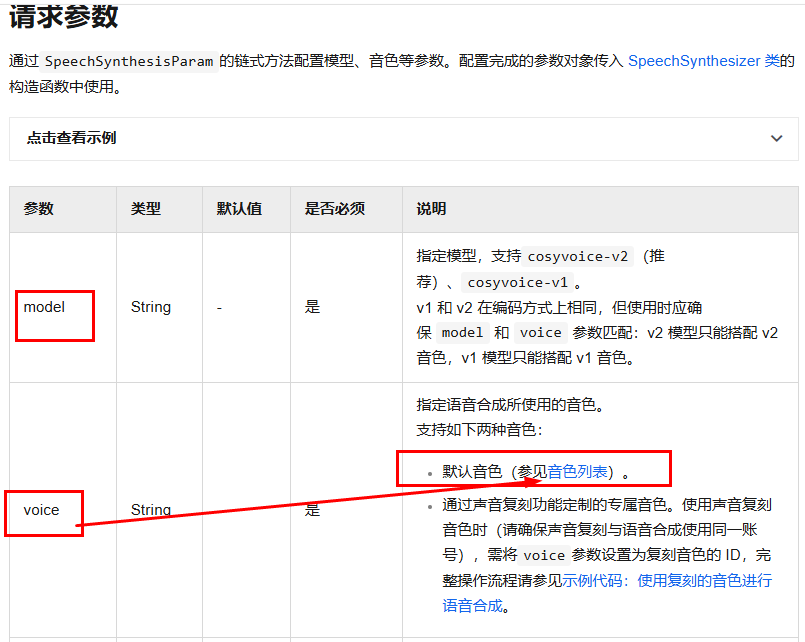
https://help.aliyun.com/zh/model-studio/cosyvoice-java-sdk#722dd7ca66a6x
controller
1
2
3
4
5
6
7
8
9
10
11
12
13
14
15
16
17
18
19
20
21
22
23
24
25
26
27
28
29
30
31
32
33
34
35
36
37
38
39
40
41
42
43
44
45
46
47
48
49
50
51
52
53
54
55
56
57
58
59
60
61
62
63
64
65
| package com.atguigu.study.controller;
import com.alibaba.cloud.ai.dashscope.audio.DashScopeSpeechSynthesisOptions;
import com.alibaba.cloud.ai.dashscope.audio.synthesis.SpeechSynthesisModel;
import com.alibaba.cloud.ai.dashscope.audio.synthesis.SpeechSynthesisPrompt;
import com.alibaba.cloud.ai.dashscope.audio.synthesis.SpeechSynthesisResponse;
import jakarta.annotation.Resource;
import org.springframework.web.bind.annotation.GetMapping;
import org.springframework.web.bind.annotation.RequestParam;
import org.springframework.web.bind.annotation.RestController;
import java.io.FileOutputStream;
import java.nio.ByteBuffer;
import java.util.UUID;
@RestController
public class Text2VoiceController
{
@Resource
private SpeechSynthesisModel speechSynthesisModel;
public static final String BAILIAN_VOICE_MODEL = "cosyvoice-v2";
public static final String BAILIAN_VOICE_TIMBER = "longyingcui";
@GetMapping("/t2v/voice")
public String voice(@RequestParam(name = "msg",defaultValue = "温馨提醒,支付宝到账100元请注意查收") String msg)
{
String filePath = "d:\\" + UUID.randomUUID() + ".mp3";
DashScopeSpeechSynthesisOptions options = DashScopeSpeechSynthesisOptions.builder()
.model(BAILIAN_VOICE_MODEL)
.voice(BAILIAN_VOICE_TIMBER)
.build();
SpeechSynthesisResponse response = speechSynthesisModel.call(new SpeechSynthesisPrompt(msg, options));
ByteBuffer byteBuffer = response.getResult().getOutput().getAudio();
try (FileOutputStream fileOutputStream = new FileOutputStream(filePath))
{
fileOutputStream.write(byteBuffer.array());
} catch (Exception e) {
System.out.println(e.getMessage());
}
return filePath;
}
}
|
12.向量化和向量数据库
1.向量

2.文本向量化
1.是什么
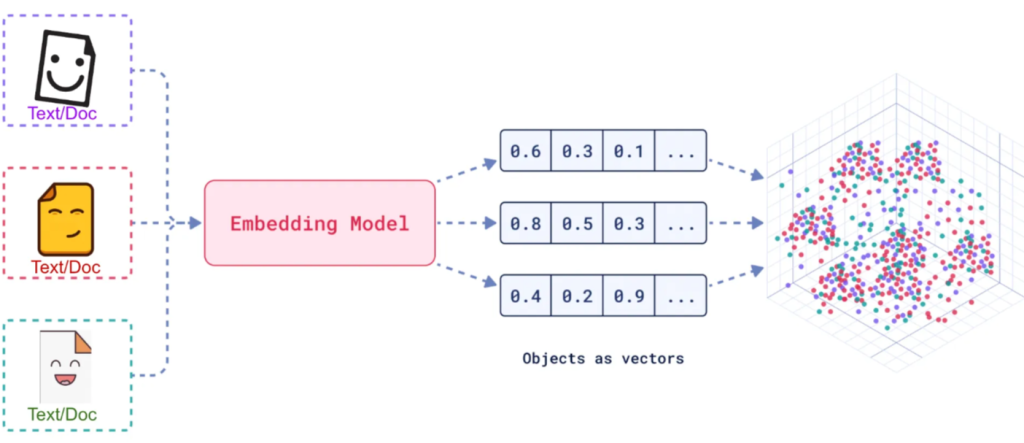
官网-嵌入模型 (Embedding Model)
https://java2ai.com/docs/1.0.0.2/tutorials/basics/embedding/?spm=5176.29160081.0.0.2856aa5cXggpMJ
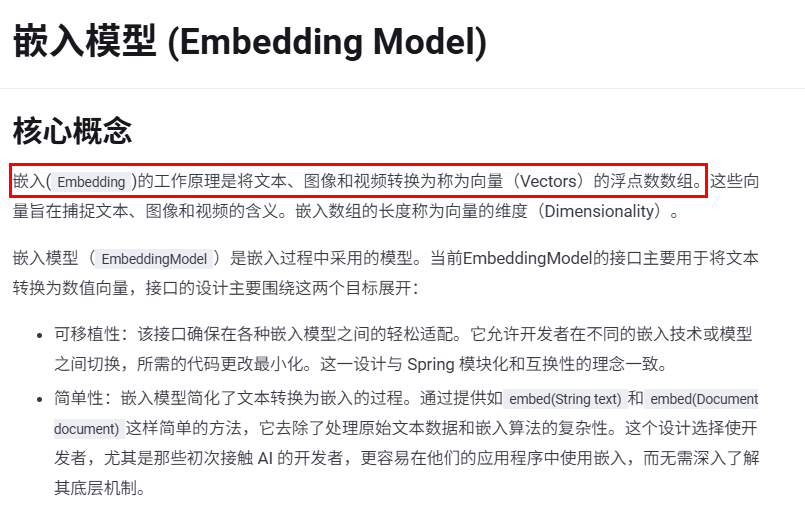
案例1
案列2
嵌入模型小总结

3.向量数据库
1.向量存储是什么
官网-向量存储(Vector Store)
https://java2ai.com/docs/1.0.0.2/tutorials/basics/vectorstore/?spm=5176.29160081.0.0.2856aa5cXggpMJ
一句话:一种专门用于存储、管理和检索向量数据(即高维数值数组)的数据库系统。
其核心功能是通过高效的索引结构和相似性计算算法,支持大规模向量数据的快速查询与分析,向量数据库维度越高,查询精准度也越高,查询效果也越好。
下方是LangChain4J支持的向量数据库List清单
https://docs.langchain4j.dev/integrations/embedding-stores
下方是SpringAI支持的向量数据库List清单
https://docs.spring.io/spring-ai/reference/api/vectordbs.html
2.向量数据库能干嘛
将文本、图像和视频转换为称为向量(Vectors)的浮点数数组在 VectorStore中,查询与传统关系数据库不同。它们执行相似性搜索,而不是精确匹配。当给定一个向量作为查询时,VectorStore 返回与查询向量“相似”的向量
指征特点
- 捕捉复杂的词汇关系(如语义相似性、同义词、多义词)
- 向量嵌入为检索增强生成 (RAG) 应用程序提供支持
小总结
- 将文本映射到高维空间中的点,使语义相似的文本在这个空间中距离较近。
- 例如,“肯德基”和”麦当劳”的向量可能会比”肯德基”和”新疆大盘鸡”的向量更接近
4.开发步骤
1.用redisStack作为向量存储
https://docs.spring.io/spring-ai/reference/api/vectordbs/redis.html
RedisStack是什么

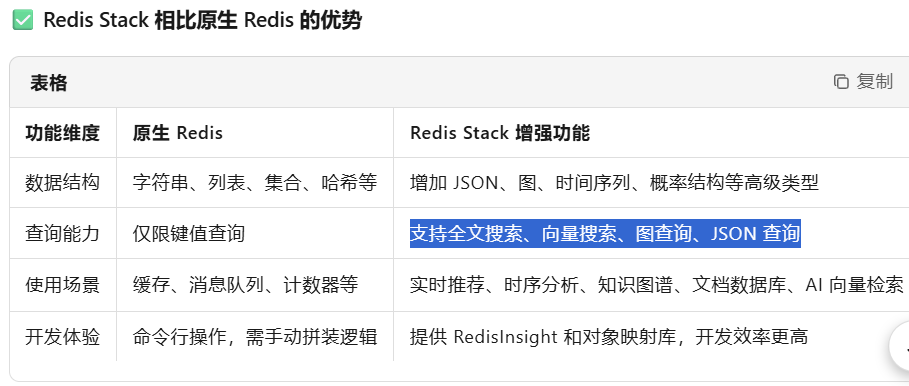
RedisStack核心组件
- RediSearch:提供全文搜索能力,支持复杂的文本搜索、聚合和过滤,以及向量数据的存储和检索
- RedisJSON:原生支持JSON数据的存储、索引I和查询,可高效存储和操作嵌套的JSON文档。
- RedisGraph:支持图数据模型,使用Cypher查询语言进行图遍历查询。
- RedisBloom:支持 Bloom、Cuckoo、Count-Min Sketch等概率数据结构。
一句话(重要)
RedisStack = 原生Redis + 搜索 + 图 + 时间序列 + JSON + 概率结构 + 可视化工具 + 开发框架支持
RedisStack安装
1
| docker run -d --name redis-stack-server -p 6379:6379 redis/redis-stack-server
|
基础api
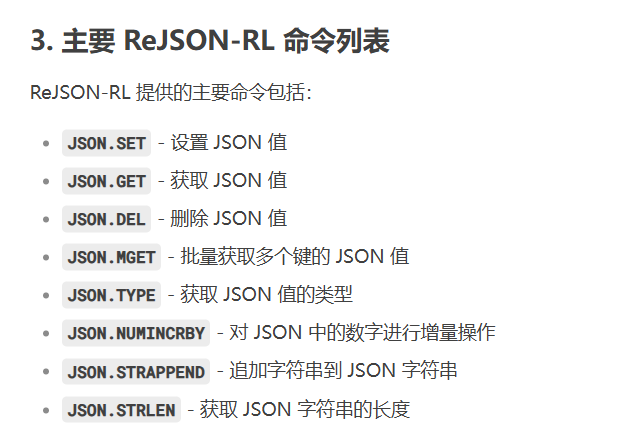
2.业务类
知识出处
https://docs.spring.io/spring-ai/reference/api/vectordbs.html
controller 文本向量化 向量化存储 向量化查询
1
2
3
4
5
6
7
8
9
10
11
12
13
14
15
16
17
18
19
20
21
22
23
24
25
26
27
28
29
30
31
32
33
34
35
36
37
38
39
40
41
42
43
44
45
46
47
48
49
50
51
52
53
54
55
56
57
58
59
60
61
62
63
64
65
66
67
68
69
70
71
72
73
74
75
76
77
78
79
| package com.atguigu.study.controller;
import com.alibaba.cloud.ai.dashscope.embedding.DashScopeEmbeddingOptions;
import jakarta.annotation.Resource;
import lombok.extern.slf4j.Slf4j;
import org.springframework.ai.document.Document;
import org.springframework.ai.embedding.EmbeddingModel;
import org.springframework.ai.embedding.EmbeddingRequest;
import org.springframework.ai.embedding.EmbeddingResponse;
import org.springframework.ai.vectorstore.SearchRequest;
import org.springframework.ai.vectorstore.VectorStore;
import org.springframework.web.bind.annotation.GetMapping;
import org.springframework.web.bind.annotation.RequestParam;
import org.springframework.web.bind.annotation.RestController;
import java.util.Arrays;
import java.util.List;
@RestController
@Slf4j
public class Embed2VectorController
{
@Resource
private EmbeddingModel embeddingModel;
@Resource
private VectorStore vectorStore;
@GetMapping("/text2embed")
public EmbeddingResponse text2Embed(String msg)
{
EmbeddingResponse embeddingResponse = embeddingModel.call(new EmbeddingRequest(List.of(msg),
DashScopeEmbeddingOptions.builder().withModel("text-embedding-v3").build()));
System.out.println(Arrays.toString(embeddingResponse.getResult().getOutput()));
return embeddingResponse;
}
@GetMapping("/embed2vector/add")
public void add()
{
List<Document> documents = List.of(
new Document("i study LLM"),
new Document("i love java")
);
vectorStore.add(documents);
}
@GetMapping("/embed2vector/get")
public List getAll(@RequestParam(name = "msg") String msg)
{
SearchRequest searchRequest = SearchRequest.builder()
.query(msg)
.topK(2)
.build();
List<Document> list = vectorStore.similaritySearch(searchRequest);
System.out.println(list);
return list;
}
}
|
测试

3.实现原理

13.RAG(Retrieval Augmented Generation)
1.前言
RAG (Retrieval-Augmented Generation)检索增强生成
需求
- AI智能运维助手,通过提供的错误编码,给出异常解释辅助运维人员更好的定位问题和维护系统
- SpringAI+阿里百炼嵌入模型text-embedding-v3+向量数据库RedisStack+DeepSeek来实现RAG功能。
LLM的缺陷
- LLM的知识不是实时的,不具备知识更新.
- LLM可能不知道你私有的领域/业务知识.
- LLM有时会在回答中生成看似合理但实际上是错误的信息
2.RAG是什么
官网
RAG (Retrieval-Augmented Generation)
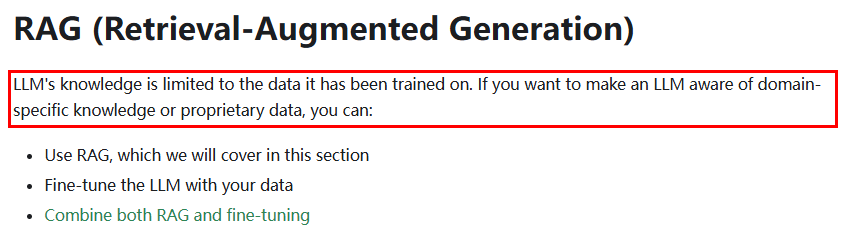
LLM 的知识仅限于它所接受的训练数据。如果你想让一个 LLM 了解特定领域的知识或专有数据,你可以
什么是RAG?

幻觉?
springai中的RAG
https://docs.spring.io/spring-ai/reference/api/retrieval-augmented-generation.html
springai alibaba中的RAG叫做文档检索 (Document Retriever)
https://java2ai.com/docs/1.0.0.2/tutorials/basics/retriever/?spm=5176.29160081.0.0.2856aa5cXggpMJ

3.RAG核心设计理念
RAG技术就像给AI大模型装上了「实时百科大脑」,为了让大模型获取足够的上下文,以便获得更加广泛的信息源,通过先查资料后回答的机制,让AI摆脱传统模型的”知识遗忘和幻觉回复”困境
一句话
类似考试时有不懂的,给你准备了小抄,对大模型知识盲区的一种补充
4.RAG能干嘛
通过引入外部知识源来增强LLM的输出能力,传统的LLM通常基于其训练数据生成响应,但这些数据可能过时或不够全面。RAG允许模型在生成答案之前,从特定的知识库中检索相关信息,从而提供更准确和上下文相关的回答
5.RAG怎么用

RAG流程分为两个不同的阶段:索引和检索
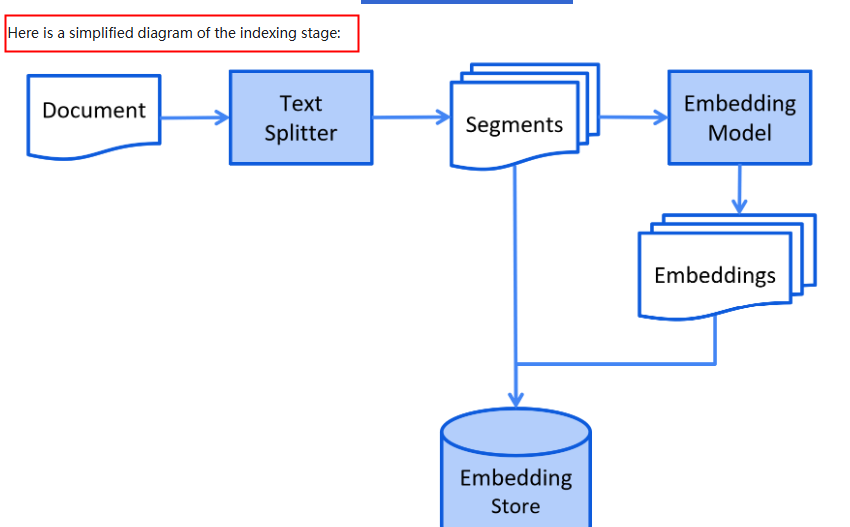

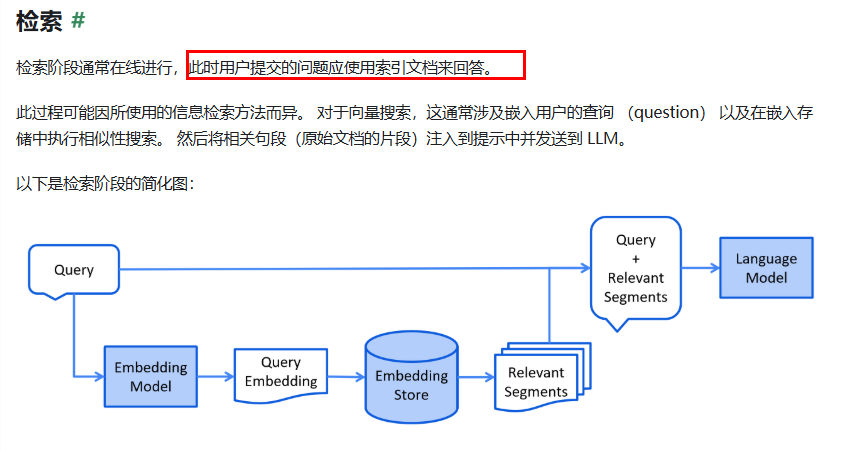

6.开发步骤
需求:
- AI智能运维助手,通过提供的错误编码,给出异常解释辅助运维人员更好的定位问题和维护系统
- SpringAI+阿里百炼嵌入模型text-embedding-v3+向量数据库RedisStack+DeepSeek来实现RAG功能。
建Module
SAA-12RAG4AiOps
改POM
1
2
3
4
5
6
7
8
9
10
11
12
13
14
15
16
17
18
19
20
21
22
23
24
25
26
27
28
29
30
31
32
33
34
35
36
37
38
39
40
41
42
43
44
45
46
47
48
49
50
51
52
53
54
55
56
57
58
59
60
61
62
63
64
65
66
67
68
69
70
71
72
73
74
75
76
77
78
79
80
81
| <?xml version="1.0" encoding="UTF-8"?>
<project xmlns="http://maven.apache.org/POM/4.0.0" xmlns:xsi="http://www.w3.org/2001/XMLSchema-instance"
xsi:schemaLocation="http://maven.apache.org/POM/4.0.0 https://maven.apache.org/xsd/maven-4.0.0.xsd">
<modelVersion>4.0.0</modelVersion>
<parent>
<groupId>com.atguigu.study</groupId>
<artifactId>SpringAIAlibaba-atguiguV1</artifactId>
<version>1.0-SNAPSHOT</version>
</parent>
<artifactId>SAA-12RAG4AiOps</artifactId>
<dependencies>
<dependency>
<groupId>org.springframework.boot</groupId>
<artifactId>spring-boot-starter-web</artifactId>
</dependency>
<dependency>
<groupId>com.alibaba.cloud.ai</groupId>
<artifactId>spring-ai-alibaba-starter-dashscope</artifactId>
</dependency>
<dependency>
<groupId>org.springframework.ai</groupId>
<artifactId>spring-ai-starter-vector-store-redis</artifactId>
</dependency>
<dependency>
<groupId>org.projectlombok</groupId>
<artifactId>lombok</artifactId>
<version>1.18.38</version>
</dependency>
<dependency>
<groupId>cn.hutool</groupId>
<artifactId>hutool-all</artifactId>
<version>5.8.22</version>
</dependency>
<dependency>
<groupId>org.springframework.boot</groupId>
<artifactId>spring-boot-starter-test</artifactId>
<scope>test</scope>
</dependency>
</dependencies>
<build>
<plugins>
<plugin>
<groupId>org.springframework.boot</groupId>
<artifactId>spring-boot-maven-plugin</artifactId>
</plugin>
<plugin>
<groupId>org.apache.maven.plugins</groupId>
<artifactId>maven-compiler-plugin</artifactId>
<version>3.11.0</version>
<configuration>
<compilerArgs>
<arg>-parameters</arg>
</compilerArgs>
<source>21</source>
<target>21</target>
</configuration>
</plugin>
</plugins>
</build>
<repositories>
<repository>
<id>spring-milestones</id>
<name>Spring Milestones</name>
<url>https://repo.spring.io/milestone</url>
<snapshots>
<enabled>false</enabled>
</snapshots>
</repository>
</repositories>
</project>
|
写YML
1
2
3
4
5
6
7
8
9
10
11
12
13
14
15
16
17
18
19
20
21
22
23
| server.port=8012
server.servlet.encoding.enabled=true
server.servlet.encoding.force=true
server.servlet.encoding.charset=UTF-8
spring.application.name=SAA-12RAG4AiDatabase
spring.ai.dashscope.api-key=${aliQwen-api}
spring.ai.dashscope.chat.options.model=deepseek-r1
spring.ai.dashscope.embedding.options.model=text-embedding-v3
spring.data.redis.host=localhost
spring.data.redis.port=6379
spring.data.redis.username=default
spring.data.redis.password=
spring.ai.vectorstore.redis.initialize-schema=true
spring.ai.vectorstore.redis.index-name=atguigu-index
spring.ai.vectorstore.redis.prefix=atguigu-prefix
|
阿里云百炼平台向量大模型 text-embedding-v3
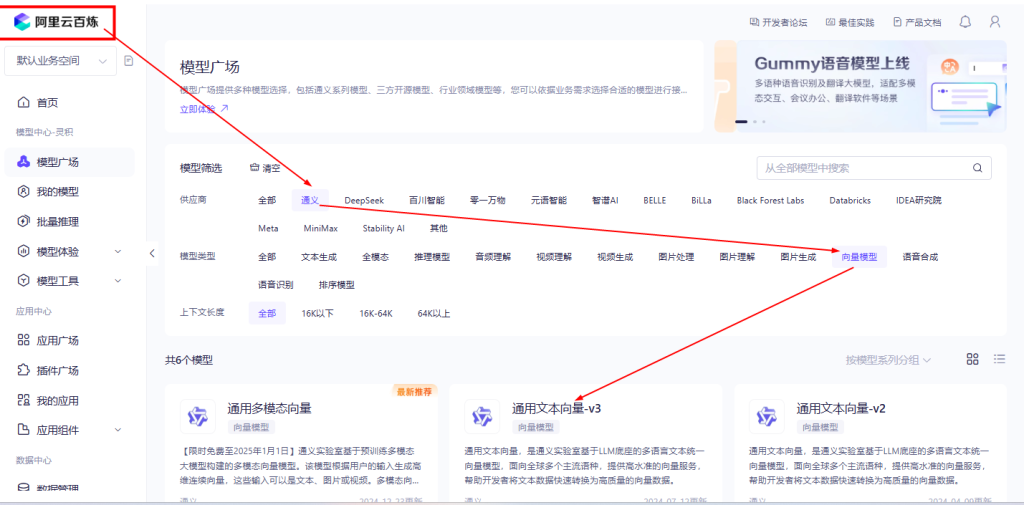
配置参考信息来源和知识出处
https://docs.spring.io/spring-ai/reference/api/vectordbs/redis.html
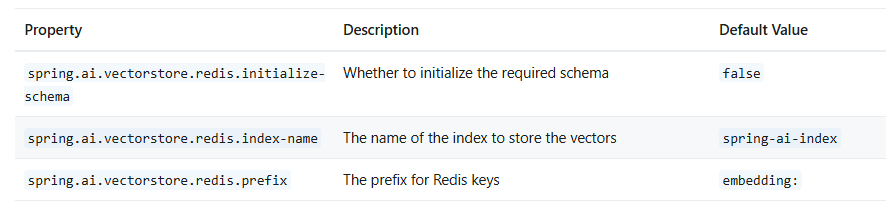
主启动
1
2
3
4
5
6
7
8
9
10
11
12
13
14
15
| package com.atguigu.study;
import org.springframework.boot.SpringApplication;
import org.springframework.boot.autoconfigure.SpringBootApplication;
@SpringBootApplication
public class Saa12Rag4AiOpsApplication
{
public static void main(String[] args)
{
SpringApplication.run(Saa12Rag4AiOpsApplication.class, args);
}
}
|
提供ErrorCode脚本让他存入向量数据库RedisStack,形成文档知识库
ops.txt
1
2
3
4
5
| 00000 系统OK正确执行后的返回
A0001 用户端错误一级宏观错误码
A0100 用户注册错误二级宏观错误码
B1111 支付接口超时
C2222 Kafka消息解压严重
|
7.业务类第一版
SpringAI源代码接口 VectorStore
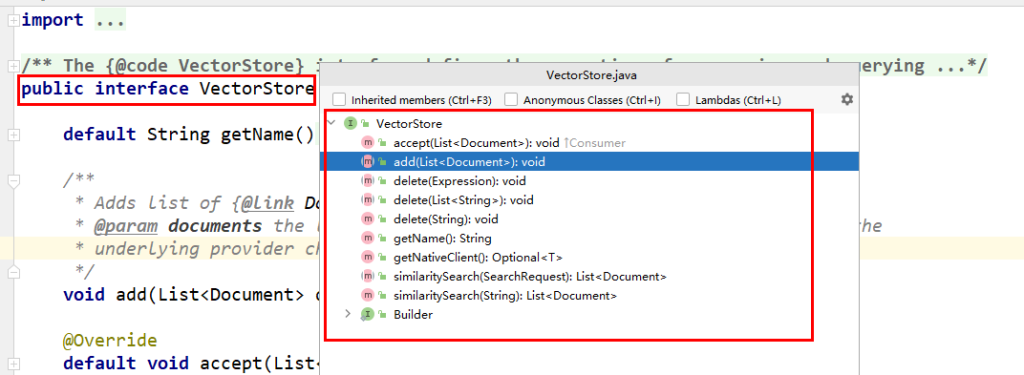
用redis作为向量存储
安装 redis-stack-server
1
| docker run -d --name redis-stack-server -p 6379:6379 redis/redis-stack-server
|

配置类
配置类LLMConfig
1
2
3
4
5
6
7
8
9
10
11
12
13
14
15
16
17
18
19
20
21
22
23
24
25
26
27
28
29
30
31
32
33
34
35
36
37
38
39
40
41
42
43
44
45
46
47
48
49
50
51
52
53
54
55
56
57
58
59
60
61
62
63
64
65
66
67
68
69
70
71
72
73
74
75
76
| package com.atguigu.study.config;
import com.alibaba.cloud.ai.dashscope.api.DashScopeApi;
import com.alibaba.cloud.ai.dashscope.chat.DashScopeChatModel;
import com.alibaba.cloud.ai.dashscope.chat.DashScopeChatOptions;
import org.springframework.ai.chat.client.ChatClient;
import org.springframework.ai.chat.model.ChatModel;
import org.springframework.ai.chat.prompt.ChatOptions;
import org.springframework.ai.rag.advisor.RetrievalAugmentationAdvisor;
import org.springframework.ai.rag.retrieval.search.VectorStoreDocumentRetriever;
import org.springframework.ai.vectorstore.VectorStore;
import org.springframework.beans.factory.annotation.Autowired;
import org.springframework.beans.factory.annotation.Qualifier;
import org.springframework.context.annotation.Bean;
import org.springframework.context.annotation.Configuration;
@Configuration
public class SaaLLMConfig
{
private final String DEEPSEEK_MODEL = "deepseek-v3";
private final String QWEN_MODEL = "qwen-plus";
@Bean(name = "deepseek")
public ChatModel deepSeek()
{
return DashScopeChatModel.builder()
.dashScopeApi(DashScopeApi.builder()
.apiKey(System.getenv("aliQwen-api"))
.build())
.defaultOptions(
DashScopeChatOptions.builder().withModel(DEEPSEEK_MODEL).build()
)
.build();
}
@Bean(name = "qwen")
public ChatModel qwen()
{
return DashScopeChatModel.builder().dashScopeApi(DashScopeApi.builder()
.apiKey(System.getenv("aliQwen-api"))
.build())
.defaultOptions(
DashScopeChatOptions.builder()
.withModel(QWEN_MODEL)
.build()
)
.build();
}
@Bean(name = "deepseekChatClient")
public ChatClient deepseekChatClient(@Qualifier("deepseek") ChatModel deepSeek)
{
return ChatClient.builder(deepSeek)
.defaultOptions(ChatOptions.builder()
.model(DEEPSEEK_MODEL)
.build())
.build();
}
@Bean(name = "qwenChatClient")
public ChatClient qwenChatClient(@Qualifier("qwen") ChatModel qwen)
{
return ChatClient.builder(qwen)
.defaultOptions(ChatOptions.builder()
.model(QWEN_MODEL)
.build())
.build();
}
}
|
InitVectorDatabaseConfig(第一版)
1
2
3
4
5
6
7
8
9
10
11
12
13
14
15
16
17
18
19
20
21
22
23
24
25
26
27
28
29
30
31
32
33
34
35
36
37
38
39
40
41
42
43
| package com.atguigu.study.config;
import cn.hutool.crypto.SecureUtil;
import jakarta.annotation.PostConstruct;
import org.springframework.ai.document.Document;
import org.springframework.ai.reader.TextReader;
import org.springframework.ai.transformer.splitter.TokenTextSplitter;
import org.springframework.ai.vectorstore.VectorStore;
import org.springframework.beans.factory.annotation.Autowired;
import org.springframework.beans.factory.annotation.Value;
import org.springframework.context.annotation.Configuration;
import org.springframework.core.io.Resource;
import org.springframework.data.redis.core.RedisTemplate;
import java.nio.charset.Charset;
import java.util.List;
@Configuration
public class InitVectorDatabaseConfig
{
@Autowired
private VectorStore vectorStore;
@Value("classpath:ops.txt")
private Resource sqlFile;
@PostConstruct
public void init()
{
TextReader textReader = new TextReader(sqlFile);
textReader.setCharset(Charset.defaultCharset());
List<Document> list = new TokenTextSplitter().transform(textReader.read());
vectorStore.add(list);
}
|
Controller
1
2
3
4
5
6
7
8
9
10
11
12
13
14
15
16
17
18
19
20
21
22
23
24
25
26
27
28
29
30
31
32
33
34
35
36
37
38
39
40
41
42
43
44
45
46
47
48
49
50
51
52
53
54
| package com.atguigu.study.controller;
import jakarta.annotation.Resource;
import org.springframework.ai.chat.client.ChatClient;
import org.springframework.ai.rag.advisor.RetrievalAugmentationAdvisor;
import org.springframework.ai.rag.retrieval.search.VectorStoreDocumentRetriever;
import org.springframework.ai.vectorstore.VectorStore;
import org.springframework.beans.factory.annotation.Autowired;
import org.springframework.web.bind.annotation.GetMapping;
import org.springframework.web.bind.annotation.RestController;
import reactor.core.publisher.Flux;
@RestController
public class RagController
{
@Resource(name = "qwenChatClient")
private ChatClient chatClient;
@Resource
private VectorStore vectorStore;
@GetMapping("/rag4aiops")
public Flux<String> rag(String msg)
{
String systemInfo = """
你是一个运维工程师,按照给出的编码给出对应故障解释,否则回复找不到信息。
""";
RetrievalAugmentationAdvisor advisor = RetrievalAugmentationAdvisor.builder()
.documentRetriever(
VectorStoreDocumentRetriever.builder()
.vectorStore(vectorStore)
.build()
)
.build();
return chatClient.prompt()
.system(systemInfo)
.user(msg)
.advisors(advisor)
.stream()
.content();
}
}
|
测试

其它问题
重启下微服务:重复数据写入问题需考虑,不然每次重启都要新增
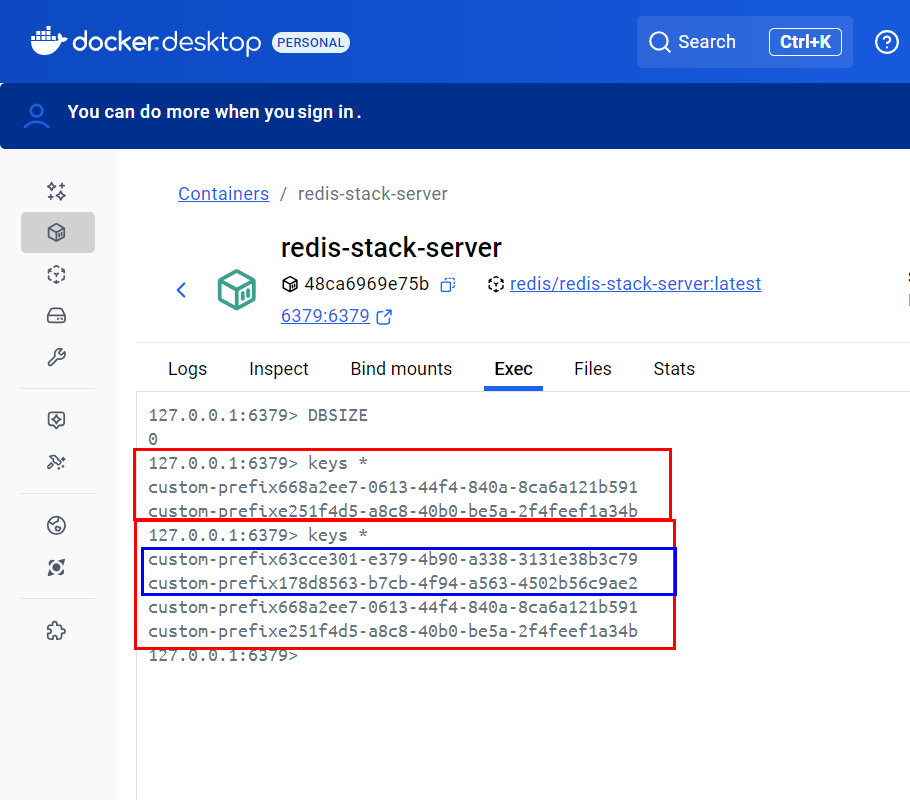
8.业务类第二版 向量数据库去重问题解决
使用RedisSetNX去重
RedisConfig
1
2
3
4
5
6
7
8
9
10
11
12
13
14
15
16
17
18
19
20
21
22
23
24
25
26
27
28
29
30
31
32
33
34
35
36
37
38
39
40
41
42
43
44
45
46
47
48
49
50
51
| package com.zzyy.study.config;
import lombok.extern.slf4j.Slf4j;
import org.springframework.context.annotation.Bean;
import org.springframework.context.annotation.Configuration;
import org.springframework.data.redis.connection.RedisConnectionFactory;
import org.springframework.data.redis.core.RedisTemplate;
import org.springframework.data.redis.serializer.GenericJackson2JsonRedisSerializer;
import org.springframework.data.redis.serializer.StringRedisSerializer;
@Configuration
@Slf4j
public class RedisConfig
{
@Bean
public RedisTemplate<String, Object> redisTemplate(RedisConnectionFactory redisConnectionFactor)
{
RedisTemplate<String,Object> redisTemplate = new RedisTemplate<>();
redisTemplate.setConnectionFactory(redisConnectionFactor);
redisTemplate.setKeySerializer(new StringRedisSerializer());
redisTemplate.setValueSerializer(new GenericJackson2JsonRedisSerializer());
redisTemplate.setHashKeySerializer(new StringRedisSerializer());
redisTemplate.setHashValueSerializer(new GenericJackson2JsonRedisSerializer());
redisTemplate.afterPropertiesSet();
return redisTemplate;
}
}
|
InitVectorDatabaseConfig(第二版)
1
2
3
4
5
6
7
8
9
10
11
12
13
14
15
16
17
18
19
20
21
22
23
24
25
26
27
28
29
30
31
32
33
34
35
36
37
38
39
40
41
42
43
44
45
46
47
48
49
50
51
52
53
54
55
56
57
58
59
60
61
62
63
64
65
66
67
68
69
70
71
72
73
| package com.atguigu.study.config;
import cn.hutool.crypto.SecureUtil;
import jakarta.annotation.PostConstruct;
import org.springframework.ai.document.Document;
import org.springframework.ai.reader.TextReader;
import org.springframework.ai.transformer.splitter.TokenTextSplitter;
import org.springframework.ai.vectorstore.AbstractVectorStoreBuilder;
import org.springframework.ai.vectorstore.VectorStore;
import org.springframework.beans.factory.annotation.Autowired;
import org.springframework.beans.factory.annotation.Qualifier;
import org.springframework.beans.factory.annotation.Value;
import org.springframework.context.annotation.Configuration;
import org.springframework.core.io.Resource;
import org.springframework.data.redis.core.RedisTemplate;
import java.nio.charset.Charset;
import java.util.List;
@Configuration
public class InitVectorDatabaseConfig
{
@Autowired
private VectorStore vectorStore;
@Autowired
private RedisTemplate<String,String> redisTemplate;
@Value("classpath:ops.txt")
private Resource opsFile;
@PostConstruct
public void init()
{
TextReader textReader = new TextReader(opsFile);
textReader.setCharset(Charset.defaultCharset());
List<Document> list = new TokenTextSplitter().transform(textReader.read());
String sourceMetadata = (String)textReader.getCustomMetadata().get("source");
String textHash = SecureUtil.md5(sourceMetadata);
String redisKey = "vector-xxx:" + textHash;
Boolean retFlag = redisTemplate.opsForValue().setIfAbsent(redisKey, "1");
System.out.println("****retFlag : "+retFlag);
if(Boolean.TRUE.equals(retFlag))
{
vectorStore.add(list);
}else {
System.out.println("------向量初始化数据已经加载过,请不要重复操作");
}
}
}
|
优点:性能高+线程安全问题OK
controller
1
2
3
4
5
6
7
8
9
10
11
12
13
14
15
16
17
18
19
20
21
22
23
24
25
26
27
28
29
30
31
32
33
34
35
36
37
38
39
40
41
42
43
44
45
46
47
48
49
50
51
52
53
54
| package com.atguigu.study.controller;
import jakarta.annotation.Resource;
import org.springframework.ai.chat.client.ChatClient;
import org.springframework.ai.rag.advisor.RetrievalAugmentationAdvisor;
import org.springframework.ai.rag.retrieval.search.VectorStoreDocumentRetriever;
import org.springframework.ai.vectorstore.VectorStore;
import org.springframework.beans.factory.annotation.Autowired;
import org.springframework.web.bind.annotation.GetMapping;
import org.springframework.web.bind.annotation.RestController;
import reactor.core.publisher.Flux;
@RestController
public class RagController
{
@Resource(name = "qwenChatClient")
private ChatClient chatClient;
@Resource
private VectorStore vectorStore;
@GetMapping("/rag4aiops")
public Flux<String> rag(String msg)
{
String systemInfo = """
你是一个运维工程师,按照给出的编码给出对应故障解释,否则回复找不到信息。
""";
RetrievalAugmentationAdvisor advisor = RetrievalAugmentationAdvisor.builder()
.documentRetriever(
VectorStoreDocumentRetriever.builder()
.vectorStore(vectorStore)
.build()
)
.build();
return chatClient.prompt()
.system(systemInfo)
.user(msg)
.advisors(advisor)
.stream()
.content();
}
}
|
1.为什么需要工具调用?
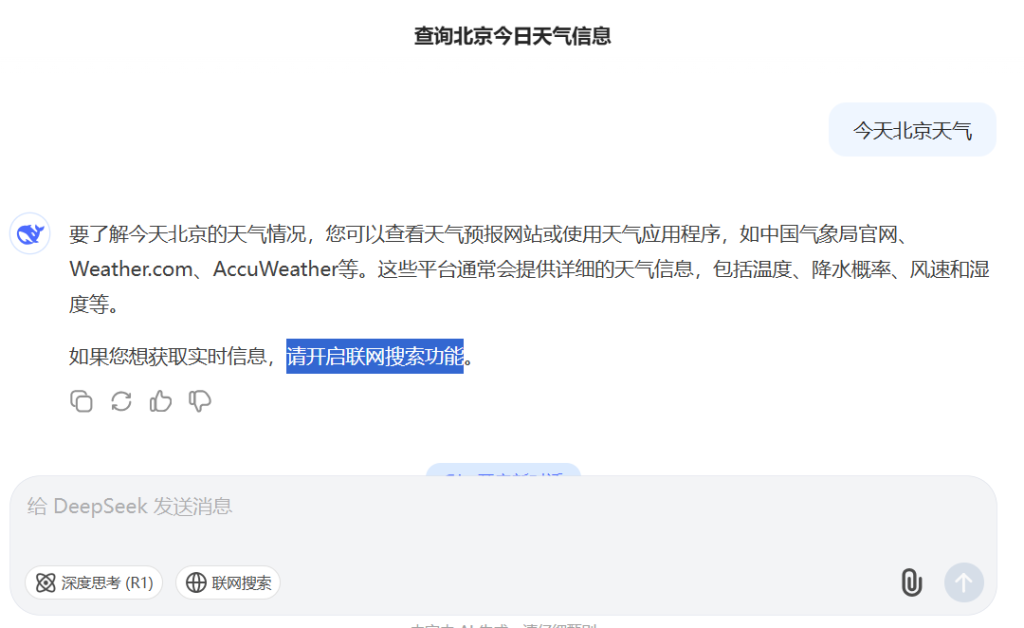
2.工具调用是什么
官网
SpringAI
https://docs.spring.io/spring-ai/reference/api/tools.html
SpringAI Alibba
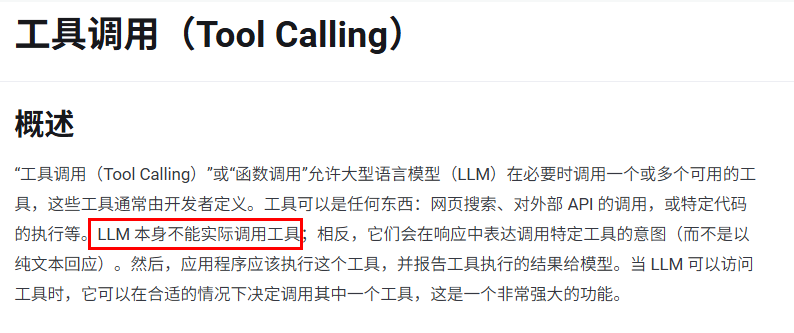
https://java2ai.com/docs/1.0.0.2/tutorials/basics/tool-calling/?spm=5176.29160081.0.0.2856aa5cgvn0gm
一句话:LLM的外部utils工具类
重要提示:
- ToolCalling(也称为FunctionCalling)它允许大模型与一组API或工具进行交互,将 LLM 的智能与外部工具或 API无缝连接,从而增强大模型其功能。
- LLM本身并不执行函数,它只是指示应该调用哪个函数以及如何调用
3.工具调用能干嘛
- 1.访问实时数据
- 2.执行某种工具类/辅助类操作:大语言模型(LLMs)不仅仅是文本生成的能手,它们还能触发并调用第3方函数,比如发邮件/查询微信/调用支付宝/查看顺丰快递单据号等等……
4.工具调用怎么用
工作流程
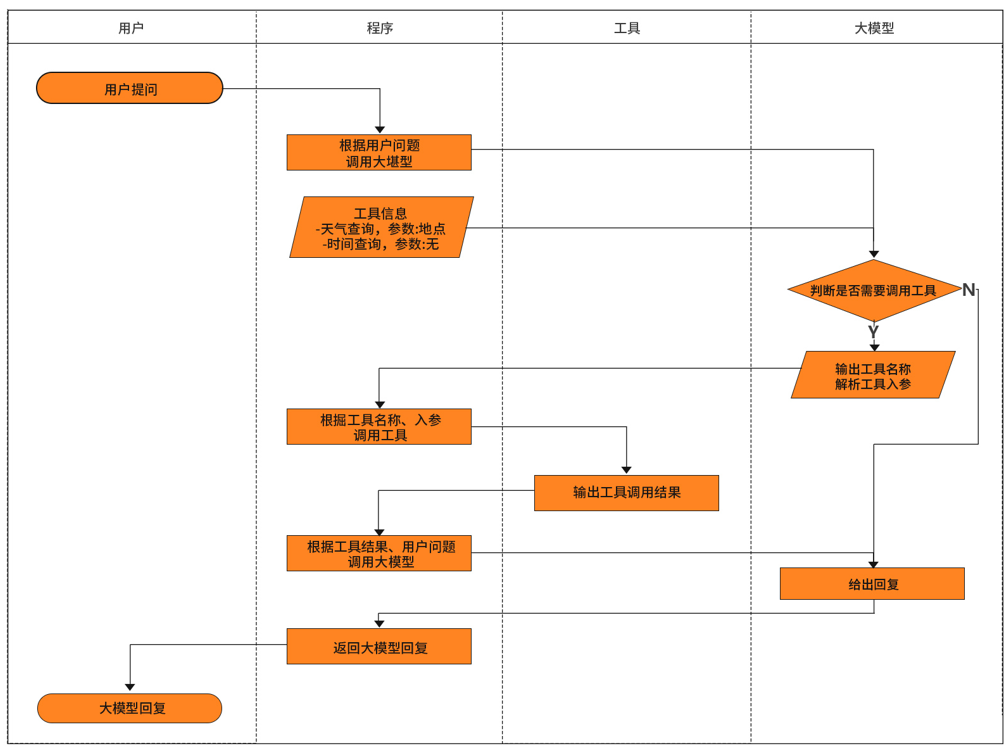
5.开发步骤
新建子模块Module
SAA-13ToolCalling
改POM
1
2
3
4
5
6
7
8
9
10
11
12
13
14
15
16
17
18
19
20
21
22
23
24
25
26
27
28
29
30
31
32
33
34
35
36
37
38
39
40
41
42
43
44
45
46
47
48
49
50
51
52
53
54
55
56
57
58
59
60
61
62
63
64
65
66
67
68
69
70
71
72
73
74
75
76
| <?xml version="1.0" encoding="UTF-8"?>
<project xmlns="http://maven.apache.org/POM/4.0.0" xmlns:xsi="http://www.w3.org/2001/XMLSchema-instance"
xsi:schemaLocation="http://maven.apache.org/POM/4.0.0 https://maven.apache.org/xsd/maven-4.0.0.xsd">
<modelVersion>4.0.0</modelVersion>
<parent>
<groupId>com.atguigu.study</groupId>
<artifactId>SpringAIAlibaba-atguiguV1</artifactId>
<version>1.0-SNAPSHOT</version>
</parent>
<artifactId>SAA-13ToolCalling</artifactId>
<dependencies>
<dependency>
<groupId>org.springframework.boot</groupId>
<artifactId>spring-boot-starter-web</artifactId>
</dependency>
<dependency>
<groupId>com.alibaba.cloud.ai</groupId>
<artifactId>spring-ai-alibaba-starter-dashscope</artifactId>
</dependency>
<dependency>
<groupId>org.projectlombok</groupId>
<artifactId>lombok</artifactId>
<version>1.18.38</version>
</dependency>
<dependency>
<groupId>cn.hutool</groupId>
<artifactId>hutool-all</artifactId>
<version>5.8.22</version>
</dependency>
<dependency>
<groupId>org.springframework.boot</groupId>
<artifactId>spring-boot-starter-test</artifactId>
<scope>test</scope>
</dependency>
</dependencies>
<build>
<plugins>
<plugin>
<groupId>org.springframework.boot</groupId>
<artifactId>spring-boot-maven-plugin</artifactId>
</plugin>
<plugin>
<groupId>org.apache.maven.plugins</groupId>
<artifactId>maven-compiler-plugin</artifactId>
<version>3.11.0</version>
<configuration>
<compilerArgs>
<arg>-parameters</arg>
</compilerArgs>
<source>21</source>
<target>21</target>
</configuration>
</plugin>
</plugins>
</build>
<repositories>
<repository>
<id>spring-milestones</id>
<name>Spring Milestones</name>
<url>https://repo.spring.io/milestone</url>
<snapshots>
<enabled>false</enabled>
</snapshots>
</repository>
</repositories>
</project>
|
写YML
1
2
3
4
5
6
7
8
9
10
11
| server.port=8013
server.servlet.encoding.enabled=true
server.servlet.encoding.force=true
server.servlet.encoding.charset=UTF-8
spring.application.name=SAA-13ToolCalling
spring.ai.dashscope.api-key=${aliQwen-api}
|
主启动
1
2
3
4
5
6
7
8
9
10
11
12
13
| package com.atguigu.study;
import org.springframework.boot.SpringApplication;
import org.springframework.boot.autoconfigure.SpringBootApplication;
@SpringBootApplication
public class Saa13ToolCallingApplication
{
public static void main(String[] args)
{
SpringApplication.run(Saa13ToolCallingApplication.class, args);
}
}
|
6.业务类
没有配置类LLMConfig
controller
1
2
3
4
5
6
7
8
9
10
11
12
13
14
15
16
17
18
19
20
21
22
23
24
25
26
27
| package com.atguigu.study.controller;
import com.alibaba.cloud.ai.dashscope.api.DashScopeApi;
import jakarta.annotation.Resource;
import org.springframework.ai.chat.model.ChatModel;
import org.springframework.web.bind.annotation.GetMapping;
import org.springframework.web.bind.annotation.RequestParam;
import org.springframework.web.bind.annotation.RestController;
import reactor.core.publisher.Flux;
@RestController
public class NoToolCallingController
{
@Resource
private ChatModel chatModel;
@GetMapping("/notoolcall/chat")
public Flux<String> chat(@RequestParam(name = "msg",defaultValue = "你是谁现在几点") String msg)
{
return chatModel.stream(msg);
}
}
|

方式1通过ChatModel实现
没有配置类LLMConfig
新建Tool工具类,类似Utils工具类
1
2
3
4
5
6
7
8
9
10
11
12
13
14
15
16
17
18
19
20
21
22
23
24
25
| package com.atguigu.study.utils;
import org.springframework.ai.tool.annotation.Tool;
import java.time.LocalDateTime;
public class DateTimeTools
{
@Tool(description = "获取当前时间", returnDirect = false)
public String getCurrentTime()
{
return LocalDateTime.now().toString();
}
}
|
工具调用直接返回
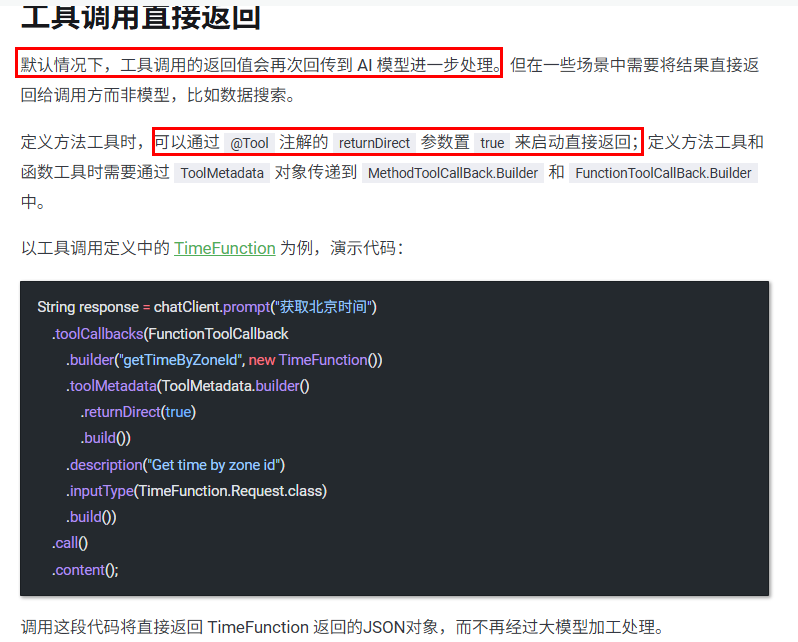
1
2
3
4
5
6
7
8
9
10
11
12
13
14
15
16
17
18
19
20
21
22
23
24
25
26
27
28
29
30
31
32
33
34
35
36
37
38
39
40
41
| package com.atguigu.study.controller;
import com.atguigu.study.utils.DateTimeTools;
import jakarta.annotation.Resource;
import org.springframework.ai.chat.client.ChatClient;
import org.springframework.ai.chat.model.ChatModel;
import org.springframework.ai.chat.prompt.ChatOptions;
import org.springframework.ai.chat.prompt.Prompt;
import org.springframework.ai.model.tool.ToolCallingChatOptions;
import org.springframework.ai.support.ToolCallbacks;
import org.springframework.ai.tool.ToolCallback;
import org.springframework.web.bind.annotation.GetMapping;
import org.springframework.web.bind.annotation.RequestParam;
import org.springframework.web.bind.annotation.RestController;
import reactor.core.publisher.Flux;
@RestController
public class ToolCallingController
{
@Resource
private ChatModel chatModel;
@GetMapping("/toolcall/chat")
public String chat(@RequestParam(name = "msg",defaultValue = "你是谁,现在几点了") String msg)
{
ToolCallback[] tools = ToolCallbacks.from(new DateTimeTools());
ChatOptions options = ToolCallingChatOptions.builder().toolCallbacks(tools).build();
Prompt prompt = new Prompt(msg, options);
return chatModel.call(prompt).getResult().getOutput().getText();
}
}
|
http://localhost:8013/toolcall/chat后就能查看当前时间了
方式2通过ChatClient实现

复习一下:它本身不会自动装配,直接定义无法使用,需要ChatModel套层壳
配置类LLMConfig
1
2
3
4
5
6
7
8
9
10
11
12
13
14
15
16
17
18
19
20
21
| package com.atguigu.study.config;
import org.springframework.ai.chat.client.ChatClient;
import org.springframework.ai.chat.model.ChatModel;
import org.springframework.context.annotation.Bean;
import org.springframework.context.annotation.Configuration;
@Configuration
public class SaaLLMConfig
{
@Bean
public ChatClient chatClient(ChatModel chatModel)
{
return ChatClient.builder(chatModel).build();
}
}
|
Controller
1
2
3
4
5
6
7
8
9
10
11
12
13
14
15
16
17
18
19
20
21
22
23
24
25
26
27
28
29
30
31
32
33
34
35
36
37
38
39
40
41
42
43
44
45
46
47
48
49
50
51
52
53
| package com.atguigu.study.controller;
import com.atguigu.study.utils.DateTimeTools;
import jakarta.annotation.Resource;
import org.springframework.ai.chat.client.ChatClient;
import org.springframework.ai.chat.model.ChatModel;
import org.springframework.ai.chat.prompt.ChatOptions;
import org.springframework.ai.chat.prompt.Prompt;
import org.springframework.ai.model.tool.ToolCallingChatOptions;
import org.springframework.ai.support.ToolCallbacks;
import org.springframework.ai.tool.ToolCallback;
import org.springframework.web.bind.annotation.GetMapping;
import org.springframework.web.bind.annotation.RequestParam;
import org.springframework.web.bind.annotation.RestController;
import reactor.core.publisher.Flux;
@RestController
public class ToolCallingController
{
@Resource
private ChatModel chatModel;
@Resource
private ChatClient chatClient;
@GetMapping("/toolcall/chat")
public String chat(@RequestParam(name = "msg",defaultValue = "你是谁现在几点") String msg)
{
ToolCallback[] tools = ToolCallbacks.from(new DateTimeTools());
ChatOptions options = ToolCallingChatOptions.builder().toolCallbacks(tools).build();
Prompt prompt = new Prompt(msg, options);
return chatModel.call(prompt).getResult().getOutput().getText();
}
@GetMapping("/toolcall/chat2")
public Flux<String> chat2(@RequestParam(name = "msg",defaultValue = "你是谁现在几点") String msg)
{
return chatClient.prompt(msg)
.tools(new DateTimeTools())
.stream()
.content();
}
}
|
测试

关于工具调用直接返回
ture:大模型直接返回原始未处理的数据
flase:大模型会再对原始数据处理一次,返回我们熟知的格式
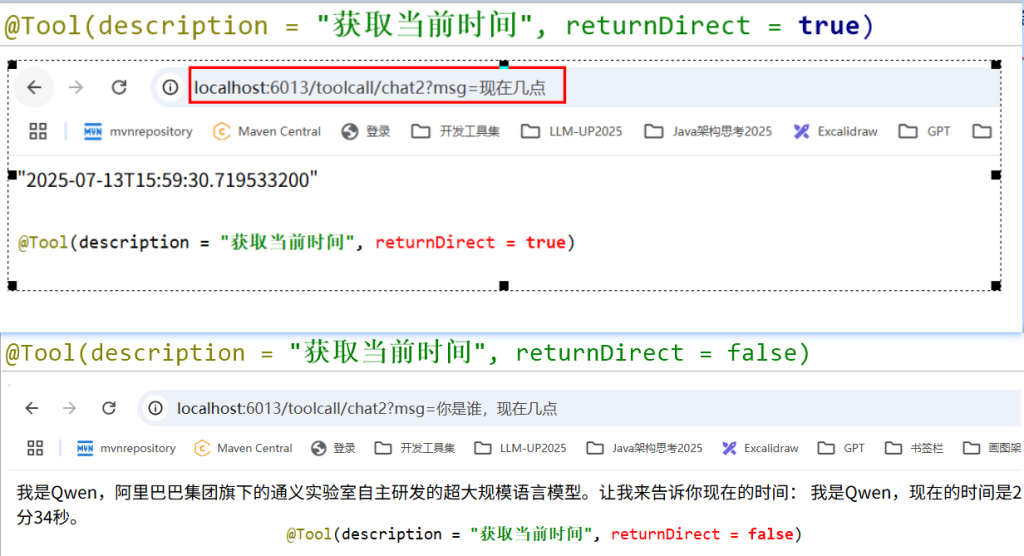
3.小总结
- 新建定义一个Tool工具类
- ChatModel/ChatClient使用
- Tool Calling使用注意事项:ToolCalling使用的前提是大模型支持functioncall才能正常调用。
15.MCP模型上下文协议(Model Context Protocol)
1.为什么会有MCP出现,之前痛点是什么
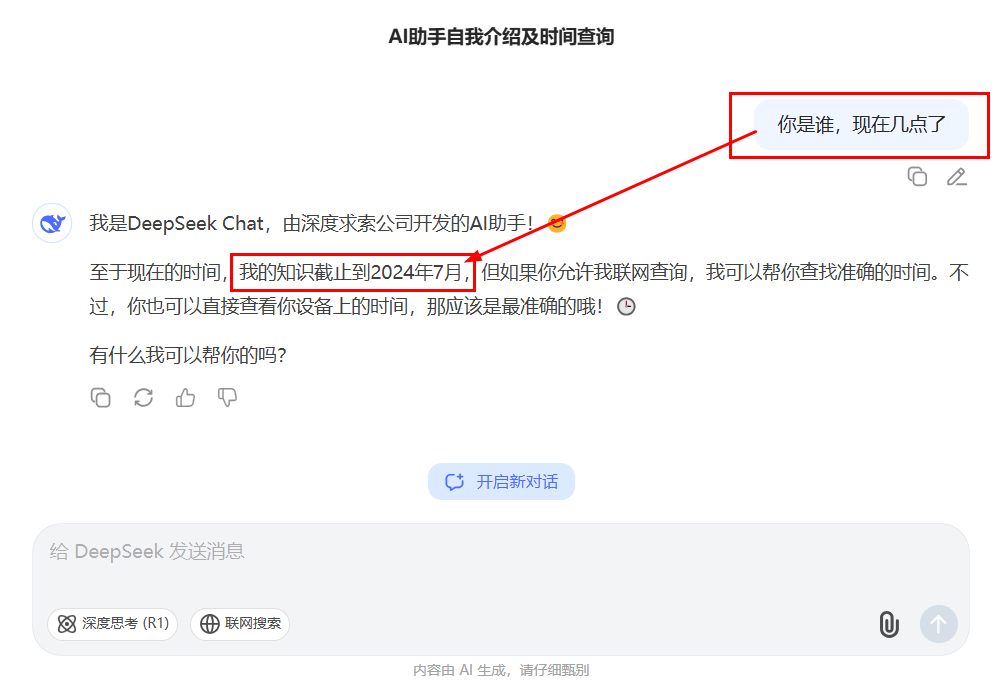
之前每个大模型(如DeepSeek、ChatGPT)需要为每个工具单独开发接口(FunctionCalling),导致重复劳动
痛点
2.MCP入门概念
MCP自身协议官网

https://modelcontextprotocol.io/introduction
SpringAI官网支持MCP
https://docs.spring.io/spring-ai/reference/api/mcp/mcp-overview.html
SpringAI Aibaba官网支持MCP
https://java2ai.com/docs/1.0.0.2/tutorials/basics/model-context-protocol/?spm=5176.29160081.0.0.2856aa5ccBJ7XE
MCP是什么
一句话:Java界的SpringCloud Openfeign,只不过Openfeign是用于微服务通讯的,
而MCP用于大模型通讯的,但它们都是为了通讯获取某项数据的一种机制
MCP能干嘛
提供了一种标准化的方式来连接 LLMs 需要的上下文,MCP 就类似于一个 Agent 时代的 Type-C协议,希望能将不同来源的数据、工具、服务统一起来供大模型调用

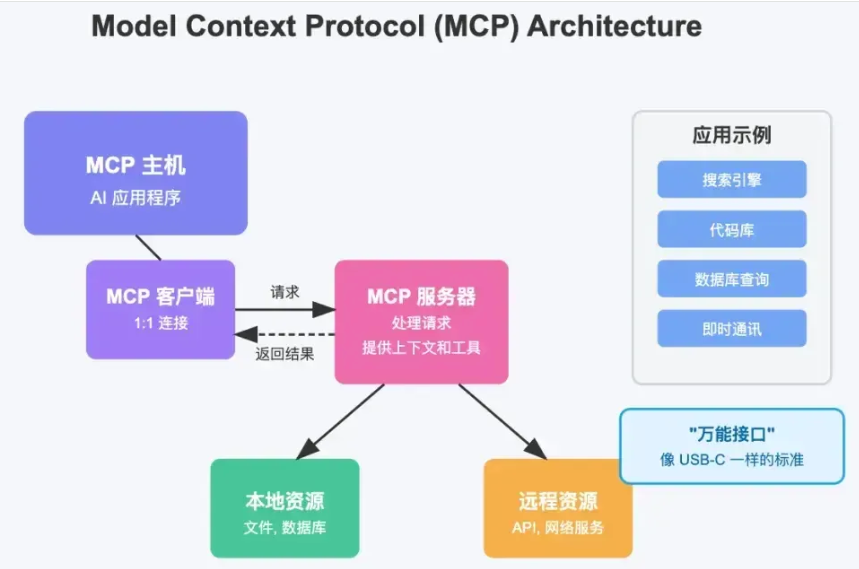
MCP 厉害的地方在于,不用重复造轮子。
过去每个软件(比如微信、Excel)都要单独给 AI 做接口,
现在 MCP 统一了标准,就像所有电器都用 USB-C 充电口,AI 一个接口就能连接所有工具
MCP怎么玩
https://mcp.so/zh
3.MCP架构知识
MCP遵循客户端-服务器架构包含以下几个核心部分
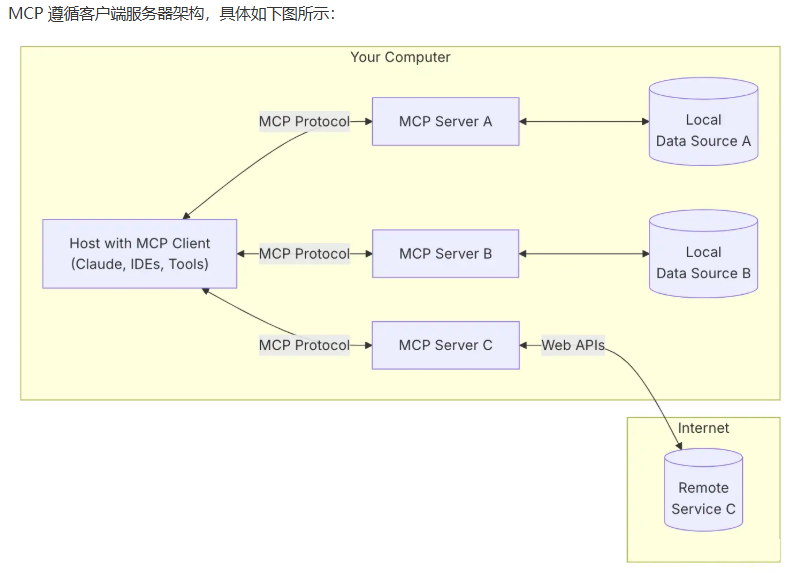
- MCP 主机(MCP Hosts):发起请求的 AI 应用程序,比如聊天机器人、AI 驱动的 IDE 等
- MCP 客户端(MCP Clients):在主机程序内部,与 MCP 服务器保持 1:1 的连接。
- MCP 服务器(MCP Servers):为 MCP 客户端提供上下文、工具和提示信息。
- 本地资源(Local Resources):本地计算机中可供 MCP 服务器安全访问的资源,如文件、数据库。
- 远程资源(Remote Resources):MCP 服务器可以连接到的远程资源,如通过 API 提供的数据
在MCP通信协议中,一般有两种模式
- STDIO(标准输入/输出)
- 支持标准输入和输出流进行通信,主要用于本地集成、命令行工具等场景
- SSE (Server-Sent Events)
- 支持使用 HTTP POST 请求进行服务器到客户端流式处理,以实现客户端到服务器的通信
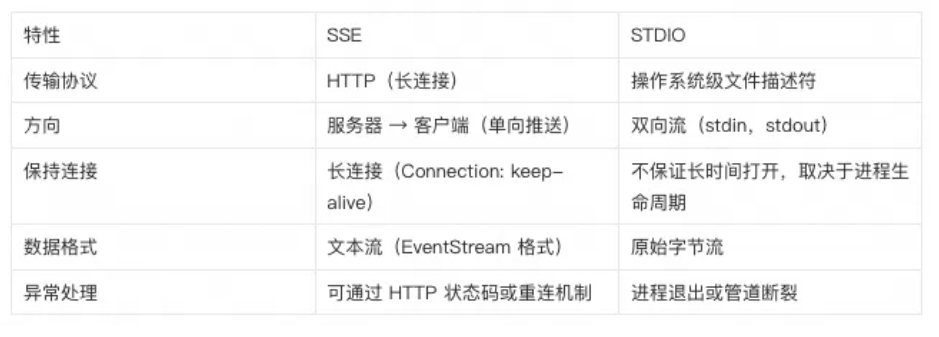
4.小总结(快速分清楚 工具调用、检索增强生成、模型上下文协议)
ToolCalling 工具类,为了让大模型使用Util工具
RAG 知识库,为了让大模型获取足够的上下文
MCP 协议,为了让大模型之间的相互调用
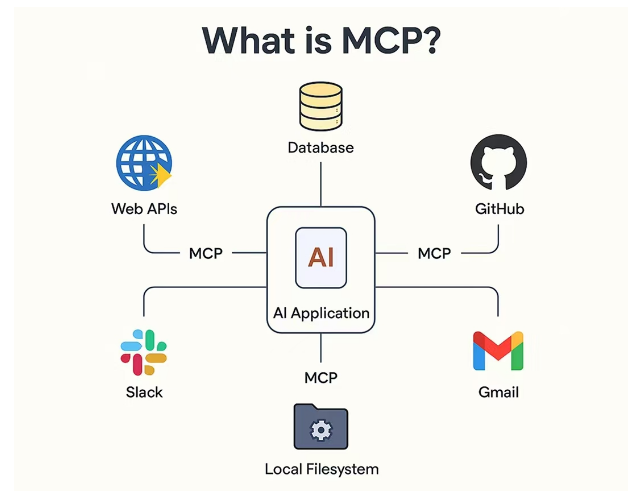
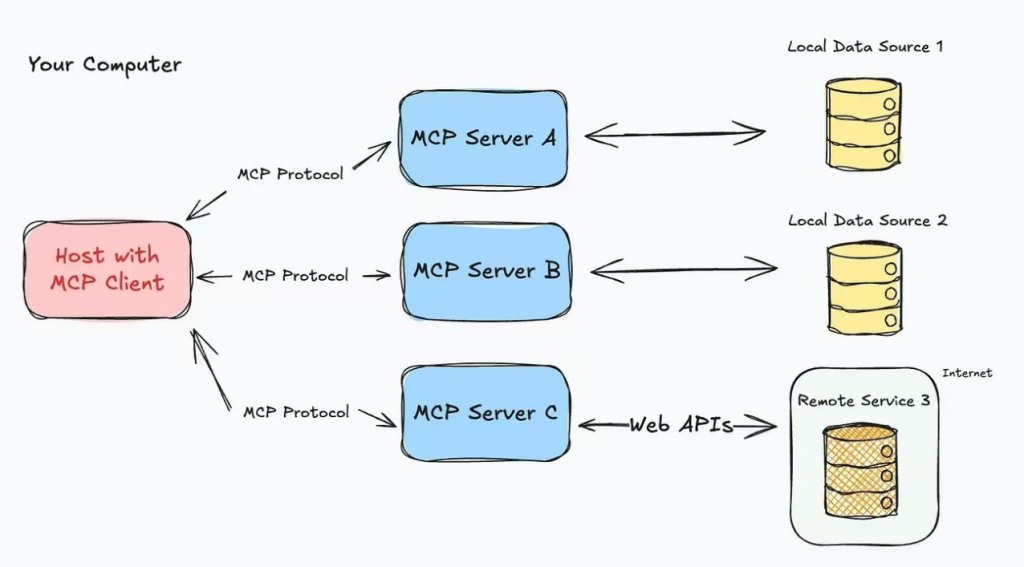
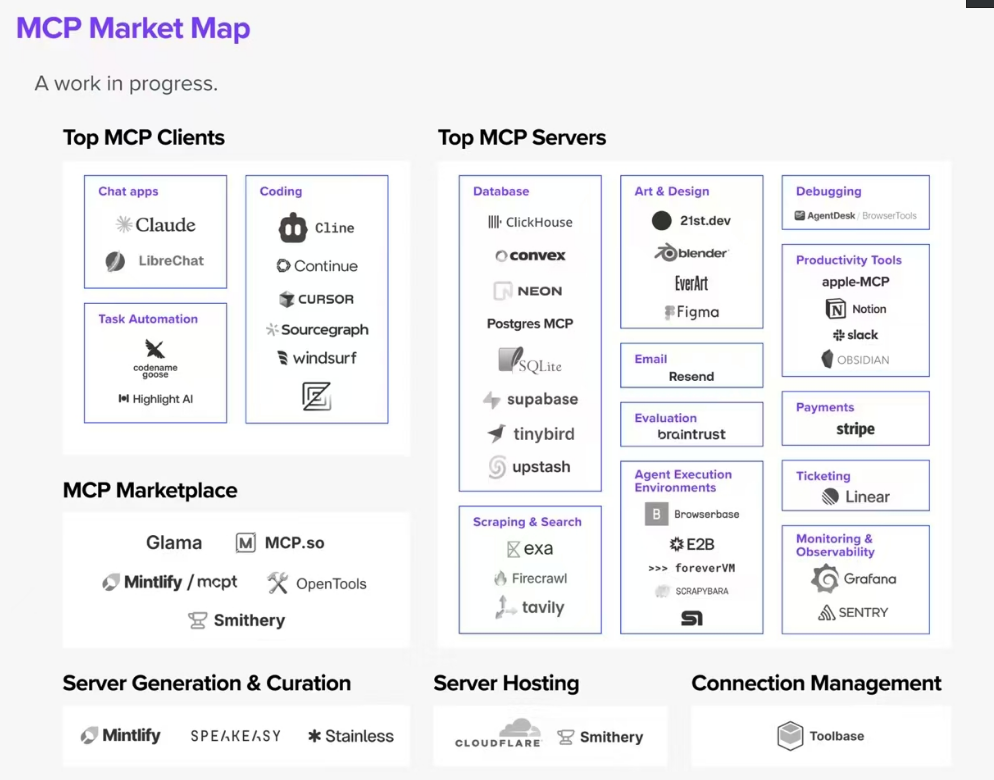
- 之前每个大模型(如DeepSeek、ChatGPT)需要为每个工具单独开发接口(FunctionCalling),导致重复劳动
- MCP通过统一协议
- 开发者只需写一次MCP服务端,所有兼容MCP协议的模型都能调用,MCP让大模型从"被动应答”变为”主动调用工具”
- 我调用一个MCP服务器就等价调用一个带有多个功能的Utils工具类,自己还不用受累携带
5.本地MCP-开发步骤
1.MCP-Server服务端实现
SAA-14LocalMcpServer
1
2
3
4
5
6
7
8
9
10
11
12
13
14
15
16
17
18
19
20
21
22
23
24
25
26
27
28
29
30
31
32
33
34
35
36
37
38
39
40
41
42
43
44
45
46
47
48
49
50
51
52
53
54
55
56
57
58
59
60
61
62
63
64
65
66
67
68
69
70
71
72
73
74
75
76
77
78
79
80
81
| <?xml version="1.0" encoding="UTF-8"?>
<project xmlns="http://maven.apache.org/POM/4.0.0" xmlns:xsi="http://www.w3.org/2001/XMLSchema-instance"
xsi:schemaLocation="http://maven.apache.org/POM/4.0.0 https://maven.apache.org/xsd/maven-4.0.0.xsd">
<modelVersion>4.0.0</modelVersion>
<parent>
<groupId>com.atguigu.study</groupId>
<artifactId>SpringAIAlibaba-atguiguV1</artifactId>
<version>1.0-SNAPSHOT</version>
</parent>
<artifactId>SAA-14LocalMcpServer</artifactId>
<dependencies>
<dependency>
<groupId>org.springframework.boot</groupId>
<artifactId>spring-boot-starter</artifactId>
</dependency>
<dependency>
<groupId>org.springframework.ai</groupId>
<artifactId>spring-ai-starter-mcp-server-webflux</artifactId>
</dependency>
<dependency>
<groupId>org.projectlombok</groupId>
<artifactId>lombok</artifactId>
<version>1.18.38</version>
</dependency>
<dependency>
<groupId>cn.hutool</groupId>
<artifactId>hutool-all</artifactId>
<version>5.8.22</version>
</dependency>
<dependency>
<groupId>org.springframework.boot</groupId>
<artifactId>spring-boot-starter-test</artifactId>
<scope>test</scope>
</dependency>
</dependencies>
<build>
<plugins>
<plugin>
<groupId>org.springframework.boot</groupId>
<artifactId>spring-boot-maven-plugin</artifactId>
</plugin>
<plugin>
<groupId>org.apache.maven.plugins</groupId>
<artifactId>maven-compiler-plugin</artifactId>
<version>3.11.0</version>
<configuration>
<compilerArgs>
<arg>-parameters</arg>
</compilerArgs>
<source>21</source>
<target>21</target>
</configuration>
</plugin>
</plugins>
</build>
<repositories>
<repository>
<id>spring-milestones</id>
<name>Spring Milestones</name>
<url>https://repo.spring.io/milestone</url>
<snapshots>
<enabled>false</enabled>
</snapshots>
</repository>
</repositories>
</project>
|
写YML
1
2
3
4
5
6
7
8
9
10
11
12
13
14
| server.port=8014
server.servlet.encoding.enabled=true
server.servlet.encoding.force=true
server.servlet.encoding.charset=UTF-8
spring.application.name=SAA-14LocalMcpServer
spring.ai.mcp.server.type=async
spring.ai.mcp.server.name=customer-define-mcp-server
spring.ai.mcp.server.version=1.0.0
|
主启动
1
2
3
4
5
6
7
8
9
10
11
12
13
14
| package com.atguigu.study;
import org.springframework.boot.SpringApplication;
import org.springframework.boot.autoconfigure.SpringBootApplication;
@SpringBootApplication
public class Saa14LocalMcpServerApplication
{
public static void main(String[] args)
{
SpringApplication.run(Saa14LocalMcpServerApplication.class, args);
}
}
|
业务类
天气预报WeatherService服务类
1
2
3
4
5
6
7
8
9
10
11
12
13
14
15
16
17
18
19
20
21
22
23
24
25
26
| package com.atguigu.study.service;
import org.springframework.ai.tool.annotation.Tool;
import org.springframework.stereotype.Service;
import java.util.Map;
@Service
public class WeatherService
{
@Tool(description = "根据城市名称获取天气预报")
public String getWeatherByCity(String city)
{
Map<String, String> map = Map.of(
"北京", "11111降雨频繁,其中今天和后天雨势较强,部分地区有暴雨并伴强对流天气,需注意",
"上海", "22222多云,15℃~27℃,南风3级,当前温度27℃。",
"深圳", "333333多云40天,阴16天,雨30天,晴3天"
);
return map.getOrDefault(city, "抱歉:未查询到对应城市!");
}
}
|
ToolCallbackProvider接口配置类
1
2
3
4
5
6
7
8
9
10
11
12
13
14
15
16
17
18
19
20
21
22
23
24
25
26
27
28
29
30
| package com.atguigu.study.config;
import com.atguigu.study.service.WeatherService;
import org.springframework.ai.tool.ToolCallbackProvider;
import org.springframework.ai.tool.method.MethodToolCallbackProvider;
import org.springframework.context.annotation.Bean;
import org.springframework.context.annotation.Configuration;
@Configuration
public class McpServerConfig
{
@Bean
public ToolCallbackProvider weatherTools(WeatherService weatherService)
{
return MethodToolCallbackProvider.builder()
.toolObjects(weatherService)
.build();
}
}
|
自启动作为服务端等待调用即可
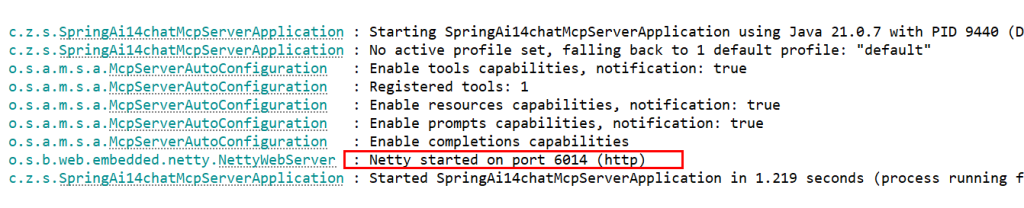
2.MCP-Client客户端实现
新建子模块Module
SAA-15LocalMcpClient
改POM
1
2
3
4
5
6
7
8
9
10
11
12
13
14
15
16
17
18
19
20
21
22
23
24
25
26
27
28
29
30
31
32
33
34
35
36
37
38
39
40
41
42
43
44
45
46
47
48
49
50
51
52
53
54
55
56
57
58
59
60
61
62
63
64
65
66
67
68
69
70
71
72
73
74
75
76
77
78
79
80
81
| <?xml version="1.0" encoding="UTF-8"?>
<project xmlns="http://maven.apache.org/POM/4.0.0" xmlns:xsi="http://www.w3.org/2001/XMLSchema-instance"
xsi:schemaLocation="http://maven.apache.org/POM/4.0.0 https://maven.apache.org/xsd/maven-4.0.0.xsd">
<modelVersion>4.0.0</modelVersion>
<parent>
<groupId>com.atguigu.study</groupId>
<artifactId>SpringAIAlibaba-atguiguV1</artifactId>
<version>1.0-SNAPSHOT</version>
</parent>
<artifactId>SAA-15LocalMcpClient</artifactId>
<dependencies>
<dependency>
<groupId>org.springframework.boot</groupId>
<artifactId>spring-boot-starter-web</artifactId>
</dependency>
<dependency>
<groupId>com.alibaba.cloud.ai</groupId>
<artifactId>spring-ai-alibaba-starter-dashscope</artifactId>
</dependency>
<dependency>
<groupId>org.springframework.ai</groupId>
<artifactId>spring-ai-starter-mcp-client</artifactId>
</dependency>
<dependency>
<groupId>org.projectlombok</groupId>
<artifactId>lombok</artifactId>
<version>1.18.38</version>
</dependency>
<dependency>
<groupId>cn.hutool</groupId>
<artifactId>hutool-all</artifactId>
<version>5.8.22</version>
</dependency>
<dependency>
<groupId>org.springframework.boot</groupId>
<artifactId>spring-boot-starter-test</artifactId>
<scope>test</scope>
</dependency>
</dependencies>
<build>
<plugins>
<plugin>
<groupId>org.springframework.boot</groupId>
<artifactId>spring-boot-maven-plugin</artifactId>
</plugin>
<plugin>
<groupId>org.apache.maven.plugins</groupId>
<artifactId>maven-compiler-plugin</artifactId>
<version>3.11.0</version>
<configuration>
<compilerArgs>
<arg>-parameters</arg>
</compilerArgs>
<source>21</source>
<target>21</target>
</configuration>
</plugin>
</plugins>
</build>
<repositories>
<repository>
<id>spring-milestones</id>
<name>Spring Milestones</name>
<url>https://repo.spring.io/milestone</url>
<snapshots>
<enabled>false</enabled>
</snapshots>
</repository>
</repositories>
</project>
|
写YML
1
2
3
4
5
6
7
8
9
10
11
12
13
14
15
16
17
| server.port=8015
server.servlet.encoding.enabled=true
server.servlet.encoding.force=true
server.servlet.encoding.charset=UTF-8
spring.application.name=SAA-15LocalMcpClient
spring.ai.dashscope.api-key=${aliQwen-api}
spring.ai.mcp.client.type=async
spring.ai.mcp.client.request-timeout=60s
spring.ai.mcp.client.toolcallback.enabled=true
spring.ai.mcp.client.sse.connections.mcp-server1.url=http://localhost:8014
|
主启动
1
2
3
4
5
6
7
8
9
10
11
12
13
| package com.atguigu.study;
import org.springframework.boot.SpringApplication;
import org.springframework.boot.autoconfigure.SpringBootApplication;
@SpringBootApplication
public class Saa15LocalMcpClientApplication
{
public static void main(String[] args)
{
SpringApplication.run(Saa15LocalMcpClientApplication.class, args);
}
}
|
业务类
LLMConfig并添加tool调用
1
2
3
4
5
6
7
8
9
10
11
12
13
14
15
16
17
18
19
20
21
22
23
24
| package com.atguigu.study.config;
import org.springframework.ai.chat.client.ChatClient;
import org.springframework.ai.chat.model.ChatModel;
import org.springframework.ai.tool.ToolCallbackProvider;
import org.springframework.context.annotation.Bean;
import org.springframework.context.annotation.Configuration;
@Configuration
public class SaaLLMConfig
{
@Bean
public ChatClient chatClient(ChatModel chatModel, ToolCallbackProvider tools)
{
return ChatClient.builder(chatModel)
.defaultToolCallbacks(tools.getToolCallbacks())
.build();
}
}
|
controller
1
2
3
4
5
6
7
8
9
10
11
12
13
14
15
16
17
18
19
20
21
22
23
24
25
26
27
28
29
30
31
32
33
34
35
36
37
38
39
40
41
| package com.atguigu.study.controller;
import jakarta.annotation.Resource;
import org.springframework.ai.chat.client.ChatClient;
import org.springframework.ai.chat.model.ChatModel;
import org.springframework.web.bind.annotation.GetMapping;
import org.springframework.web.bind.annotation.RequestMapping;
import org.springframework.web.bind.annotation.RequestParam;
import org.springframework.web.bind.annotation.RestController;
import reactor.core.publisher.Flux;
@RestController
public class McpClientController
{
@Resource
private ChatClient chatClient;
@Resource
private ChatModel chatModel;
@GetMapping("/mcpclient/chat")
public Flux<String> chat(@RequestParam(name = "msg",defaultValue = "北京") String msg)
{
System.out.println("使用了mcp");
return chatClient.prompt(msg).stream().content();
}
@RequestMapping("/mcpclient/chat2")
public Flux<String> chat2(@RequestParam(name = "msg",defaultValue = "北京") String msg)
{
System.out.println("未使用mcp");
return chatModel.stream(msg);
}
}
|
3.MCP-Client invoke MCP-Server测试
使用mcp
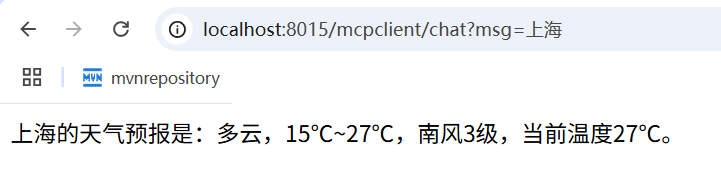
没有mcp支持,已读乱回
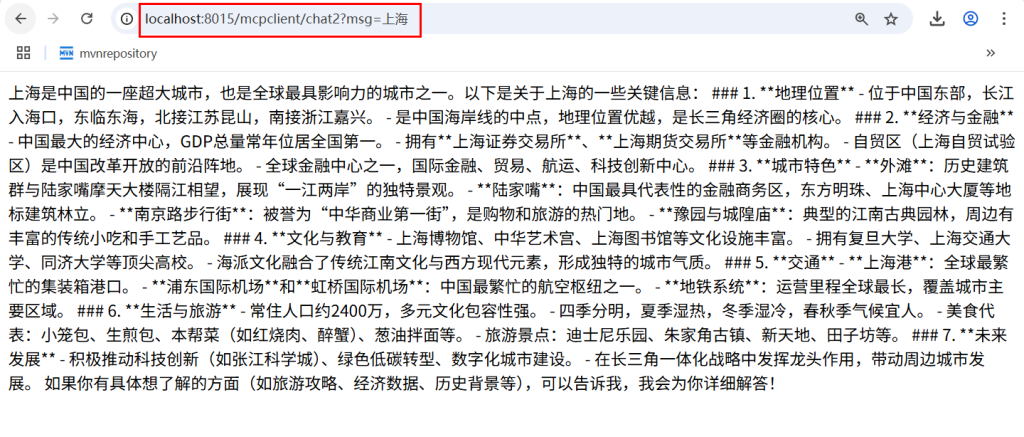
6.远程MCP增强案例-对接互联网通用MCP服务(百度地图)
对接互联网通用MCP服务(百度地图)
https://mcp.so/zh/server/baidu-map/baidu-maps
1.环境配置
- 下载最新版的NodeJS
- 注册百度地图账号+申请API-key :速成langchain4j时我们配置过这里省略
- nodejs配置编码-Typescript接入
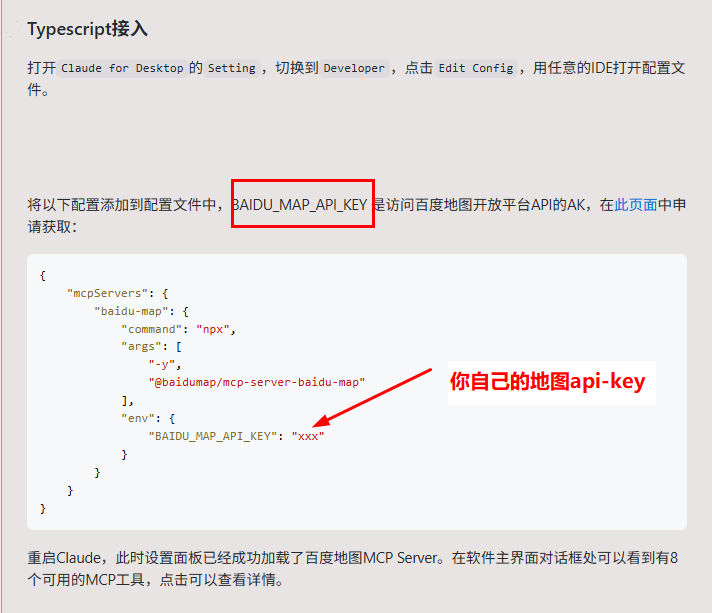
2.开发步骤
新建子模块Module
springAI-16chat-mcpclient-call-baidumcp
改POM
1
2
3
4
5
6
7
8
9
10
11
12
13
14
15
16
17
18
19
20
21
22
23
24
25
26
27
28
29
30
31
32
33
34
35
36
37
38
39
40
41
42
43
44
45
46
47
48
49
50
51
52
53
54
55
56
57
58
59
60
61
62
63
64
65
66
67
| <?xml version="1.0" encoding="UTF-8"?>
<project xmlns="http://maven.apache.org/POM/4.0.0" xmlns:xsi="http://www.w3.org/2001/XMLSchema-instance"
xsi:schemaLocation="http://maven.apache.org/POM/4.0.0 https://maven.apache.org/xsd/maven-4.0.0.xsd">
<modelVersion>4.0.0</modelVersion>
<parent>
<groupId>com.zzyy.study</groupId>
<artifactId>SpringAI-zyfanV1</artifactId>
<version>1.0-SNAPSHOT</version>
</parent>
<artifactId>springAI-16chat-mcpclient-call-baidumcp</artifactId>
<dependencies>
<dependency>
<groupId>org.springframework.boot</groupId>
<artifactId>spring-boot-starter-web</artifactId>
</dependency>
<dependency>
<groupId>org.springframework.ai</groupId>
<artifactId>spring-ai-starter-model-openai</artifactId>
</dependency>
<dependency>
<groupId>org.springframework.ai</groupId>
<artifactId>spring-ai-starter-mcp-client</artifactId>
</dependency>
<dependency>
<groupId>cn.hutool</groupId>
<artifactId>hutool-all</artifactId>
<version>5.8.22</version>
</dependency>
<dependency>
<groupId>org.projectlombok</groupId>
<artifactId>lombok</artifactId>
<version>1.18.38</version>
</dependency>
<dependency>
<groupId>org.springframework.boot</groupId>
<artifactId>spring-boot-starter-test</artifactId>
<scope>test</scope>
</dependency>
</dependencies>
<build>
<plugins>
<plugin>
<groupId>org.springframework.boot</groupId>
<artifactId>spring-boot-maven-plugin</artifactId>
</plugin>
<plugin>
<groupId>org.apache.maven.plugins</groupId>
<artifactId>maven-compiler-plugin</artifactId>
<version>3.11.0</version>
<configuration>
<compilerArgs>
<arg>-parameters</arg>
</compilerArgs>
<source>21</source>
<target>21</target>
</configuration>
</plugin>
</plugins>
</build>
</project>
|
写YML
1
2
3
4
5
6
7
8
9
10
11
12
13
14
15
16
17
| server.port=6016
server.servlet.encoding.enabled=true
server.servlet.encoding.force=true
server.servlet.encoding.charset=UTF-8
spring.application.name=springAI-16chat-mcpclient-call-baidumcp
spring.ai.openai.api-key=${aliQwen-api}
spring.ai.openai.base-url=https://dashscope.aliyuncs.com/compatible-mode
spring.ai.openai.chat.options.model=qwen-plus
spring.ai.mcp.client.toolcallback.enabled=true
spring.ai.mcp.client.stdio.servers-configuration=classpath:/mcp-server.json
|
nodejs配置编码-Typescript接入
https://mcp.so/zh/server/baidu-map/baidu-maps?tab=content#typescript%E6%8E%A5%E5%85%A5
mcp-server.json
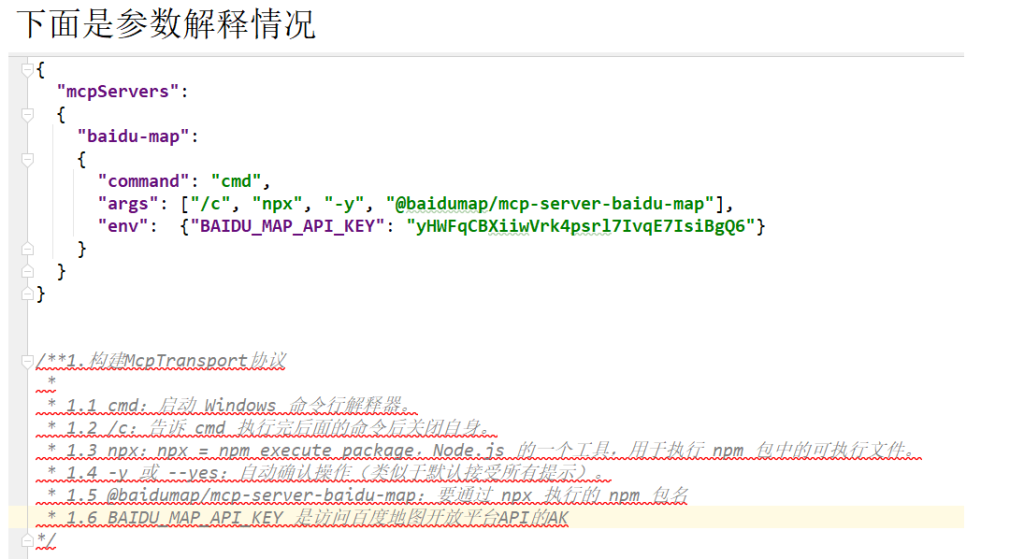
主启动
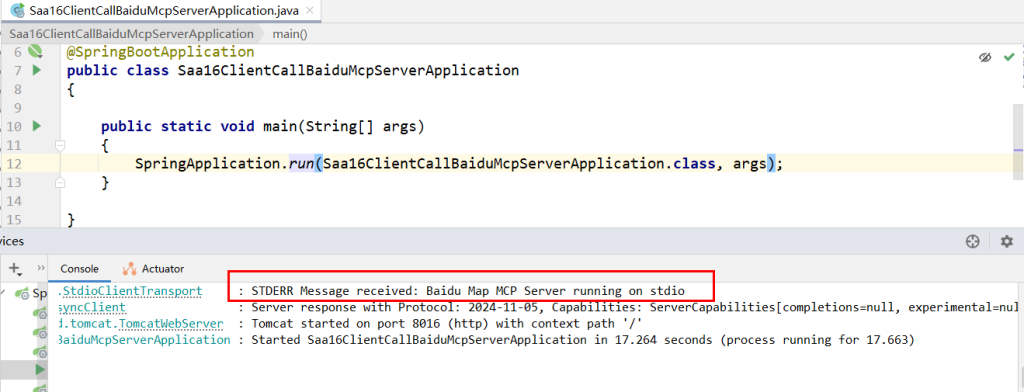
业务类
LLMConfig
1
2
3
4
5
6
7
8
9
10
11
12
13
14
15
16
17
18
19
20
21
22
23
24
25
| package com.atguigu.study.config;
import org.springframework.ai.chat.client.ChatClient;
import org.springframework.ai.chat.model.ChatModel;
import org.springframework.ai.tool.ToolCallbackProvider;
import org.springframework.context.annotation.Bean;
import org.springframework.context.annotation.Configuration;
@Configuration
public class SaaLLMConfig
{
@Bean
public ChatClient chatClient(ChatModel chatModel, ToolCallbackProvider tools)
{
return ChatClient.builder(chatModel)
.defaultToolCallbacks(tools.getToolCallbacks())
.build();
}
}
|
controller
1
2
3
4
5
6
7
8
9
10
11
12
13
14
15
16
17
18
19
20
21
22
23
24
25
26
27
28
29
30
31
32
33
34
35
36
37
38
39
40
41
42
43
44
45
46
47
48
49
50
51
| package com.zzyy.study.controller;
import jakarta.annotation.Resource;
import org.springframework.ai.chat.client.ChatClient;
import org.springframework.ai.chat.model.ChatModel;
import org.springframework.web.bind.annotation.GetMapping;
import org.springframework.web.bind.annotation.RequestMapping;
import org.springframework.web.bind.annotation.RestController;
import reactor.core.publisher.Flux;
@RestController
public class McpClientCallBaiDuMcpController
{
@Resource
private ChatClient chatClient;
@Resource
private ChatModel chatModel;
@GetMapping("/mcp/chat")
public Flux<String> chat(String msg)
{
return chatClient.prompt(msg).stream().content();
}
@RequestMapping("/mcp/chat2")
public Flux<String> chat2(String msg)
{
return chatModel.stream(msg);
}
}
|
3.测试
具备mcp能力的
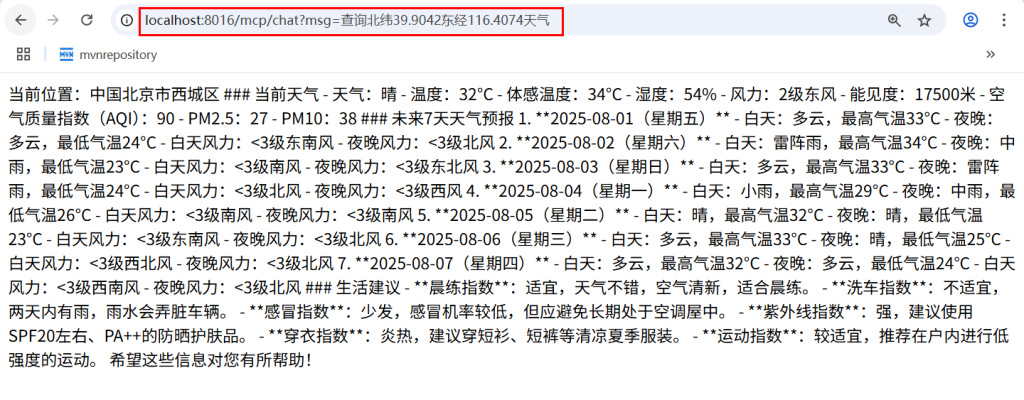
不具备mcp能力的

7.MCP原理+源码分析
源码获得
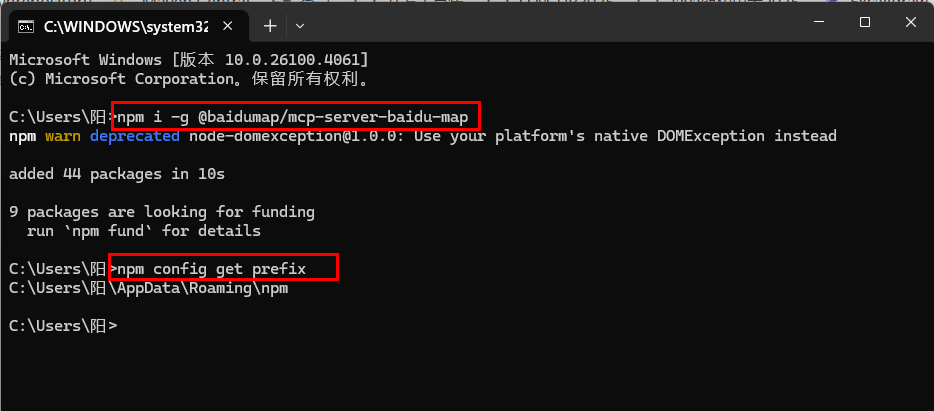
下载后的源码
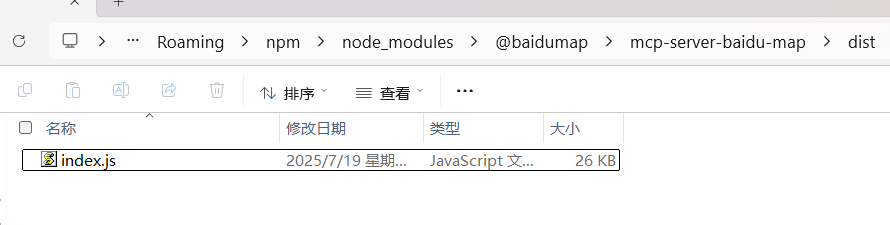
原理说明

16.SAA生态篇
1.阿里云百炼平台云上RAG知识库(AI智能运维)
需求说明
阿里云上知识库搭建

开发步骤
新建子模块Module
SAA-17BailianRAG
改POM
1
2
3
4
5
6
7
8
9
10
11
12
13
14
15
16
17
18
19
20
21
22
23
24
25
26
27
28
29
30
31
32
33
34
35
36
37
38
39
40
41
42
43
44
45
46
47
48
49
50
51
52
53
54
55
56
57
58
59
60
61
62
63
64
65
66
67
68
69
70
71
72
73
74
75
| <?xml version="1.0" encoding="UTF-8"?>
<project xmlns="http://maven.apache.org/POM/4.0.0" xmlns:xsi="http://www.w3.org/2001/XMLSchema-instance"
xsi:schemaLocation="http://maven.apache.org/POM/4.0.0 https://maven.apache.org/xsd/maven-4.0.0.xsd">
<modelVersion>4.0.0</modelVersion>
<parent>
<groupId>com.atguigu.study</groupId>
<artifactId>SpringAIAlibaba-atguiguV1</artifactId>
<version>1.0-SNAPSHOT</version>
</parent>
<artifactId>SAA-17BailianRAG</artifactId>
<dependencies>
<dependency>
<groupId>org.springframework.boot</groupId>
<artifactId>spring-boot-starter-web</artifactId>
</dependency>
<dependency>
<groupId>com.alibaba.cloud.ai</groupId>
<artifactId>spring-ai-alibaba-starter-dashscope</artifactId>
</dependency>
<dependency>
<groupId>org.projectlombok</groupId>
<artifactId>lombok</artifactId>
<version>1.18.38</version>
</dependency>
<dependency>
<groupId>cn.hutool</groupId>
<artifactId>hutool-all</artifactId>
<version>5.8.22</version>
</dependency>
<dependency>
<groupId>org.springframework.boot</groupId>
<artifactId>spring-boot-starter-test</artifactId>
<scope>test</scope>
</dependency>
</dependencies>
<build>
<plugins>
<plugin>
<groupId>org.springframework.boot</groupId>
<artifactId>spring-boot-maven-plugin</artifactId>
</plugin>
<plugin>
<groupId>org.apache.maven.plugins</groupId>
<artifactId>maven-compiler-plugin</artifactId>
<version>3.11.0</version>
<configuration>
<compilerArgs>
<arg>-parameters</arg>
</compilerArgs>
<source>21</source>
<target>21</target>
</configuration>
</plugin>
</plugins>
</build>
<repositories>
<repository>
<id>spring-milestones</id>
<name>Spring Milestones</name>
<url>https://repo.spring.io/milestone</url>
<snapshots>
<enabled>false</enabled>
</snapshots>
</repository>
</repositories>
</project>
|
写YML
1
2
3
4
5
6
7
8
9
10
11
12
| server.port=8017
server.servlet.encoding.enabled=true
server.servlet.encoding.force=true
server.servlet.encoding.charset=UTF-8
spring.application.name=SAA-17BailianRAG
spring.ai.dashscope.api-key=${aliQwen-api}
|
主启动
1
2
3
4
5
6
7
8
9
10
11
12
13
14
15
| package com.atguigu.study;
import org.springframework.boot.SpringApplication;
import org.springframework.boot.autoconfigure.SpringBootApplication;
@SpringBootApplication
public class Saa17BailianRagApplication
{
public static void main(String[] args)
{
SpringApplication.run(Saa17BailianRagApplication.class, args);
}
}
|
业务类
DashScopeConfig
1
2
3
4
5
6
7
8
9
10
11
12
13
14
15
16
17
18
19
20
21
22
23
24
25
26
27
28
29
30
| package com.zzyy.study.config;
import com.alibaba.cloud.ai.dashscope.api.DashScopeApi;
import org.springframework.ai.chat.client.ChatClient;
import org.springframework.ai.chat.model.ChatModel;
import org.springframework.beans.factory.annotation.Value;
import org.springframework.context.annotation.Bean;
import org.springframework.context.annotation.Configuration;
@Configuration
public class DashScopeConfig {
@Value("${spring.ai.dashscope.api-key}")
private String apiKey;
@Bean
public DashScopeApi dashScopeApi()
{
return DashScopeApi.builder()
.apiKey(apiKey)
.workSpaceId("llm-3as714s6flm80yc1")
.build();
}
@Bean
public ChatClient chatClient(ChatModel dashscopeChatModel)
{
return ChatClient.builder(dashscopeChatModel).build();
}
}
|
controller
1
2
3
4
5
6
7
8
9
10
11
12
13
14
15
16
17
18
19
20
21
22
23
24
25
26
27
28
29
30
31
32
33
34
35
36
37
38
39
40
41
42
43
44
45
46
47
48
49
50
51
| package com.zzyy.study.controller;
import com.alibaba.cloud.ai.advisor.DocumentRetrievalAdvisor;
import com.alibaba.cloud.ai.dashscope.api.DashScopeApi;
import com.alibaba.cloud.ai.dashscope.rag.DashScopeDocumentRetriever;
import com.alibaba.cloud.ai.dashscope.rag.DashScopeDocumentRetrieverOptions;
import jakarta.annotation.Resource;
import org.springframework.ai.chat.client.ChatClient;
import org.springframework.ai.rag.retrieval.search.DocumentRetriever;
import org.springframework.web.bind.annotation.GetMapping;
import org.springframework.web.bind.annotation.RequestParam;
import org.springframework.web.bind.annotation.RestController;
import reactor.core.publisher.Flux;
@RestController
public class BailianRagController
{
@Resource
private ChatClient chatClient;
@Resource
private DashScopeApi dashScopeApi;
@GetMapping("/bailian/rag/chat")
public Flux<String> chat(@RequestParam(name = "msg",defaultValue = "00000错误信息") String msg)
{
DashScopeDocumentRetrieverOptions documentRetrieverOptions = DashScopeDocumentRetrieverOptions.builder()
.withIndexName("myerror")
.build();
DocumentRetriever retriever = new DashScopeDocumentRetriever(dashScopeApi,documentRetrieverOptions);
return chatClient.prompt()
.user(msg)
.advisors(new DocumentRetrievalAdvisor(retriever))
.stream()
.content();
}
}
|
测试:

2.阿里云百炼平台云上RAG知识库(电商智能客服案例)
需求说明
阿里云上知识库搭建RAG,电商客服统一话术
开发步骤
新建子模块Module
springAI-21chat-CustomerService
改POM
1
2
3
4
5
6
7
8
9
10
11
12
13
14
15
16
17
18
19
20
21
22
23
24
25
26
27
28
29
30
31
32
33
34
35
36
37
38
39
40
41
42
43
44
45
46
47
48
49
50
51
52
53
54
55
56
57
58
59
60
61
62
63
64
| <?xml version="1.0" encoding="UTF-8"?>
<project xmlns="http://maven.apache.org/POM/4.0.0" xmlns:xsi="http://www.w3.org/2001/XMLSchema-instance"
xsi:schemaLocation="http://maven.apache.org/POM/4.0.0 https://maven.apache.org/xsd/maven-4.0.0.xsd">
<modelVersion>4.0.0</modelVersion>
<parent>
<groupId>com.zzyy.study</groupId>
<artifactId>SpringAI-zyfanV1</artifactId>
<version>1.0-SNAPSHOT</version>
</parent>
<artifactId>springAI-21chat-CustomerService</artifactId>
<dependencies>
<dependency>
<groupId>org.springframework.boot</groupId>
<artifactId>spring-boot-starter-web</artifactId>
</dependency>
<dependency>
<groupId>com.alibaba.cloud.ai</groupId>
<artifactId>spring-ai-alibaba-starter-dashscope</artifactId>
<version>1.0.0.2</version>
</dependency>
<dependency>
<groupId>cn.hutool</groupId>
<artifactId>hutool-all</artifactId>
<version>5.8.22</version>
</dependency>
<dependency>
<groupId>org.projectlombok</groupId>
<artifactId>lombok</artifactId>
<version>1.18.38</version>
</dependency>
<dependency>
<groupId>org.springframework.boot</groupId>
<artifactId>spring-boot-starter-test</artifactId>
<scope>test</scope>
</dependency>
</dependencies>
<build>
<plugins>
<plugin>
<groupId>org.springframework.boot</groupId>
<artifactId>spring-boot-maven-plugin</artifactId>
</plugin>
<plugin>
<groupId>org.apache.maven.plugins</groupId>
<artifactId>maven-compiler-plugin</artifactId>
<version>3.11.0</version>
<configuration>
<compilerArgs>
<arg>-parameters</arg>
</compilerArgs>
<source>21</source>
<target>21</target>
</configuration>
</plugin>
</plugins>
</build>
</project>
|
写YML
1
2
3
4
5
6
7
8
9
10
11
| server.port=6021
server.servlet.encoding.enabled=true
server.servlet.encoding.force=true
server.servlet.encoding.charset=UTF-8
spring.application.name=springAI-21chat-CustomerService
spring.ai.dashscope.api-key=${aliQwen-api}
|
主启动
1
2
3
4
5
6
7
8
9
10
11
12
13
14
| package com.zzyy.study;
import org.springframework.boot.SpringApplication;
import org.springframework.boot.autoconfigure.SpringBootApplication;
@SpringBootApplication
public class SpringAi21chatCustomerServiceApplication
{
public static void main(String[] args)
{
SpringApplication.run(SpringAi21chatCustomerServiceApplication.class, args);
}
}
|
业务类
DashSocpeConfig
1
2
3
4
5
6
7
8
9
10
11
12
13
14
15
16
17
18
19
20
21
22
23
24
25
26
27
28
| package com.zzyy.study.config;
import com.alibaba.cloud.ai.dashscope.api.DashScopeApi;
import org.springframework.ai.chat.client.ChatClient;
import org.springframework.ai.chat.model.ChatModel;
import org.springframework.beans.factory.annotation.Value;
import org.springframework.context.annotation.Bean;
import org.springframework.context.annotation.Configuration;
@Configuration
public class DashSocpeConfig {
@Value("${spring.ai.dashscope.api-key}")
private String apiKey;
@Bean
public DashScopeApi dashScopeApi() {
return DashScopeApi.builder()
.apiKey(apiKey)
.workSpaceId("llm-3as714s6flm80yc1")
.build();
}
@Bean
public ChatClient chatClient(ChatModel dashscopeChatModel) {
return ChatClient.builder(dashscopeChatModel).build();
}
}
|
controller
1
2
3
4
5
6
7
8
9
10
11
12
13
14
15
16
17
18
19
20
21
22
23
24
25
26
27
28
29
30
31
32
33
34
35
36
37
38
39
40
41
42
43
44
45
46
47
48
49
50
51
52
53
54
| package com.zzyy.study.controller;
import com.alibaba.cloud.ai.advisor.DocumentRetrievalAdvisor;
import com.alibaba.cloud.ai.dashscope.api.DashScopeApi;
import com.alibaba.cloud.ai.dashscope.rag.DashScopeDocumentRetriever;
import com.alibaba.cloud.ai.dashscope.rag.DashScopeDocumentRetrieverOptions;
import jakarta.annotation.Resource;
import org.springframework.ai.chat.client.ChatClient;
import org.springframework.ai.rag.retrieval.search.DocumentRetriever;
import org.springframework.web.bind.annotation.GetMapping;
import org.springframework.web.bind.annotation.RequestParam;
import org.springframework.web.bind.annotation.RestController;
import reactor.core.publisher.Flux;
@RestController
public class AICustomerServiceController
{
@Resource
private ChatClient chatClient;
@Resource
private DashScopeApi dashScopeApi;
@GetMapping("/customer/service")
public Flux<String> service(@RequestParam(name = "msg",defaultValue = "什么时候发货") String msg)
{
DashScopeDocumentRetrieverOptions documentRetrieverOptions = DashScopeDocumentRetrieverOptions.builder()
.withIndexName("淘宝电商话术")
.build();
DocumentRetriever retriever = new DashScopeDocumentRetriever(dashScopeApi,documentRetrieverOptions);
return chatClient.prompt()
.system("你是一个电商智能客服助手,根据用户的问题去知识库查询信息," +
"如果知识库查询不到信息,返回抱歉查询不到任何信息。")
.user(msg)
.advisors(new DocumentRetrievalAdvisor(retriever))
.stream()
.content();
}
}
|
3.本地微服务调用阿里云百炼平台工作流(AI智能菜单,今天吃什么)
美团,今天吃什么AI智能菜单
1.不用阿里SAA生态
开发步骤
新建子模块Module
SAA-18TodayMenu
改POM
1
2
3
4
5
6
7
8
9
10
11
12
13
14
15
16
17
18
19
20
21
22
23
24
25
26
27
28
29
30
31
32
33
34
35
36
37
38
39
40
41
42
43
44
45
46
47
48
49
50
51
52
53
54
55
56
57
58
59
60
61
62
63
64
| <?xml version="1.0" encoding="UTF-8"?>
<project xmlns="http://maven.apache.org/POM/4.0.0" xmlns:xsi="http://www.w3.org/2001/XMLSchema-instance"
xsi:schemaLocation="http://maven.apache.org/POM/4.0.0 https://maven.apache.org/xsd/maven-4.0.0.xsd">
<modelVersion>4.0.0</modelVersion>
<parent>
<groupId>com.zzyy.study</groupId>
<artifactId>SpringAI-zyfanV1</artifactId>
<version>1.0-SNAPSHOT</version>
</parent>
<artifactId>springAI-20chat-TodayMenu</artifactId>
<dependencies>
<dependency>
<groupId>org.springframework.boot</groupId>
<artifactId>spring-boot-starter-web</artifactId>
</dependency>
<dependency>
<groupId>com.alibaba.cloud.ai</groupId>
<artifactId>spring-ai-alibaba-starter-dashscope</artifactId>
<version>1.0.0.2</version>
</dependency>
<dependency>
<groupId>cn.hutool</groupId>
<artifactId>hutool-all</artifactId>
<version>5.8.22</version>
</dependency>
<dependency>
<groupId>org.projectlombok</groupId>
<artifactId>lombok</artifactId>
<version>1.18.38</version>
</dependency>
<dependency>
<groupId>org.springframework.boot</groupId>
<artifactId>spring-boot-starter-test</artifactId>
<scope>test</scope>
</dependency>
</dependencies>
<build>
<plugins>
<plugin>
<groupId>org.springframework.boot</groupId>
<artifactId>spring-boot-maven-plugin</artifactId>
</plugin>
<plugin>
<groupId>org.apache.maven.plugins</groupId>
<artifactId>maven-compiler-plugin</artifactId>
<version>3.11.0</version>
<configuration>
<compilerArgs>
<arg>-parameters</arg>
</compilerArgs>
<source>21</source>
<target>21</target>
</configuration>
</plugin>
</plugins>
</build>
</project>
|
写YML
1
2
3
4
5
6
7
8
9
10
11
12
| server.port=8018
server.servlet.encoding.enabled=true
server.servlet.encoding.force=true
server.servlet.encoding.charset=UTF-8
spring.application.name=SAA-18TodayMenu
spring.ai.dashscope.api-key=${aliQwen-api}
|
主启动
1
2
3
4
5
6
7
8
9
10
11
12
13
14
| package com.atguigu.study;
import org.springframework.boot.SpringApplication;
import org.springframework.boot.autoconfigure.SpringBootApplication;
@SpringBootApplication
public class Saa18TodayMenuApplication
{
public static void main(String[] args)
{
SpringApplication.run(Saa18TodayMenuApplication.class, args);
}
}
|
业务类
配置类LLMConfig
1
2
3
4
5
6
7
8
9
10
11
12
13
14
15
16
17
18
19
20
21
22
23
24
25
26
27
28
| package com.atguigu.study.config;
import com.alibaba.cloud.ai.dashscope.api.DashScopeApi;
import org.springframework.ai.chat.client.ChatClient;
import org.springframework.ai.chat.model.ChatModel;
import org.springframework.beans.factory.annotation.Value;
import org.springframework.context.annotation.Bean;
import org.springframework.context.annotation.Configuration;
@Configuration
public class DashScopeConfig
{
@Value("${spring.ai.dashscope.api-key}")
private String apiKey;
@Bean
public DashScopeApi dashScopeApi() {
return DashScopeApi.builder()
.apiKey(apiKey)
.build();
}
@Bean
public ChatClient chatClient(ChatModel dashscopeChatModel) {
return ChatClient.builder(dashscopeChatModel).build();
}
}
|
controller
1
2
3
4
5
6
7
8
9
10
11
12
13
14
15
16
17
18
19
20
21
22
23
24
25
26
27
28
29
30
31
32
33
34
35
36
37
38
39
40
41
| package com.atguigu.study.controller;
import jakarta.annotation.Resource;
import org.springframework.ai.chat.model.ChatModel;
import org.springframework.ai.chat.messages.SystemMessage;
import org.springframework.ai.chat.messages.UserMessage;
import org.springframework.ai.chat.prompt.Prompt;
import org.springframework.web.bind.annotation.GetMapping;
import org.springframework.web.bind.annotation.RequestParam;
import org.springframework.web.bind.annotation.RestController;
import reactor.core.publisher.Flux;
@RestController
public class MenuController
{
@Resource
private ChatModel chatModel;
@GetMapping(value = "/eat")
public Flux<String> eat(@RequestParam(name = "msg",defaultValue = "今天吃什么") String question)
{
String info = """
你是一个AI厨师助手,每次随机生成三个家常菜,并且提供这些家常菜的详细做法步骤,以HTML格式返回
字数控制在1500字以内。
""";
SystemMessage systemMessage = new SystemMessage(info);
UserMessage userMessage = new UserMessage(question);
Prompt prompt = new Prompt(userMessage, systemMessage);
return chatModel.stream(prompt).map(response -> response.getResults().get(0).getOutput().getText());
}
}
|
测试
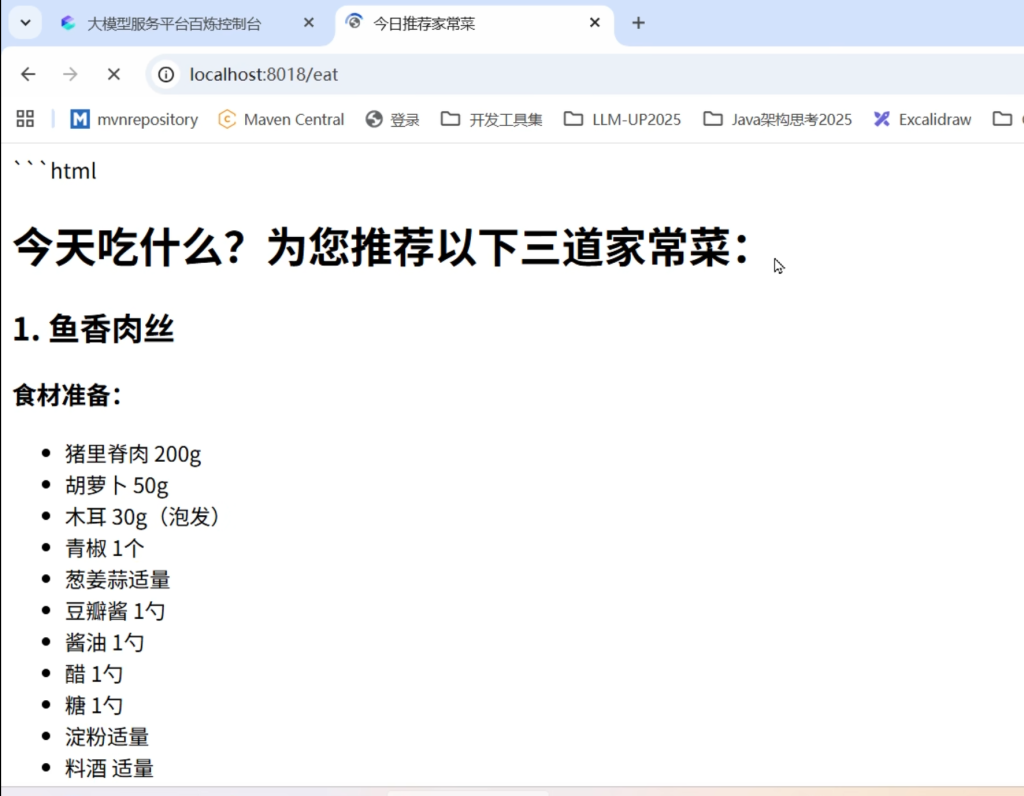
2.使用阿里SAA生态 -重点
工作流配置
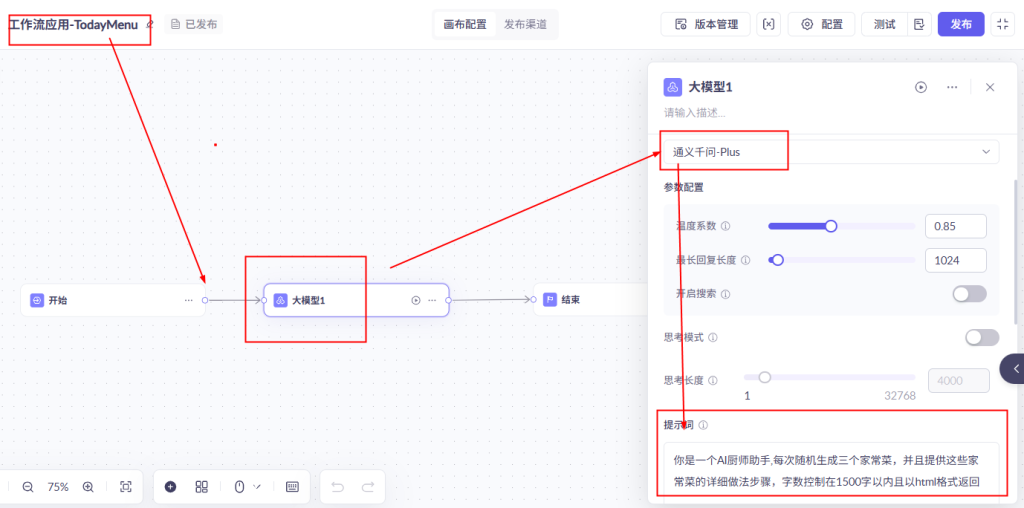
写YML
1
2
3
4
5
6
7
8
9
10
11
12
13
| server.port=6020
server.servlet.encoding.enabled=true
server.servlet.encoding.force=true
server.servlet.encoding.charset=UTF-8
spring.application.name=springAI-20chat-TodayMenu
spring.ai.dashscope.api-key=${aliQwen-api}
spring.ai.dashscope.agent.options.app-id=f0a4613e6bd540c5bcd55e137e3b0e35
|
业务类
配置类LLMConfig
1
2
3
4
5
6
7
8
9
10
11
12
13
14
15
16
17
18
19
20
21
22
23
24
25
26
27
28
| package com.zzyy.study.config;
import com.alibaba.cloud.ai.dashscope.api.DashScopeApi;
import org.springframework.ai.chat.client.ChatClient;
import org.springframework.ai.chat.model.ChatModel;
import org.springframework.beans.factory.annotation.Value;
import org.springframework.context.annotation.Bean;
import org.springframework.context.annotation.Configuration;
@Configuration
public class DashScopeConfig
{
@Value("${spring.ai.dashscope.api-key}")
private String apiKey;
@Bean
public DashScopeApi dashScopeApi() {
return DashScopeApi.builder()
.apiKey(apiKey)
.build();
}
@Bean
public ChatClient chatClient(ChatModel dashscopeChatModel) {
return ChatClient.builder(dashscopeChatModel).build();
}
}
|
controller
1
2
3
4
5
6
7
8
9
10
11
12
13
14
15
16
17
18
19
20
21
22
23
24
25
26
27
28
29
30
31
32
33
34
35
36
37
38
39
40
41
42
43
44
45
| package com.zzyy.study.controller;
import com.alibaba.cloud.ai.dashscope.agent.DashScopeAgent;
import com.alibaba.cloud.ai.dashscope.agent.DashScopeAgentOptions;
import com.alibaba.cloud.ai.dashscope.api.DashScopeAgentApi;
import org.springframework.ai.chat.prompt.Prompt;
import org.springframework.beans.factory.annotation.Value;
import org.springframework.web.bind.annotation.GetMapping;
import org.springframework.web.bind.annotation.RequestParam;
import org.springframework.web.bind.annotation.RestController;
@RestController
public class MenuCallAgentController
{
@Value("${spring.ai.dashscope.agent.options.app-id}")
private String APPID;
private DashScopeAgent agent;
public MenuCallAgentController(DashScopeAgentApi agentApi)
{
this.agent = new DashScopeAgent(agentApi);
}
@GetMapping("/eatAgent")
public String eatAgent(@RequestParam(name = "topic",defaultValue = "今天中午吃什么") String topic)
{
DashScopeAgentOptions options = DashScopeAgentOptions.builder().withAppId(APPID).build();
Prompt prompt = new Prompt(topic, options);
return agent.call(prompt).getResult().getOutput().getText();
}
}
|
测试:
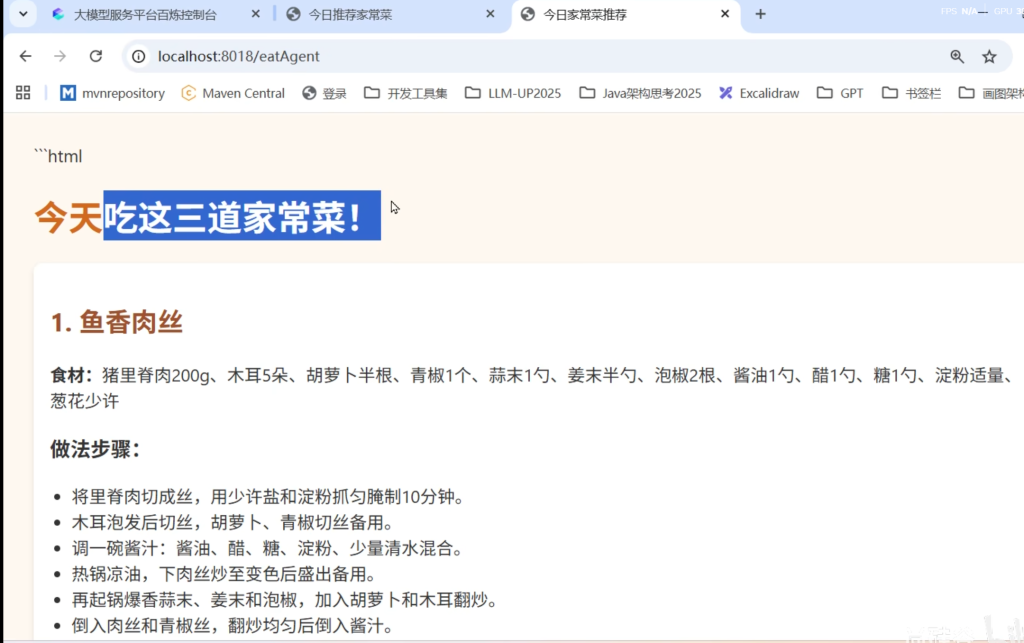
4.智能体
是什么
“智能体”是从对话工具进化为数字助手,能像人类助理一样完成端到端的复杂任务,核心突破在于主动性和环境操作能力
智能体(Agent)指的是一种应用,它依靠大模型进行自主决策,在与用户进行自然语言交互的时候,根据用户问题能够自主感知环境、做出决策并执行行动的系统。它不仅仅是被动回答问题,而是像“有自主意识的程序”,能主动完成复杂任务
举个例子
- 普通大模型
- 问题提问调用:你问“上海明天天气如何?”它返回一段文字描述。
- 智能体
- 你说“如果明天下雨,提醒我带伞,并取消明天的户外会议。”它会查询天气→设定提醒→检查日历→发送会议取消邮件。
能干嘛
典型应用场景
- 自动化办公:智能体读取邮件、生成报告、安排会议。
- 智能家居:根据你的作息自动调节灯光、空调,甚至订购物资。
- 复杂问题解决:如“帮我用1万元预算策划一场50人的公司团建”,它会拆解需求、搜索场地、比价、生成方案
怎么用
阿里云百炼平台
https://bailian.console.aliyun.com
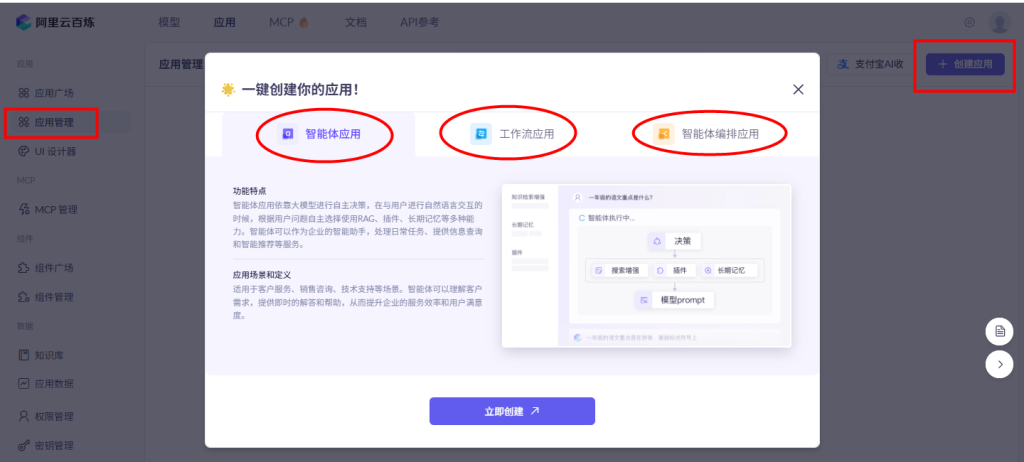
速通SpringAI Alibaba完结